HERE’S HOW TO GLAM UP DOLLAR STORE PUMPKINS WITH EASY TO APPLY GOLD LEAF
 I’m one of those people who do an eye roll when stores display Christmas decor in September. And in blog land, holiday decor posts are usually featured months before the actual holiday — so these pumpkins may be a little late to the party. 😉 But I hope you love them as much as I enjoyed making them. And even more so, I REALLY hope you find the How To Gold Leaf tutorial inspirational. This gold leaf can be applied to almost anything so I hope it sparks some ideas!
It’s also TRASH TO TREASURE TUESDAY – one of my favorite days of the month where I join my blogging besties. I’m linking to their makeovers below… so be sure to check them out.
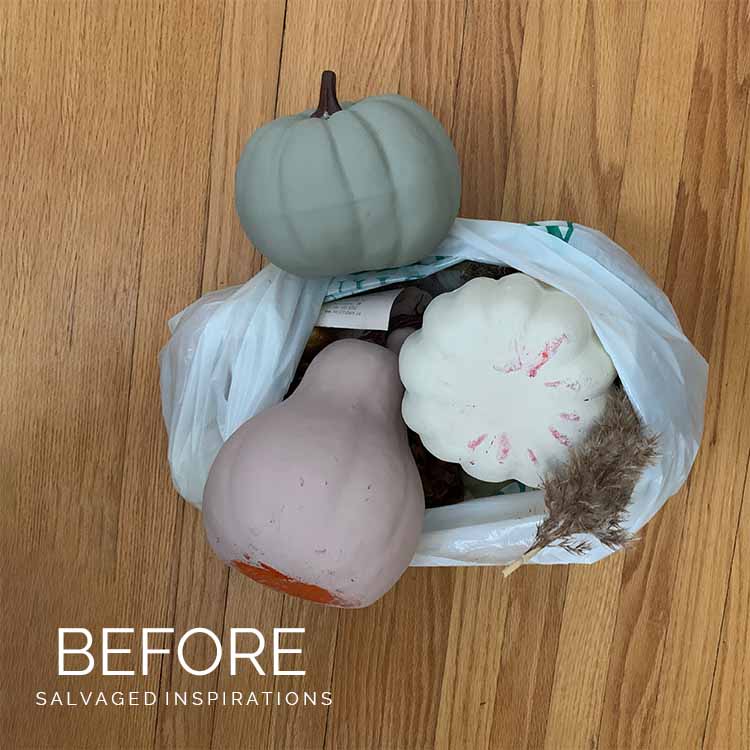
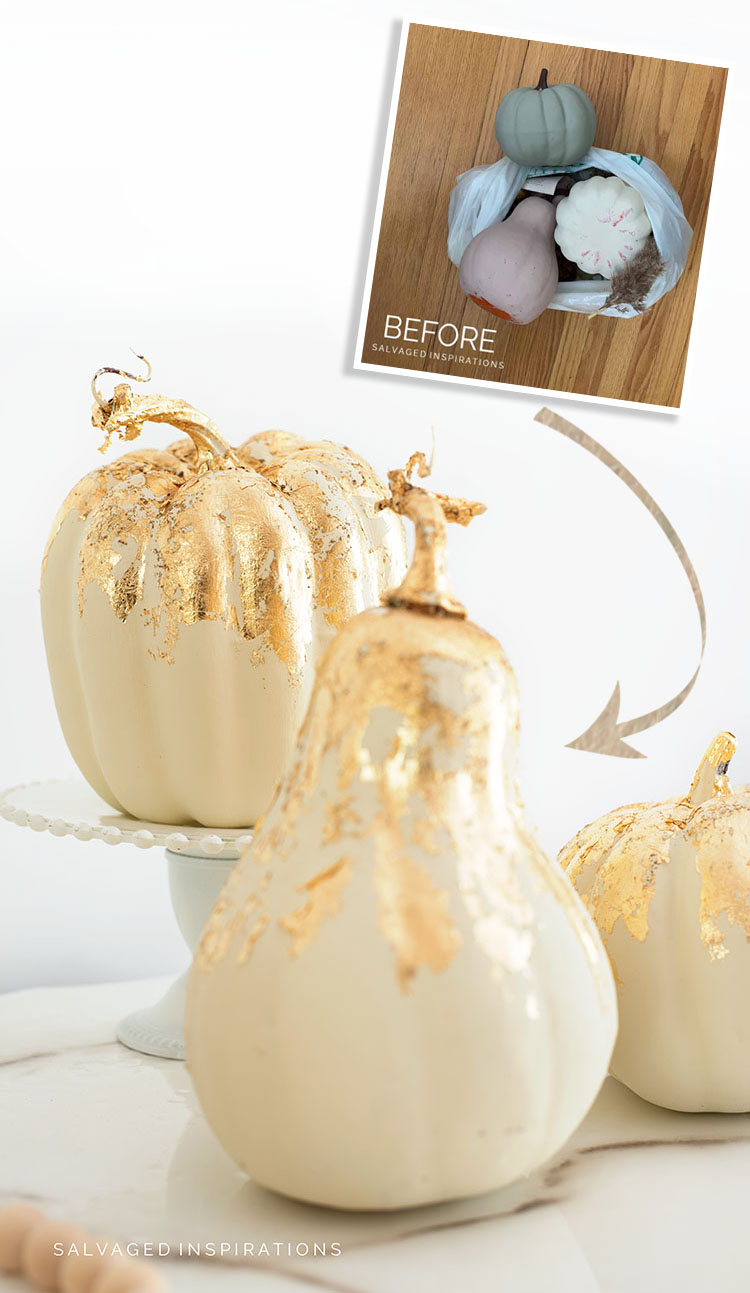
Here are the trash-bound dollar store pumpkins I started with. My sister was going to throw them away so I scooped them up for staging and styling my furniture. I previously painted them… but we can do better! 🙂
THIS POST IS SPONSORED/CONTAINS AFFILIATE LINKS TO PRODUCTS I USE. YOU CAN SEE MY FULL DISCLOSURE HERE.
SOURCE LIST
Dollar Store Pumpkins – SALVAGED
Oval Med Paint Brush
Chip Brush
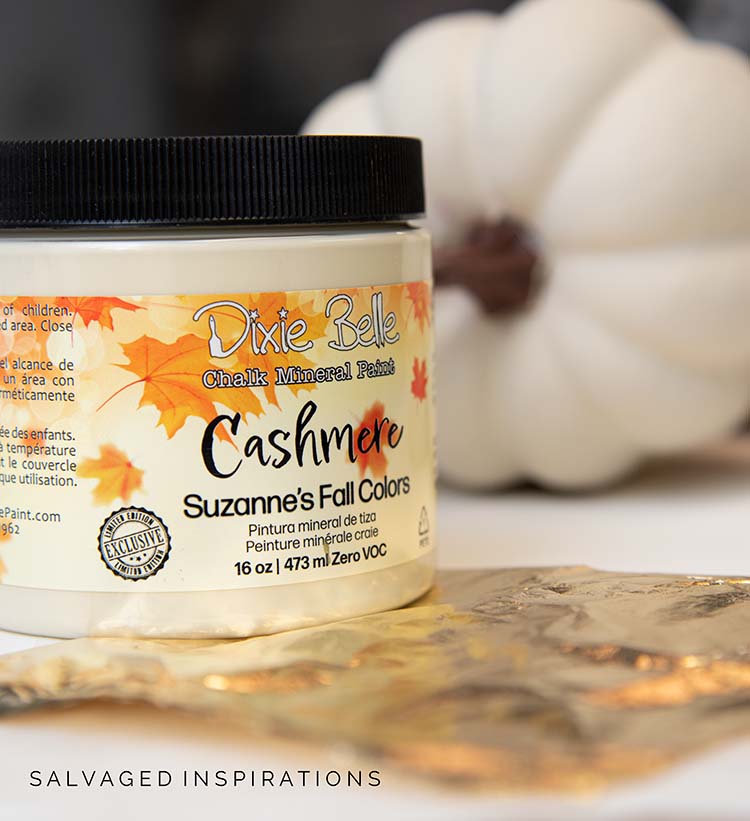
Cashmere Chalk Mineral Paint (similar)
Buttercream Chalk Mineral Paint (substitute)
5 x 5 Gold Leaf Sheets
Mod Podge Glue
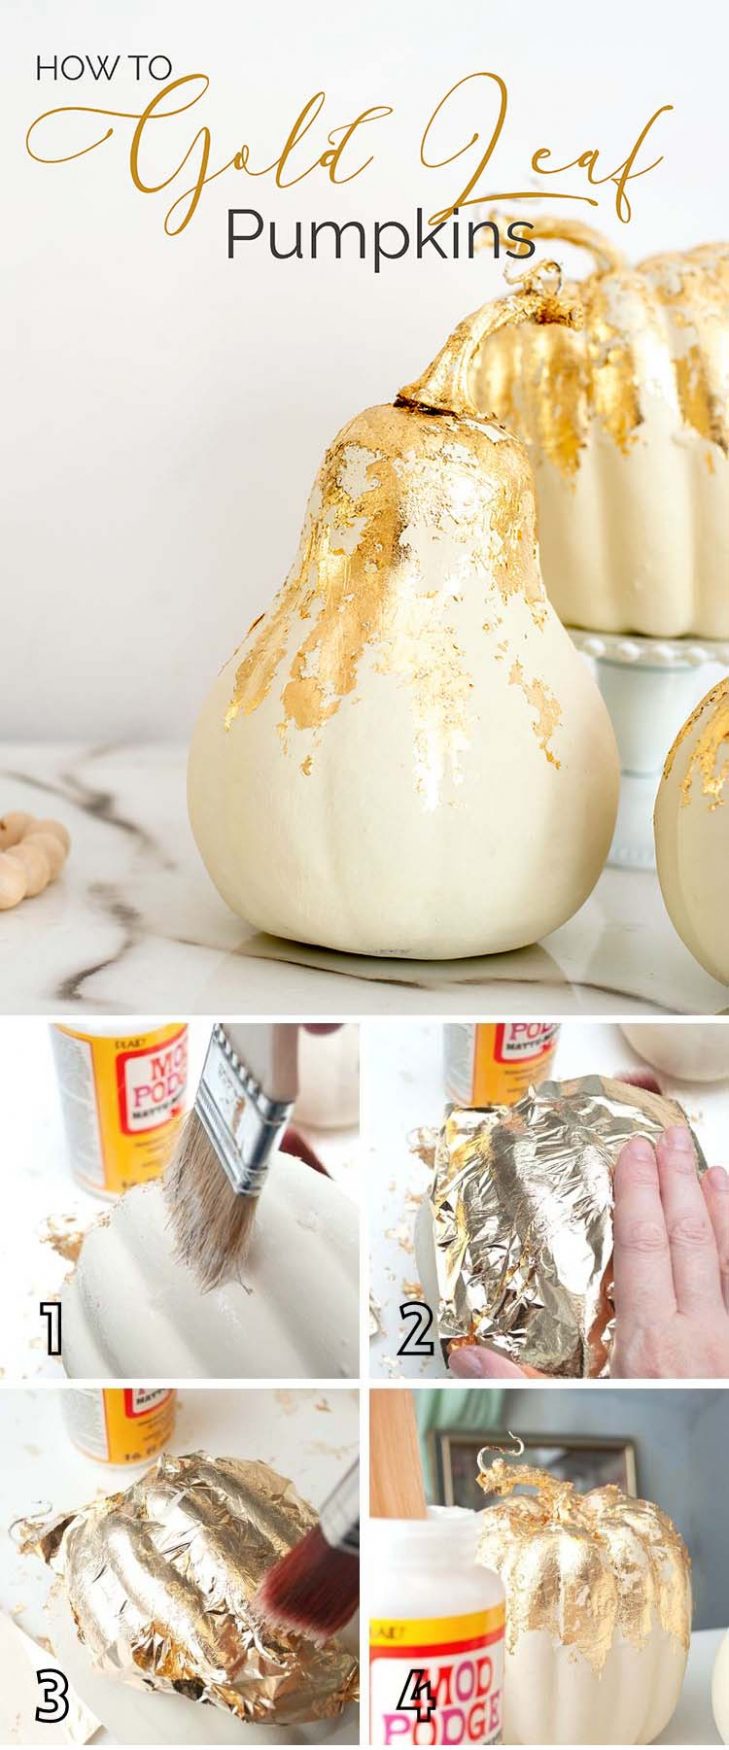
HOW TO GOLD LEAF
I’ve been wanting to try Gold Leaf on furniture for a while now. What better way to practice on a smaller project like these pumpkins, right?! I like calling this a build-my-confidence project before I jump in and use a project on a large piece of furniture.
You can buy gold leaf in REAL gold sheets. It’s made by hammering gold into super-thin sheets. For this project, I bought this imitation Gold Leaf which is less expensive and in my opinion, works just as well for most projects. Instead of using real gold, they substitute hammered zinc, copper, brass, and other cheaper materials are used to achieve a real gold look.
Here’s how these pumpkins came all together with a little gold glam…
PAINT
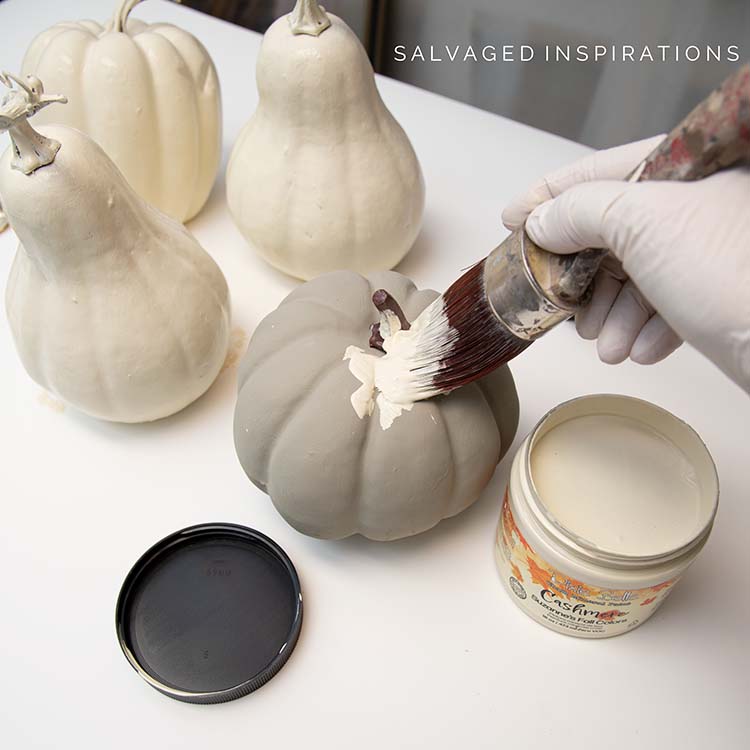
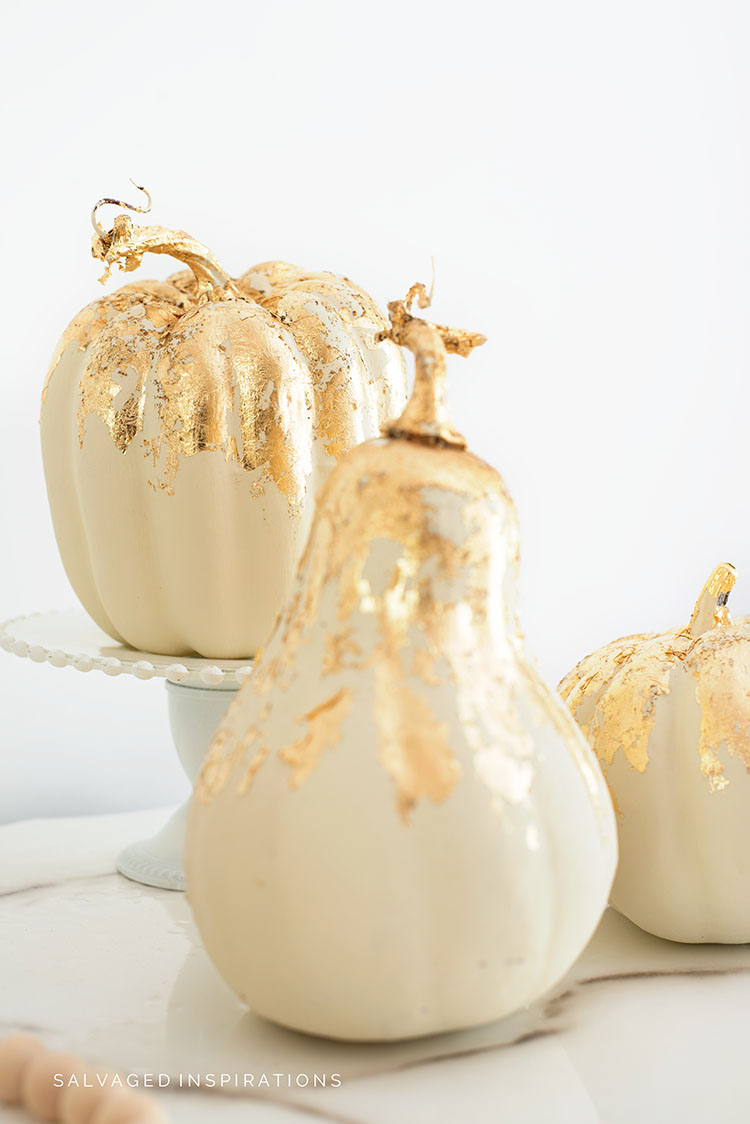
I decided to use Dixie Belle’s Fall Cashmere which is a gorgeous warm cream. A creamy white is always classic and elegant and it plays off the gold beautifully. I believe Dixie Belle has sold out of their limited edition Fall Collection (your local retailer may still have some in stock) or this Buttercream is the lovely substitute!
Two coats were applied to these pumpkins for full coverage.
GOLD LEAF SHEETS
I bought these Gold Leaf Sheets off Amazon for $8.99 for 100 5×5 sheets. As I mentioned these are faux gold leaf sheets. Perfect for this pumpkin project!
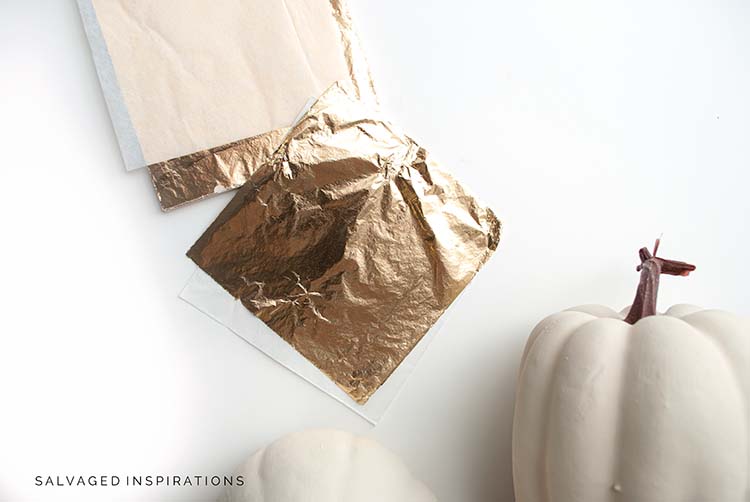
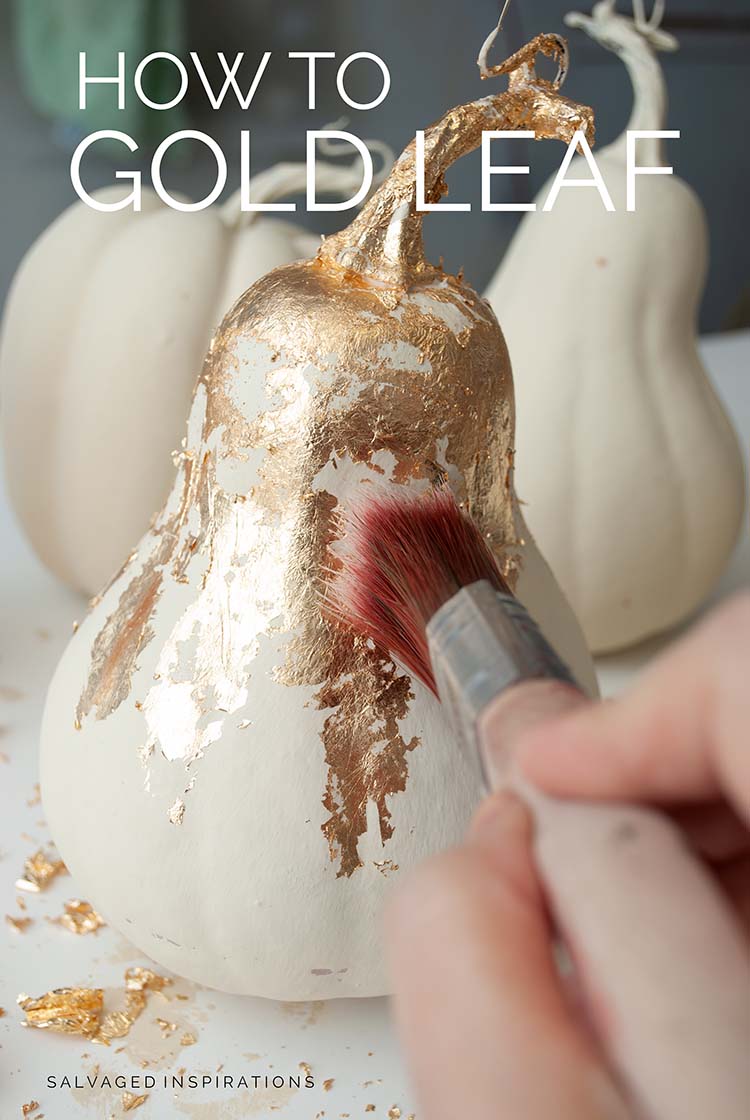
APPLYING THE GOLD LEAF
This was FUN and I’m pretty impressed how a little of this gold goes a loooong way. I only used 6 sheets in total. Six! Ninety-four sheets left to go!
The steps I took are ~
- I applied Mod Podge Glue
- Patted on a sheet of Gold Leaf
- Used a soft brush to brush off the excess
- Let it dry

Tip ~ I found using this really cheap chip brush to apply the Mod Podge worked great. I brushed it on where I wanted heavy coverage and then stippled on the glue where I wanted little flakes of the gold leaf to stick.
Here they are all finished… don’t they look amazing!
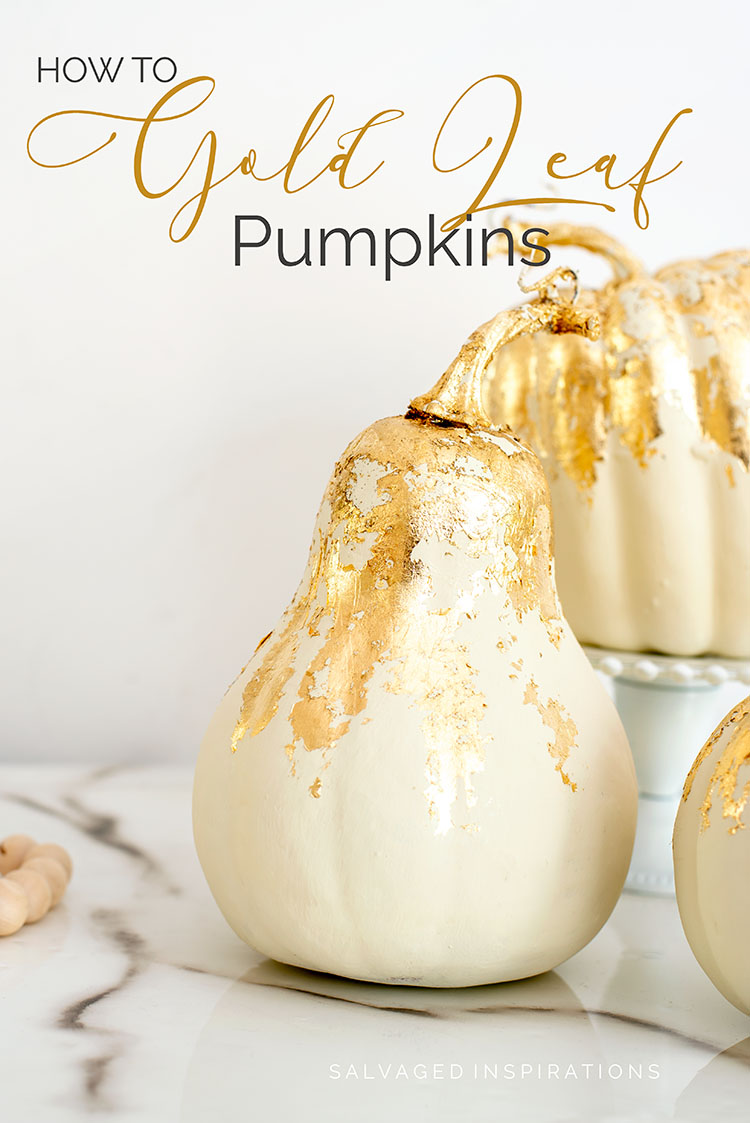
What a difference a little gold makes!

When the light catches the gold leaf, it actually glimmers like jewels!

I can’t wait to hear what you think of them!
AND NOW FOR SOME TRASH TO TREASURE FUN!
You’re going to LOVE what my creative team of T2T ladies do! Below are their BEFORE photos. Visit the links underneath to see the amazing AFTERS and learn how they did it! I’m heading over to take a peek as well! x
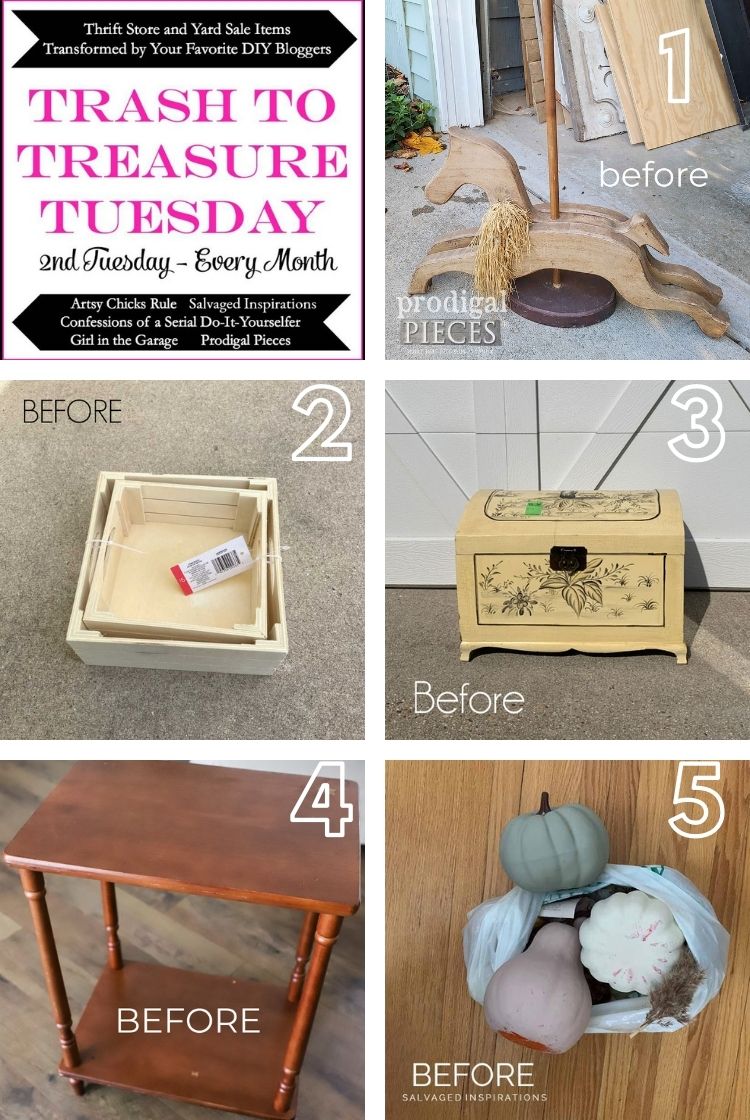
1. PRODIGAL PIECES
2. GIRL IN THE GARAGE
3. CONFESSIONS OF A SERIAL DIYER
4. ARTSY CHICKS RULE
5. SALVAGED INSPIRATIONS (HAPPY YOU’RE HERE!)
Using Gold Leaf was A LOT OF FUN so if you’ve ever had an urge to try – JUST DO IT! It’s easy to apply/work with and looks amazing!
Here’s another look at this before and after. I hope it’s inspired you and given you some new ideas for your projects.
LET ME KNOW WHAT YOU THINK OF THESE CASHMERE GOLD LEAF PUMPKINS. FEEL FREE TO ASK ANY QUESTIONS YOU MAY HAVE… I ALWAYS LOVE HEARING FROM YOU. IT MAKES MY DAY! 🙂
Happy DIY’ing friends!
Denise x
RELATED POSTS::
TRAY TABLE MAKEOVER
DIY CONCRETE HEAD PLANTER
DIY DOLLAR STORE ART
WHITEWASHED WOOD PLANT STAND
15 QUICK & EASY DIY PAINT PROJECTS
PIN AND SHARE!

JOIN THE SALVAGED INSPIRATIONS FAMILY!

Hi Denise! I had to come back to this blog post because I’m working on mine dollar tree pumpkins now and I needed to know if you sealed the paint before you put on the gold leaf but I see that you didn’t. Wish me luck.
No I didn’t and they are holding up GREAT! Have fun Cheryl!
Lovely! I am going to get some pumpkins and also some apples from the Dollar Store and REALLY glam it up! Great job, as usual, Denise. What fun!!!!
Thanks, have fun Caye! XOXO
Hi Denise! I love them! Very Glam Shabby Chic. I think I’m going to try it. I have the DB Buttercream and some gold leaf sheets. Fake gold. Lol. Thank you for your inspiration.
Thanks and have fun Cheryl!🤗
Wow, your pumpkins are so gorgeous and elegant, Denise. I love this idea for classy fall pumpkins! Pinned 🙂
Aw thanks my friend… and thanks for the PIN!🤗
Hi Denise,
Thank you for sharing your lovely gold leaf inspiration! I agree that a bit of gold bling totally transforms anything!
I am also keen to have a go at using some gold leaf on furniture.
Does this one you bought need to have a sealer over it to stop it from changing colour over time, when in contact with the air?
Hi Dale! Great question that I had to look up so thank you! Yes. Faux gold leaf will tarnish over time so top coating/sealing is recommended.
Fabulous! These turned out so pretty, Denise. I love the idea of adding gold leafing. Thank you for sharing this idea. I have a few I need to try this on. 🙂
Thank you Do! I love all the pumpkin makeovers you’ve been doing. They all look phenomenal! XOXO
Your pumpkins look original and oh so wonderful… Thanks for the tutorial and graphics.
Thanks, Maureen!
WOW!!! They look soooooooooooo high end – looks like you spent a fortune. Well done, ma’am!!!!!
So glad you like them Michele…thank YOU! x
These pumpkins look magical, Denise! Also, I guess I’m late with my pumpkin project today too – LOL! I don’t like to rush the seasons too much. xo
lol… I think WE are right on time my friend!🤣💙
Wow! I am a girl who loves a sparkle…I always have. These really rock! Talk about taking the pumpkin to the next level. Well done.
Thanks, sparkly girl!✨😉✨
Hi Denise,
What a fabulous result! Maybe I’m just such a newbie at DIY crafting I in need of MORE INSTRUCTION: because I can’t figure out how you got the stems (for example) to appear totally coated with the gold leaf vs what technique you used to create the flaking affect on the body of the gourds. Could you explain a bit more specifically what you did after applying the Mod Podge to create the look? Sorry to impose — but I’m a loyal, teachable Padawan! — so I’ll pay close attention to whatever you can throw my way: and you are a great teacher, by the way 🙂
Hi Suzy and thank YOU! 💕 The flaking effect on the pumpkins was created by dipping the tips of the chip brush into the Mod Podge and then stippling and dabbing the Mod Podge on. Then the gold leaf sheet is placed on top. The gold sheet catches the glued areas and easily brushes off the dry areas. For the stems, I made sure they were 100% brushed with Mod Podge and pressed a sheet of gold leaf all around them to get good coverage. The best part of this project is it doesn’t have to be perfect tho. The gold leaf looks gorgeous even if it doesn’t catch 100%! I hope this helps.🤗
Totally helps. Thanks a ton 🙂
Oh good 🙂 … have a super day! x
This is a great idea and turned out so well! I love the look of gold leaf and glad to be able to try it with imitation sheets.
Thank you Celia!😊
Those are so gorgeous! The gold leaf takes them over the top! 🙂
Thanks my friend! XOXO
Love them!!! They are super cute!!!
Thanks Linda!🤗
Love the pumpkins! I’m definitely going to make these, as I’ve been on a gold leaf rampage this week! Thanks for this gorgeous idea!
My pleasure and have fun, Paula! Tag me on social… I’d love to see how they turn out!😃
This is the best pumpkin makeover I’ve ever seen Denise, they are beautiful! A must try for me!
Awww, thanks Nicki! And if you give it a try, I’d LOVE to hear how it works out for you. The Gold Leaf is SO MUCH FUN! XOXO
I Love the cashmere with the gold leaf 🙂
Elegant and timeless..
Thanks for sharing the process !! I’d love to try this too.
p
It makes for a really nice combo, doesn’t it?! 😊 Thanks so much P!!! XOXO
These are the most stunning, elegant dollar store pumpkins ever!! And I am so with you on the Christmas being thrown at us before the first fall leaf has fallen! I want to enjoy the all the fall first! Have a great day, my friend! XOXO
Yaaaay and thank you! And exactly. Fall and Spring are my favorite seasons so I want to enjoy and stretch them out for as long as I can too. 😉
Hi Denise! These are amazing! I just pulled out a garbage bag full of ugly pumpkins from last year’s 75% off sale! I have to get some of the faux gold leaf! Hope it’s as easy as it looks! Thanks for the inspiration!
It’s as easy as it looks… promise! 🤗 I’m sure you’ll have a lot of fun with the Gold Leaf. 🙂
Really nice job! Very classy looking – I’m guessing it would work on a real white pumpkin!?
Thanks for the inspiration!
Thanks Vick… and I’m guessing it would work on a real pumpkin as well! Obviously, you’d be throwing it away after the season but I think it was prepped and glued properly, it should hold up for a good few weeks. If you try, I’d love to hear how it works!
I love them!!! Beautiful!!
Thanks Janice!
These are just gorgeous!!! I’ve often thought of trying gold leafing over the years. Now you’ve inspired me to; especially since I love pumpkins. Thank you. 😉
I’ve thought of gold leafing over the years as well and I’m SO HAPPY I finally tried. You’ll have a lot of fun with it Donna! x
I think this application would look good on some cone shaped Christmas trees
I think it would look AMAZING on some cond shaped Christmas trees as well!
Love, Love, Love them.. can’t wait to see what you do to the rest of 94 sheets !!!! 😋
Thanks so much Lorri!🤗
Hi Denise. What adorable little gold leafed pumpkins. They’d make a great autumn entryway table accent. I’d love to see you use gold leaf on a future furniture project:).
Thanks, Monique and ohhhh I plan to! 🙂 I just have to find the right piece. Stay tuned.😉
How beautifully done, Denise. Love the bling on white.
Thanks Larissa! XOXO