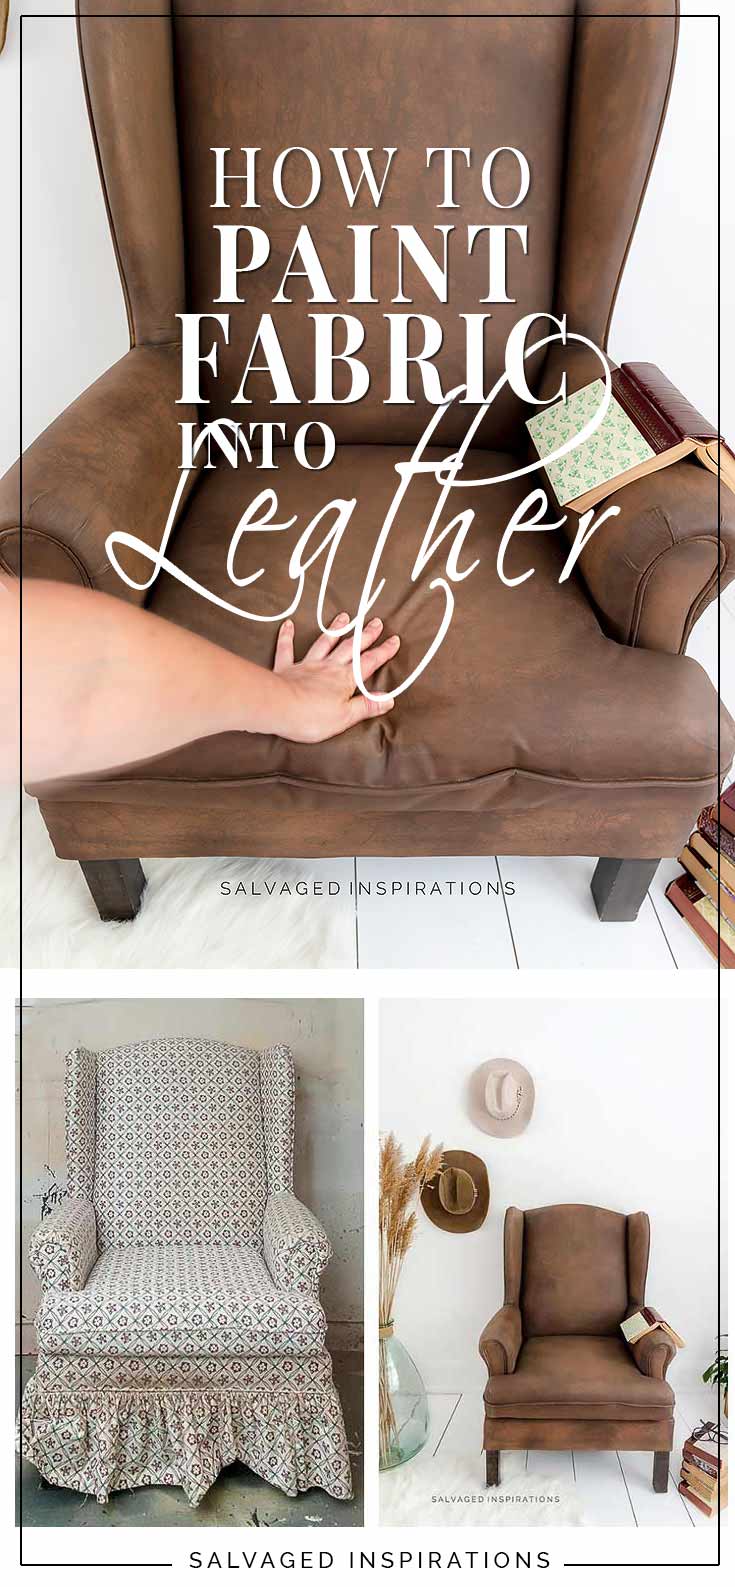
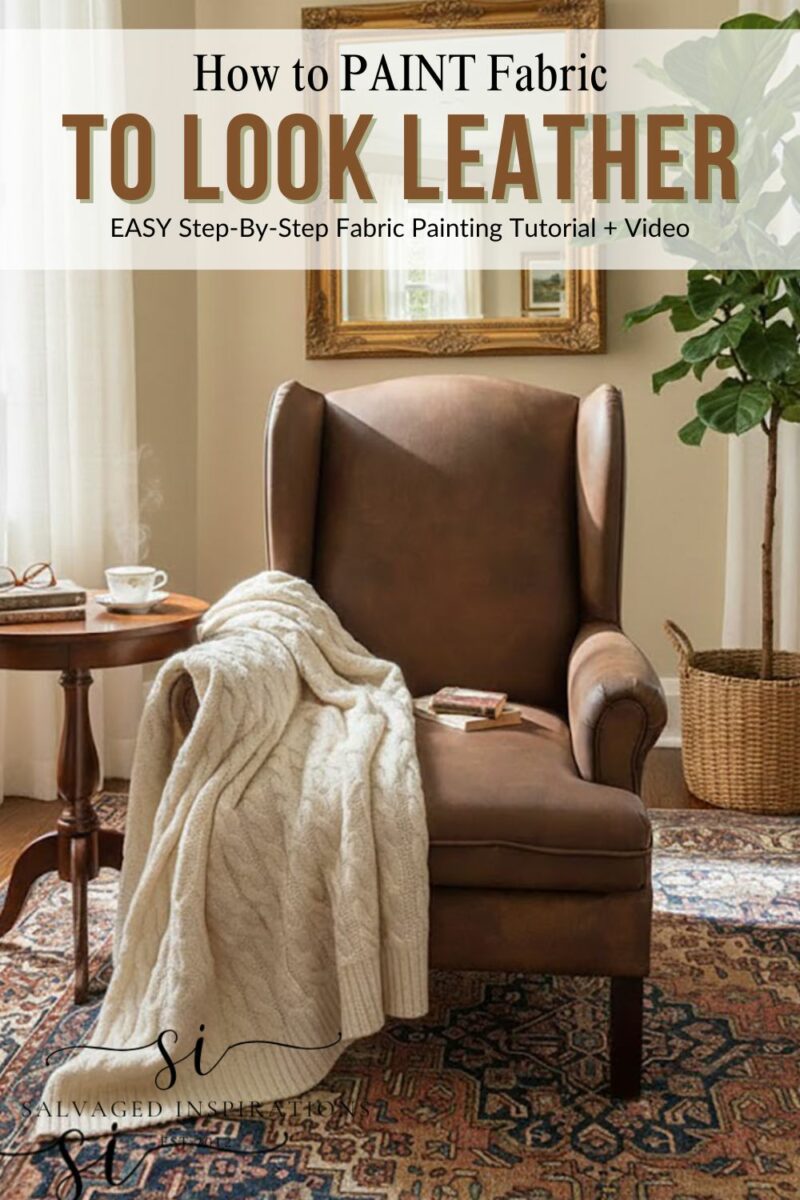
A STEP-BY-STEP TUTORIAL ON HOW TO CREATE A FAUX LEATHER PAINT FINISH ON UPHOLSTERY FABRIC | 90S WINGBACK CHAIR MAKEOVER | YOUTUBE VIDEO INCLUDED!
If you’ve ever wanted to give dated fabric furniture a rich, faux-leather makeover, you’re going to love this tutorial! With a few budget-friendly materials and some simple, beginner-friendly techniques, I’ll show you exactly how to create an authentic leather-look finish using paint, glaze, texture, and wax. This updated post includes a detailed step-by-step guide and a full video tutorial so you can follow along with ease. If I didn’t paint this myself, I almost wouldn’t believe it was the same chair — I can’t wait to hear what YOU think!
Update November 2025: This post has been refreshed with new step-by-step instructions, updated photos, and tips to make your fabric furniture look like realistic leather using chalk mineral paint, glaze, tissue texture, and wax. Whether you’re working on a thrifted chair, bench, or vintage find, this guide walks you through each step for a beautiful, professional-looking finish. Original post: first published in July 2020
*As an Amazon Associate, I earn from qualifying purchases. There are affiliate links in this post to other companies/products I use and love as well. You will never be charged extra when you purchase through these affiliate links. If you purchase from my links – A BIG thank you for supporting me and the #siblog! To see my full disclaimer, click here.
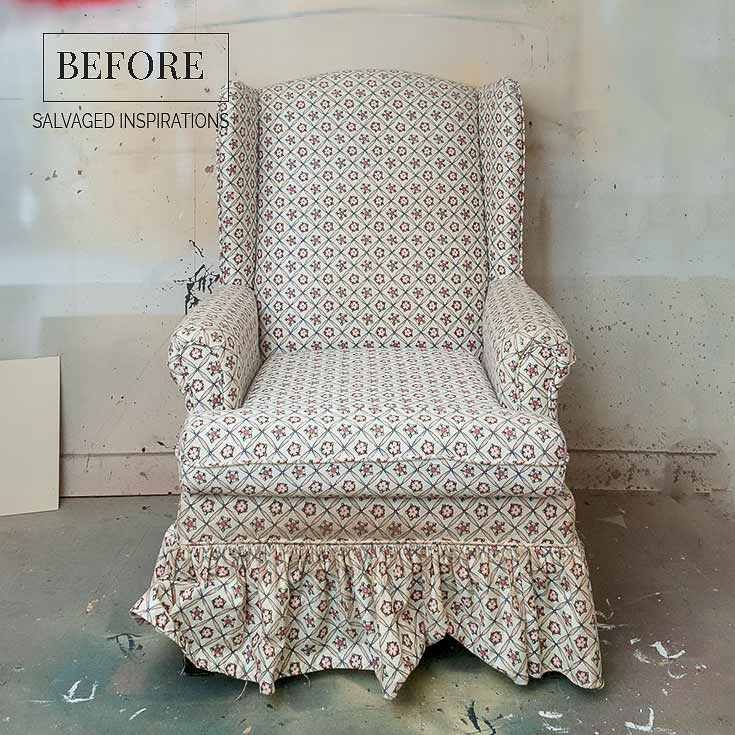
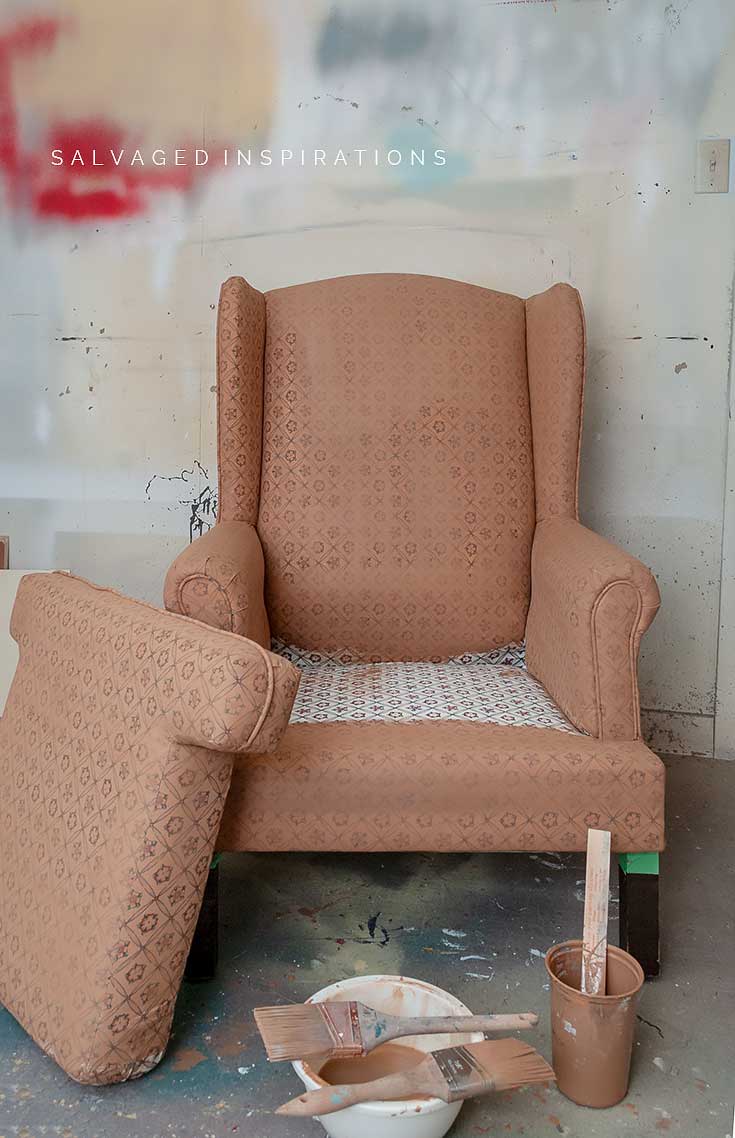
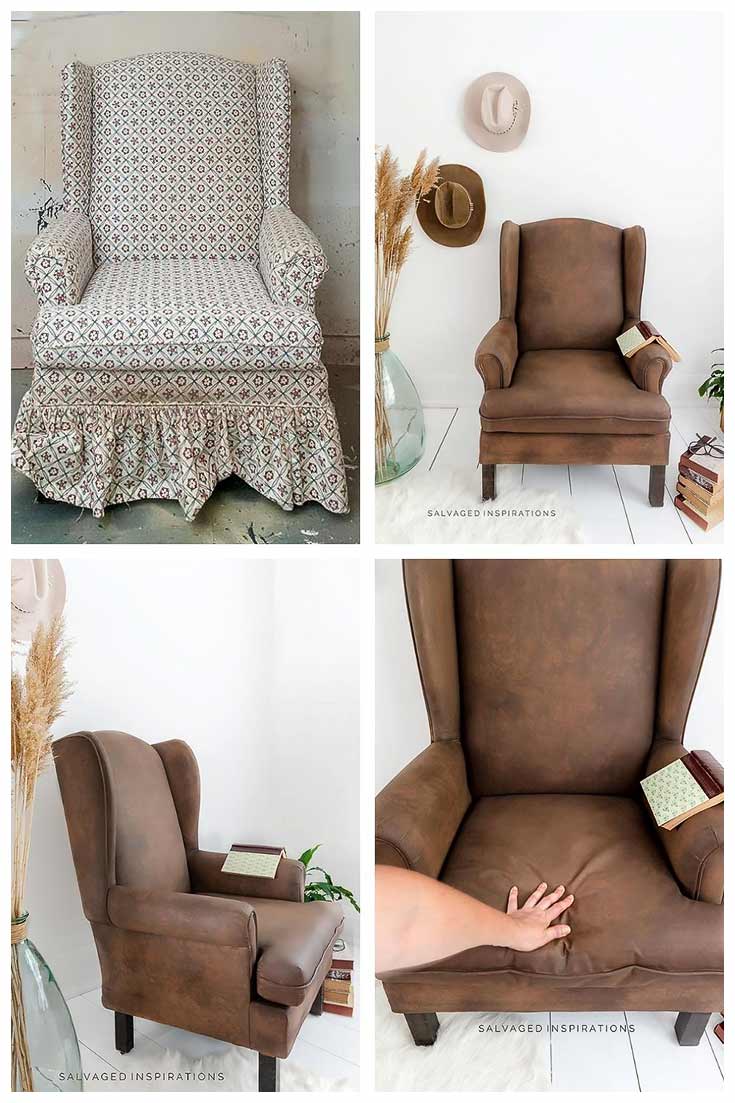
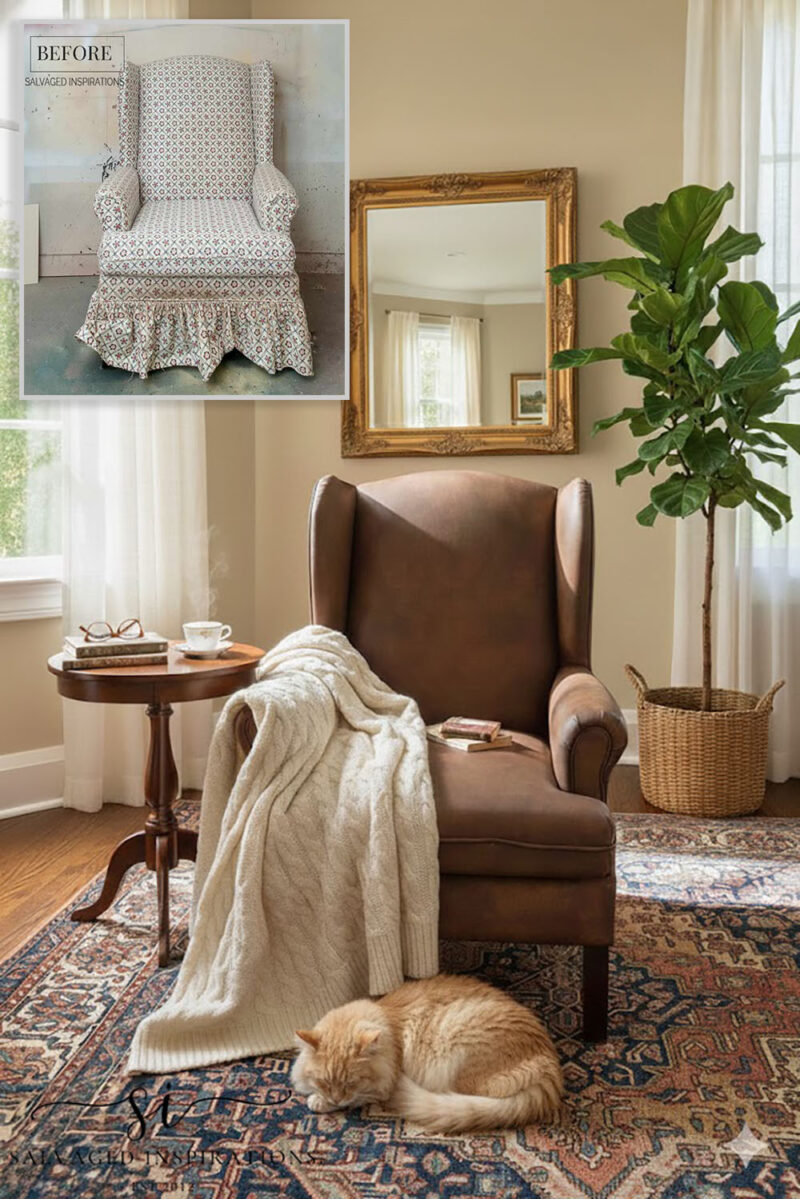
Here’s what I started with. This floral wingback chair is from the ’90s. It was my dog’s favorite chair. FreddiGirl is no longer with us, but she used to clean her face and dirty paws on it like it was her personal face cloth… can you tell?…lol. We are going to clean this up and remove that skirt bottom.

THIS POST IS SPONSORED/CONTAINS AFFILIATE LINKS TO PRODUCTS I USE. YOU CAN SEE MY FULL DISCLOSURE HERE.
SUPPLY LIST
’90s Fabric Wing Chair – SALVAGED
Water + Tissue Paper
Sanding Pad
Large Paint Brush
Terracotta
Chocolate
VanDyke Glaze
Brown Wax
MATERIALS & TOOLS
Large 3″ natural-bristle brush (e.g., Wooster)
Soft dry brush (for texture work)
Bowl of water + optional water mister
Painter’s tape and masking paper
Pliers & screwdriver (for removing staples)
Shop towels
Disposable gloves
Drop cloths or floor protection
STEP 1 – PREP CHAIR FOR PAINT
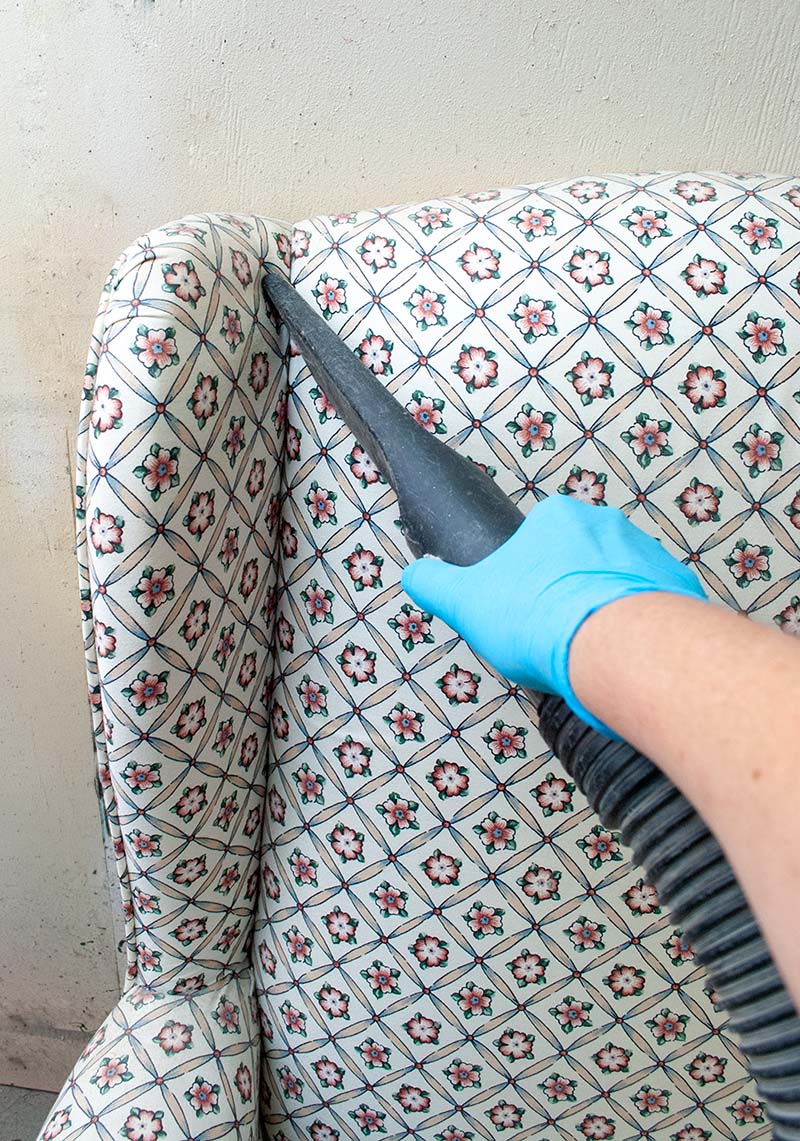
Before we even get to the fun part of painting, tackling the dirt is a must. This chair wasn’t just a ’90s relic—as I mentioned, it was FreddiGirl’s favorite face and paw wipe. Dirt and grime can prevent paint from adhering well and dull your faux leather finish. I gave the chair a good vacuum and focused on the skirt, which was the dirtiest part and coming off anyway. Remember, a clean surface is the secret behind a smooth, durable faux leather look. Plus, removing hidden dust and dirt means your makeover will last longer and look professionally done.
The skirt was held on with upholstery staples. I used a screwdriver and pliers to remove them. Once I got into the groove, they came out fairly easily which I share in the video at the end of this post. There were a few staples that broke off and were too hard to remove, so I hammered them back into the wood.
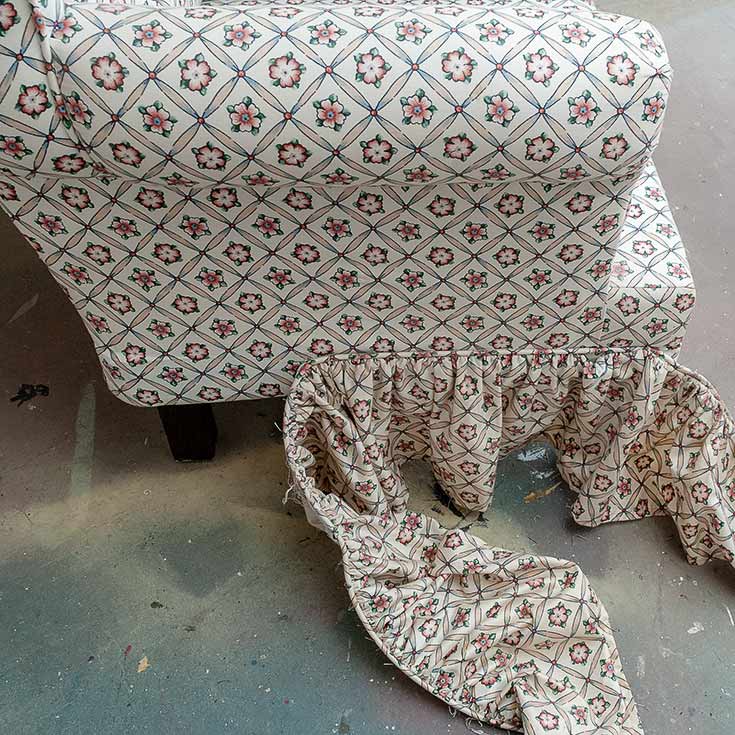
Removing all the staples and/or hammering them back into the frame is important. The staples are sharp. They can be dangerous to your pets and/or your legs. Make sure ALL the staples are removed or hammered back in for safety!

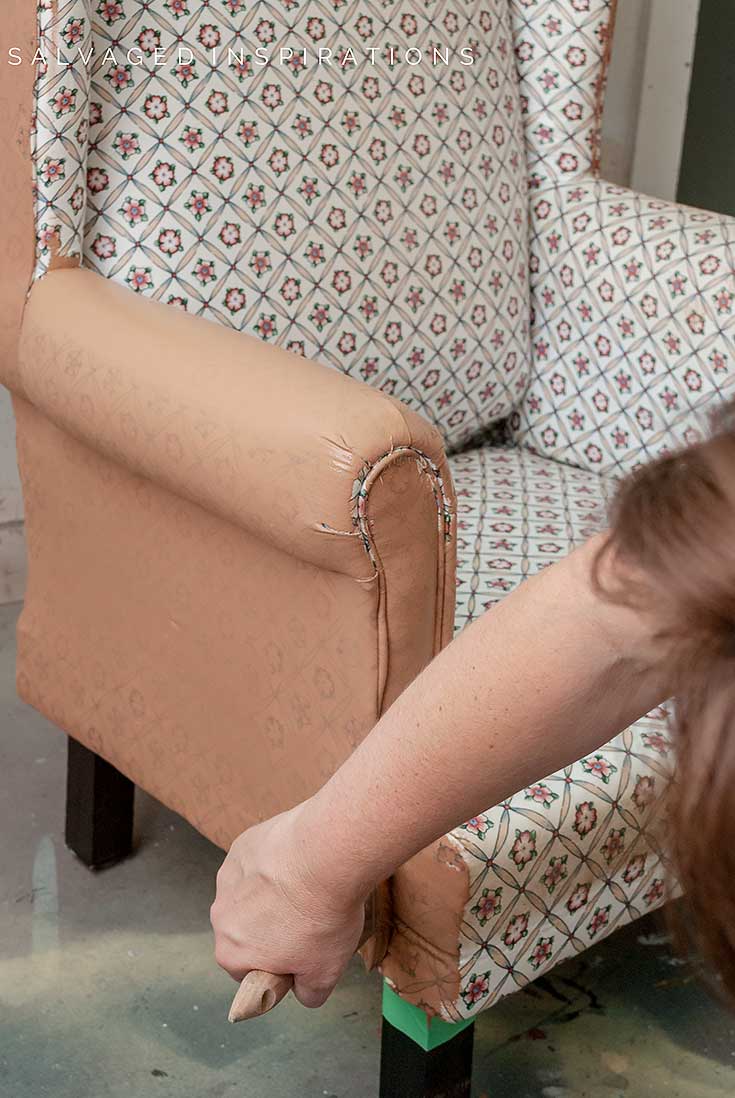
The last part of the prep before painting this fabric was to keep the paint off the legs and underbelly. I masked off the areas with painter’s tape. Well, my sister, Andrea, did. I had her help at the start of this project. 🙂

STEP 2 – PAINT THE FABRIC BASE COAT
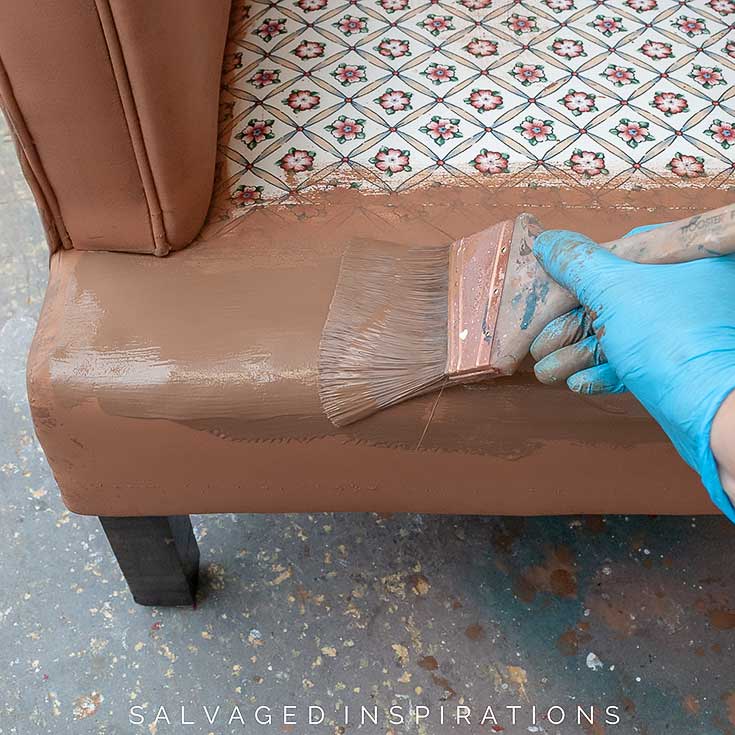
Painting fabric is easy to do. The key is to get your fabric wet enough to absorb the pigment of the paint. This way it dyes the fabric instead of just sitting on top of the fabric. I picked this Terracotta and Chocolate Chalk Mineral Paint to create the base color for the wingback. I mixed approximately a 3:1 ratio which is about 75% Terracotta and 25% Chocolate. Using my big 3″ Wooster brush, I dipped it in a bowl of water to get the bristles it nice and wet, and then dipped it into the paint.
- Dip Brush in Water
- Dip Brush in Paint
- Paint Fabric and Repeat
Step A — Mix Your Paint
Mix your paint in roughly a 3:1 ratio of Terracotta to Chocolate. This creates a warm, leather-inspired foundation color. Test your mix in a hidden spot if you want to adjust the tone.
Step B — Apply the First Coat
Dampen your large brush with water — you want it slightly wet, not dripping. Apply your paint in thin, even coats, working it into the fabric so it absorbs like dye rather than sitting on the surface. You can also lightly mist the upholstery before painting to help the paint absorb more evenly.
Step C — Add More Coats
Once the first coat is mostly dry (a bit tacky is fine), add a second thin coat. Most upholstery pieces need about three coats for full coverage. Thin coats are key — thick coats can crack or feel stiff.
Some people prefer to use a water mister and spray the fabric before painting. I tried both methods on this Granny Chair I painted 4 years ago and I find dipping the brush MUCH easier and faster than spraying the fabric. It’s a good idea to try both methods and see which works better for you. Also, be sure to watch to the end of the video where I’m sharing how the painted Granny Chair has held up over the years!
Here’s what the chair looked like after the first coat…
STEP 3 – ADD MORE COATS OF PAINT
After the first coat was almost dry (still slightly damp) I applied a second coat. I repeated for a total of three coats to totally cover the floral pattern. Once the first coat is mostly dry (a bit damp is fine), add a second thin coat. Most upholstery pieces need about three coats for full coverage.
Thin coats are key — thick coats can crack or feel stiff.
Below is what it looked like with the second coat…

Below is what it looked like with the third coat…

If you were to stop right there and give it a waxing, the results are still impressive! But I thought I’d try a faux leather finish with a little more detail on this one.
STEP 4 – Glaze
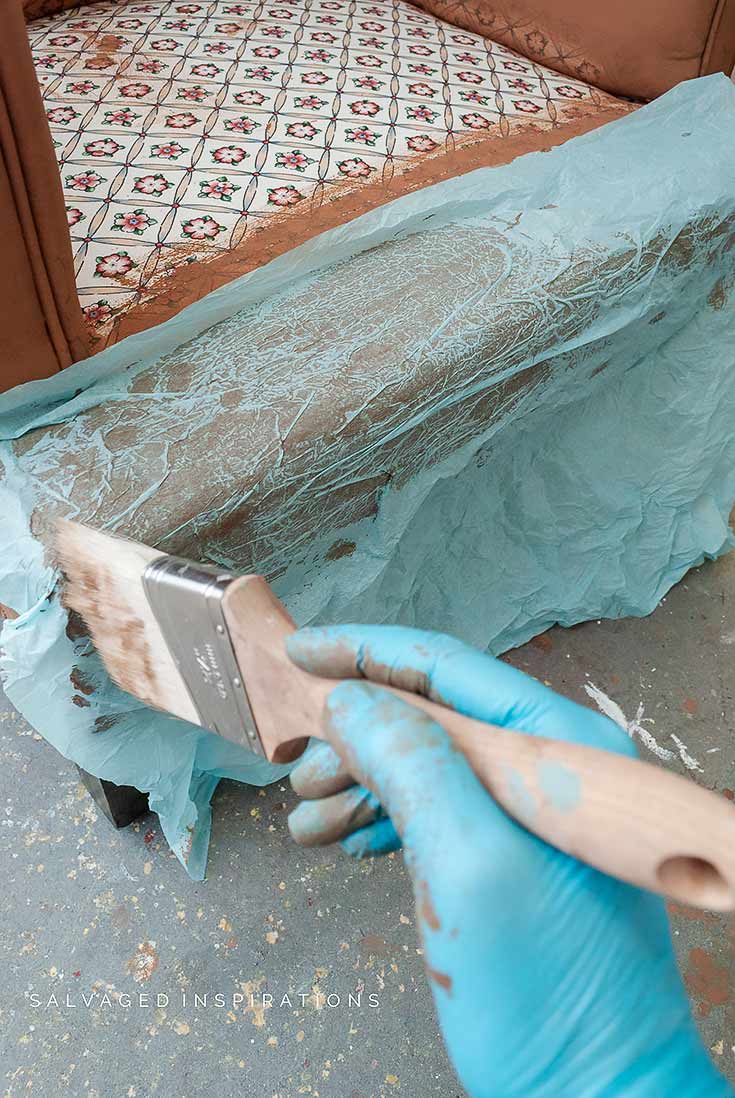
After my third coat of paint was dry, I added some Chocolate to the leftover paint I had in the container along with a little VanDyke Brown Glaze. I didn’t measure but I’m guessing it was around 10-15% glaze to 85-90% paint. The glaze was added to give me a little more playtime to create some texture.
I applied a coat of this paint/glaze mixture, working in sections.
To get the leather texture look, I crumpled up a piece of tissue paper and then laid it on the wet paint/glaze mixture.
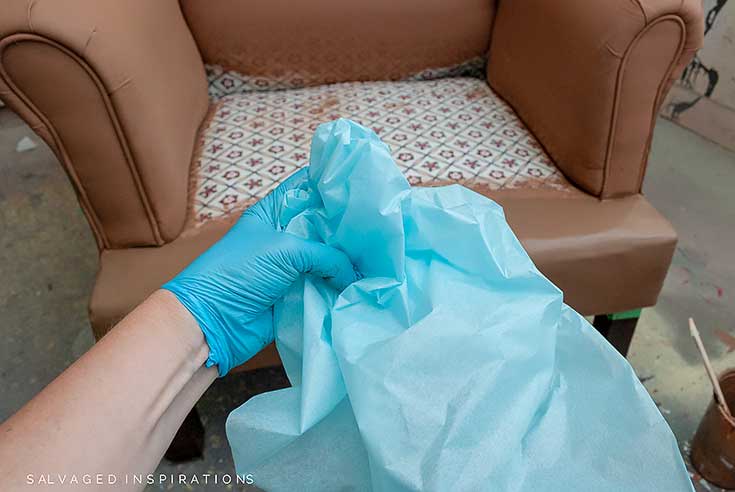
Using a soft dry brush, I gently brushed the tissue paper onto the wet paint/glaze.
Once all the tissue paper had made contact, I pulled it up right away. Isn’t this amazing?! I was so impressed by how authentic it looked!

Step 4 Recap — Create the Faux Leather Texture

- Mix another batch of your base color, adding about 10–15% Van Dyke Brown glaze to extend open time.
- Work in small sections so the glaze stays wet while you texture.
- Brush on a thin layer of the paint-glaze mix.
- Crumple a piece of tissue paper and gently press it onto the wet glaze.
- Use a soft dry brush or gloved hand to tap it lightly so the texture transfers.
- Immediately pull the tissue off to reveal a mottled, leather-like pattern.
- Repeat across the entire piece. Add extra texture only where needed.
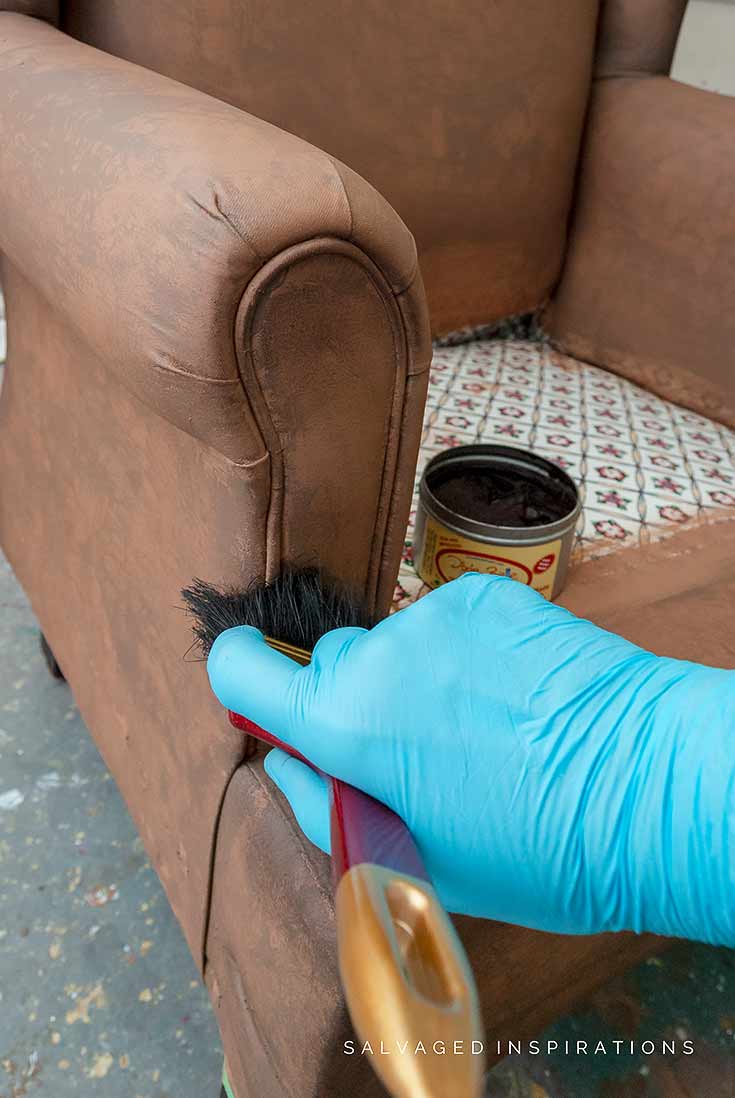
STEP 5 – WAX AND SAND
To finish this faux leather chair, I used this brown wax to darken up the seams and random areas on the leather. Waxing is where your chair truly comes alive. Aging the seams and areas where the chair gets the most use makes the ‘leather paint finish’ look even more realistic. I like using a cheap dollar store brush which I keep on hand for dark waxing. The wax was applied heavier in some areas, less heavily in others and then I gently wiped the excess off with a shop towel. Because I didn’t rub and buff the wax, it will take longer to dry. I’ll check it periodically but I probably won’t be sitting on it for the next 1-2 weeks just to be sure.
To soften everything up, I gave the chair a light sanding with a 220 sanding pad.
Step 6 — CURE TIME
Because this finish uses paint, glaze, and wax, allow at least 1–2 weeks before heavy use. Always test a small spot before sitting on the chair. The finish will continue to harden and cure over time.
Troubleshooting Tips
• Paint cracking or flaking: Coats were too thick or fabric wasn’t clean. Repaint with thin layers.
• Texture not showing: Tissue must be pulled off immediately; add more glaze for longer working time.
• Flat seams: Reapply glaze just to seams and texture again, then deepen with wax.
• Wax feels tacky: Too much wax or not enough cure time. Wipe off excess and allow more time to dry.
THE BIG REVEAL…
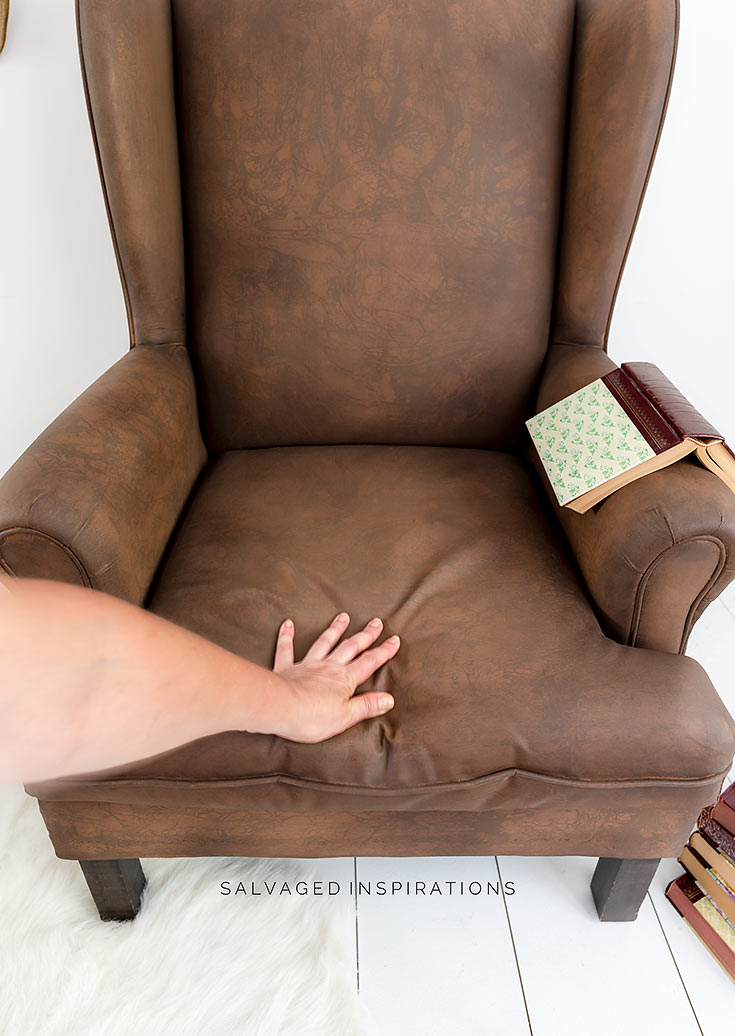
Here’s the painted faux leather chair now… what do you think?
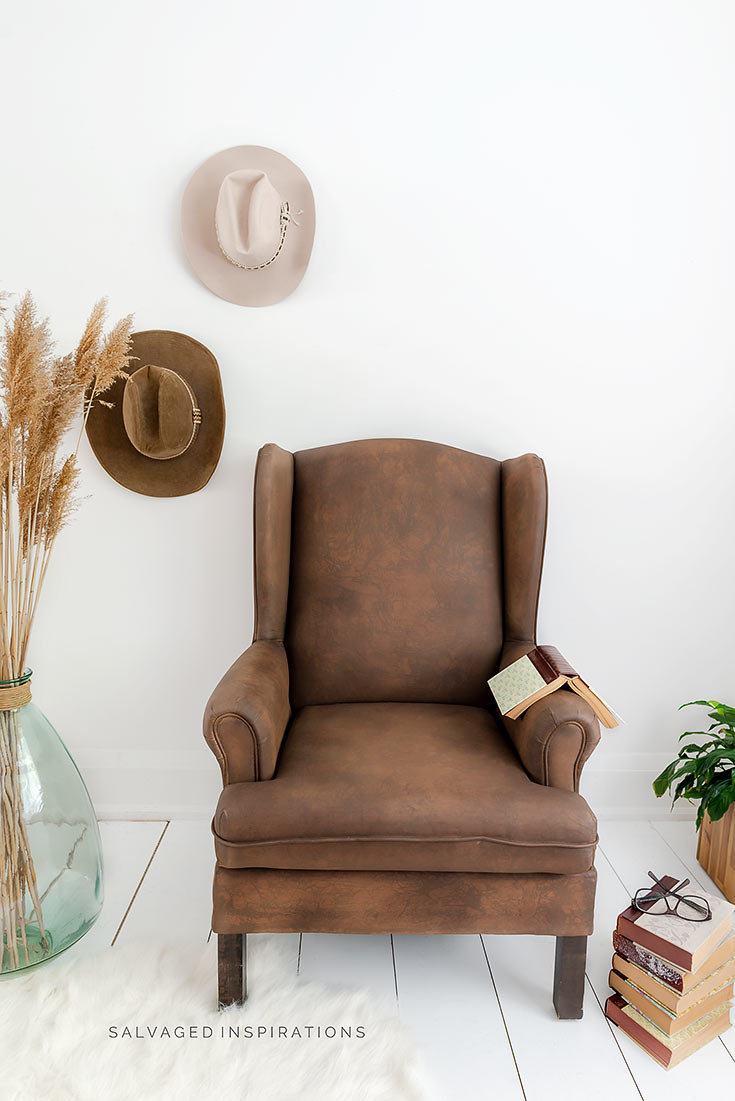
If I didn’t paint this myself, I almost wouldn’t believe it was the same chair!
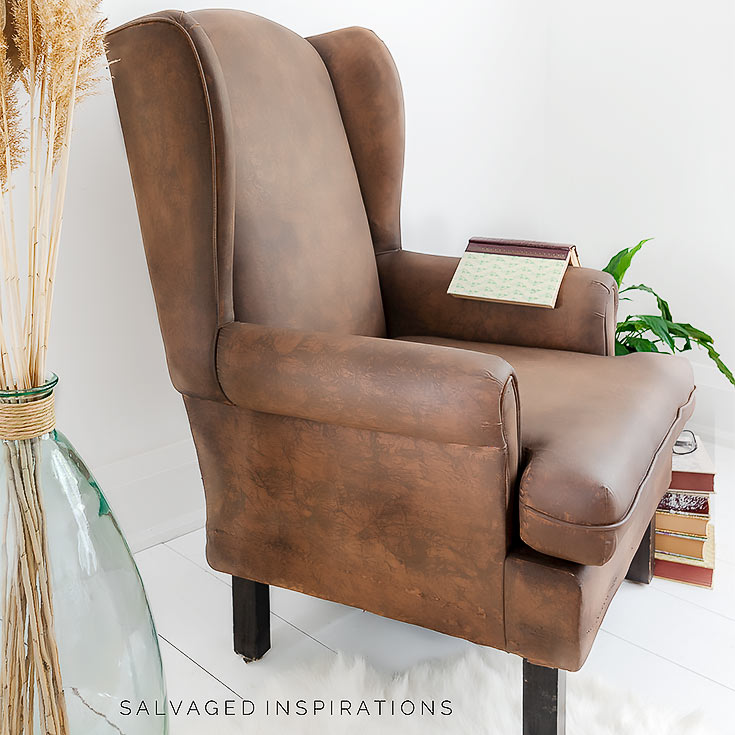

I’m loving my “new” wingback leather chair!
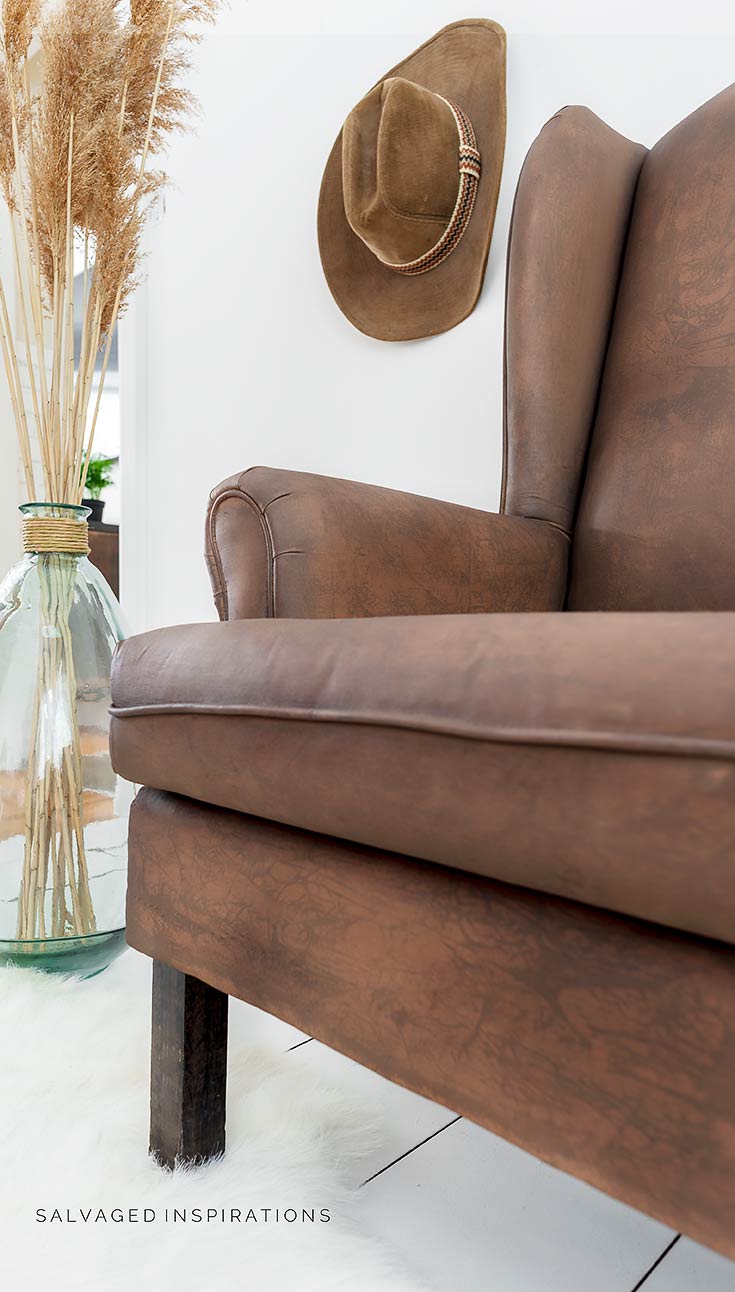

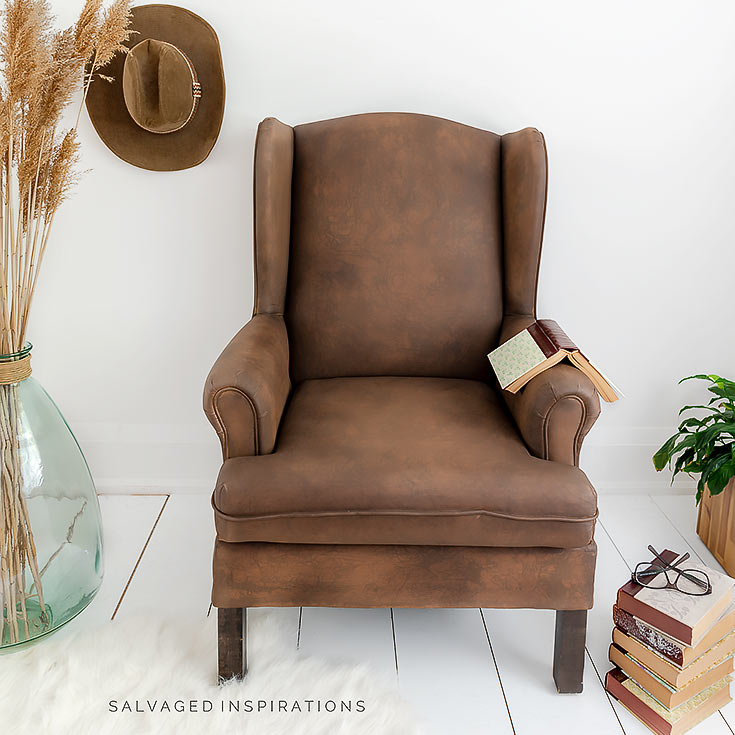
It really does look and have a similar feel to leather.

YOUTUBE TUTORIAL
Here’s the full step-by-step YouTube video tutorial. Our #siyoutubefamily is already a community of 55.5K, so don’t forget to subscribe if you haven’t done so already. You’re the BEST, and I appreciate your support! 🙂
Here’s another look at the before and after.
This is a fun painted faux leather finish to play around with. With the right layering and a little patience, you can completely transform fabric upholstery into a realistic, leather-like finish that looks high-end and totally unique. I’m guessing a brown-black with a black glaze would look amazing as well. Would you try this? I’d love to hear your thoughts and thanks for joining me for another Salvaged Furniture Makeover. I’ve included some Related Posts below, and feel free to leave me a hello or ask any questions you may have in the comments below. I always love hearing from you. It makes my day!!
Happy painting, my friends!
Denise x
RELATED POSTS::
Painting Fabric – Granny Chair Makeover
Painting Velvet with Fabric Medium
Applying Furniture Transfers on Fabric
Dying Fabric With Chalk Paints
Salvaged Granny Chair Turns Hip
PIN AND SHARE!

Hi Denise! Thank you for sharing! What a beautiful chair! I wanted to share something I just watched again on “our upcycled life” YouTube channel, about painting fabric with acrylic paint that will not crack fabric and is pliable, and soft to the touch. She adds ‘modpodge’ and ‘clear downy fabric softener’ to the acrylic paints: then mixes well and paints on chosen fabrics; It lightens the color but can be adjusted accordingly. I thought it might work on this type of upholstery leather look for upcycling chairs etc. God bless you!
I’ve heard of fabric softener but never modpodge. Thanks so much Rohondda! 🙂
I love what you did here, Denise. I have a storage cabinet that’s covered in vinyl right now, and I think I’d like to try this technique on it since it would fit in with most decor. Quite a few years ago I saw a technique using crushed up brown paper. I’m going to have to see if I can find it again. Your technique is much more simplified and I like the idea, but there’s that niggling itch that I have to scratch.
You did your usual terrific job and the chair is hardly recognizable. Thank you!
Thanks and…crushed up brown paper! I’m guessing the faux finish would look even more pronounced! If you give that a try on your vinyl storage cabinet, I’d love to hear how it works out for you! 🙂
That looks great! It really looks like leather. Painting fabric works!
Thanks and ya, painting fabric works GREAT! Revisiting this, I’ve inspired myself to find another piece to try this on!🤣🤣🤣
I loved this makeover then and still love it now. It’s gorgeous, Denise
I’m pretty sure your sweet Freddigirl would approve. Dogs add so much to our lives. 🐾 xo 😘 Pinned 📌
Thanks my friend and they really do! I was blessed to have her in my life for 18years!💙 Wishing you a lovely week Do! XOXO
I love this! How much of each paint do you think you used for the chair after all the coats? Did you need a full 32 oz container of the terracotta?
I can’t wait to try this out!
Hi Brittany, so glad you love it. A 16 oz of the terracotta would be plenty for this size of project. Hope this helps.
Fabulous tutorial. So much so I’m going to give my own chair a go at this technique.
Thank you so much for the video and the notes at the end which means I don’t have to go back over the video to find all your pointers I can just scroll through your notes, very professional and very much appreciated.
I’m so happy its inspired you to give it a try! I’d LOVE to hear how it all turns out for you Skylar.🙂
Genius! You are so clever. Thank you for sharing
Thanks Sandra!
I love your tutorial! Can I ask how durable this is as far as staining? I have four kiddos and am considering doing something like this for a small wingback loveseat to be used at our dining room table. Do you think it could be wiped down or is there a product you’d recommend for wiping sealing it with so it could be wiped down?
Thanks Missy! Hmm, I don’t have kiddos but for adults, it holds up perfectly. For extra protection, you could try waiting till the wax is cured, and then spraying with some sort of stain guard for furniture.
This is incredible! I’m inheriting some couches that need an update… how is this chair holding up a few years later?
Hi Victoria! I’ve used this chair in my office and now in the corner of my bedroom and it’s held up perfectly.😊
So amazing, this is such a beautiful transformation!!! Thank you for sharing.
Thank you Rochelle! xo
Hi Denise, This is amazing!!! I have two valences in the home I recently purchased. They span one 3 slider door/window and then another 2 slider door/ window so they are quite a presence in the room. I am slowly trying to introduce a southwestern feel to the room and this technique would be awesome!! Thought some Native American block stamping here and there might look good as well.
I am not very crafty and this would be a real stretch for me. Thoughts? Tips? Appreciate your help. You are a real inspiration!!!
Lauren
Love it! What a great idea.
Thank you!
Sorry for being repetitive. Just found a few of the comments that talk about painting leather. Maybe I’ll try it.
No worries! 🙂 There’s a ton of great questions and tips in the Comments Section so they can take a while to go through sometimes. I learn a ton from my fabulous readers/#sifamily!! So ya, I’ve never tried but if you give it a go I’d LOVE to hear how it works out for you. And so would a lot of others who have asked so if you have the time, I hope you drop in to let us know. Have a super day Teri! 🙂
Do you think this painting technique would work on a leather recliner. I have a scratched up navy blue chair that could use a facelift?
Girl, you just slayed this chair. It is the most real-looking faux leather I’ve ever seen.
A million kudos!
Susie from Chelsea Project
Awwww, thank YOUUUU! I had a lot of fun with it! Now I’m on the lookout for a more MCM thrift chair with wood legs and armrests but fabric back and seat. I’d LOVE to try this technique on one of those.
What size of paint was required, 16 oz? Looks awesome but the supplies to do this are pretty expensive.
Hi Carla! It depends on the size of your chair (or how many you’d like to paint) but yes, a 16oz of each color would do a chair of average size. The paint goes a long way because it’s mixed with water. 🙂
This is absolutely awesome !!! I know this is paint but I wonder if there’s any concerns with the transfer of the paint colors to skin or clothing. ? Should there be some form of sealant at the end ?
Thanks Nikki! The paint was sealed with dark wax and I’ve been sitting on it with no issues whatsoever. You just have to make sure the finish is cured before ‘regular’ use which is anywhere between 2-4 weeks depending on your environment. As for the transfer wear, I’m not sure yet. I purposely didn’t seal them because I’m hoping they wear down a little to look more authentic. 🙂
This amazing! Do you think this technique would work on shoes?
I do! I’m not sure how the shoes would wear over time but it will work. 🙂
Will this technique work on velvet wings? I know you didn’t have much luck with the fabric medium, but I have two blue velvet wings needing an update.
You also mentioned other decorators having luck painting velvet… do you have their links?
BTW, love your work.
Hi Cat! I’m really not sure if a leather look can be achieved on velvet??… but here’s Debi from Debi’s Designs painting a velvet sofa that turned out beautiful. Hope this helps.
Wow, wow, wow. That’s incredible. It looks stunning!!!
Thanks, Michelle! 🙂
Love, love, love it!! your tutorial came across my e-mail just as i was starting my wing back chair…..I was really nervous about trying, but your tutorial is fantastic! So easy to follow. Thank you so much for sharing all of your makeovers!!! So talented!!
Thanks, Uli and if you give it a try on your wingback, I’d love to hear how it turns out for you!
That is fantastic, as is the technique you used. I could also see this technique being used for a small side table top, or an ottoman, vintage suitcases……….so many possibilities. Thanks for posting, you are a genius!
Exactly, all of those sound amazing, and thanks my friend. I hope you’re enjoying your long weekend. XOXO
Absolutely stunning makeover, probably the best, biggest change I’ve seen on the net! Just amazing. Will be saving these instructions for sure. Super talent, lady!
Aw thanks so much, Linda! Much appreciated! XOXO
Good morning! I am impressed beyond belief. This is THE best makeover, redo, flip I have seen in forever! Not joking at all! It looks like a brand new chair for sure. Thank you for sharing this.
Be Blessed and be a Blessing, Hope
Thanks SO MUCH, Hope! You just put a big smile on face.😁
This is one of your very best make-overs! I am sentimental when it comes to wingback chairs as I remember as a child spending so much time in my mum’s reading. I think I’ve always made a connection to that chair and my love of reading..
Your make-over is brilliant because I love the look of an old leather chair but don’t really like the feel of sitting on leather for any length of time. Your chair is perfect for me. I can wait to hunt for an old wingback chair & start painting it.
Thanks so much for sharing this with all your internet fans. We adore your style!
Lis
Thanks so much, Lis! And I love the story of you reading on your Mum’s Wingback chair. I’ve done my fair share of reading on this very chair too… looking forward to some more good reads on it. If you give this technique a try, I’d love to hear how it all turns out for you. And have fun! 🙂
Wow, how cool is this? But I have to ask: how comfortable is this painted fabric to sit on? I have a chair that I’m thinking about trying this on, but it needs to be comfortable for both me and our cat! *grin*
It’s very comfortable Lisa. It’s stiffer to the touch (with your hands), but sitting on it you don’t really notice a big difference. I’m not a cat owner but the other chair I painted, my dog finds comfy.
Denise, your makeover is simply amazing! I would never guess that it was the same chair. I love the final look and the details that you share in your photos and the explanations you give are so helpful. I have seen furniture painted before, but your piece took it to another level!. What an inspiration. I have been thinking about painting an occasional chair that I have in my den. It just has a fabric seat. So I might give it a try. The wood could use a makeover as well. Thanks for sharing.
Thanks for this Sue! And if you paint your fabric occasional chair, have fun. I’d LOVE to hear how it works out for you! 🙂
Ok seriously mind blown! I have a loveseat in the basement that is in great condition, it has that ruffled 80’s skirt too.
What colors would you use to go gray black? or maybe deeper brown?
I LOVE this. Thank-you!
Thanks Debbie! And it really depends on what tones of grey/black you’d like. I just played around with a couple of colors until I found the tone I wanted. I’m a HUGE fan of Caviar Black or Coffee Bean which are gorgeous softer blacks. A deep/dark gray that would work nicley (I think) is this Gravel Road or something similiar. 🙂
Hi Denise, I am a member of way too many blogs and decided yesterday that I needed to unsubscribe to a lot of them but I will never unsubscribe to yours. Love every single one of them. You are an inspiration and I have learnt so much from you.
Best wishes,
Suzanne (Australia)
Hi Suzanne! I’m so happy you’re finding a little inspiration in the projects I attempt. And I’m grateful to YOU for taking the time to drop by and leave such a heartwarming comment… thank YOU! 🤗
Can you do this on an old leather chair? We have an old recliner that has worn spots .
I’ve come across a few tutorials on Pinterest that have painted on leather but I’ve never tried it for myself, so I’m not sure. If you google it you might find something tho! 🙂
YOU CAN REFRESH OLD LEATHER CHAIRS WITH CAKE SHOE POLISH..DEPT. STORES HAVE IT IN SHOE DEPT..
Great tip Gail! 🙂
Denise do you realize how you just rocked my world? I have a fabric armchair that is my favorite chair in the whole house and I chalk painted it several years ago but the color no longer worked in our restyled living room. It’s sitting in the basement and I miss that chair so much. I thought about repainting it but felt it would look too umm plain jane until now! We have a leather sofa in our living room and I’m so excited that thanks to your tutorial, I can give it the same look! Thanks to you, I get my chair back – so excited!!! You are so amazingly talented my friend. xo
I can’t WAIT to see what you do Marie! 😃 It’s a really fun process… you’re going to have fun with this one!XOXO 🤗
Amazing!!
Love all your work
Thank you Ionara!
You do amazing work! This one is spectacular.
Thank you Robin!😊
From “granny” to mod; Love it! Really looks like leather; I’m going to try this! As always, you inspire me!
Thanks Jackie! And if you give it a go I’d love to hear how it goes for you… I know you’d make it gorgeous! XOXO
That is amazing! It looks great. Does your dog still use the chair?
Thanks, Lizzy! 🙂 And no, unfortunately, Freddi (my furbaby who used the wingback chair as a face cloth) passed away back in 2014 and Gidget (my furbaby in the video) doesn’t use this chair at all.
Denise, this blew me away. beautifully done! Does the tissue paper ever stick and become difficult to remove?
Thanks Val!! 🙂 I’m uploading the video as I write this and there is a place in the video where the tissue paper did stick a little… but just a tiny piece. For the most part, I had NO issues at all. 🙂
Hi Denise, wonderful makeover! Can you keep us posted on how it wears? It looks so good I think it would be worth it if you just have to do touch ups once in awhile.
I am going to assume that you don’t have to use more water after that first coat: my other question was also about the fabric. Your chair looks like it has a nice tight weave cotton that wouldn’t stretch much. The chair I would try this on has a weave, I think I may just try a section on the lower back and see how it takes the paint or better yet, go get a scrap piece of woven material and try it on that. Great posting!
I’m not sure how it would work on a stretchy woven material so very good idea to try on the back or a scrap piece. And for sure. I’ll keep you posted. I finally edited the video and uploaded it so you can see exactly how my other painted chair held up over the years. If you don’t want to watch the entire tutorial, you can check out the 4yr old painted chair in the last 2 minutes. 🙂
This is amazing!! I cannot believe it is even the same chair!! You are a miracle-worker, my friend!! XOXO
Thank YOU! I’m pretty pleased with how it turned out too.🤗
That looks incredible! Well done! I am curious if you have ever used Fabric Medium. I just bought some so I can turn any paint into fabric paint. I want to paint a duvet cover but font’s want it to be stiff. Would love to hear your insight.
Leslie, I didn’t have any luck with my fabric medium.😐 But it could be because I tried it on velvet. If you give it a try on your duvet cover, I’d LOVE to hear how it works for you.
Thanks so much! Velvet would be tricky. 🙂 I think I will try it first on some faded outdoor pillows. Those fade so badly but I hate to contribute to landfills every summer with pillows.
Brilliant Leslie! And ya, I had a hard time painting velvet… literally…lol, they turned out super hard.
Wow, that is impressive! I love everything you do. So inspirational. Thank you
Thank you, Angela!! 🙂
Dang!!! The faux leather texture and the artfully applied dark wax really make the look. Fantastic! I’ll remember this I find an adorable chair with ugly upholstery!
I like your ‘Dang’…lol. Thanks, Rebecca! XOXO
This is an AMAZING before and after! You’ve outdone yourself. I would never have thought to paint faux leather on a chair. ~ Nicki
Aw, thanks my friend! XOXO
WONDERFUL JOB!! You are a superstar! I’ve seen painted fabric but never to imitate leather. Kudos to you.
Thanks so much Cate! xo
Absolutely fabulous! Do you seal it at all ?
Thanks, Debi! Only with the dark wax. 🙂
OMG- what an incredible makeover. It looks FANTASTIC. !!
Who would have even thought this was possible. Thanks so much for sharing.
Aw, thanks Maria! It was a really fun project!
I love this. Would this work for a problem I have? I love the red microfiber couch I have but the seat cushions are showing wear. Could I do this without changing the color?
Hi Barbara! I’m sure you could but the trick would be to match the color perfectly. Before you start the seat cushions it would be wise to do a test area on the back or in an inconspicuous area to make sure it matches perfectly after the paint has dried. 🙂
Love it! It is gorgeous ! Denise you did a fantastic job. I am on the lookout for a chair so I can try this. Tissue paper who knew? Thanks for all your great advice.
My pleasure Sue… it’s a REALLY fun project. If you give it a go I’d love to hear how it all turns out for you! XOXO
Hey Denise!! That is amazing. Who would have thought tissue paper? It really does look like leather. So cool!! Very creative.
Thanks so much Cheryl! And video is coming soon if you want to see the tissue paper in action. I’m editing it right now but I’m sooo slooow editing video…lol
What if my wingback chair has a texture and is not smooth. How would that work or look using this technique?
Thanks for any advice.
Michele
Hi Michele! You can definitely paint textured fabrics but depending on the texture your working with, I’m not sure if it would turn out looking like leather. I tried painting velvet once, but unfortunately, it didn’t turn out so great. I know other painters who have a great success with it tho.
What i wanted to say was the fabric has a design that is raised. I think you’re right that it wouldn’t look like leather. I could probably just use chalk paint. Thanks for your help. Your projects are always beautiful. I look forward to your new projects!
Michele
I see… i still think it would depend on what the raised pattern looks like. Maybe it would look like embossed leather! 🙂
Impressive! It’s looks like real leather. What a great way to salvage those out of date chairs without having to reupholster. Oh, by the way… I have a sister named Andra. 🙂
Thanks Do, and hey I didn’t know that! Sisters are the BEST!💙
What an incredible transformation. I love it!
Thanks Donna! XOXO
Hi Denise. WOW!!! If you had not shown the before and after (and the in between) pics I would never have believed that this chair is not real leather. What an amazing, surprising, and gorgeous transformation. I look forward to visiting your blog every week. LOVE IT!
Thanks Monique! I’m really impressed with this one as well. It may just be the inspiration I need to re-do my office hehe. XOXO
Amazing! I love your style and the things you create!
Thank you Nancy!😊