APPLYING REDESIGN WITH PRIMA TRANSFERS TO FABRIC IS JUST AS EASY AS APPLYING THEM TO FURNITURE . . . AND CHECK OUT THE AUTHENTIC RESULTS!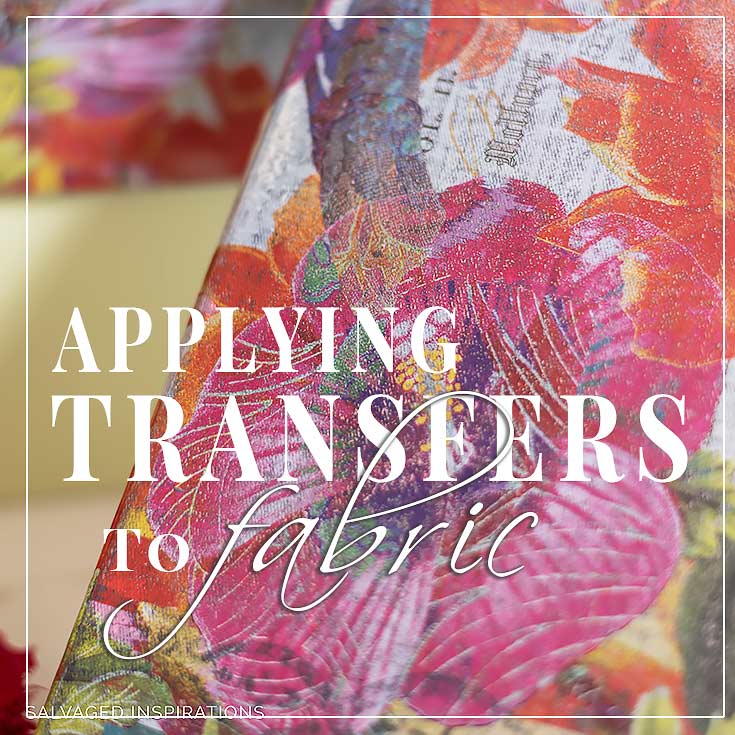
Do you have anything fabric that could use a fresh new look? Maybe old canvas shoes, a plain-jane throw pillow — or as in today’s’ makeover, a set of dated fabric storage boxes? If you’re new to using transfers (and even if you’re NOT!) this is a great “build your confidence project” with an amazing outcome.
And now that I’ve seen the results, OMGOSH… seriously, the possibilities are endless. I love finding new ways to use products so I’m excited to share furniture transfers aren’t just for furniture!
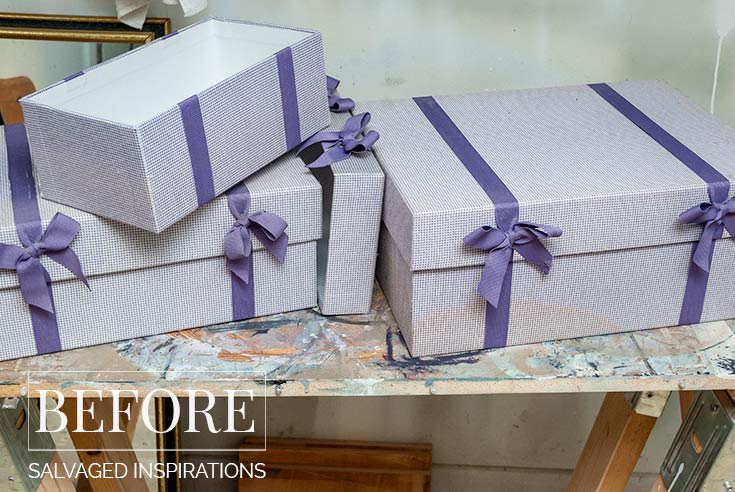
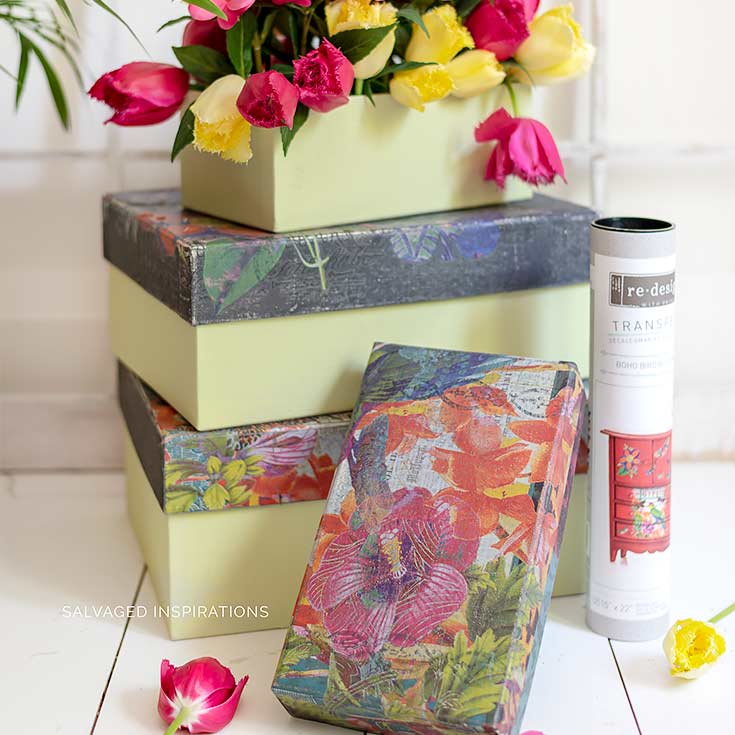
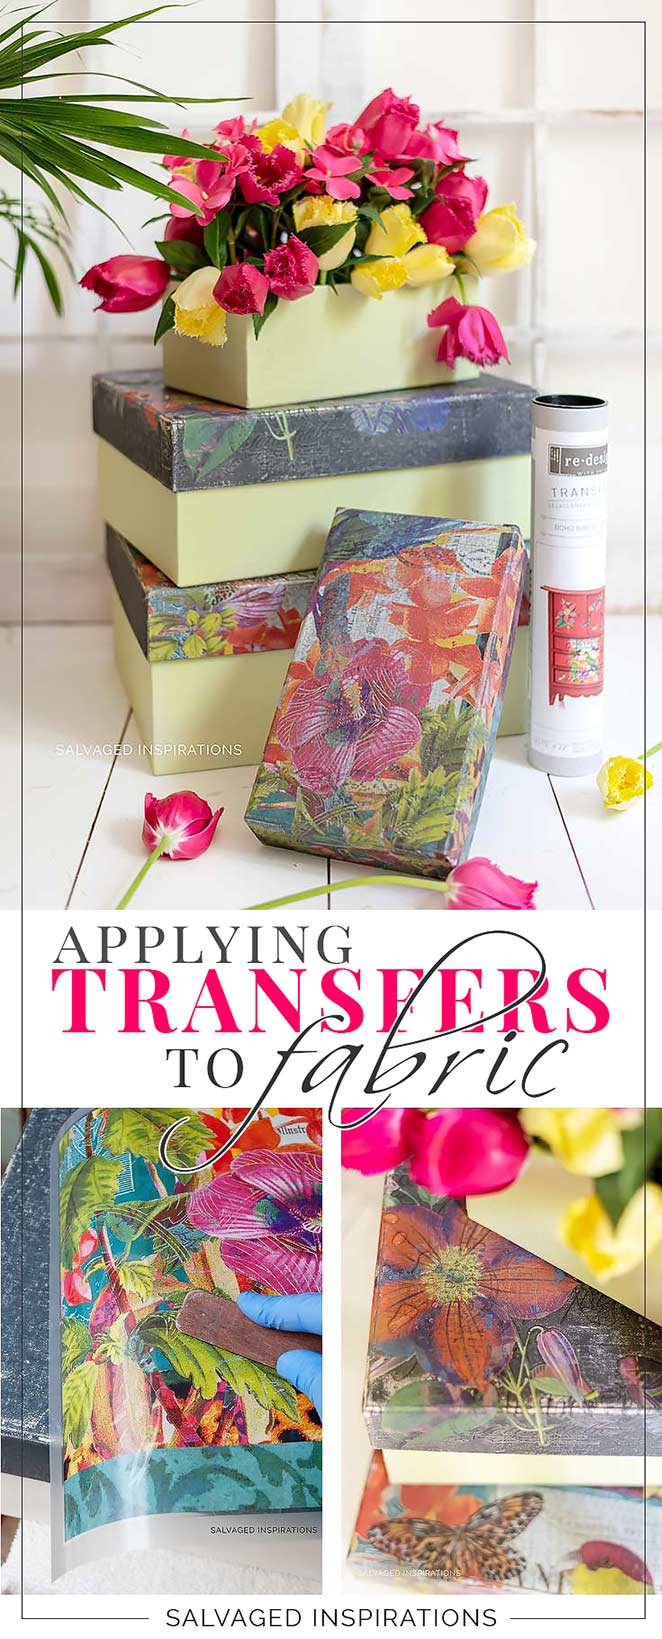
Here’s the before. This box set was super cute when I bought them from Homesense years ago but were looking a little drab and dated…
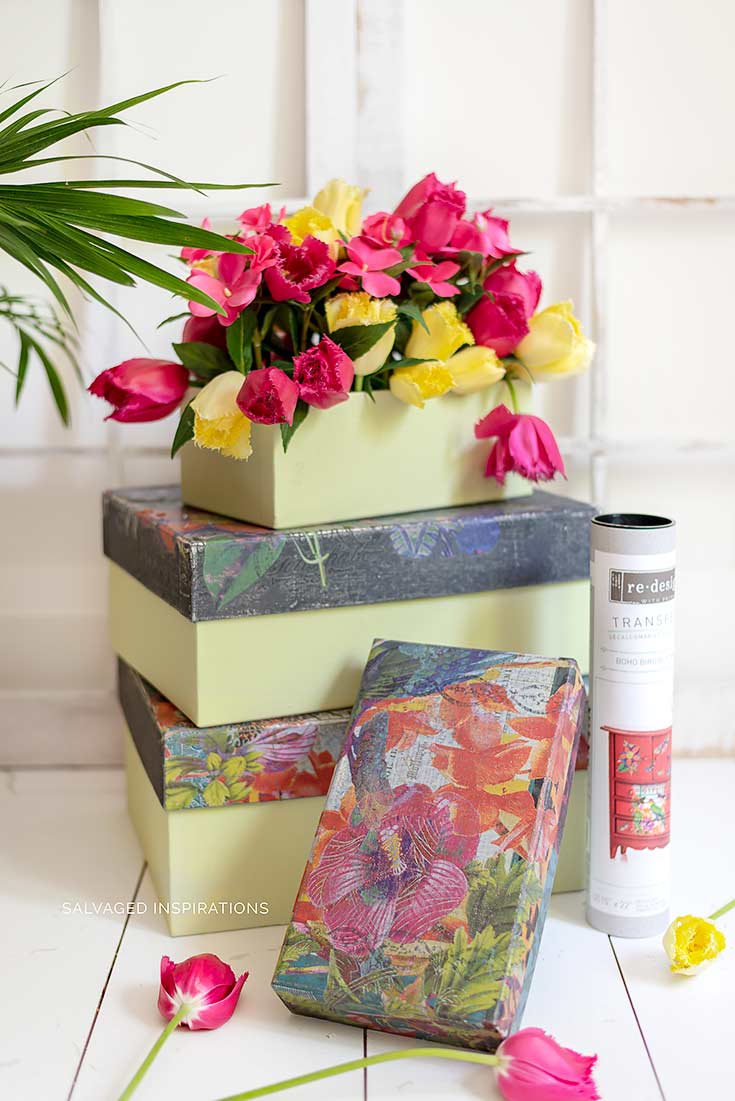
Looks how bright and cheerful they are now! What do you think?
THIS POST IS SPONSORED/CONTAINS AFFILIATE LINKS TO PRODUCTS I USE. YOU CAN SEE MY FULL DISCLOSURE HERE.
SOURCE LIST::
-
- Set of Fabric Covered Storage Boxes – SALVAGED
- Paint Brushes
- 4″ Foam Roller
- Farmhouse Green Chalk Mineral Paint
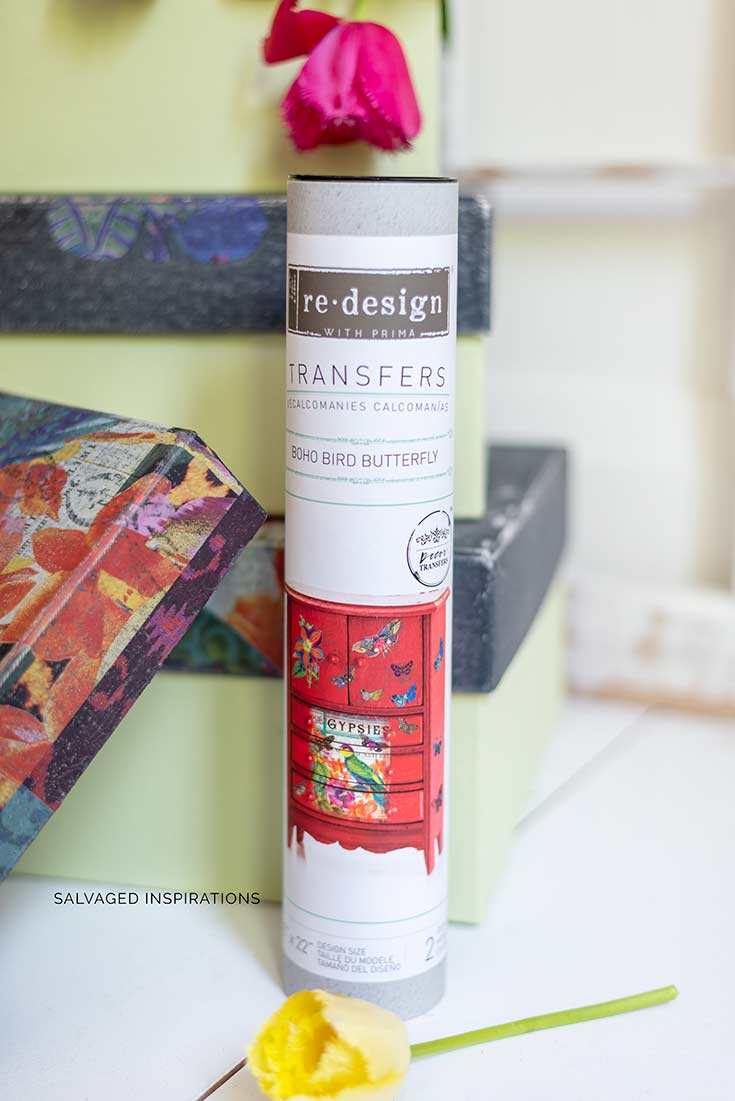
- Boho Bird Butterfly Transfer
- Iron Gate Chalk Paste
- Silicone Applicator
Prima Transfers On Fabric::
Before I get into the How-To’s, a big thank you to ReDesign With Prima for providing the supplies for this project. Sometimes I have things sent to me that I wouldn’t otherwise try. Although I love the bright colors and design in this Boho Bird Butterfly Transfer, I probably wouldn’t have picked it for myself so it’s fun to try new colors/products and stretch out of my ‘creative norm’ every once in a while.
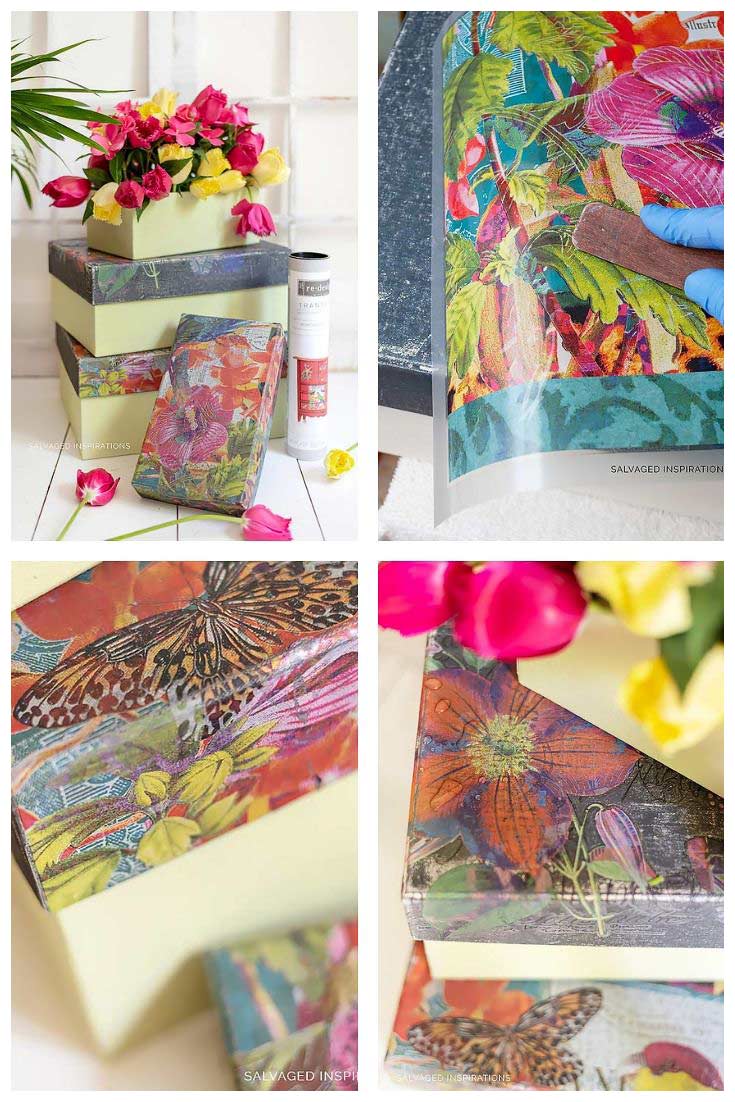
Okay, so I started by removing the ribbons and giving these boxes a good vacuum. My original thought was to silkscreen stencil ribbon strips back on (which I did and didn’t like) so then I decided to take it an entirely different direction.
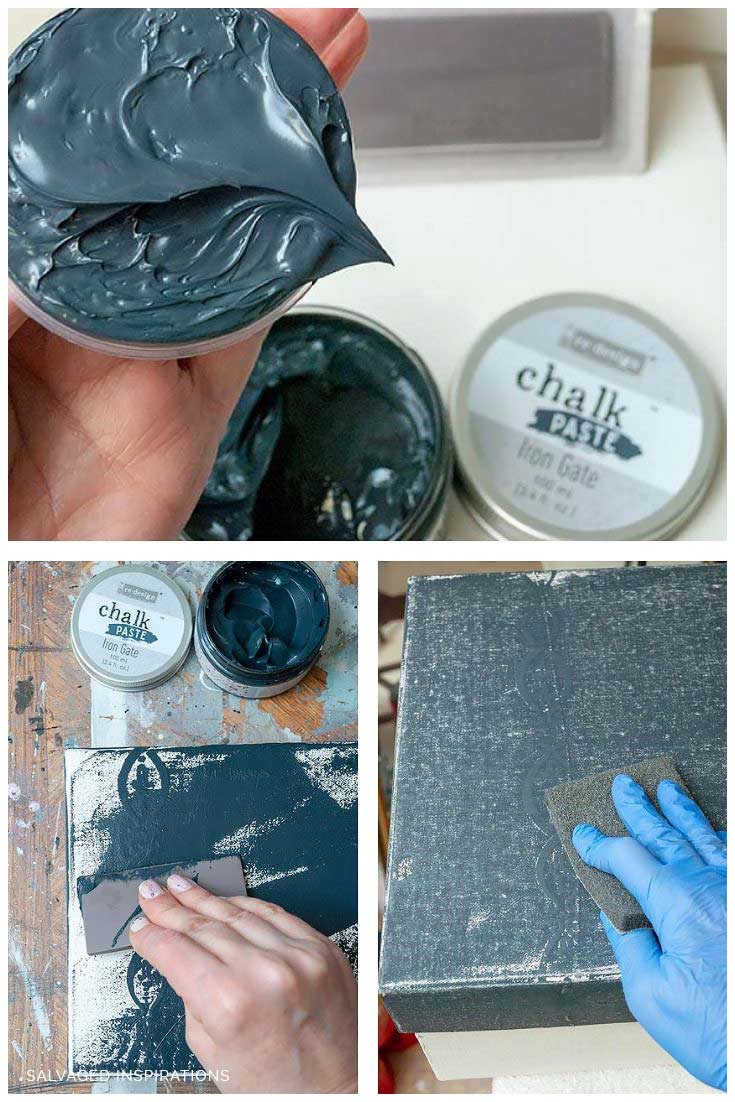
I ended up painting the entire top[s] with this Iron Gate Chalk Paste. Chalk Pastes are wonderful to work with. They’re super thick with great coverage.
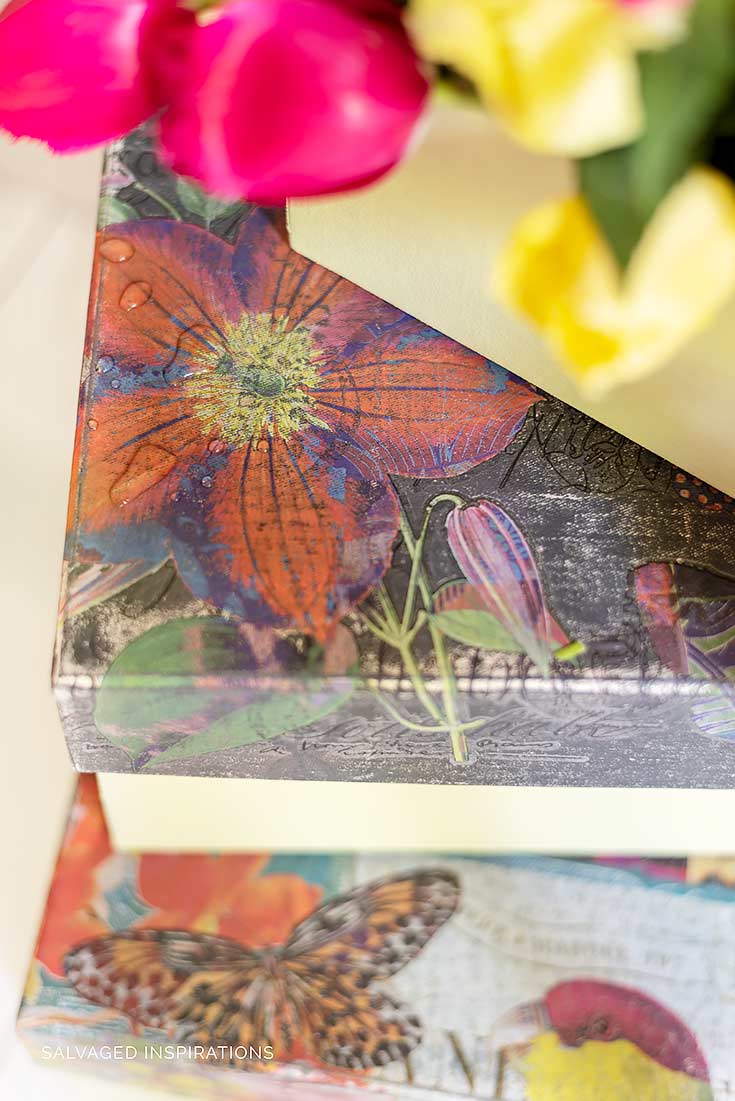
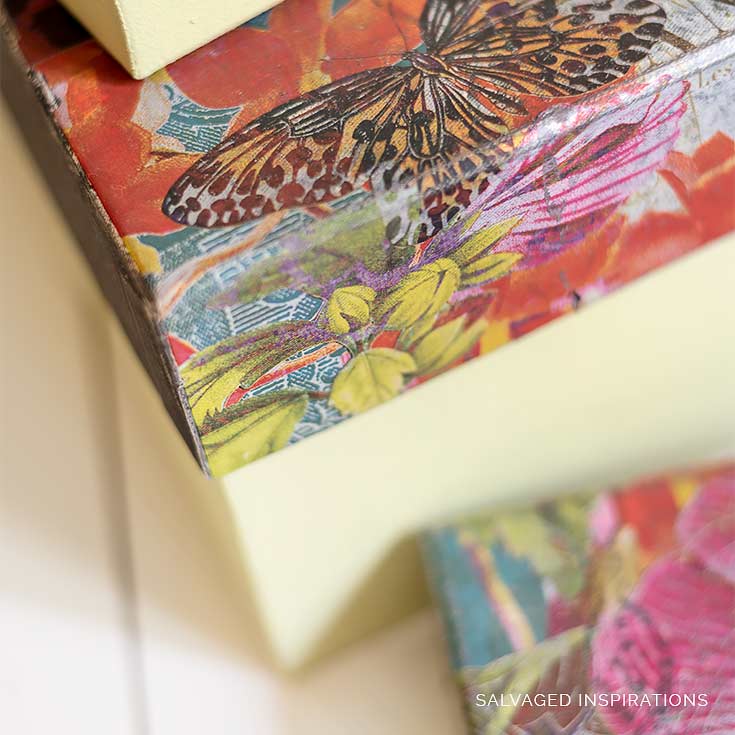
To get the authentic fabric look, I sanded it down so all the fabric’s texture shows through.
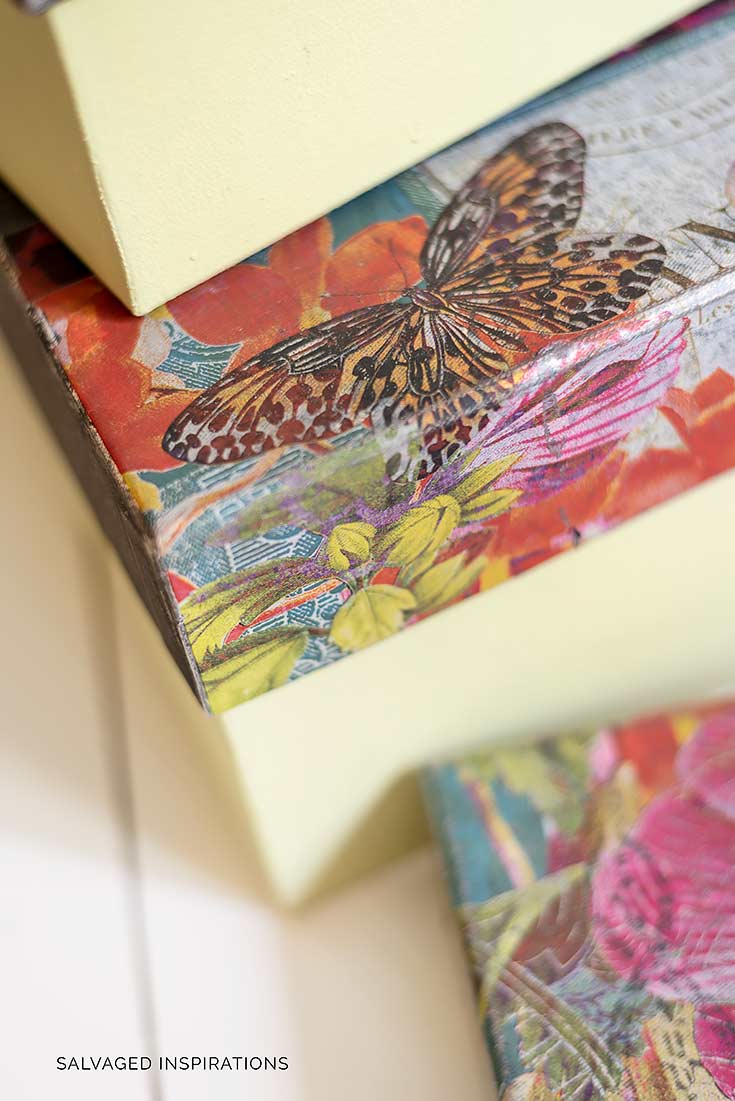
Once the top was painted and sanded, I applied the colorful Boho Butterfly Design with the wood applicator.
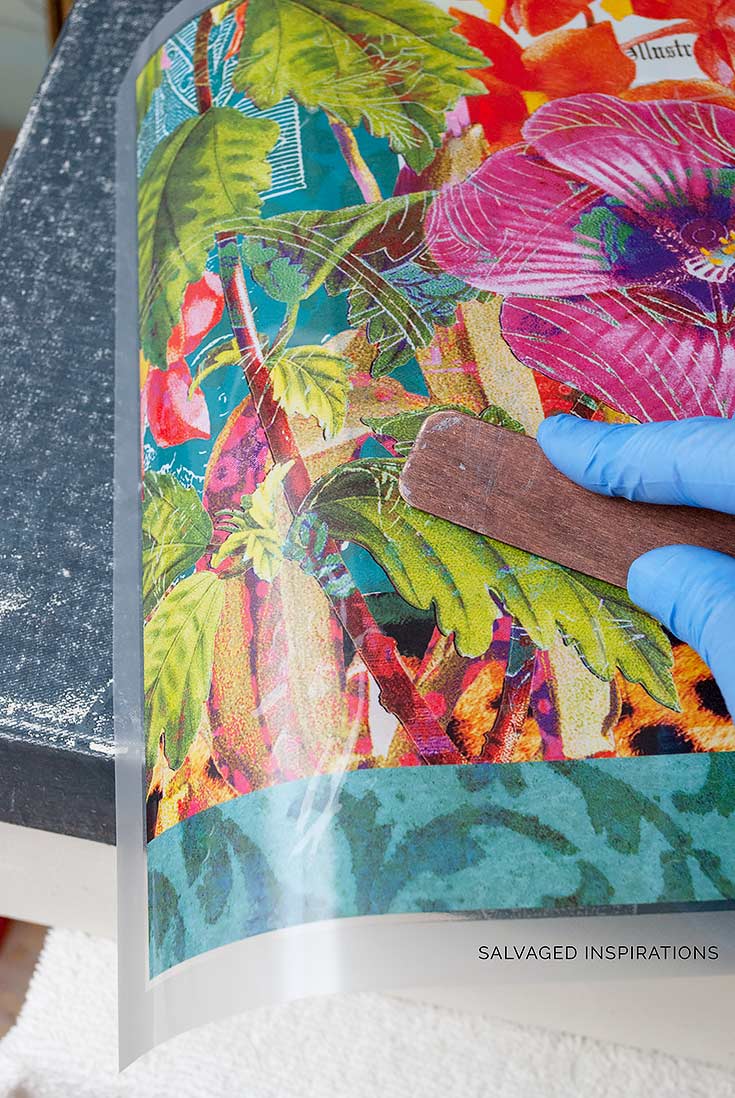
Applying a transfer to fabric works the EXACT same way as applying a transfer it to furniture. The only difference when working with fabric is the fabric needs to be laid flat and on a firm surface so you can apply pressure when rubbing the design on.
To get the transfer to look like fabric, I sanded so the texture of the fabric shows through the design.
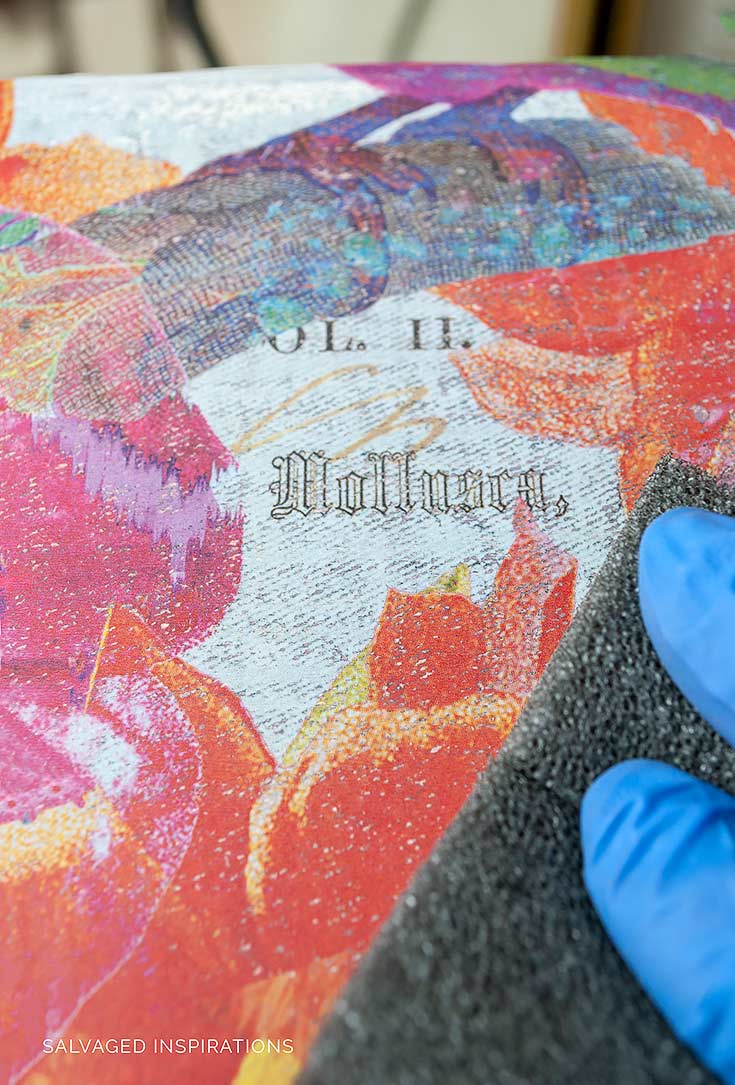
I’ve taken some close up’s so you can really see the texture. Doesn’t it look like REAL fabric?!
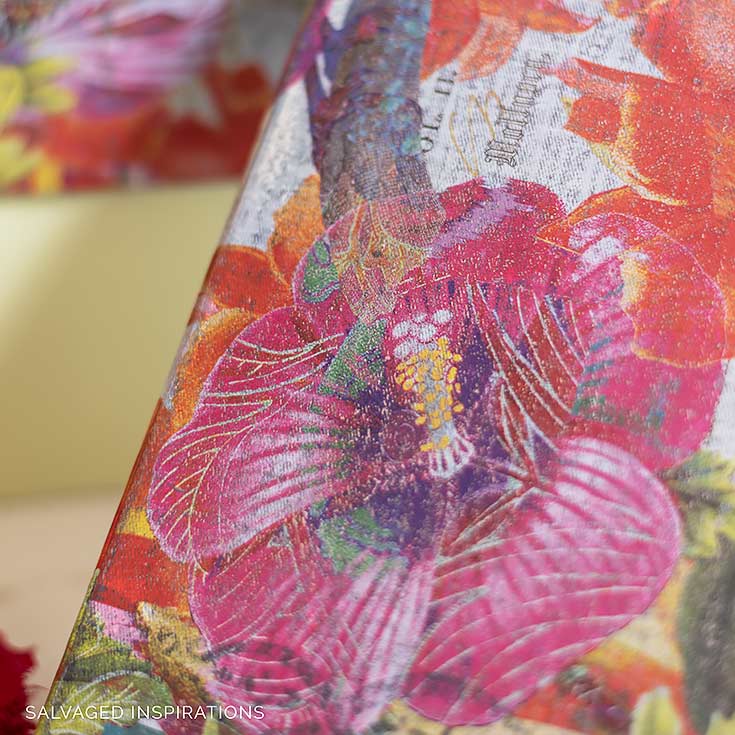
I’m so impressed!
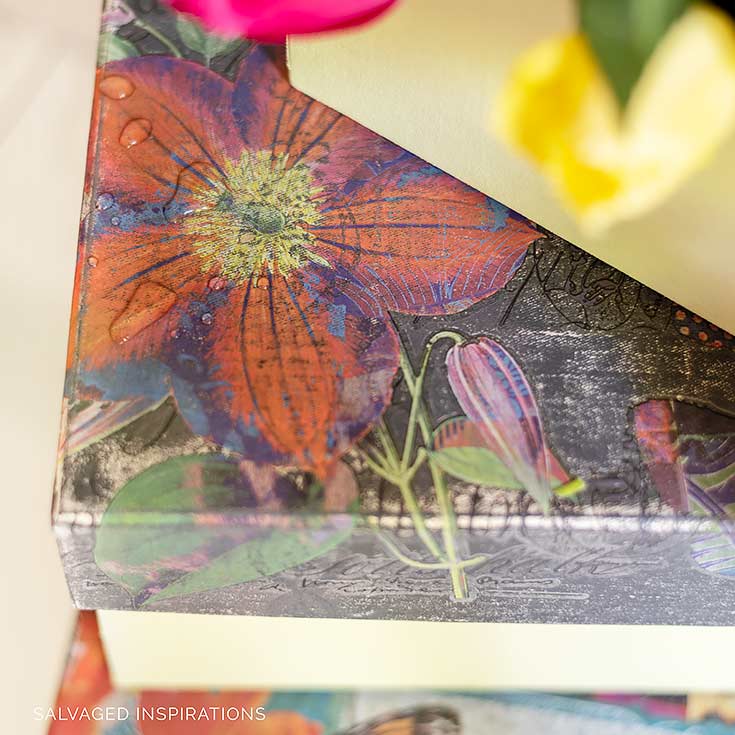
My parrot tulips are blooming in my garden so I thought they’d be perfect styling since there’s a parrot in this design. 🙂
Can you think of any other fabric projects to use these transfers on? I’m sure there are endless possibilities I’m not even thinking of!
LET ME KNOW WHAT YOU THINK OF THIS BOX SET MAKEOVER… OR FEEL FREE TO ASK ANY QUESTIONS YOU MAY HAVE… I ALWAYS LOVE HEARING FROM YOU. IT MAKES MY DAY. 🤗
Happy furniture painting my friends!
Denise x
RELATED POSTS::
How To Apply Furniture Transfers
Adding Graphics | Vintage TeaCart Makeover
Floral Transfers For Furniture
Butterfly Collage Dresser Makeover
Lavender Fields Buffet Makeover
How To Rub On Furniture Transfer [Video]
PIN FOR LATER!

I have applied transfers to an antique fabric chair.
How can I seal them. Should I just wax the seat and back?
Advice would be appreciated
Thanks
Yes, you can seal with wax just be sure it’s 100% cured before you start really using it. There’s also this spray wax that works great and very easy to use on fabric.
Wow fantastic! Love this project! Possibilities are unlimited! 😍😍😍
Right!?!… my mind is full of ideas!😍
Although your boxes look great and turned out amazing, this will not work on anything you intend to put through the washing machine or dryer, I just want people to know that so they don’t waste their money thinking they can make a set of kitchen towels or something.
Yes, I wouldn’t imagine these would hold up in the washer. Thanks for this Crystal!
Denise, your boxes are so cool. What a great idea and as another commenter said, a great way to practise before committing to a larger project.
Because these transfers are pretty pricey, I’m wondering if this technique would work if I just reverse printed a design on my inkjet? Any idea if that would work? Or perhaps had my print shop print out my design on plastic of something that would release the design from it’s backing???
Oh my! One more project to add to my summer list!! 🙂
Hi Lisa! Yes, you could definitely reverse print on an inkjet… and then depending on the surface you’re applying it to would depend on what you use to apply it. Hope that makes sense. 🙂 I reverse printed my hot and cold indicators for my taps and they are still perfect to this day!
Hi Denise, , I always get impressed how you transform things on a piece of art! I love it. For me would be a challenge to add the transfers on the corners of the lids.
Hi Mara and thank you! You’re going to be a PRO come end of Sept.😉 And what I always like to keep in mind is it doesn’t have to be perfect. In fact, the most character of a piece (or any project) come from those little imperfections. Gives them character. 😊
Did you use a scrubby pad for the sanding, is that best on fabric? Would this process work if the boxes are just cardboard not fabric and do you think the paper on top might buckle from the moisture o the paint?
Truly stunning repurposed storage boxes, you are so creative.
Hi Mary!!! I used a 220 grit sanding pad and it worked perfectly. And my guess is this would look amazing on a cardboard box. You’d need something solid underneath while applying the transfer (so the cardboard doesn’t buckle if you press down a little harder) and also the transfer wouldn’t look like fabric because there’s no fabric texture to show through. But the transfer designs to pick from are stunning and would make for a beautiful transfer/painted box!! 🙂
I would never have thought of that, but your boxes turned out beautifully. I have some canvas pillows I am thinking about trying this technique on. Your instructions were most helpful and your pictures clear and beautiful. Thanks for sharing.
Hi Sue and thank you! I’d love to hear how it works on your canvas pillow if you decide to give it a try! 🙂
I have another question. I ordered this transfer and it just arrived. I am planning to do a couple of pillows. The pillow forms are fabric. Do I need to use the chalk paste as you used on your boxes? the pillow forms are off white. Thanks so much for your assistance. Sue
Hi Sue! No you don’t need to use the chalk paste. You can apply these transfers directly onto fabric. Here’s a beautiful example! Hope it helps and sparks some ideas. 🙂
Hi Denise. I just love how these decorative boxes turned out. How did you ever think to put transfers on fabric? I NEVER would have thought of doing that. You’re so creative and artsy. I have a little sewing chair that I picked up years ago and I’m sure this technique would work wonderfully on it! Thanks for the inspiration;)
Thanks my friend! I can’t take credit for the idea of transfers on fabric though. I’ve seen it on Pinterest and Facebook (not on boxes but on shoes and actual art canvas. I think this would work amazing on your sewing chair. I’d love to hear how it works if you decide to give it a go! 🙂
Fabulous tutorial Denise. I love what you did here. Well done!
Thanks so much my friend!😘
Oh my goodness! Amazing. These boxes would sell like hot cakes… LOL.. I’m serious. They are so elegant and vintage ….at the same time. Love them so much.
thanks, Susie! I’m keeping them though…lol.;) They will be great for hiding a little ‘junk’ and I can use them for staging my pieces when I need a pop of color.
Denise, I appreciate you sharing smaller projects. They feel like something I can actually do without getting flustered! 😆This box set looks great and I love those colors! ~ Nicki
Thank Nicki! And ya, I like trying new techniques on smaller projects so thanks for this! 🙂
Hi Denise, I have some of these boxes and you can bet I plan on painting them and putting transfers on them now. I love this transfer but it would be out of my comfort zone to put it on furniture. Thank you for your inspiration. I hav even painting all weekend and getting very discouraged. Sometimes I feel that I’m not an artist because I’m not very creative. It is easy to copy a look. I have been looking for inspiration.
This transfer design was a little out of my comfort zone {for furniture} so that’s why I opted to use it on something else… and so happy I did. As for not feeling like an artist and copying looks, I don’t know how long you’ve been painting for but that’s pretty much how we ALL START! The very BEST artists (and I’m not just referring to furniture painters) usually start off imitating other great artists. Thats the best way to find your OWN style. Try a little of this and a little of that and then make it your own.😊
Dear Denise,
I just watched you video on distressing a mirror. I thought it was amazing! You make all of your prjects look so easy! Do you ever rate your projects according to difficulty?
Please keep your blog going! I know it meanswork for you – Haha! Thank you!
Hi Piper and thank YOU! I’m glad you’re liking the videos.. I’m SO green when it comes to videos I find that hugely encouraging. And no, I don’t rate projects according to difficulty but what a great idea!
It really does look like fabric! Love the green paint color you paired the transfer with too.
It really does, right!!! And ya, I’ve used that Farmhouse Green on a good few makeovers now… give such a nice pop of color. 🙂
FABULOUS! What a fun way to use transfers. Love the pattern you chose.
Thanks Do! I was a little leery using it on furniture (for some reason it wasn’t calling my name) but I’m soooo happy I found the perfect project for it. XO
This is very cool! I wonder how a flexible surface would work- like a pillow? Also, did you seal the transfer in any way? Thanks for experimenting with products and letting us know and see the results!
Toia, I’ve seen some people use these transfers on shoes so I’m guessing it’s more flexible than we think! And no, I didn’t topcoat these boxes and I was quite surprised when some water fell on the lid (you can see the water in one of my pics) and it beaded up nicely as if it WAS top coated!
Beautiful result! I wish I had boxes or a padded stool or something to try this technique. Did you seal it with any product?
Hi Elizabeth!! 🙂 No, I didn’t seal these boxes. As I was saying to Toia (previous comment) I was surprised when the water from my tulips spilled onto the box and it beaded up as if it had been protected/sealed though. The water sat for a bit and didn’t do any damage at all.
Wow! I am so excited about these transfers! The hardest part is which one to try first! Very nice, Denise.
Haha…exactly!!! Totally agree Cecilia!