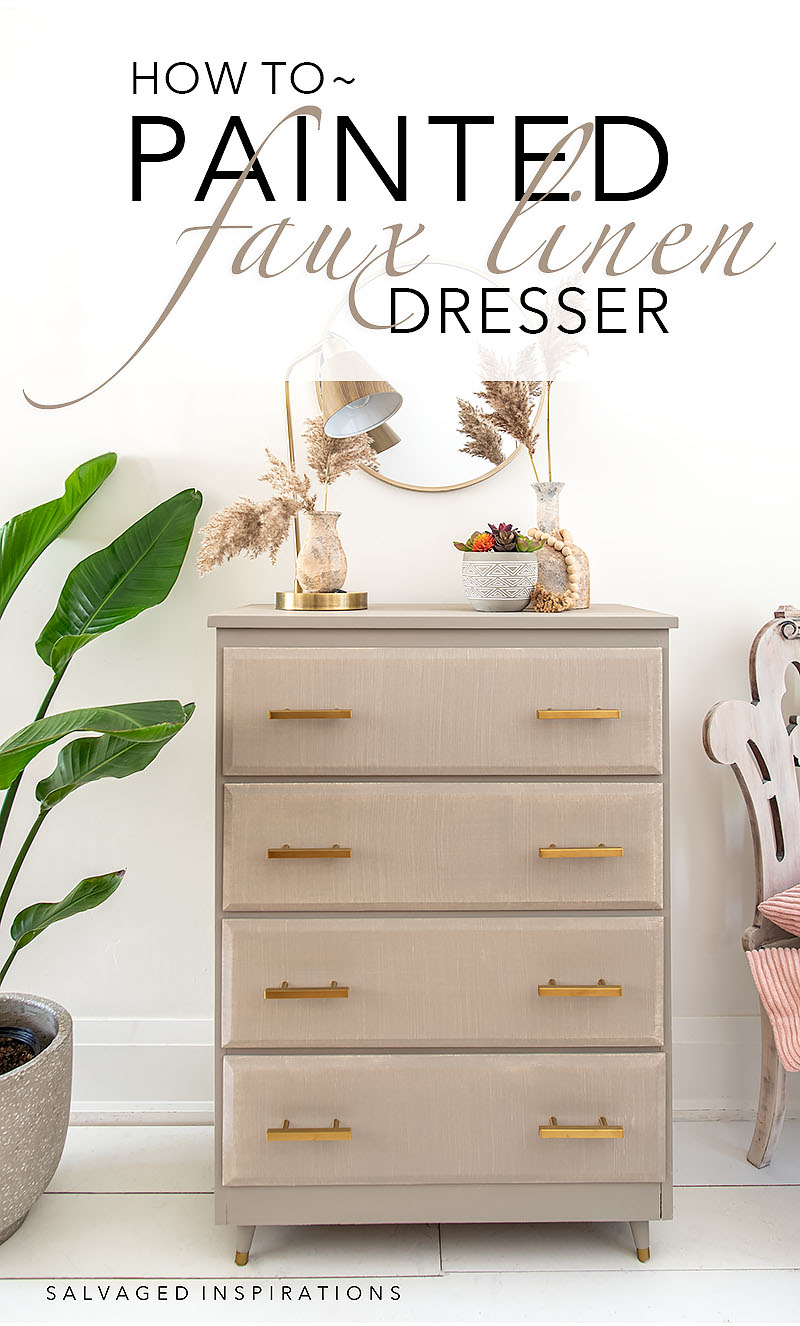
HOW TO TURN A GRIMY CURB-SHOPPED DRESSER INTO A GORGEOUS FAUX LINEN DRESSER | YOUTUBE TUTORIAL COMING THIS SATURDAY!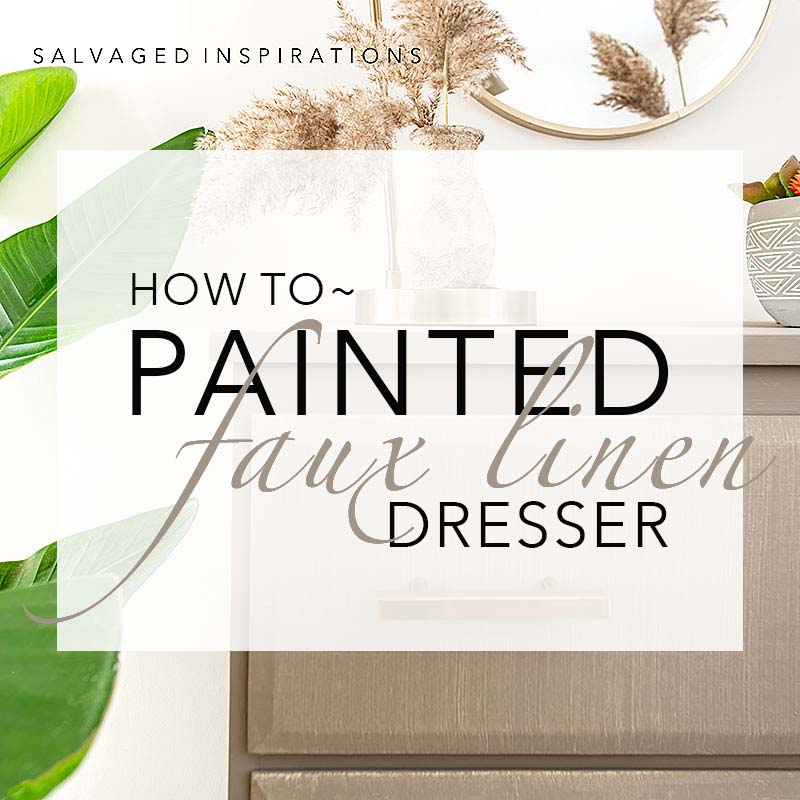
Hi creative friends! It’s Furniture Fixer Upper Day and I’m sharing how I turned this grimy curb-shopped dresser into a French Linen beauty! I picked up three different sweepers for this faux finish. Nick was teasing me it was the ONLY time he’s EVER seen me excited using a broom! 😂
I’m also sharing my blogging besties’ Furniture Fixer Upper makeovers as well so be sure to check them out below!
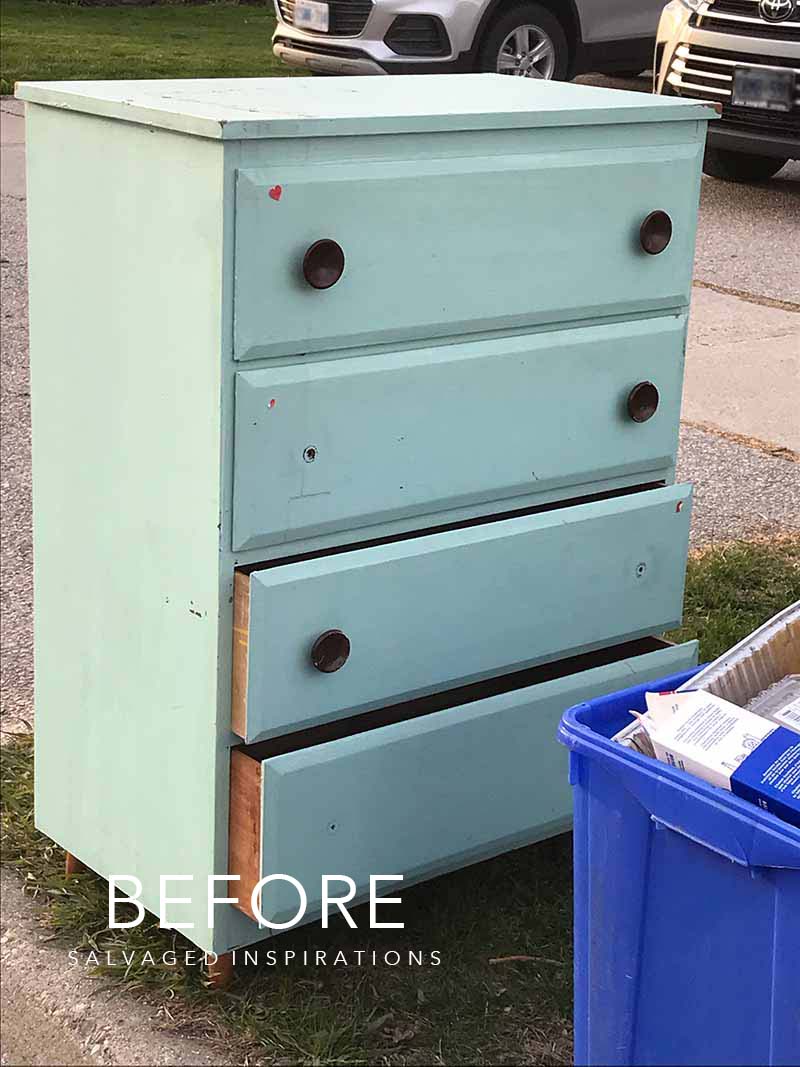
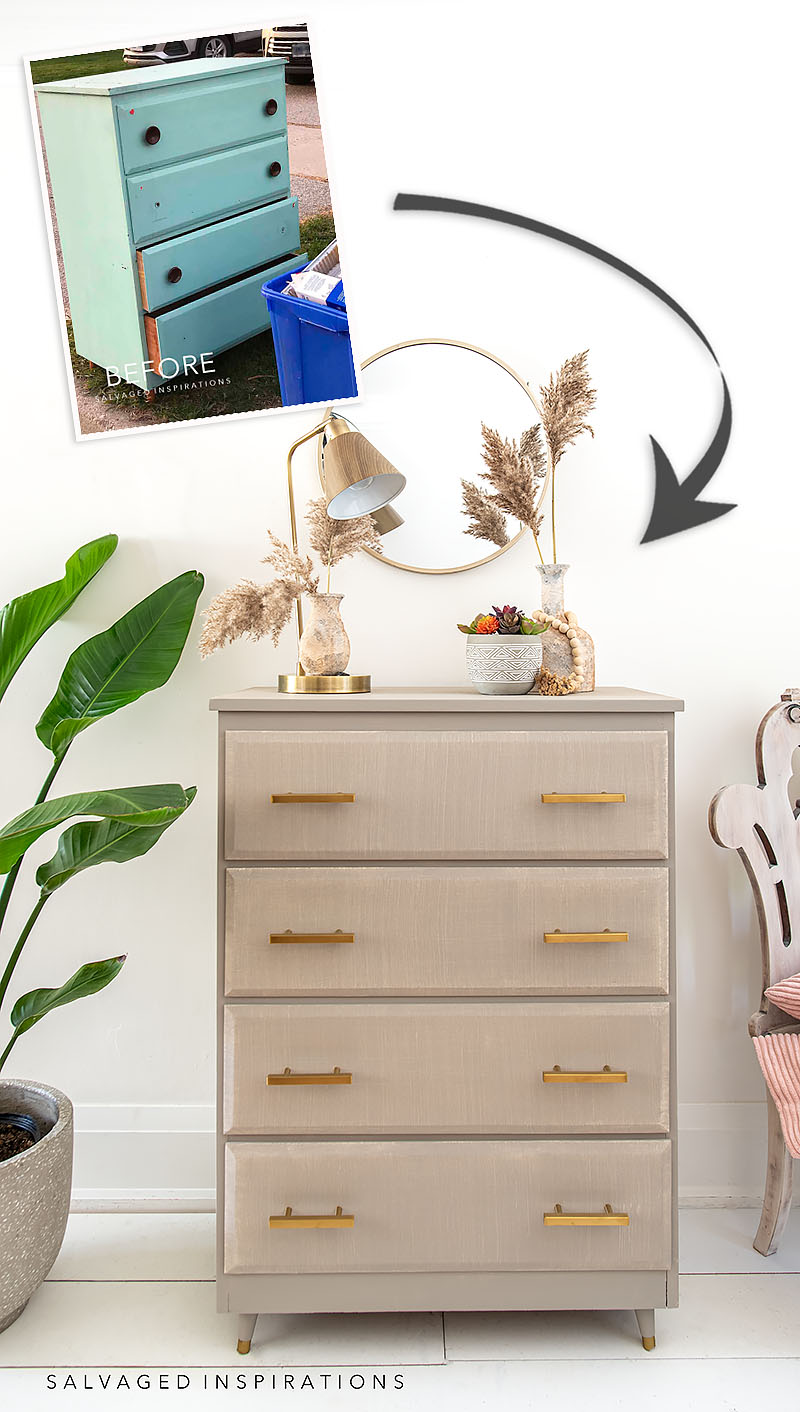
Here’s the dresser I found curbside. A four drawers tall boy that had been previously painted (a few times) and decorated with hearts.
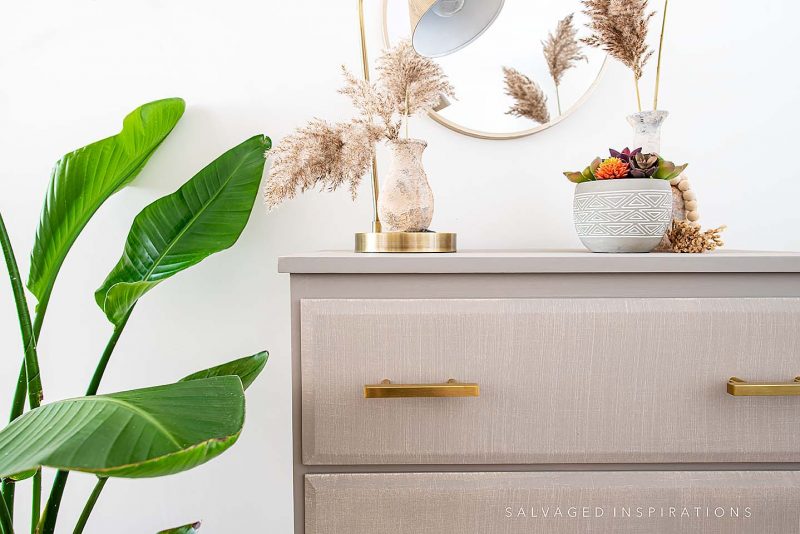
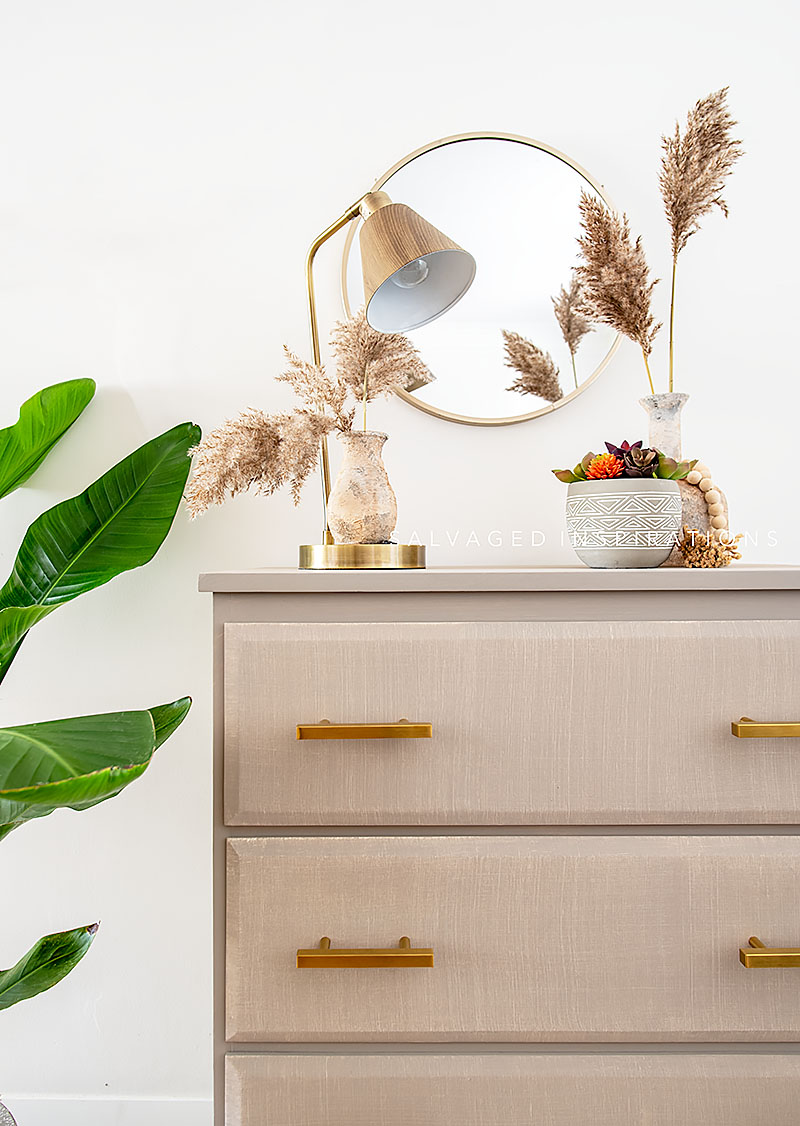
Before I get into the how-to details here’s the NEW look! What do you think?
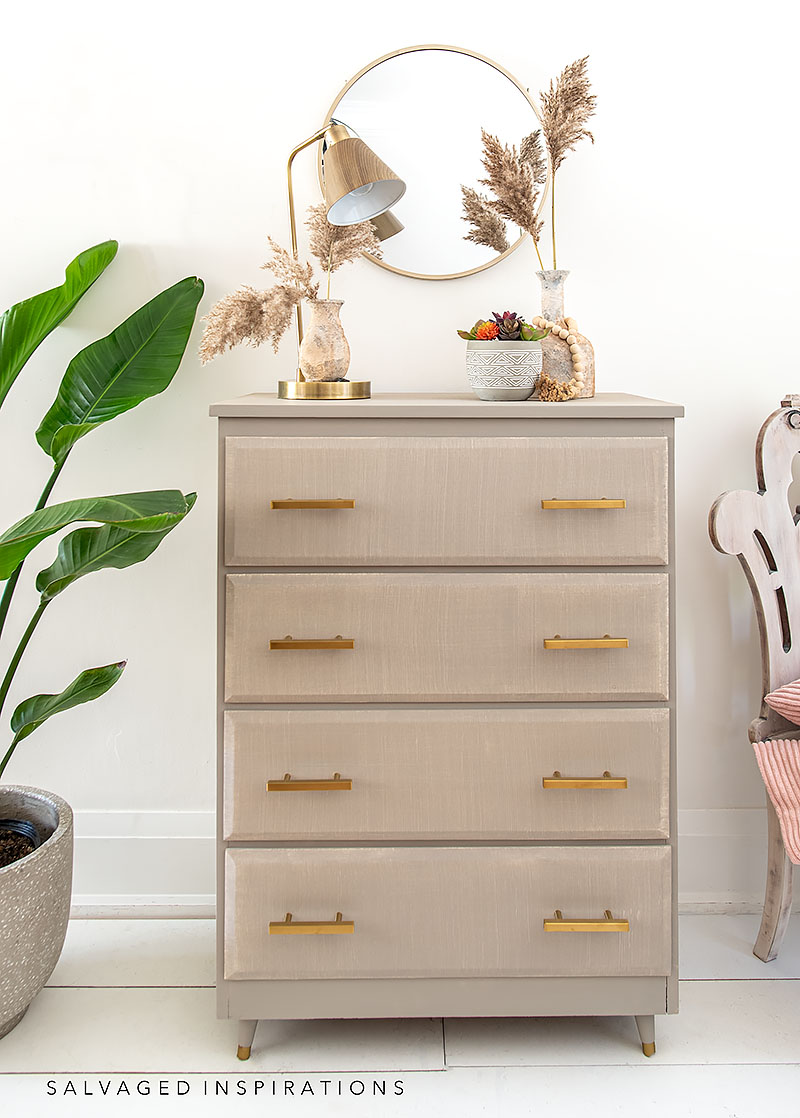
I LOVE all the texture this technique created.
THIS POST IS SPONSORED/CONTAINS AFFILIATE LINKS TO PRODUCTS I USE. YOU CAN SEE MY FULL DISCLOSURE HERE.
SOURCE LIST
Dresser – SALVAGED
White Lightning
Scrubby Soap
Wood Glue
All Purpose Bondo
Brush or Broom (similar)
Flotrol
BIN Shellac Based Primer
Paint Brush
French Linen Paint
Satin Clear Coat
Gold Gilding Wax
Brushed Brass Hardware
TOOL LIST
Screwdriver
Drill Set
Brad Nailer
Orbital Sander
Furniture Clamps
Hardware Template
FAUX-PAINTED LINEN DRESSER
It always touches my heart when I stumble across a previously painted piece. I believe it means one of two things. Possible the prior owner was on a budget and repainted so they wouldn’t have to buy new OR they loved the piece and wanted to style it up so it would have more years to love. Either way, I respect both. That said, this piece had at least three coats of paint on it from what I could see and it was a lot of work sanding it down. Three plus hours worth of sanding.
Here’s how it all came together…
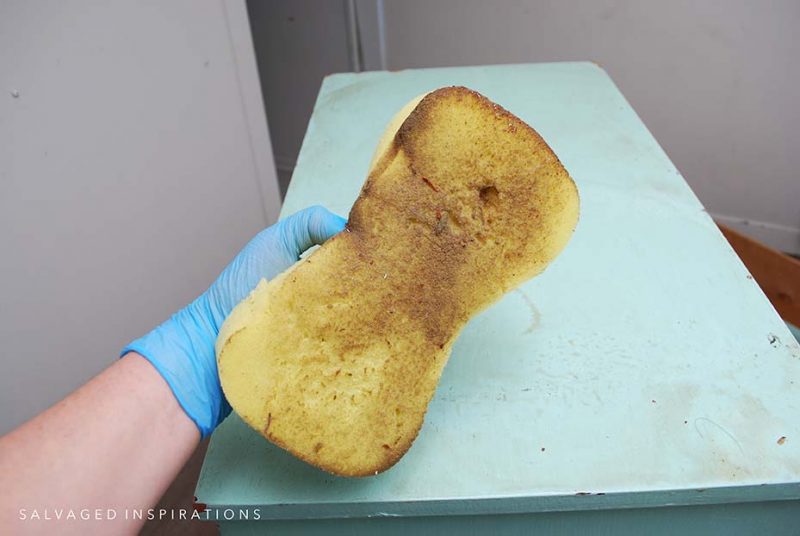
PREP | CLEAN
This dresser was filthy. I cleaned with this here cleaner on the inside and out about three times before I wiped it all down with clean water and the sponge came out perfectly clean. Then I removed all the hardware.
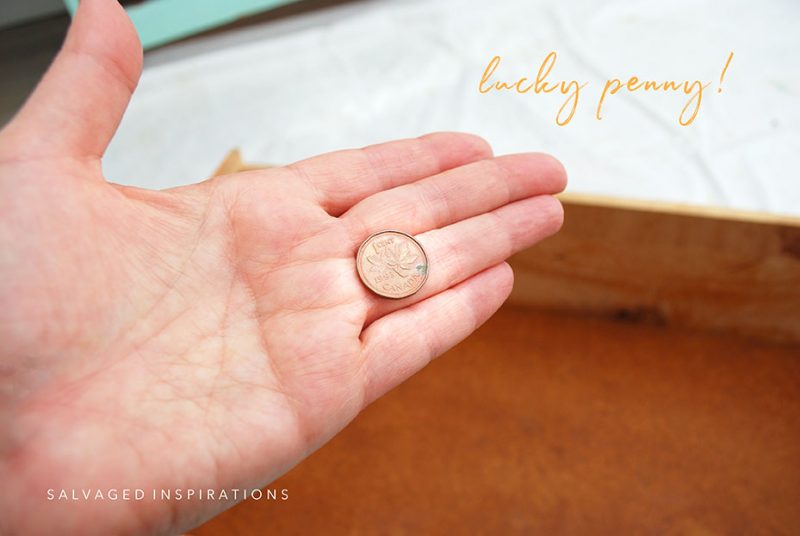
LUCKY PENNY
While cleaning the inside of the drawers, look what I found – a lucky penny! Did you know we don’t use pennies here in Canada? They stopped producing them about 10 or so years ago because they cost more to produce than they are worth. Our smallest coin is the nickel and we round up or down. Funny story: when Andrea and I were on a road trip in the states, we stopped at a service station for lunch. The McDonald’s cashier asked me for $9.96. When I handed him $9.95 we had a stare-down. I was wondering what he was waiting for and I’m sure he was wondering if I could count. It took me a full minute to clue in. Anyway, I’m keeping this one for good luck!
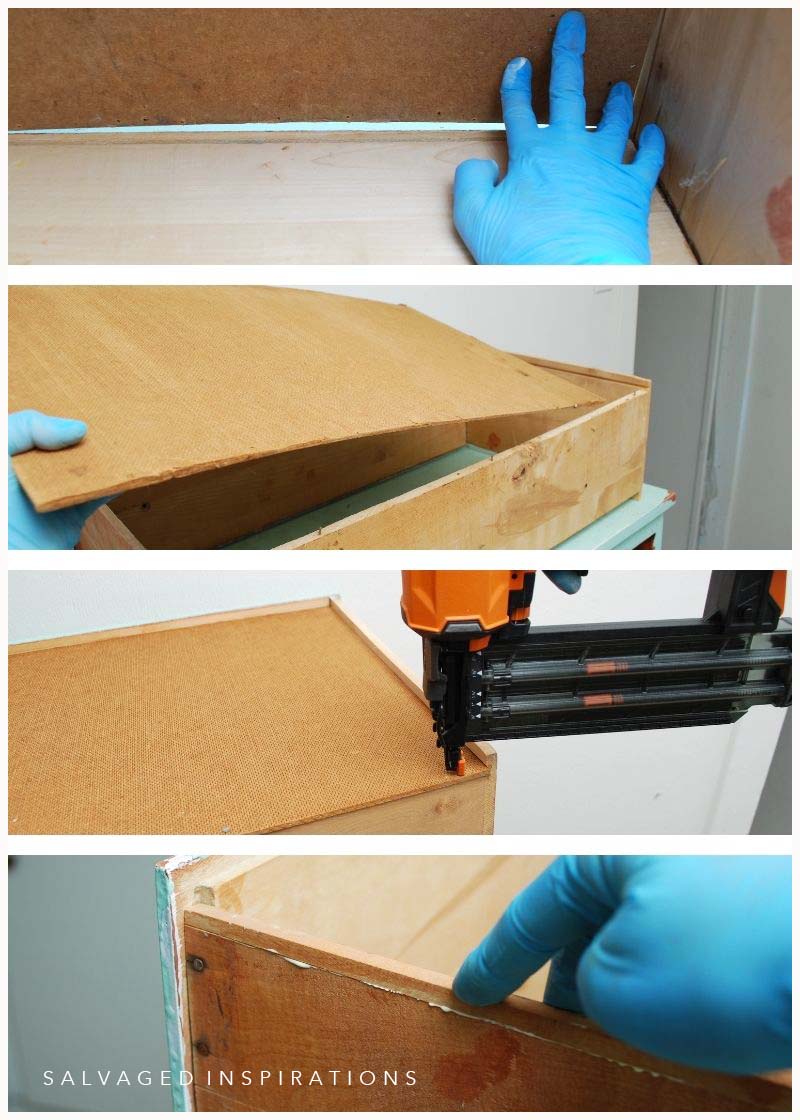
DRAWER REPAIRS
For the drawer repairs, I glued some pieces that had popped off and realigned the drawers for a perfect fit. Using my trim nailer, I nailed the drawers back in place.
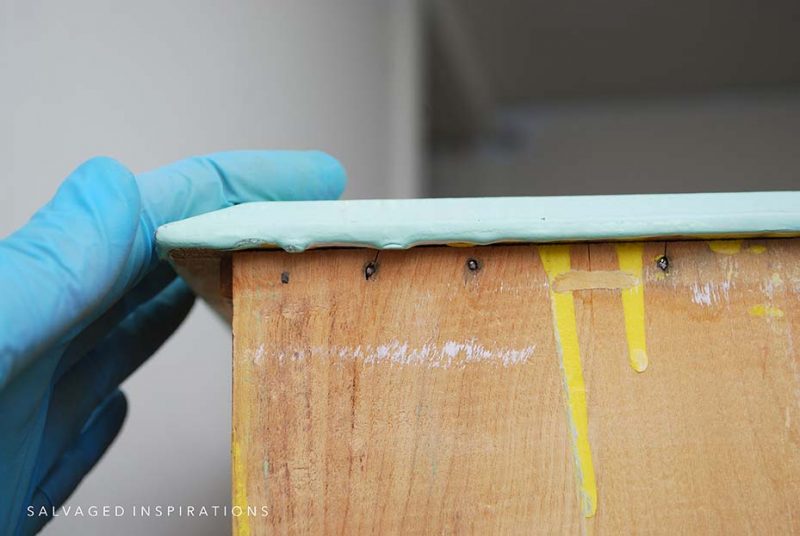
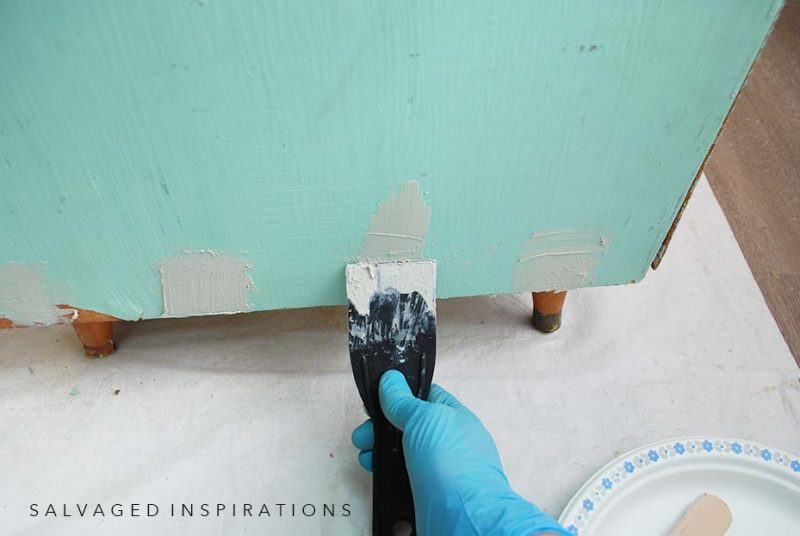
FILL AND SAND
Using this All Purpose Bondo, I filled in all the cracks and dings. Then using my orbital sander and a 120 grit, I scuff-sanded the entire dresser.
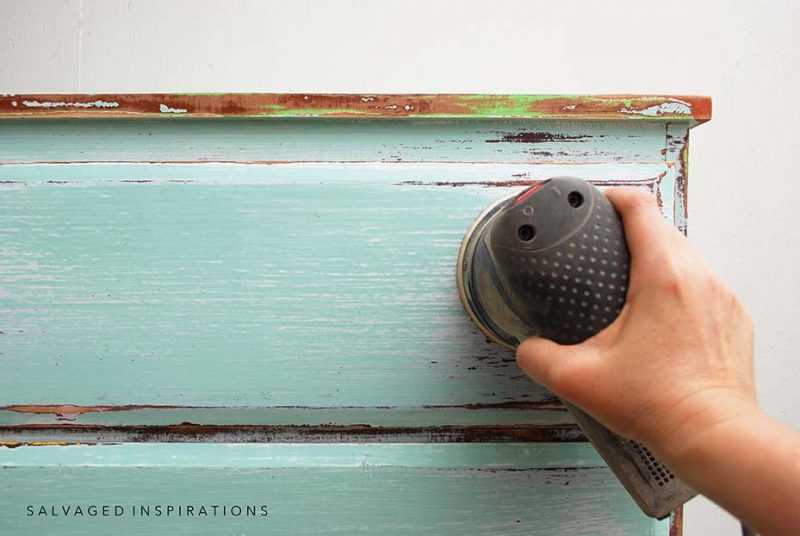
I’m often asked if a previously painted piece of furniture needs to be sanded down to wood before repainting. NO it does NOT. The goal of sanding off layers of paint is to remove all the flaking and chipping paint and create a perfectly smooth surface. Below, you can see how awful this dresser looked after three hours of sanding. It looks horrible. But when I ran my hand over the piece, it was perfectly smooth.

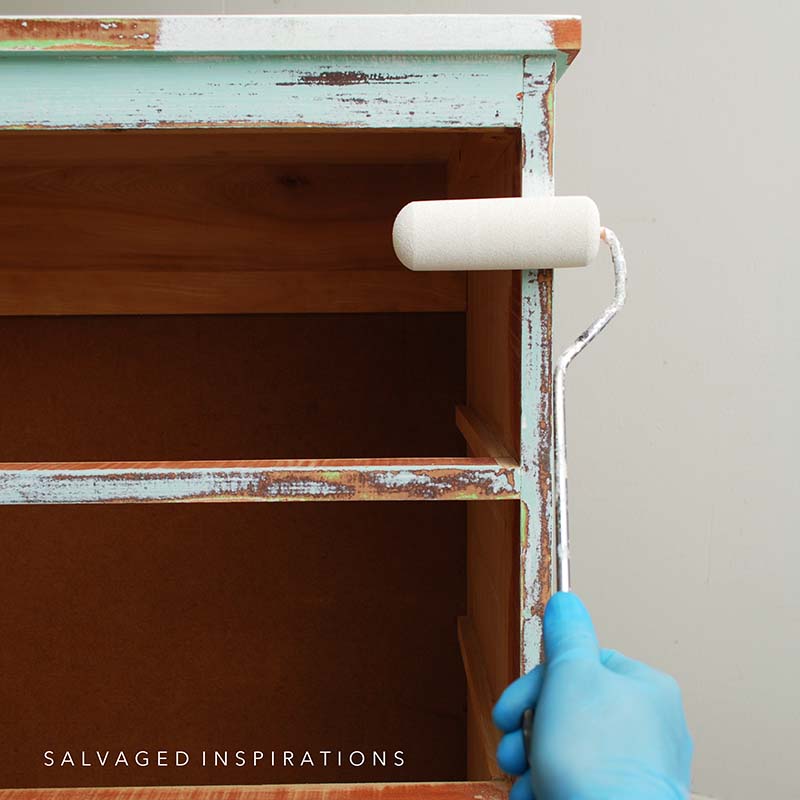
PRIME
I gave this dresser two coats of BIN Shellac Based Primer to stop any stains or bleedthrough.
FAUX LINEN PAINT FINISH
To create this faux linen finish I needed a broom. I wasn’t sure what size would work best so I picked up three from the Dollar Store.

The key to ANY faux finish is to have the open time of the paint (aka the length of time the paint remains wet) staying open long enough to manipulate it. A clear glaze or this Flotrol works great. Either or will stop your paint from drying too quickly. I mixed 1 cup of Flotrol into 1 cup of French Linen.
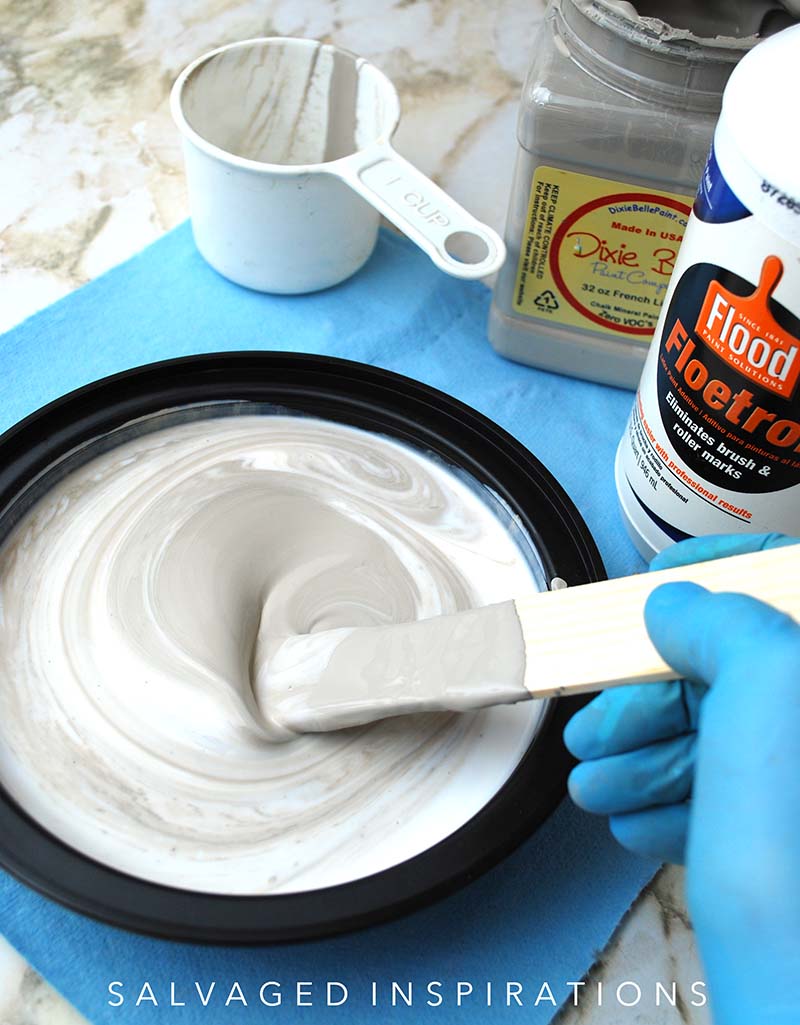
Then I mixed it up and poured it into a paper plate so I could use a roller to apply it to the dresser.
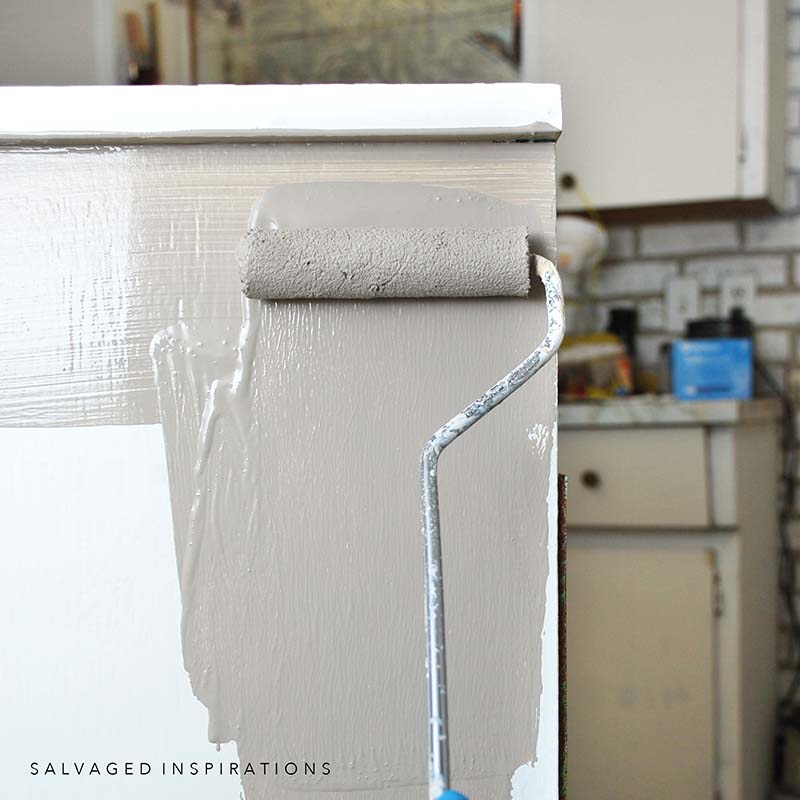
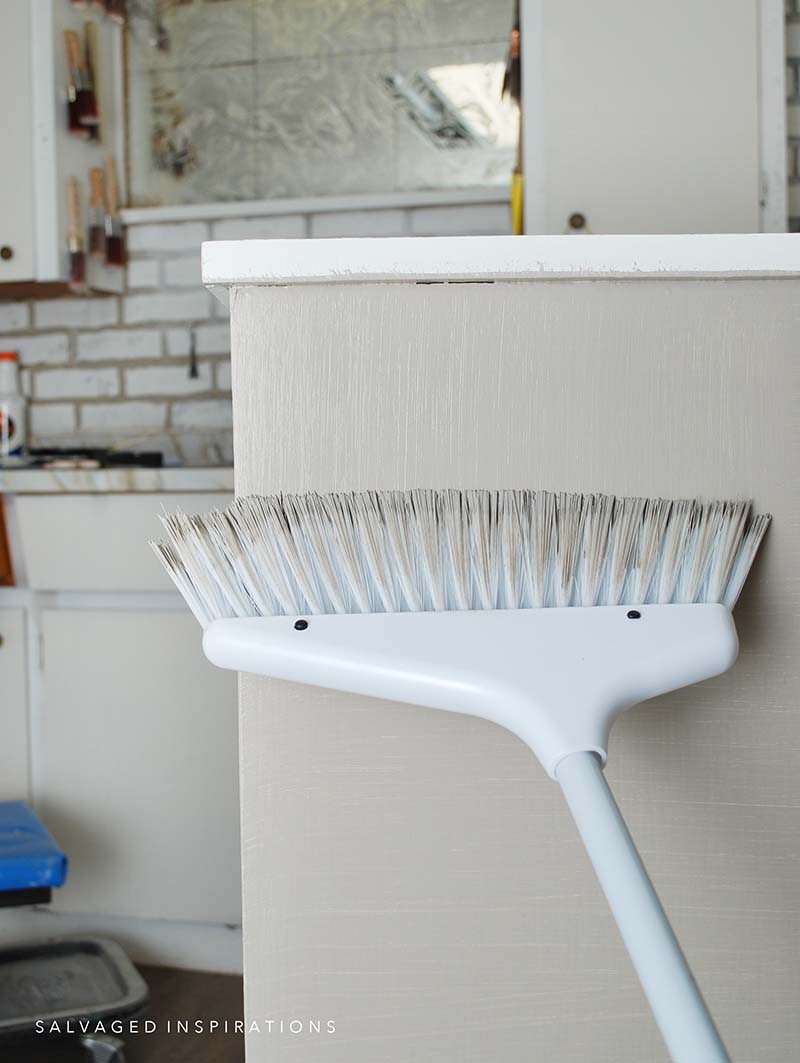
To create the delicate “fabric woven” finish, a wiry nylon brush (similar) is dragged through the wet paint in two directions. Up and down. And side to side. This creates a criss-cross woven linen finish.
I tried using all three brushes and the mid-sized one with the HANDLE left on was the winner. I’ve never seen any furniture painters leave the handle on doing this technique. They usually hold the brush in their hands and drag it over the wet paint. When I tried that, my lines went all wavey WONKY.
When I stood back from the piece and used my body to drag the brush vertically and horizontally, my lines looked great!
TOPCOAT | PROTECTION
I’ll be spraying this piece with 2-3 coats of this Satin Clear Coat.
NEW HARDWARE
I replaced the old hardware with these Brushed Brass Handles. To make installing hardware easy, I like using this template guide.
The brushed brass hardware makes the piece look fresh and modern and the brushed brass contrasts nicely against the French Linen. To tie in the brass hardware, I also used a Gold Gilding Wax on the very bottom of the feet.
Here’s the finished look!
Not bad for a girl who never picks up a broom, right?! 😉
I’ll have the full Youtube Tutorial published for you this Saturday morning so you can see this faux paint finish in action. Warning – I look pretty silly sweeping my furniture.

YOUTUBE TUTORIAL
Here’s a step-by-step tutorial on Youtube. If you have any problems viewing below, feel free to watch it on my Youtube Channel HERE. Our #siyoutubefamily has hit 13.6K so don’t forget to subscribe if you haven’t done so already! So exciting, thank YOU! 🙂
AND NOW FOR SOME FURNITURE FIXER-UPPER FUN!
You’re going to LOVE what my creative team of Furniture Fixer Upper ladies do! Below are their BEFORE photos. Visit the links below to see the amazing AFTERS and learn how they did it! I’m heading over to take a peek as well! x
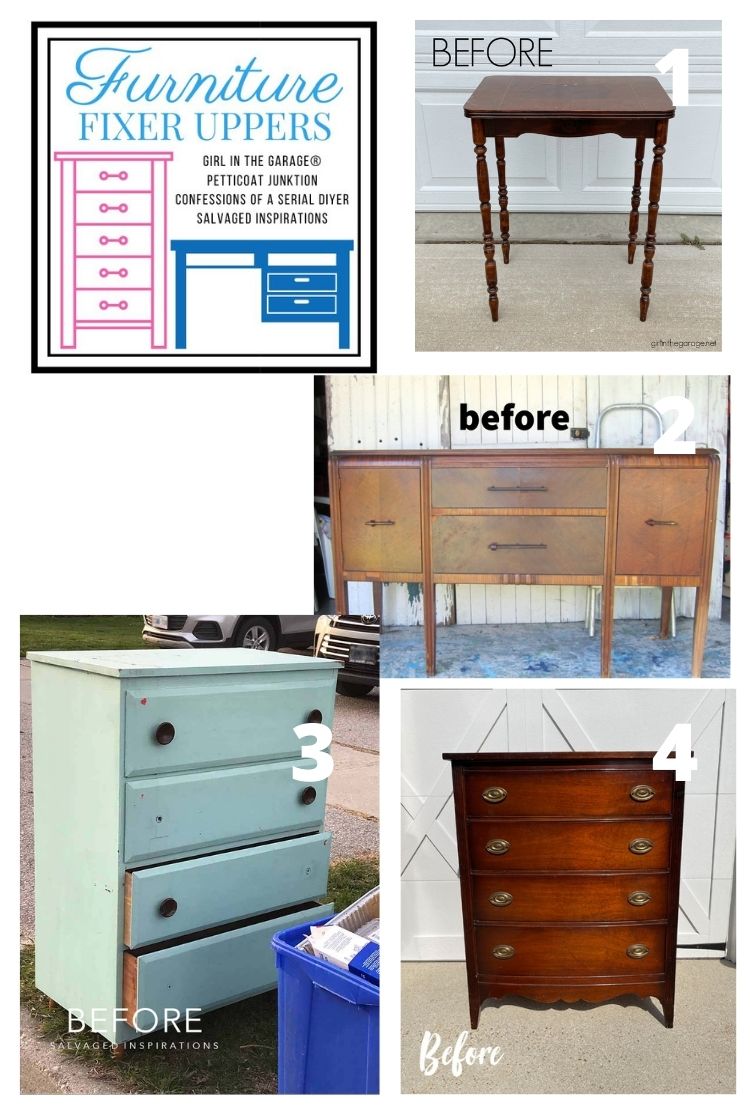
1. GIRL IN THE GARAGE
2. PETTICOAT JUNKTION
3. SALVAGED INSPIRATIONS (HAPPY YOU’RE HERE!)
4. CONFESSIONS OF A SERIAL DIYER
Here’s another look at this faux linen dresser’s before and after. I hope it’s inspired you and given you some new ideas for your projects!
LET ME KNOW WHAT YOU THINK OF THIS FAUX LINEN PAINT TECHNIQUE. WOULD YOU TRY IT? FEEL FREE TO ASK ANY QUESTIONS YOU MAY HAVE… I ALWAYS LOVE HEARING FROM YOU. IT MAKES MY DAY! 🙂
Happy furniture painting friends!
Denise x
RELATED POSTS::
REPURPOSED DESK 2 NIGHTSTANDS
CONSOLE TABLE MAKEOVER
HOW TO PAINT MCM FURNITURE
DIY BOHO NIGHTSTANDS
15 WAYS TO UPDATE YOUR FURNITURE
PIN AND SHARE!

I’m revisiting this post for how-to. Could you please clarify for me, (slow learner here) how the lighter under shade is revealed thru the brush strokes. You primed with white BIN Shellac, then painted in French linen, so is it the white primer that is revealed thru the brush strokes? If no BIN primer is required, will it suffice to paint a light base color, then apply darker color with open time allowing for brush strokes for same effect? Thanks in advance.
Hi my friend… EXACTLY! If you don’t need a primer, any light color would work for the base. 🙂
I LOVE how this piece turned out. You are such an artist!
Thanks so much Teri! XOXO
What a difference! It’s so BEAUTIFUL now! <3
Thank you Donna! It was a really fun makeover!
Just stunning!
Thank you Sami!
Denise, this turned out so pretty! And that’s such a funny story about the penny… I had no idea you didn’t use them anymore in Canada!
It was funny 😄… and thanks so much, Jen! Have a fabulous long weekend!
I love this look! I have a night stand that I wasn’t sure what I wanted to do with it and I also just recently purchased French linen so this is perfect! I always love seeing your gorgeous finished products! Thank you for all your inspiration!! ( I have an older brush that you use to put on wallpaper, I think that its suppose to do similar texture?) Also the night stand is MDF, maybe I should use slick stick first or do you think regular primer would be ok? Thanks again!! 💕Rita
Thanks! And if it’s a slick surface, Slick Stick works amazing. Also the wallpaper brush would probably work really nicely. Since you have some ‘play time’ with the wet paint, you could give it a go to see if it creates a texture you like.
I thought I had left a comment yesterday but I guess it never posted. The natural grass cloth look on this faux finish is amazing Denise. It turned out fabulous!! I’m sure everyone agrees it was well worth all the extra effort you put into it.
Aw, thanks so much Niki! It was a really fun technique to play around with!
Your efforts were worthwhile! It turned out GORGEOUS. Curious- why the legs? It looks like it was made with a kickplate bottom.
I especially appreciate the guidance on sanding – so many blog posts skim over the goal – a smooth surface, ready to prime. Getting down to bare wood is not necessary!
The extra effort with realigning the drawers… 😍 (Heart eyes smiley)
And your respect for others’ attempts over the years to spruce this piece up. Lots of love!
And… I just noticed the legs were original. Beautiful work!
Yes, the legs are original to the piece. I painted them in the French Linen and then painted the gold caps on them with gilding wax.
Thanks for this Nicole! And yes, I left the legs as is. 🙂
Just incredible! Love the faux linen look.
YAY, thanks Cecilia! XOXO
It’s really pretty. I must try the brush technique! Looking forward to the video.
Thanks Lizzy! You’d have a lot if fun with it and yes, video will be published this Saturday! XOXO
Denise,
I’ve followed you for a few years now and have been inspired by you to rehab several pieces of furniture. Thanks for the amazing techniques. I love the linen look!
Thanks so much Sharon!
Looks great! Love how you outline your complete process! Always so helpful.
Lisa
Thanks Lisa and so happy you’re finding these tutorials helpful! xo
How cool! I will be trying the technique on my next piece….thanks!
Thanks and I’d love to hear how it works out for you Laura!
It is so sophisticated and refined now…like it was a little girl who grew up lol! And funny about the penny!! XOXO
lol… YES, I love this! Thanks Christy!
I love this! You did a fantastic job!!
Thank you Lori! 🙂
I like the linen look, it’s almost like grass cloth. Anything that brings a touch of nature, real or faux is always refreshing to me. Great job Denise.
Yes, it is similar to grasscloth. A more delicate version, I’d say! Thanks
I love this color – such a nice neutral. The brushed brass hardware, and gold tipped feet add the perfect amount of up scale detail. 🙂
The linen brushed effect adds such a beautiful softening texture !! Such an amazing transformation indeed.
Thanks for sharing ! I look forward to your posts every week.
I can’t wait to watch your video. Sooo helpful.
Thanks, p
Thanks P! I’ll have the Youtube Video up for you this Saturday.💕
Denise, Once again, a little simple dresser screaming, “Make me pretty again” and you did it. You are quite the inspiration.
Thank you!
Thanks so much! 🙂
Hey Denise such a gorgeous technique! So beautiful and so smart of you figuring out leaving the broom handle on! Can’t wait to see the video. I’ve never tried Flotrol. Since it eliminates brush and roller marks, is there a downside with using it on all painted furniture projects other than longer dry time?
There’s no downside to using Flotrol as far as I can tell. I’ve used it to eliminate brush strokes on a solid color paint finish and it works amazing. I always keep a bottle in my painting arsenal. 🙂
Oh I love love it! I have a dresser that I will try this technique on soon! Thanks for the inspiration as always!
So glad you love it Pam! If you give it a go I’d love to hear how it works out for you.
Well, here’s proof that you CAN make a silk purse out of a sow’s ear! This is gorgeous, Denise. Love your linen finish!
Thanks, it was really fun to try something different! Have a super day Marcia! XOXO
Hi Denise. I love how this dresser turned out. It looks so upscale. I also love how respectful you are of other people’s efforts at painting furniture. You are a true gem of a lady.
Awww, thanks Monique! You’re super sweet!🤗