 Hi guys, thanks for all your well wishes. The flu has left the building and I’m feeling much better. For those of you who wrote in saying you were sick, I hope you’re taking good care of yourself and feeling better too! x
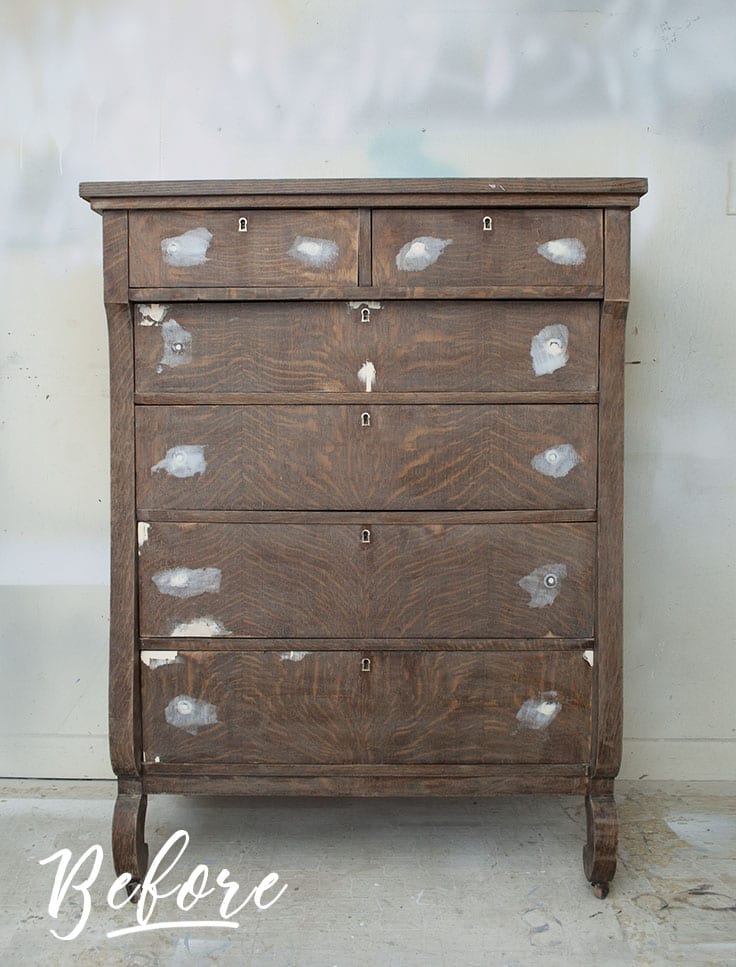
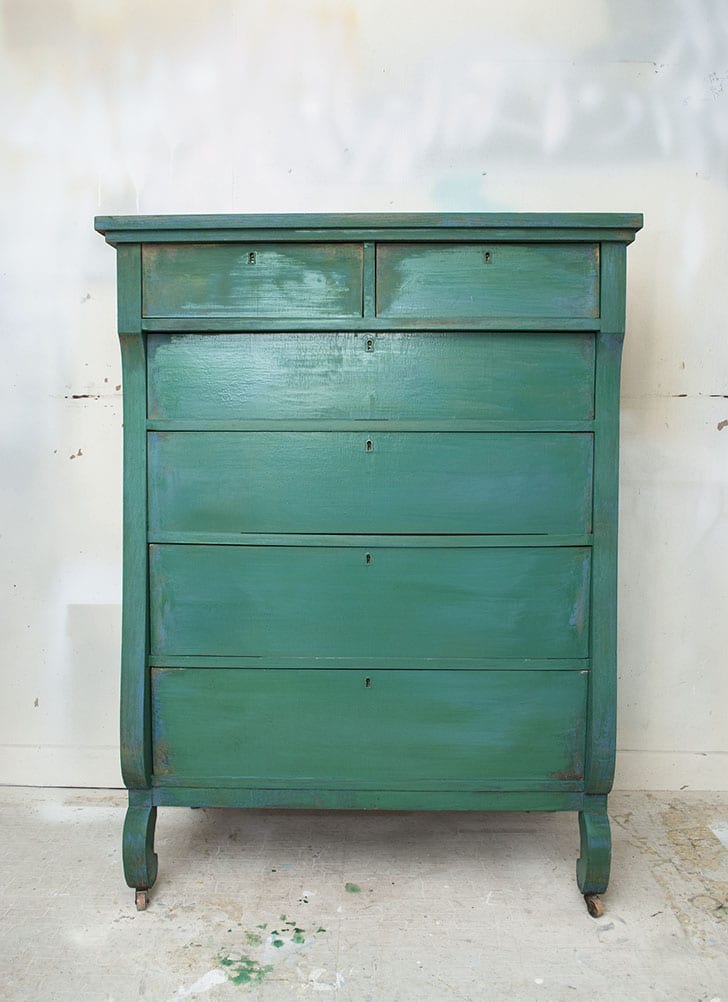
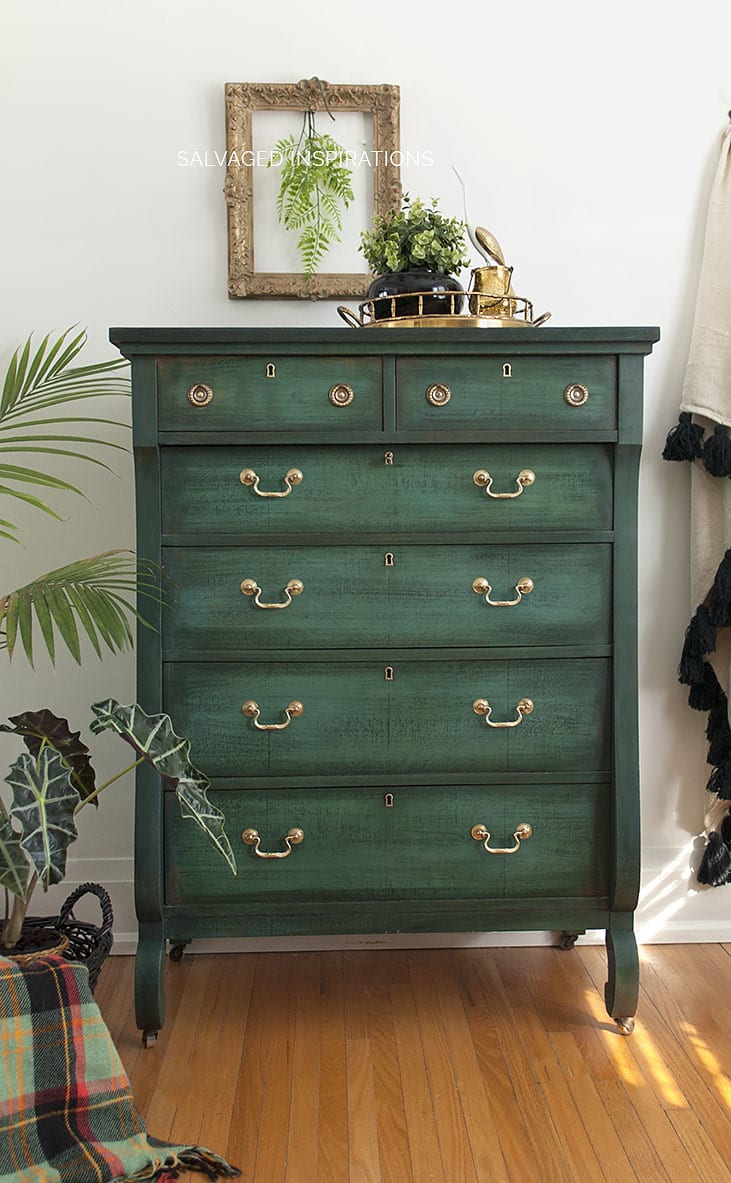
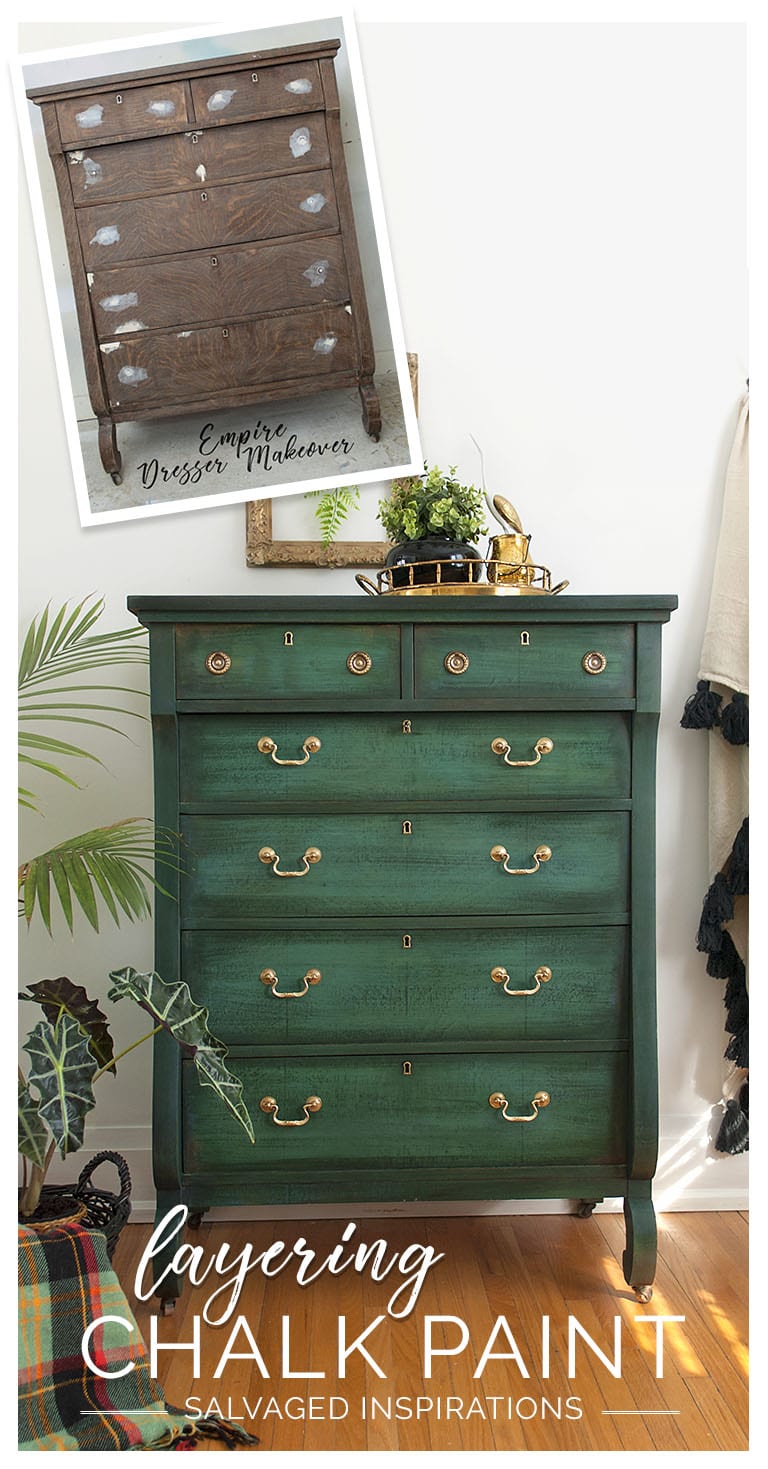
This piece was a real treat to work on because I don’t come across empire dressers too often. I was feeling adventurous and tried a new layering technique that involves painting a trio of colors in Annie Sloan Chalk Paint using a brush, a spray water bottle, and some black wax. I recently saw Debi from Debi’s Design Diary (I’ll include a link below) using a similar technique to create a vibrant piece of furniture. I used the simplified version of her technique on this empire.
 THIS POST CONTAINS AFFILIATE LINKS TO PRODUCTS USED. YOU CAN SEE MY FULL DISCLOSURE HERE.
For all the years I’ve been painting furniture, I still find layering paint to be a little intimidating. The more colors – the more intimidating! What colors should I use? What paint technique will be best? How should I blend the colors? What top coat should I use? There are so many different methods of layering chalk paint so I stuck with the bare basics and here are the steps I took to achieve this look.
SOURCE LIST::
- Empire Dresser ( Salvaged | Estate Sale – kind of… you can read more here)
- Paint Brush
- Water, TSP and Scrub Brush
- Brasso & Brass Hardware ( Salvaged from another old dresser)
- Spray Bottle
- Sand Paper & Tack Cloth
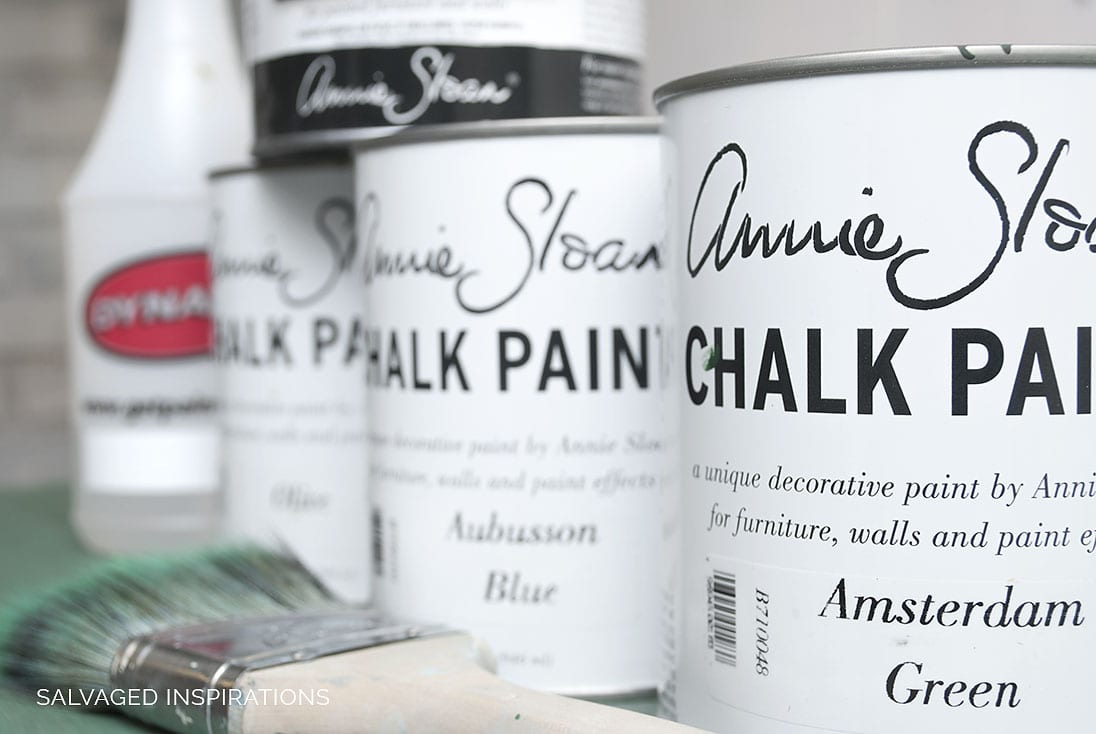
- Annie Sloan’s Olive, Aubusson Blue & Amsterdam Green
- Annie Sloan’s Black Wax
HOW TO – LAYERING CHALK PAINT
I should warn you, it gets a whole lot ugly before it starts looking good.
:: I started by cleaning the entire piece with water, TSP, and a scrub brush.
:: Then I patched and fixed all the missing veneer and old hardware with Bondo and sanded the Bondo smooth.
:: I gave the rest of the dresser a light sanding with 180 grit and then wiped away all the dust with a tack cloth.
Now for the fun… and the ugly…
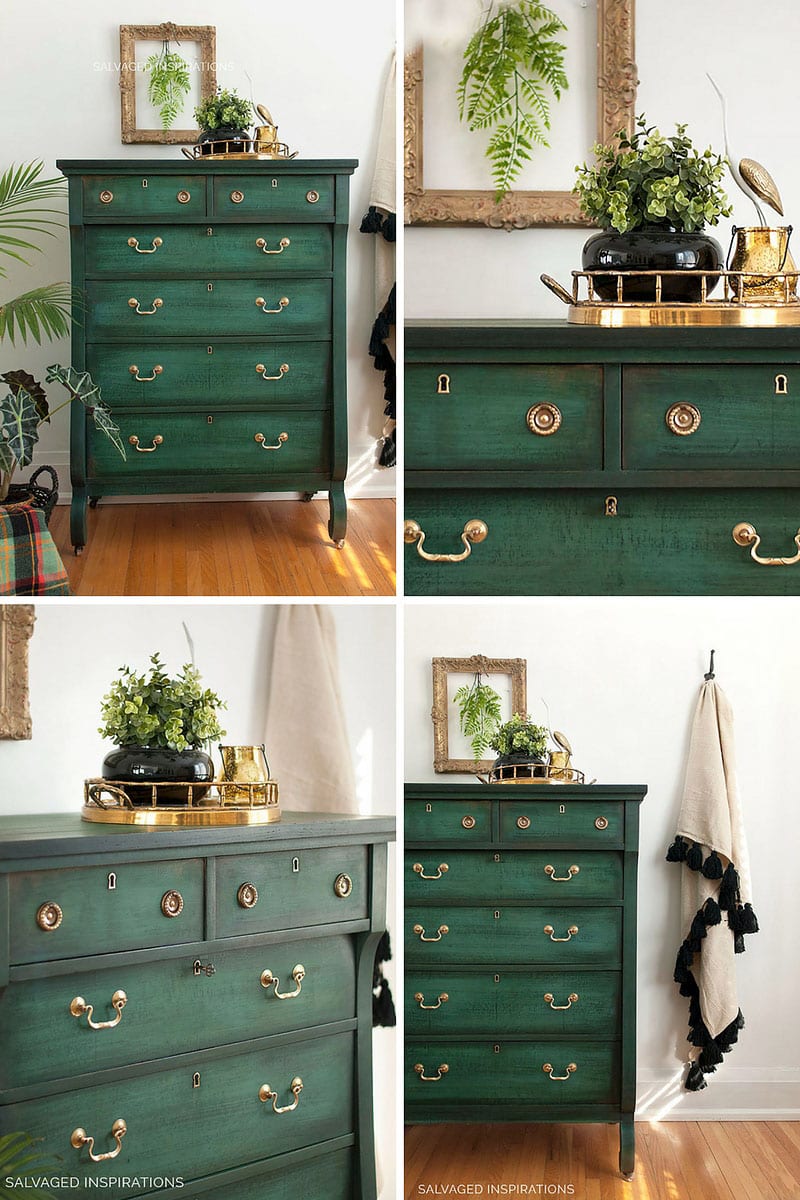
:: I chose my colors carefully. I wanted this empire dresser to have depth and rich-blended-jewel-tones while looking old-world-distressed.
Color #1 Annie Sloan’s Olive
I applied AS Olive in a random dry brush technique. Heavy in some areas, light and feathery in others.

Color #2 Annie Sloan’s Aubusson Blue
I layered on the blue with exactly the same brush technique as the first coat in Olive. With both these colors painted on the dresser, you can see there are some heavy areas, light areas and even a few areas where the natural wood is still peeking through.
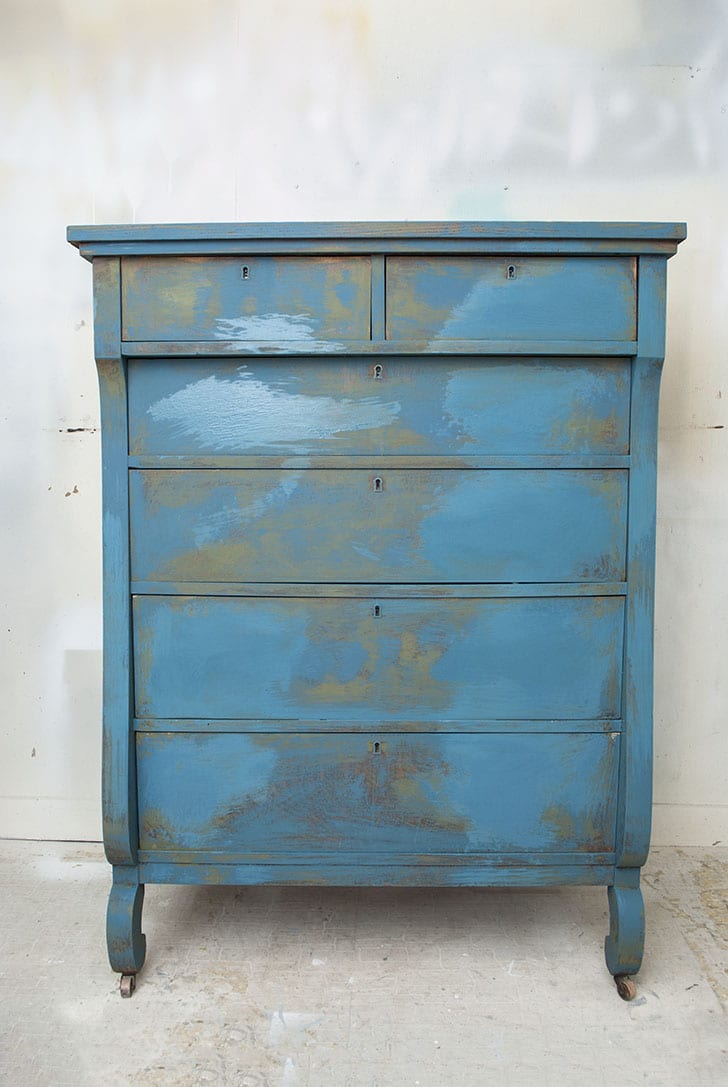
Color #3 Annie Sloan Amsterdam Green
The green was brushed on liberally. Then I took my spray bottle filled with room temperature tap water and sprayed the wet paint with the water. I let it sit for about 30-60 seconds before I took my paint brush and blended it into the Olive and Aubusson Blue leaving little areas (like around the corners of the drawers) with the first two colors revealed. There’s even a little wood left revealed too.
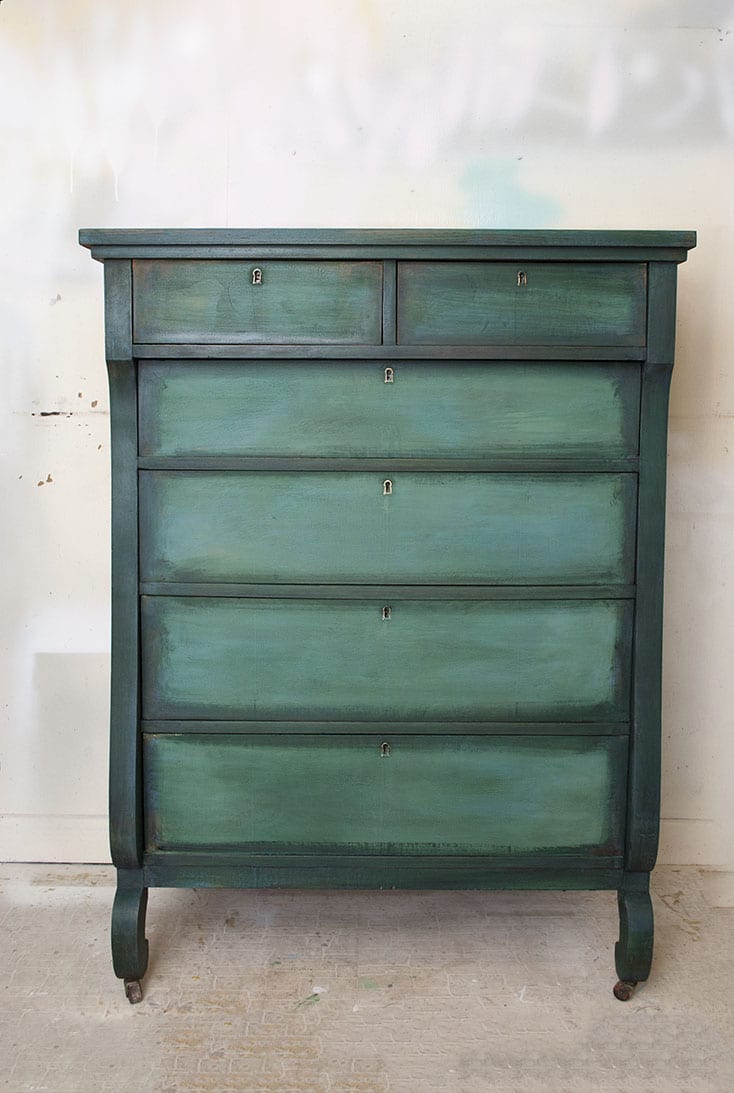
:: Each layer of paint was left to dry for about two hours before applying the next color and I only sanded the very last coat before applying wax.
:: The AS Black Wax and applied generously around the edges and then I lightly brushed it into towards the center. The brushed wax is the same technique I used on this Weathered Wood Dresser here.
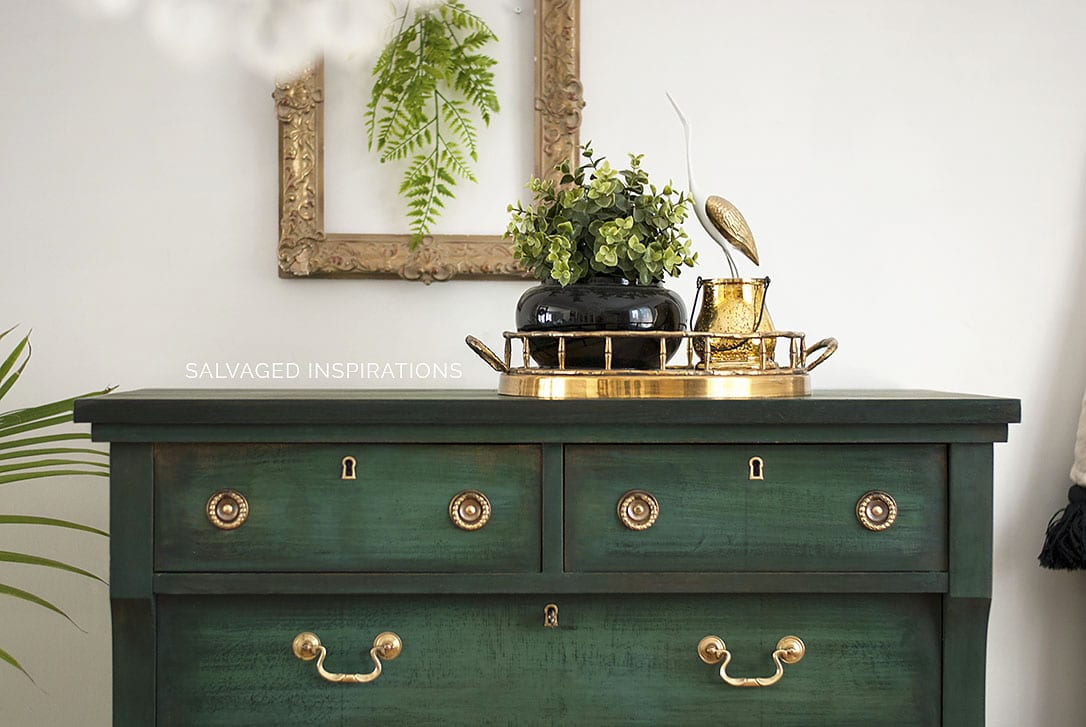
:: The finishing touch – these brass handles I salvaged from another old dresser. I keep ALL my old hardware. A little Brasso or natural cleaning and they can look brand new.
I really like this old world distressed look and will be trying it with different color combos in the future. Actually, I have an old vanity in my inventory that I might try this technique on.

Benefits of Layering Chalk Paint
Some benefits when layering chalk paint is very little paint is needed and your brush strokes don’t need to be precise. Also, if your piece of furniture has imperfections like this empire dresser did, they are easily hidden with this technique.


Oh, and before I sign off, thank you so much to all of you that took the 2018 Reader’s Survey! Your comments are amazing and I’m loving all your feedback. I’m going to keep the survey open for another week before I draw a name for the $100 Amazon Gift Card so if you haven’t taken it yet, it only takes a few minutes and is totally anonymous. I’d really appreciate your input. My goal is to keep creating posts that inspire you to tackle that DIY project and of course posts you enjoy. 🙂
2018 READER’S SURVEY LINK HERE!
Debi’s Design Diary Layering Technique
I’D LOVE TO HEAR IF YOU’VE EVER TRIED THIS BEFORE? IF YOU HAVE ANY COLOR COMBO TIPS YOU’D LIKE SHARE OR HAVE ANY QUESTIONS, FEEL FREE TO CHIME IN… I ALWAYS LOVE HEARING FROM YOU!
Thanks and have an inspiring day my friends!
Denise x

I love the look of this beauty! I’m in the middle of doing this tenique for the first time using AS Provence, Florence and Olive, who knows what else I will add in there, you really don’t know what you’re going to do until you get into the project! Thank you for the inspiration! I love your work!
Exactly…go with the flow and have fun! The furniture tends to lead in the direction it wants to take and then you’re kind of along for the ride, right?! 🙂
Hi there, I LOVE this, I’ve got Amsterdam green and will purchase the other colours and try to recreate. However, quick question as I’m new to blending. Do you not need to apply clear wax on the rest of the cheat before the black wax for protection? if I do apply clear will it have a different effect?
Thanks 🙂 Just discovered your blog on Pinterest and it’s great.
Hi Natalie and welcome! 🙂 The black wax is sufficient protection and just applied a little heavier and more blended around the edges. So no, a clear wax is not required for protection.
I just LOVE this! GORGEOUS and FUN!
Thank you so much JP 🙂
Hi. Love this piece. One quick question. When you paint do you leave the drawers in or remove and paint them separately. I’ve always removed and painted the front lip on the inside at least. But if there is no need that would save time. Thanks.
Hi Kim! It’s personal preference and I’ve done both. With this particular dresser, I left the drawers in while I was painting. There was a little paint on the lip/inside and to give it a really clean look, I took my sander and sanded it off. I don’t think there’s a right or wrong answer – just depends on the piece. 🙂
Gracias por explicarlo de una manera tan sencilla . tratare de hacerlo ya que tengo una cómoda antigua era de mi suegra que mi hijo la quiso para su hogar y me pidió que la pintara es la primera vez que haría algo tan importante , no solo para que quede bien y luzca en su casa como por el sentimiento , los recuerdos de saber que ella queria mucho ese mueble . gracias .
¡Me alegra que hayas encontrado el tutorial útil, Rita! ¡Es tan lindo que su hijo quiere mantener y actualizar a su modisto de suegra! Buena suerte y diviertete. 🙂
thank you looks great’.
i try it on on my renovo table.
try using red hot colores
Hi, I am just seeing this for the first time. WOW, I am amazed! This piece is stunning! I’ve scrolled your blog here and I must say, you are one talented lady!
Continue feeling better.
Be Blessed, Hope
Thank you so much Hope! And so happy you’ve found the SI Blog… I hope you visit again soon. Have a beautiful day. x
This dresser is stunning! I’m intrigued by the dry brushing of the wax and have a couple questions. Wouldn’t the areas that didn’t get covered by the wax streaks get dirty? How would you clean it cause it’s unprotected chalk paint? Wouldn’t the chalk paint in those areas wash off? Also I thought that wax always had to be wiped or polished after it’s applied.
Would you please post a video of your technique, as I can see from the comments there are a lot of us that are in love with this beauty!!
Thank you, Karen! This entire dresser is covered/protected with wax. Heavier around the edges and lighter brushed (to create the brushed look) on the drawer/top etc. Once the wax has dried/cured, it can be wiped down just like any other waxed piece can. 🙂
Where do you get your hardware? Beautiful makeover and this emerald green is big this season esp in upholstery paired with florals. Brass is making a comeback too…You are spot on trend!
Thank you, Carrie! I save ALL my original hardware from the pieces I have in inventory and when I buy new, it’s usually from Hobby Lobby or Lee Valley.
I love this so much and want to try. I feel like I need clarification on the drying time. You said you let each color dry for 2 hours before applying the next color? Then spray with the water?
Hi Lynne.. thank you! I sprayed with water right after I brushed on the paint – so while the paint is still wet. Then brushed it in – heavier in some areas – light in others. Then let dry for 2 hours. Then repeat with the next layer. 🙂
aha! that makes more sense ! thank you for the clarification!
Oh, good… pleasure 🙂
That is just gorgeous! I’m going to try this on an antique secretary I just got. Thank you for sharing your technique!
I have a question about how you did the top, sides and horizontal & vertical parts of the dresser.. Did those parts get more of the black wax put on them and rubbed out? Since the drawer fronts look lighter in the center field, I was wondering what the top & side looked I really love this piece!
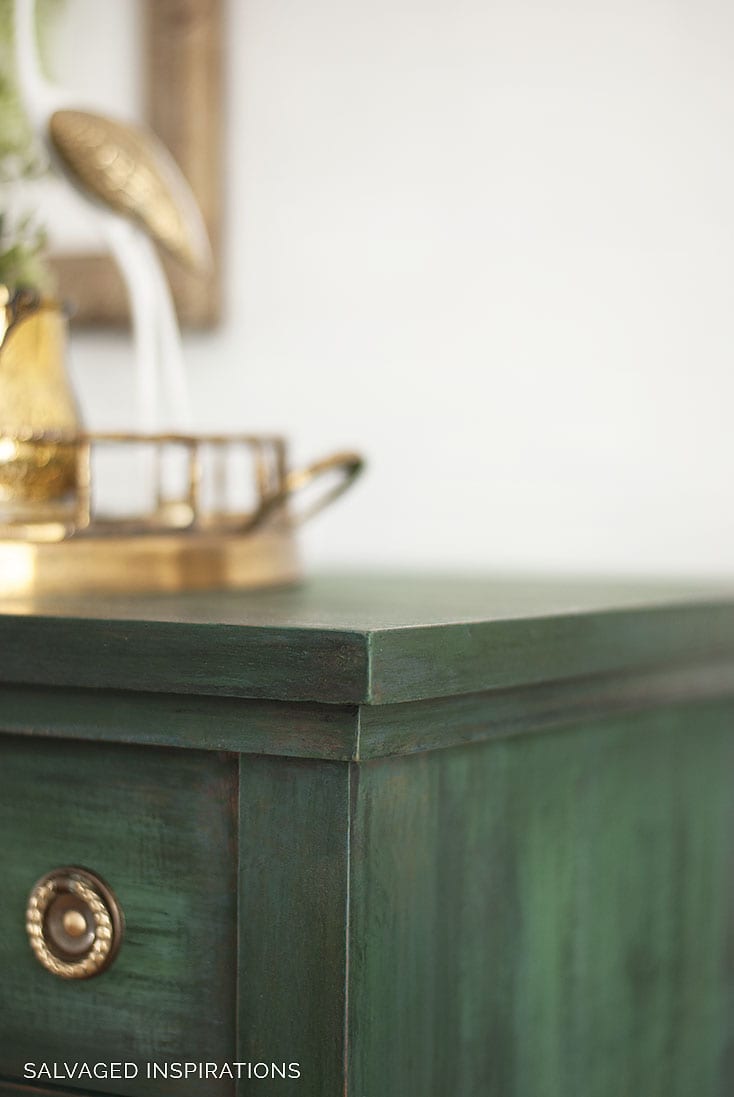
The entire empire dresser was top coated/waxed exactly the same. The top and sides have the exact same finishing technique as the drawers. 🙂
I love those antique secretary desks – I think this type of technique will look gorgeous!
Have you ever used DARK brown Butchers Wax from Lowes? I just bought some because it was half as expensive as the furniture distressing wax that they sell there.
I love this example because I do like my turquoise green paint color but at the same time it is so garish it scares me. I understand completely when you say you are afraid of paint layering! It is because you won’t know the outcome.
I saw on one site how someone did over a small jewelry box. That should not be too scary because it is so small of a project for experimenting on. Also a picture frame would be a small experiment size to try out if scared of mixing colors!
Starting on smaller projects is a brilliant idea. And no, I’ve never used Butchers Wax from Lowes. I’d love to hear how it all turns out for you.!
LOVE LOVE LOVE THIS! What was the technique for the black wax? I read the link for the weathered piece but it briefly talkabout the brown being brushed on unless I missed something . Can you tell me more?
Hi Tina! Yes, that’s exactly right. I applied the dark wax fully around the edges and then dry brushed the wax through the middle of the drawers with long brush strokes. It’s the same technique you would use if you were dry brushing on paint. Don’t apply too much wax to the bristles of your waxing brush, and then lightly brush the bristles from one end of the drawer to the other leaving brush strokes or streaks of black wax. The wax that was applied fully around the edges gets rubbed in, but the dry brushed wax does not. Hope this helps. 🙂
This is very nice.
I am wanting to do my kitchen cabinets like this, except I want to have wood, and a hunter green.
Any suggestions? Have you done something like these colors. Thank you for your time.
The most beautiful green dresser I’ve seen by far. Absolutely love this! Pinning and saving to re-create the look.
Thanks for the share Vicki! x
Hi! That gorgeous green really caught my eye so I have to ask, did it become a deeper shade of green after you added the black wax? It seems a more perfect hue in the completed pictures. I have a couple of beautiful dressers I would try this on if I knew for sure it’s a deeper emerald hue. It’s gorgeous and you did a fabulous job!
Thank you Annie! And yes, the green changes color once it’s sanded, and again after it’s wiped down and the black wax is applied. It turns a much more deep emerald. 🙂
I love how you transformed that dresser..Do you use something to seal it after you’ve painted it? I have a dresser to refinish too,so I’m going to try your technical. Wish me luck!
Hi Lori! I sealed this dresser with the black wax. It’s applied heavy around the edges and then dry brushed towards the middle. Wishing you luck and fun on your piece. I’d love to hear how it turns out for you.
I love the green, think it is amazing. My question is about the wax. You said you put black heavy around edges and brushed it over lightly toward the center…I wonder how much was put on the center as my little experience w/black wax is that it sure grabs (I am new to this). Wondering how you got enough in the center to protect the piece w/out it looking too dark? Thanks.
Hi Paula! If you’re new to this, a better way to go about it might be to apply a layer of clear wax first. I prefer the dry brush technique with this look, but I totally get it can be scary to apply black wax directly onto a newly painted piece… because it does grab for sure!
How did you get enough in the center to achieve good protection, especially on the top? Thank you.
Hi Paula! There is wax covering all areas – just heavier in some areas and lighter in others. If you are worried about protection, you could always clear wax first and then brush on the dark wax.
Absolutely stunning! Intried a layering projectcthis week…FAIL…inthink i see some things indid wrong…Thanks!
Thanks Monica!!! 🙂 And I’d love to hear how your ‘take-two’ works out for you!
This is one of your best tutorials yet! Its comforting to see a pro like you be intimidated by the layering and all that it encompasses, because I as a newbie sure am !
Beautiful choice of Annie’s colors, I think she would be very happy with this piece, gorgeous!!
Thanks Melanie, I’m so happy you like the piece and the tutorial! 🙂 🙂 🙂
I am always so inspired and impressed by your work! Being a ‘green’ girl, this piece really spoke to me. I am curious though, did you do anything to the inside of the drawers? That’s the part that always gets me, that I can make the outside look good, but the inside and outside of the drawers need so much attention. It turns an ;afternoon project into a week or more…….
You seem to get some great pieces to start with as well!! Keep it up!!!
Hi Mary! The inside of the drawers were left as-is on this empire. They wood on the inside was in good condition so I didn’t feel a need to paint them or even line them.
Absolutely beautiful! Thank you for sharing a simplified version of layering paint – some are too complicated! I definitely am going to give this a try! I have a question about Bondo. How do you get it to the best texture for spreading and what do you find best for spreading it?
Many thanks, Denise!
Lee
Hi Lee! I’m so glad this has inspired you to give it a try!!! The Bondo I use is already the right consistency right out of the can. Having said this, once I add the hardener to the Bondo, I only have a few minutes before the smooth-spreadable-consistency starts to harden up so I mix in small batches – no more than golf ball size. And for spreading Bondo, I find a flexible putty knife works the very best. Plastic putty knifes work well too. I hope this helps and I’d love to hear how this layering technique works for you if you decide to give it a try. 🙂
Wow, this is just stunning!! A masterpiece. Question: did you not use clear wax before applying the dark wax? I’m not a pro like you…I would be afraid that I would put too much dark on/it would be uneven and not be able to remove/modify it, as I could with clear underneath. Can you speak to that? Thanks!
Thanks so much Jeannie! No, I did not use clear wax before applying the black wax but you certainly could if you feel more comfortable doing it that way. The clear wax does help erase any ‘accidents’ with the dark wax for sure. 🙂
I am not a green fan but this looks amazing, fun the handles give it just the right pop! Great job
Thank you Allison! x
Wonderful! love your makeovers. What I did notice was the grain on the drawer fronts. How do you decide to paint or stain? I have few pieces that were my grandmothers. I had a fire at my house and they were covered with soot. hopefully I will get my behind in gear and do something with them. Thanks for your inspiring work!
Hi Denise! The condition of the piece helps me make my decision on whether to paint or stain. In the case of this empire, although I didn’t show the top or sides, this dresser required a fair amount of patching with Bondo – so paint was an easy choice. Have fun restyling your grandmother’s pieces. xo
I love this new rich color, and the brass is a perfect combination.
Thanks, Mary! The brass took a little effort to clean (it was salvaged off another old dresser and in pretty rough shape) but I’m really happy with how it looks too. 🙂
Denise,
You are so very talented. This is an amazing makeover and i think my favorite to date. I have an old dresser/sideboard that has been painted numerous times that was given to me and I want to make it over and start using it. I plan on reading through you tutorial very carefully. Wish me luck!
Thanks so much and I’m wishing you luck Lisa! And I hope you have some fun with your dresser/sideboard, they are great pieces to work on!
Denise
I absolutely love this and I see what you mean about getting a little scary ! I never really know how far to distress something as I always want to ‘ tidy it up ‘……… do you have anything on decoupage as that has been nagging me lately and I have seen some really good old furniture finished off in that way………thanks
Hi Sue! I have a couple of tutorials on decoupage. This napkin decoupaged desk and this french tissue covered dresser. I hope they help! 🙂
WOW!!!! That dresser is beautiful. You really did a great job. You’re brave.
Thank you Sally! XO
Goodness, who would think that green could look this great. Love it! It’s beautiful! Great job!!!
Thank you Debra… and my sister said almost the exact same thing! She’s not that ‘into’ green but she gave me the thumbs up on this one. 🙂
Love it! Beautiful dresser, fantastic technique!
Thanks Lorin, I had fun with the layering…glad you like it. 🙂
Really not a fan of green (maybe because I grew up with so much green inside/outside/cars etc) but I have to say you aced this look. Another piece saved & beautified! Gold color hardware is perfection. Just FYI, another great cleaner for hardware is Bar Keepers Friend Cleasnser & Polish. Thanks again for your time in posting another technique.
Just googled the Bar Keepers Friend Polish. I’ll have to try it – thanks!!! It says its good for rust so maybe it’s a little more aggressive than the Brasso… perfect for hardware that’s ancient like these were. It took me a couple of hours to clean/polish these suckers lol
Love everything you do! Thanks for the chance to win. I took the survey.
Thanks so much Lisa! <3
Seriously, one of the most beautiful transformations I’ve ever seen! I have several pieces I want to paint and I think this color will be one of them. To make this the statement piece in my living room, do you think I could paint one or two other pieces in a cream? Would it be too much? Thank you for your incredible tutorial!
Thanks Paula, I’m so happy you like the piece and the tutorial… and I think Amsterdam Green + Cream would look quite beautiful. 🙂
Oh my god Denise this is absolutely GORGEOUS !!!! You are an extremely talented lady !
Thanks so much Renee! XO
You do things so superbly, Denise! Keep ’em coming! Oh and I really would love to see how you get such awesome, brightly lit, sharp photos!
Aw thanks, Kellee and I appreciate the compliment on the photography!
This is pretty awesome!!!! You are so talented and always inspire me to keep painting and experimenting! Thank you for sharing your beautiful work:)
Thank you Kari!!! I’m so glad you like it… and keep experimenting girl! 😉 🙂 🙂
Great project! Now I feel that I can confidently tackle something like this! Thank you for making it look so easy.
And yes, I took the survey.
Oh I’m so glad, I hope you give it a go at some point! 🙂 And thanks so much for taking the survey Cathy…much appreciated!
This is absolutely beautiful, Denise! I love the color combinations – looking at them separately, one would question the choices but together they are stunning. The gold hardware against the pretty greens is stunning. You do such beautiful work. Pinned
I hear ya… Ialmost questioned my color choices as I was layering them on! 😉 The process isn’t flattering but I love the end result too. Thanks so much for sharing Marie. BIG HUG! xo
GORGEOUS piece! Thanks so much for the step-by-step with photos. Seeing all the stages really helps me not give up in the middle.
Oh good! I’m glad you found the pics helpful and thanks for the kindness Dyan. XO
Just love your taste, style and technique. You inspire me and I have learned so much from you. Thanks for sharing.
Thank you Marianne!!! XO
Beyond awesome! You are the master. Thanks for sharing.
Thank you Janice… you put a big smile on my face! 😀
Love this dresser and I took the survey!
Thank you so much Angie!!!.. and glad you like the dresser! 🙂
Hi Denise. Yet another beautiful piece of furniture. I’m not usually a fan of the color green but I LOVE this dresser. It looks so rich and vibrant. Excellent job.
Thanks! Ya, I think green is one of those colors you either love or hate so thanks for the HUGE compliment! XO
Just gorgeous! I wish you did videos!!
Thanks…and maybe one day! 🙂
Beautiful!!
Thanks Nanette!
This turned out amazing, Denise!! Love how the gold pops against the green! XO
Thanks Christy! The brass took me a while to clean up but well worth it I think. 🙂 xo
I’m trying layering on a piece right now after being inspired by the Turqoise Iris and Debbi’s video. Let’s just say it hasn’t come easy for me! I’m still at it and will try not to give up. Did you use clear wax before the black wax?? Thanks Denise, your piece does not look like you were intimidated at all, and your styling gets better with every piece you do!
I’m constantly working on my styling so THANK YOU! 🙂 And no, I did not use a clear wax before applying the black wax. x
I love the finished product Denise. Great color choice, and I love the use of the dark wax to give it depth.
Thanks Julie! 🙂 And ya, that black wax works its magic for sure. 🙂
That dresser s WICKEDly Stunningly gorgeous…so emerald green,love it!
Aw, thanks, Mary. hugs. It was fun to work on even though the first few coats look pretty scary. 🙂