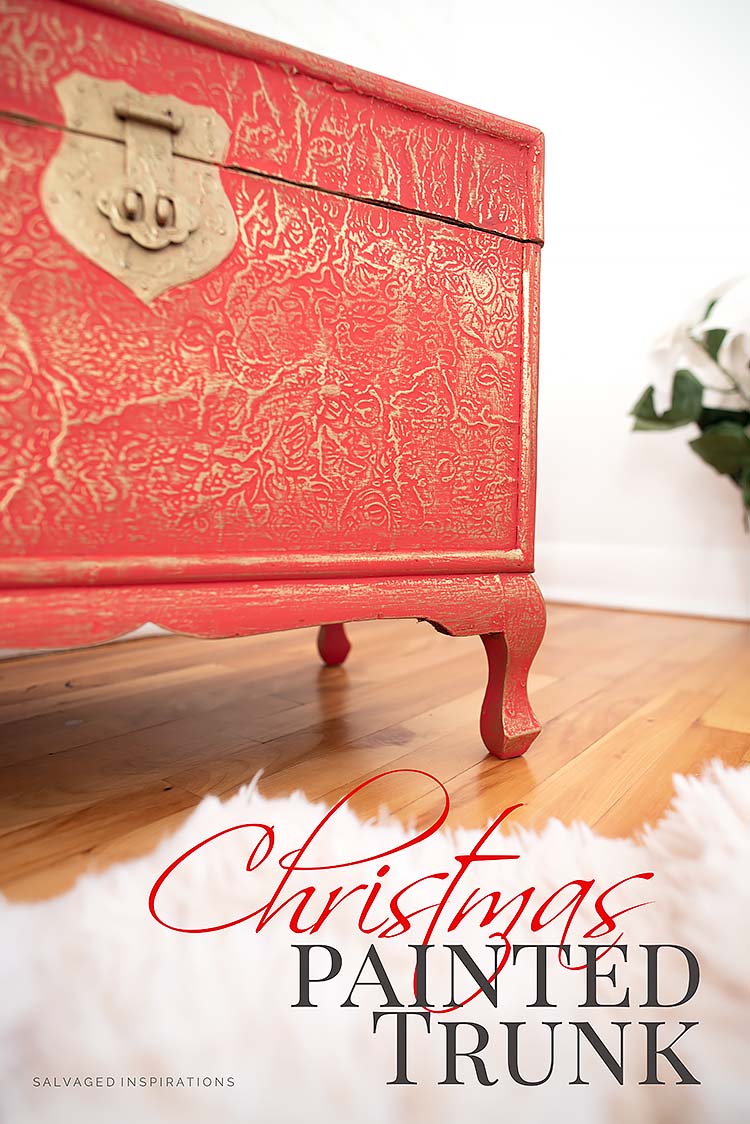
THIS CURB-SHOPPED TRUNK GETS A HOLIDAY MAKEOVER FOR TRASH TO TREASURE TUESDAY!
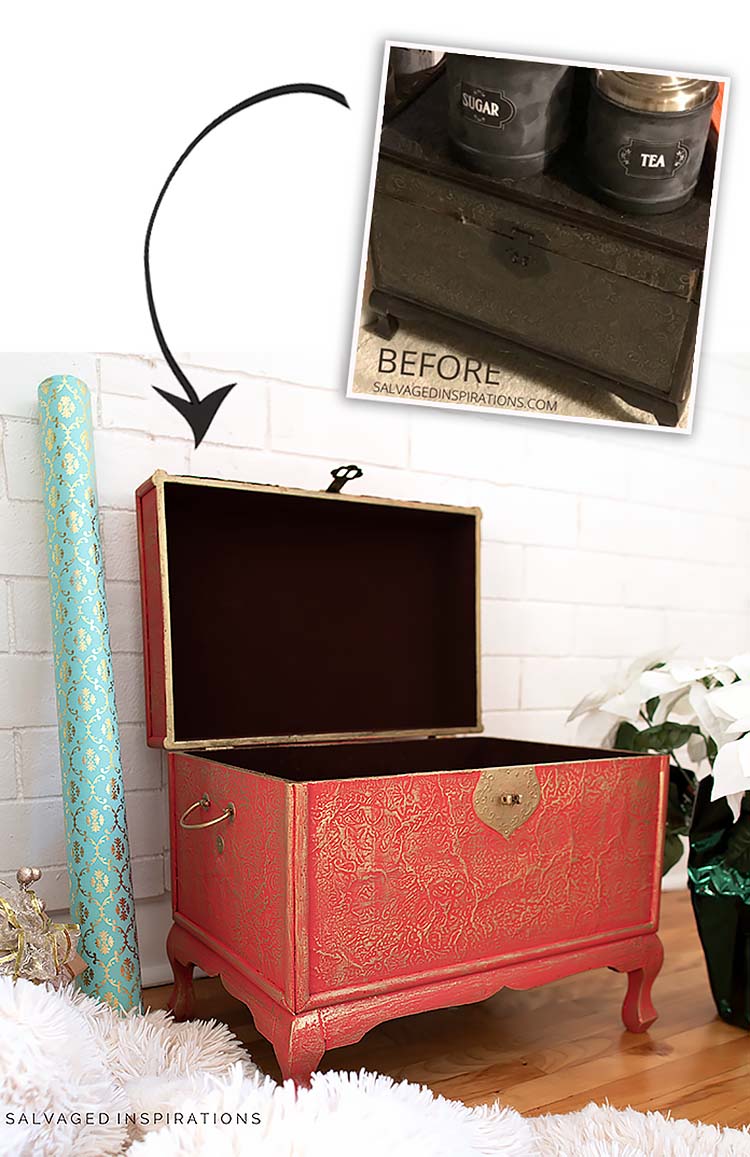
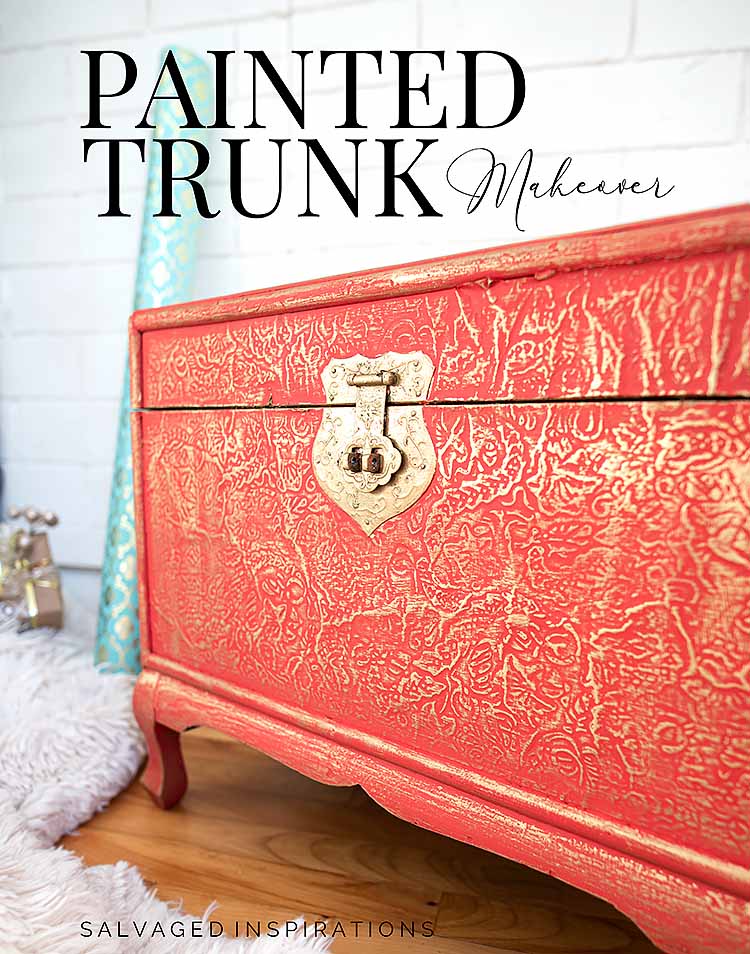 Hi, beautiful friends! It’s Trash to Treasure Tuesday and I have a holiday Curb-Shopped Painted Trunk Makeover for you today! It’s been restyled for Christmas and I can’t wait to share an EASY way to highlight in gold and the most PERFECT Holiday Red paint color! I had so much fun watching this painted trunk come to life with a gold-shimmer relief! We’re also joining my creative blogging besties and linking to their makeovers below, so be sure to check them out as well.
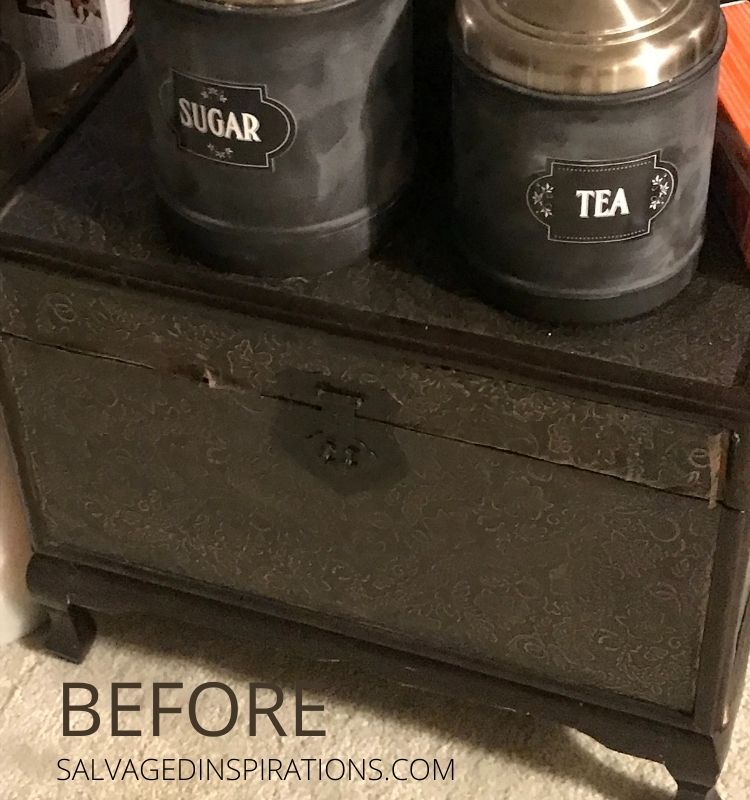
But first, here’s the curb-shopped trunk I started with. My sister and I found this one night while driving back from Oakville years ago. It’s been sitting in a storage closet collecting dust ever since.
THIS POST IS SPONSORED/CONTAINS AFFILIATE LINKS TO PRODUCTS I USE. YOU CAN SEE MY FULL DISCLOSURE HERE.
SOURCE LIST
CurbShopped Trunk – SALVAGED
Paint Brushes
Shop Towel
White Lightning
Titebond Wood Glue | Clamps
220 Sanding Sponge
Honky Tonk Chalk Mineral Paint
Gold Gilding Wax
Posh Pigments Pale Gold
Satin Clear Coat
PAINTED TRUNK MAKEOVER
A little back story on this trunk, I nearly had my hand bitten off by a family of raccoons while trying to pick this one up. Okay, maybe I’m exaggerating a touch BUT there was an entire family on the front lawn glaring at me with their masked faces. And when I got out of the car, they all started screaming at me. Raccoons are cute but scary!
Here’s the step-by-step to get this look…
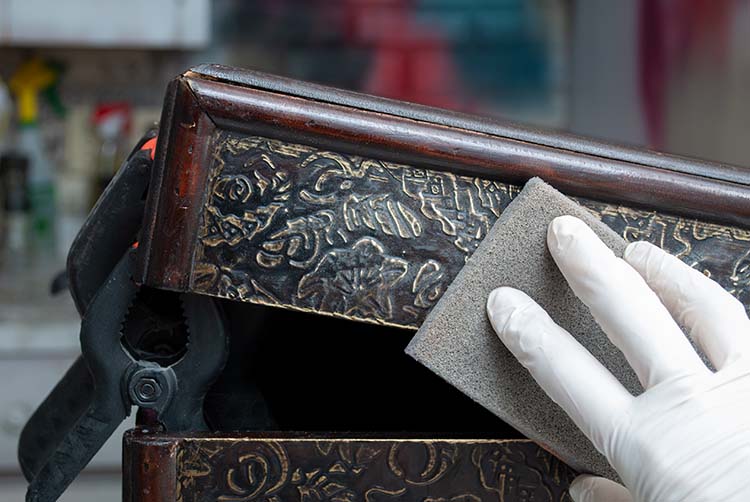
CLEAN AND SAND
This trunk was cleaned with White Lightning and then given a light scuff sanding with this sanding sponge. These sanding sponges are amazing as I’ll demo the magic it performs later in this tutorial!
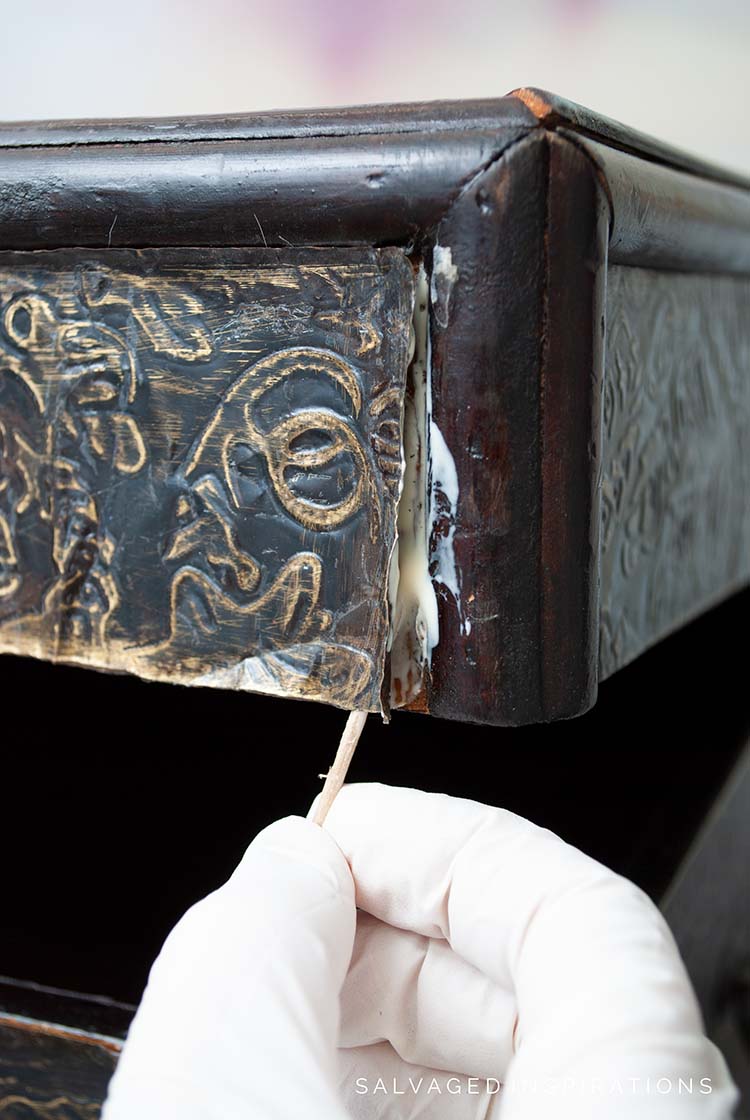
REPAIRS
The tin relief on this trunk was a little rough around the edges and peeling up in some areas. I made some simple repairs with this Titebond Wood Glue and a few of these plastic clamps.
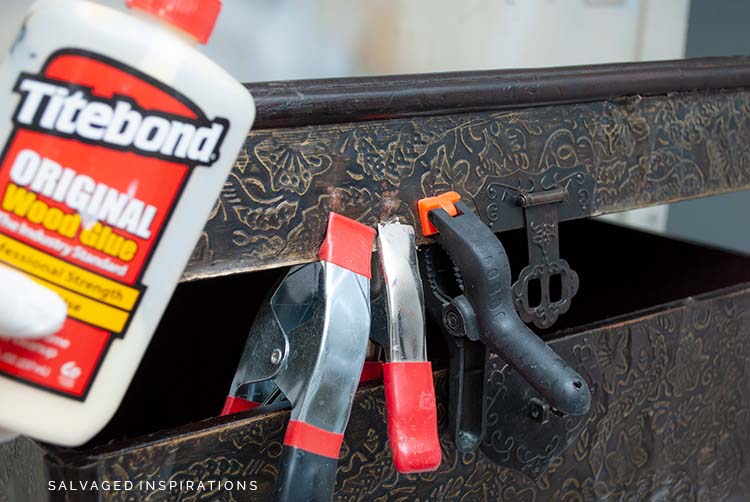
Pro Tip ~ I find using a toothpick to get under veneers or in this case the tin overlay works REALLY well for smaller projects. For larger projects, sounds a little odd, but a meat juice injector like this one here works amazing! They usually come with a few different long needle heads with holes in them that allow the glue to get injected right under the surface. If you have any odd tools of the trade, I’d love to hear about them in the comments below!
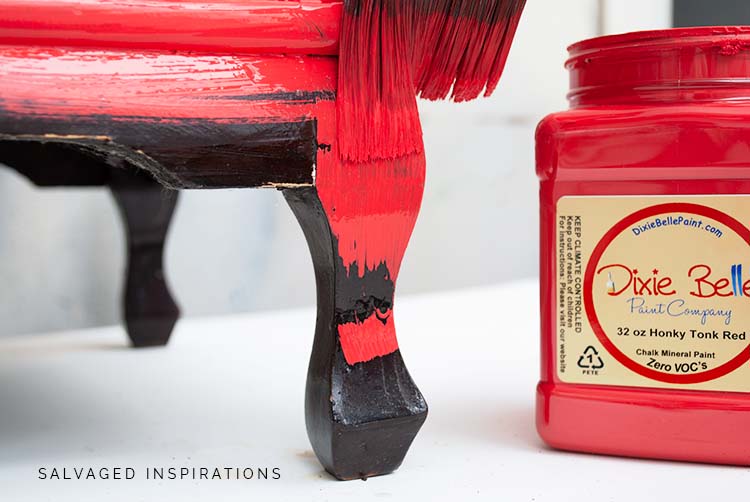
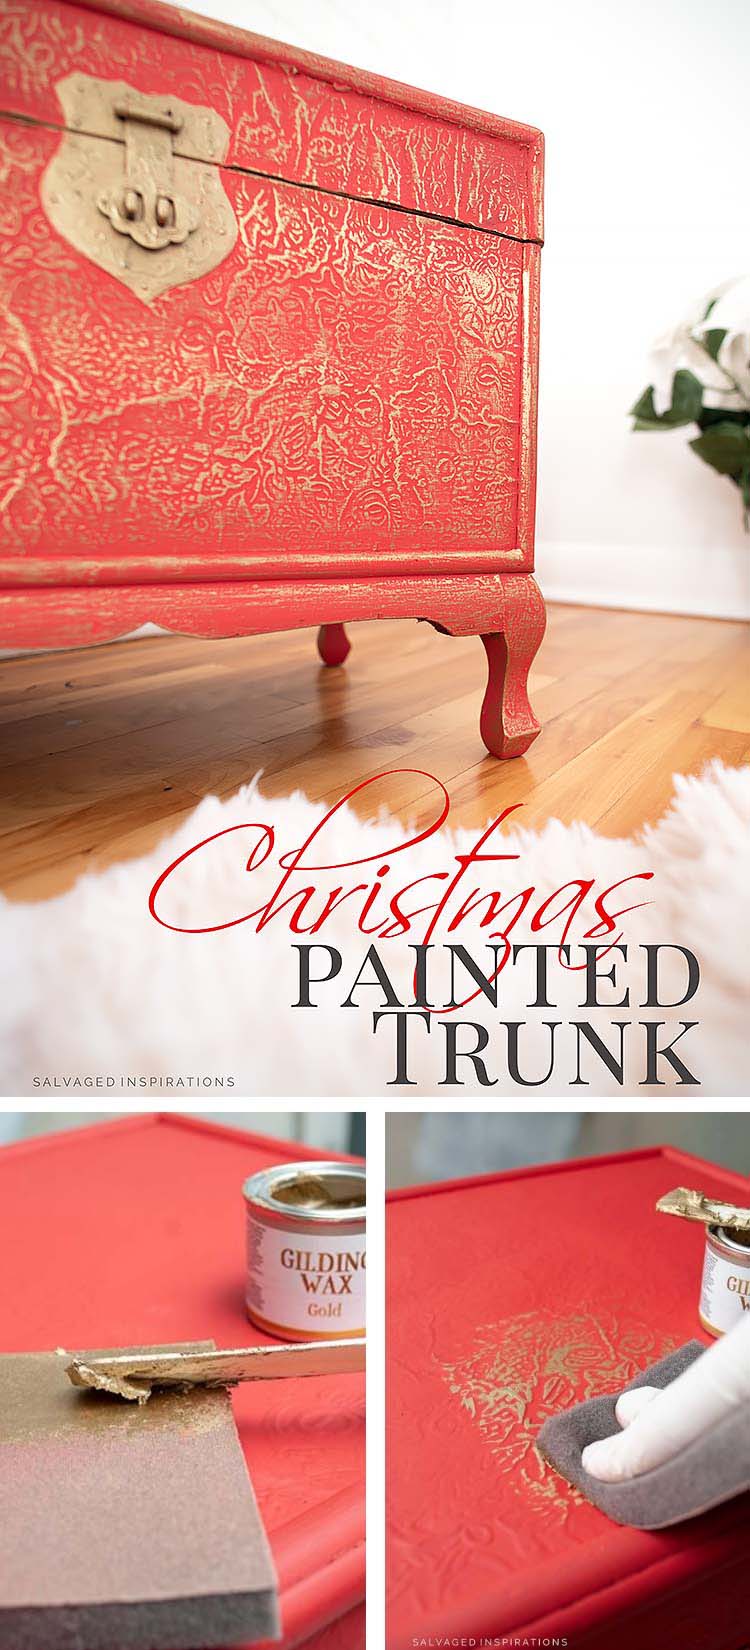
PAINT
Looking for the perfect holiday red? This is it! I chose this Honky Tonk Red which is a gorgeous vibrant red for the Christmas season. I applied two coats for full coverage.
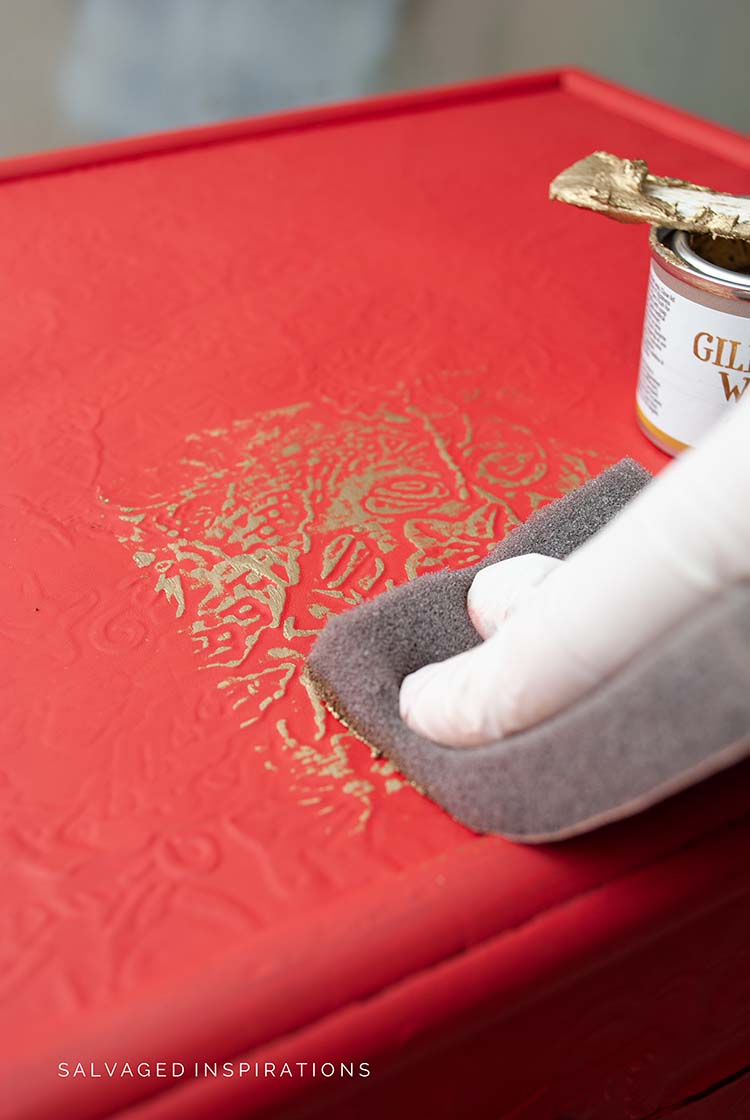
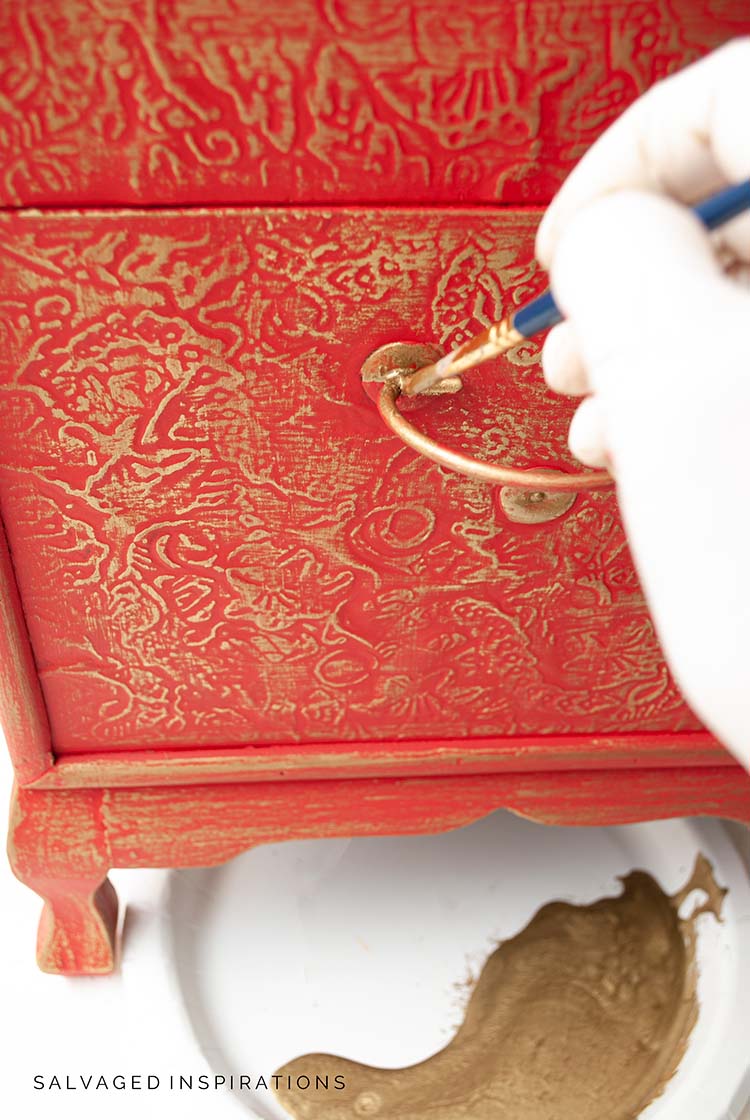
GOLD HIGHLIGHTS
Here’s where the magic happened! I applied some of this Gold Gilding Wax with a craft stick onto the sanding sponge I used earlier to scuff sand.
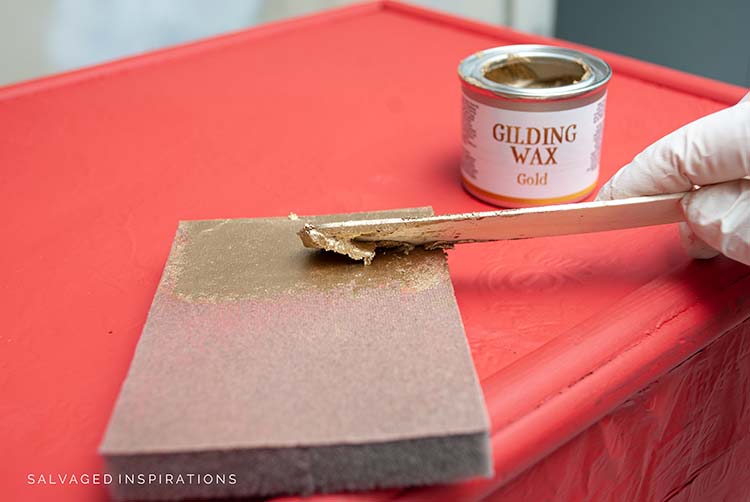
Then I ran the sanding sponge over the painted trunk to highlight all the decorative relief! I’ve never tried using a sanding sponge before but it worked like magic!!!
PAINTING HARDWARE
For the final details, I used this Gold Posh Pigment to paint all the hardware gold. This was the first time I tried Posh Pigments and it’s impressive. All I did was mix a small amount of the gold powder into a small amount of Clear Coat and brush it on. I was so focused on the process since it was my first time trying it I didn’t take any pics of the mixing. But next time I use it I’ll be sure to demo.
And here’s how this decorative trunk all came together.
The inside of this trunk is a dark almost black-maroon velvet that was in perfect condition so I didn’t bother to reline it.
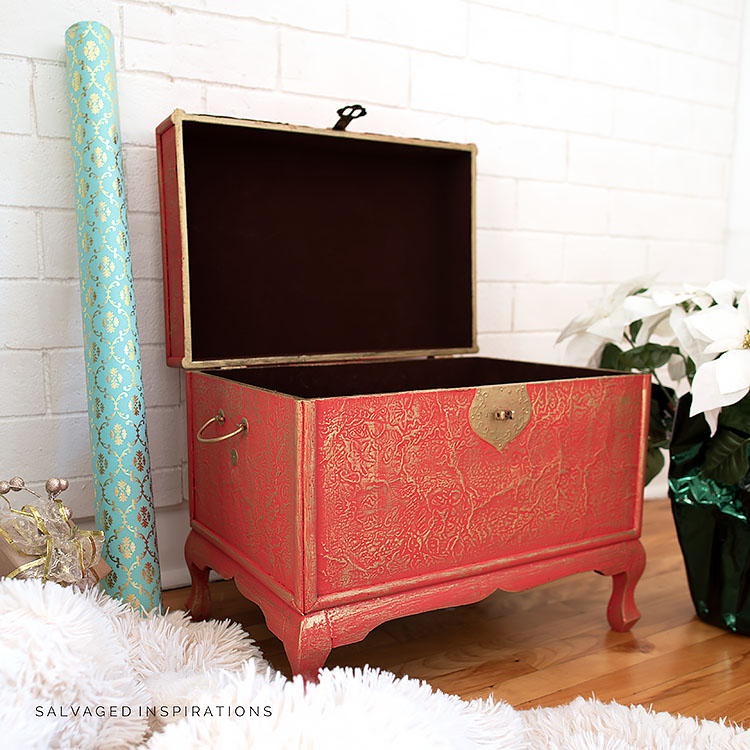
The sanding sponge technique worked equally well on adding gold highlights to the smooth areas as well. Below you can see how it added some shimmer to the legs and frame!
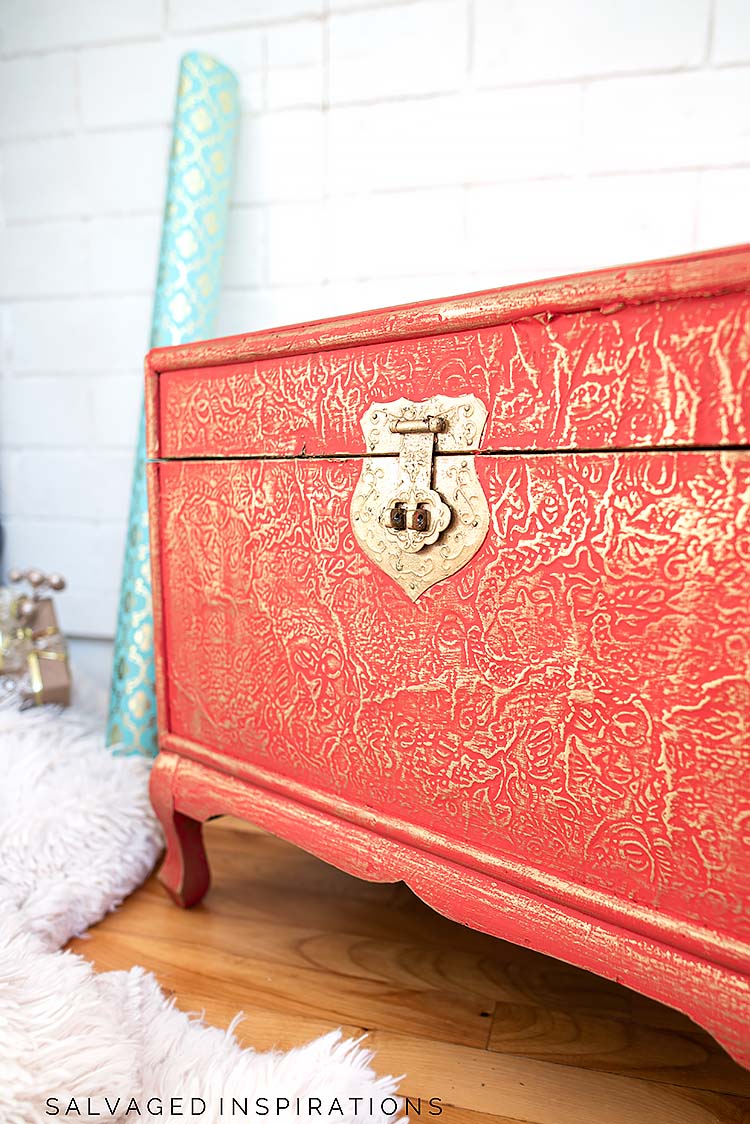
And check out this hardware! Doesn’t it look impressive? You’d NEVER know it was black and boring!

AND NOW MORE TRASH TO TREASURE FUN!
You’re going to LOVE what my creative team of T2T girls do! Below are their BEFORE photos. Visit the links underneath to see the amazing AFTERS and learn how they did it! I’m heading over to take a peek as well! x
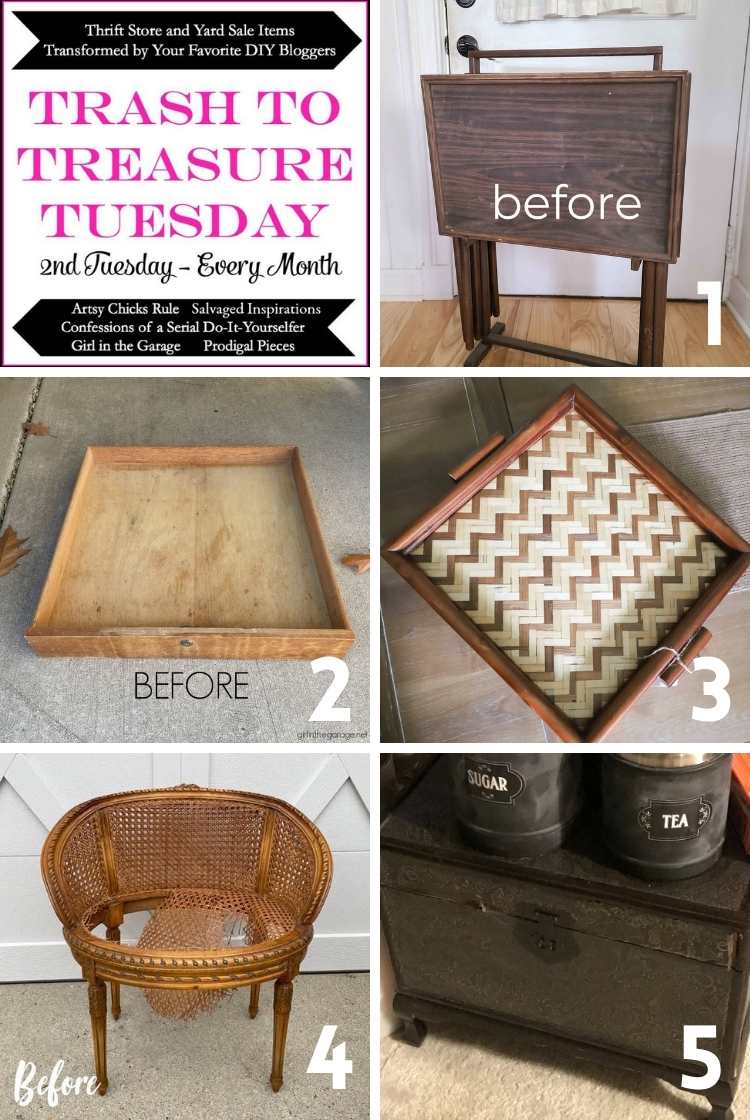
1. PRODIGAL PIECES
2. GIRL IN THE GARAGE
3. ARTSY CHICKS RULE
4. CONFESSIONS OF A SERIAL DIYER
5. SALVAGED INSPIRATIONS (HAPPY YOU’RE HERE!)
Here’s another look at this before and after. I hope it’s inspired you and given you some new ideas for your projects
Thanks so much for joining me today! Feel free to let me know what you think of this Christmas Painted Trunk Makeover. Or feel free to ask any questions you may have. I ALWAYS love hearing from you. IT MAKES MY DAY! 🙂
Happy furniture painting friends!
Denise x
RELATED POSTS::
SALVAGED TRUNK W DIY LEGS
FALL PAINT RECIPES | FREE DOWNLOAD
TEA ROSE DRESSER MAKEOVER
SINGER SEWING TABLE MAKEOVER
PAINTED KITCHEN TABLE DIY
PIN AND SHARE!
JOIN THE SALVAGED INSPIRATIONS FAMILY!

I don’t think you need to limit this for Christmas use only. It’s so pretty!
Aw, thanks so much Ruth!🤗
Wow, this is gorgeous! You know how much I love red. LOL Thanks for the great tip using a sanding sponge to apply gilding wax over textured finishes. I need the meat syringe thingy.
….”I need the meat syringe thingy”…🤣 that sounds hilarious!!!
Absolutely gorgeous! Such a stunning difference between before and after. I had expected some really intricate steps to get that amazing finish, so was pleased to see all the ‘tricks’ you’ve discovered. Your trunk is decidedly treasure now! 🙂
Thanks Carroll, I’m so glad you like it! And I was pretty pleased to see how well that sanding pad worked as well!😃
So pretty and perfect for Christmas!
thanks my friend! XOXO
This is gorgeous, Denise! It’s bigger than it looked in the before photo! Had to laugh about the raccoons and great tip about the meat juice injector! Just lovely as always! XOXO
Ya, they were scary! LOL. Thanks my friend! XOXO
This turned out so pretty, Denise! The embossing reminds me of a table I got many years ago from Kirklands. Perhaps the trunk was from there too. 🙂
Maybe!!… I should check! Thanks Jen! XOXO
Hi Denise,
I just want to publicly comment that I really appreciate your creativity and dedication to your blog and website. You take your business seriously and you never fail to impress me with your ideas. I’m a wanna-be-like-you person who is making small strides toward my version of a blog and website. I understand the work involved and how fast the days go by when coordinatlng “all the things”. I’ve begun to dismiss bloggers who go on cruise control for extended periods and regularly rehash past posts. Or, it’s the same old ho-hum redo. We who follow the same person for years have come to associate with them in a vicarious sort of way and so want to receive inspiration. It’s a tough assignment, but you always come through. Thank you very, very much.
xo
Carol
Thank YOU Carol! This means a lot and your comment couldn’t have come at a more perfect time. I was up at 3:30 am putting the final touches on this post so I’m touched by your kind words. I’m super blessed that I enjoy what I do and have exceptional people (like yourself!) that take time out of their busy day to drop in and share, so it’s soooo worth it. I’m wishing you all the best with your blog/website Carol. XOXO
Sooo cute ! The sanding pad applicator was a genius idea 😉
I haven’t tried gilding products, but this piece is inspiring.
I’m wondering…. without a textured surface to start with, if applying paint with a textured roller might
provide a similar textured surface for the gilding product ? Hmmm.
Thanks for sharing your work. You never disappoint. 🙂
p
Thanks so much P! I’m not sure if the paint on a textured roller would be high enough to create embossing for the gilding wax to catch onto but what about a raised stencil? That would work perfectly!!!
I would never have thought to use sand paper to apply the gold wax. And that hardware! 😍
I was surprised the sanding pad worked as well as it did too! 🙂
Brilliant idea using the sanding sponge. Also can be used for any project with raised areas!
Thanks Robin! 🙂
This restoration is excellent! I was happy to read about the tin repair since I have a large jewelry box of a similar nature. I absolutely love the red and gold and will give this finish a try on my very sad candidate for repair and restoration. Thanks for the inspiration 🙂
Thank YOU! And I hope you have fun with your jewelry box… they are so fun to work on!
Hi Denise. What a darling little Christmas trunk. I love how you added the gold highlights and painted all the hardware gold. Perfect for storing Christmas bows:).
Thanks, Monique! And yes! Perfect for storing anything Christmas-eee!
Oh wow! It’s now gorgeous, Denise. Love that red and gold. ❤
Thanks, Larissa!!!