Hi, guys! Thanks for all the well wishes from Tuesday’s post. Although I’m still not feeling 100%, I do feel better. So much better, I’ve included a short Dry Brushing Video in today’s post. I’m sharing how fast and easy it is to dry brush furniture to get dramatic results — just wait until you see this before and after!
And even more exciting, it’s Furniture Fixer Upper Day and I get to share my friend’s makeovers too. I’ll link to them down below!
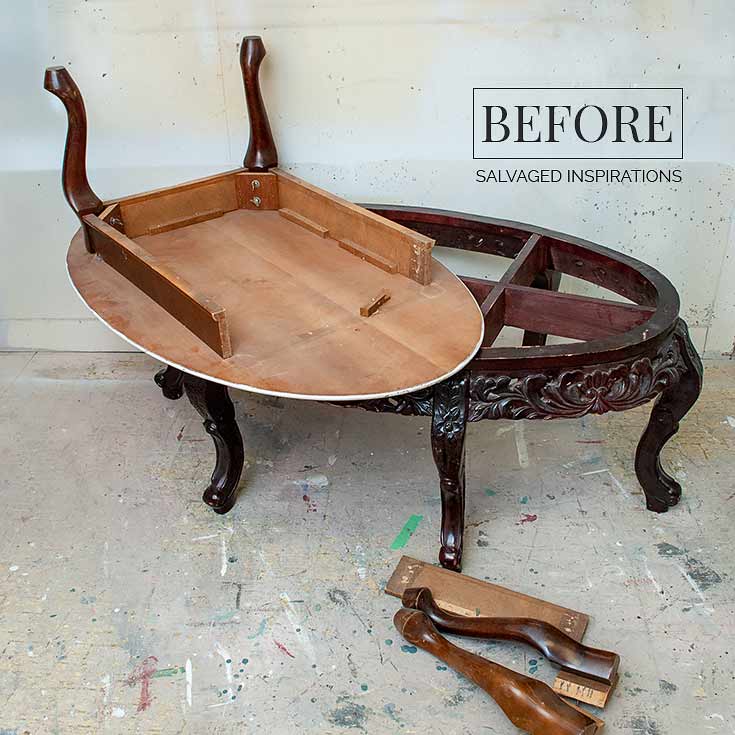
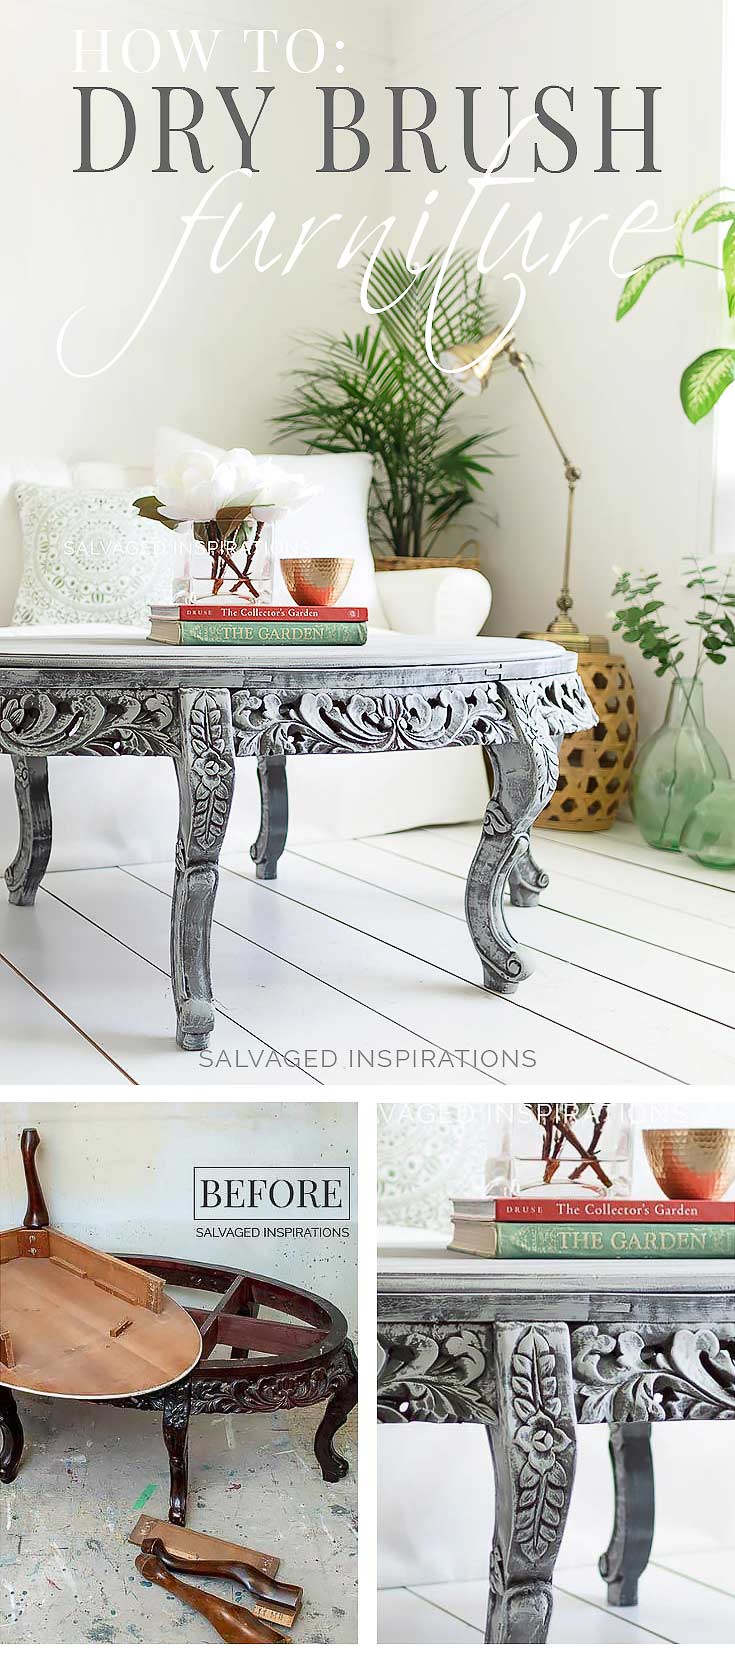
So, these old coffee tables are bringing me down memory lane as I’ve had them for 5+ years. When I first started my business, my sister and I would go curb-shopping aka salvage hunting. On ‘bulk days’ when people put out their unwanted furniture, we would drive around and grab the “good stuff”. I’m grateful that it gave me the opportunity to practice my painting skills without spending money on inventory — but the best part was spending time with Andrea. We would crank our favorite tunes, do our best to avoid the raccoons and skunks, and our ongoing joke — my sisters’ compensation for hauling furniture was a large McDonald’s soft drink. If you have a sister as a best friend, I’m sure you’ll agree it doesn’t take much to have the BEST TIME together.
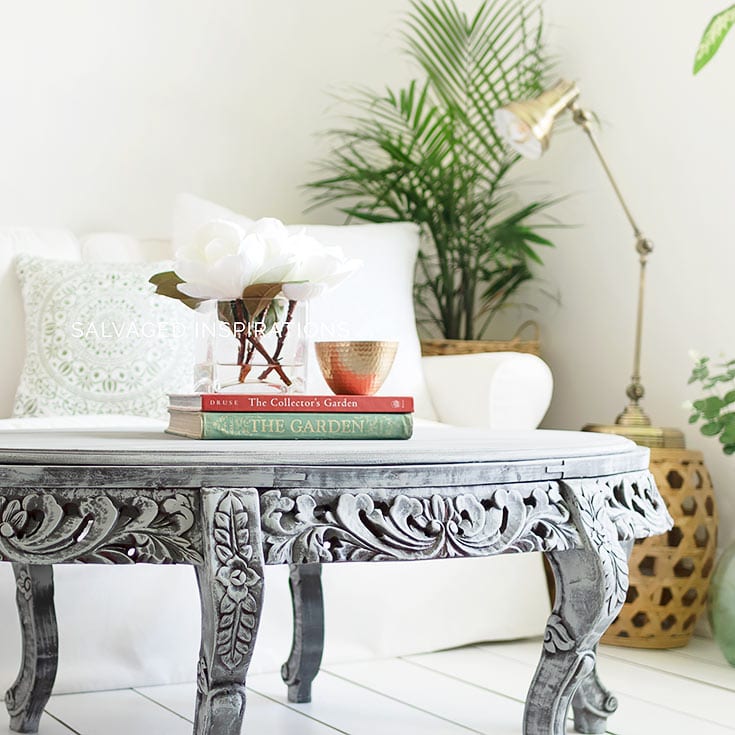
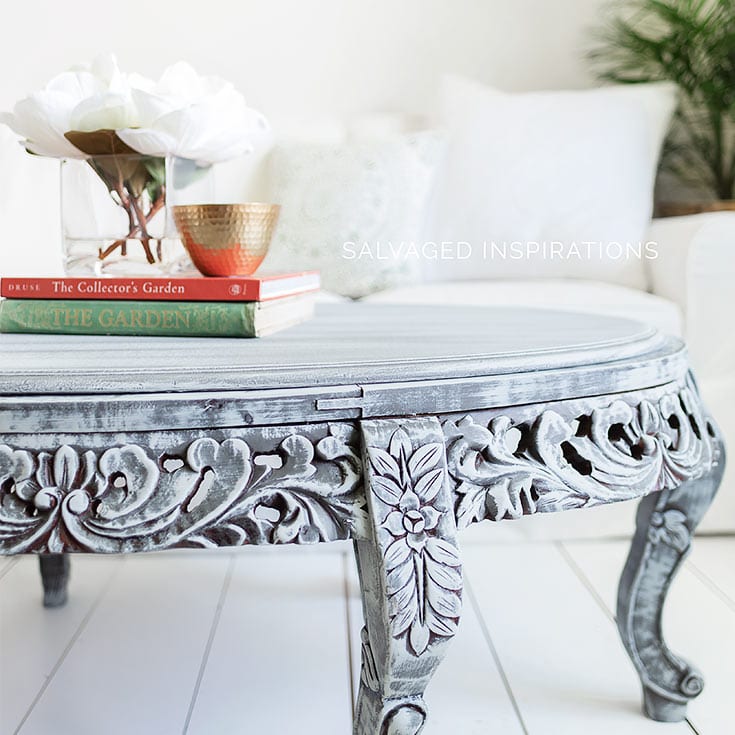
I kept putting off restyling this carved oval because I thought I needed to make an entirely new top. I don’t know how I missed seeing that the oval top on the other coffee table was an almost perfect match. Better late than never, right?
Before I get into the how-to, take a look at this old coffee table now!
THIS POST IS SPONSORED/CONTAINS AFFILIATE LINKS TO PRODUCTS I USE. YOU CAN SEE MY FULL DISCLOSURE HERE.
SOURCE LIST::
-
-
-
- 2 Curb Shopped Coffee Tables – SALVAGED
- Paint Brushes
- Water Misting Spray Bottle
- Gravel Road Chalk Mineral Paint
- Driftwood Chalk Mineral Paint
- Topcoat (to be decided!)
DRY BRUSHING FURNITURE | COFFEE TABLE MAKEOVER::
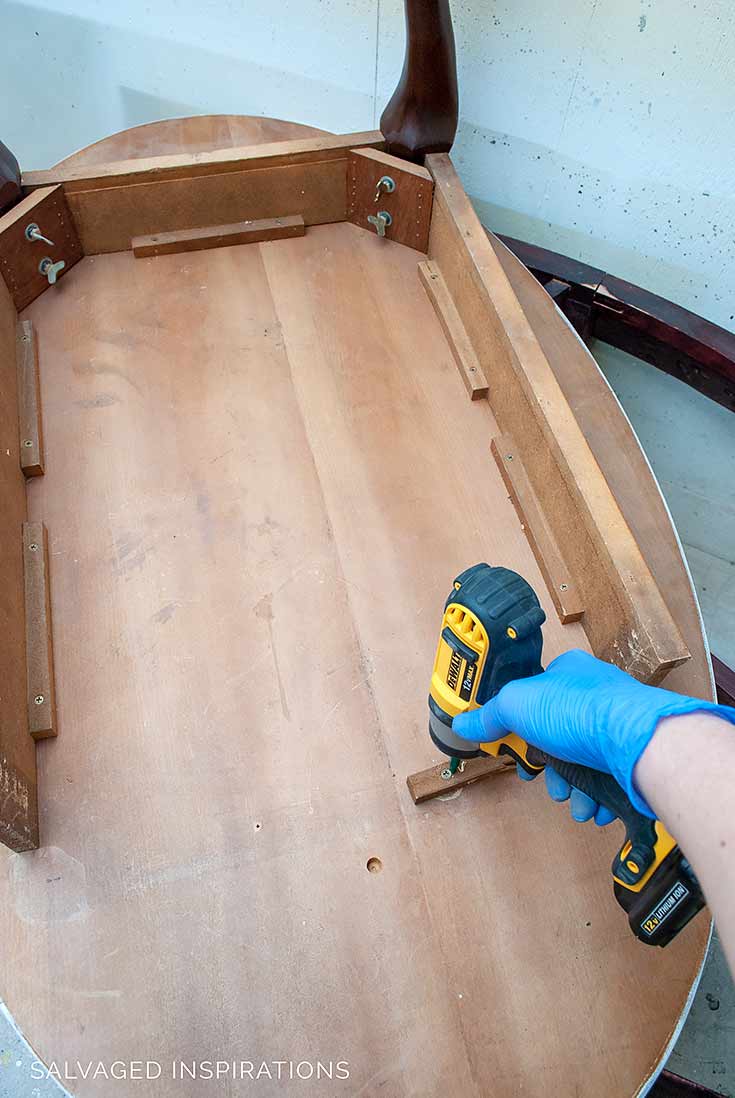
I started by giving both tables super good cleaning and then removed the oval top from the base and legs.

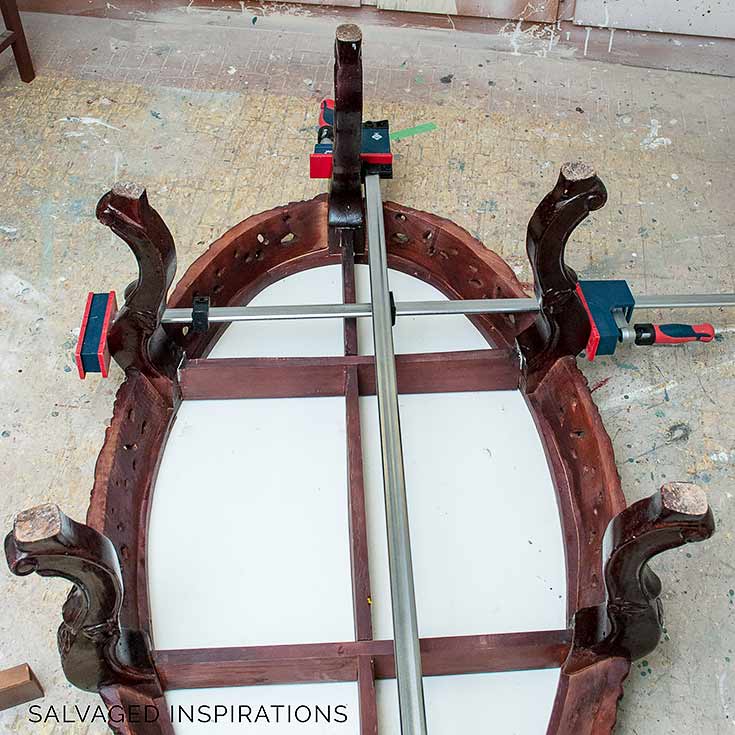
Once the oval top was removed, I glued and clamped the carved oval table to ensure everything was tight and sturdy. Once the glue had dried, I positioned the oval top to the bottom to make sure it fits nicely but I didn’t attach. They are easily attached with a few ‘L’ brackets and screws and this can be done either before or after you paint.

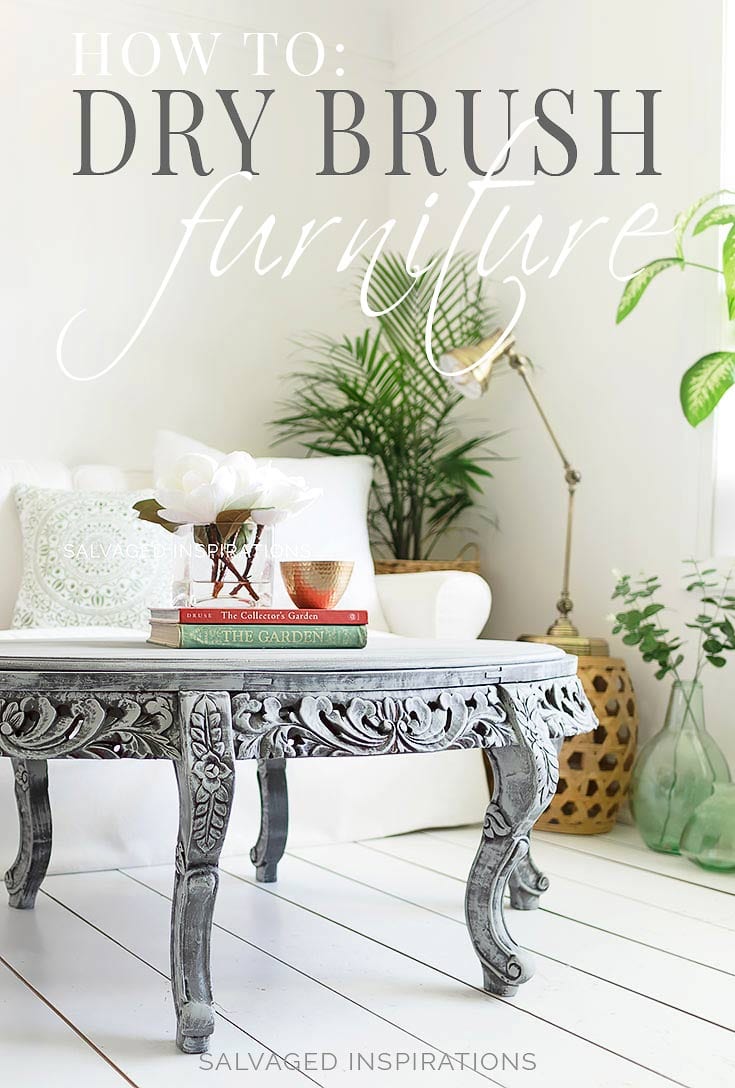
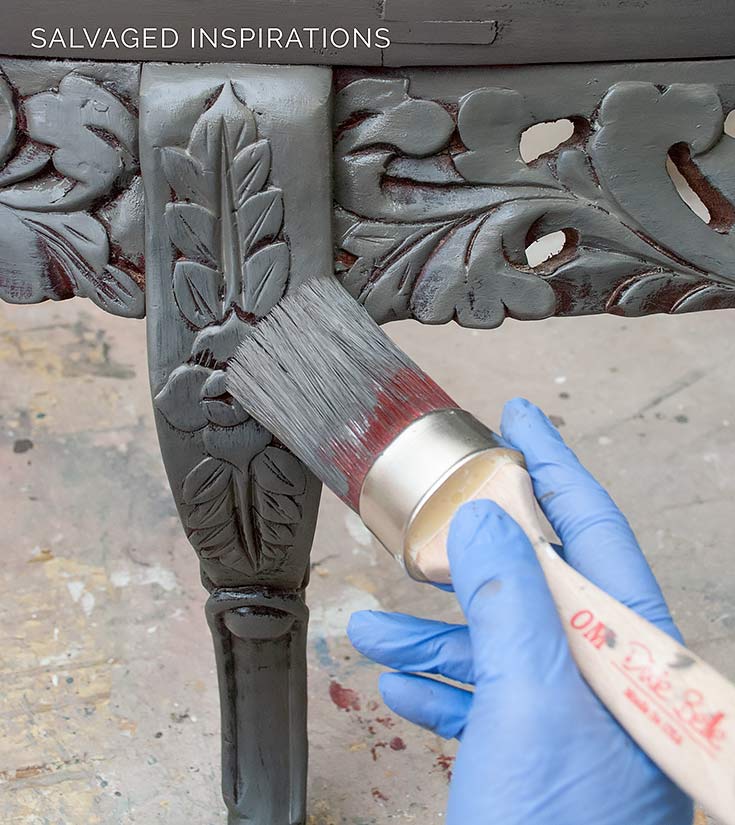
When dry brushing furniture, the quickest and easiest way to get stunning and dramatic results is when there’s some sort of detail or carving on the piece — like this coffee table. For flat surfaces like the top, it creates a lot of depth and interest. The more contrast in the paint colors you use, the more dramatic the look.
For the base coat, I applied two coats of this dark gray in Gravel Road.

The dry brushing was painted in this lighter Driftwood gray.
Here’s a quick video sharing how this coffee table was dry brushed in under 5 minutes.
 I haven’t top coated this piece yet. I debated sealing with a satin finish to give it an ever so slight sheen but then changed my mind. Now I’m thinking of leaving it as is and just using some Gator Hide on the very top so it’s flat out flat yet super durable and waterproof seeing as the top will be high traffic. I’d love your thoughts on what sheen you’d like to see. What do you think?
And now for some FURNITURE FIXER UPPER FUN!
I know you’re going to LOVE what this creative team of girls do. It’s inspiration and techniques six-fold! 😉

Below are their BEFORE photos – visit the links underneath to see the amazing AFTERS and to learn how they did it! I’ll join you too. I’m heading over to take a peek right now myself! x
2. Confessions Of A Serial DIYer
LET ME KNOW YOUR THOUGHTS ON THIS TABLE MAKEOVER AND THIS DRY BRUSH TECHNIQUE. I’D ALSO LOVE YOUR OPINION ON HOW YOU WOULD TOPCOAT IT. FLAT? SATIN? SEMI?… I ALWAYS LOVE HEARING FROM YOU. IT MAKES MY DAY! 🙂
Happy furniture painting my friends!
Denise x
RELATED POSTS::
How To Apply Furniture Transfers
How To Layer Chalk Paint
How To Paint Laminate w/o Sanding
Stop Bleed Through When Painting
How To Paint Furniture – NO Brush Marks
PIN AND SHARE!

-
-

 I haven’t top coated this piece yet. I debated sealing with a satin finish to give it an ever so slight sheen but then changed my mind. Now I’m thinking of leaving it as is and just using some Gator Hide on the very top so it’s flat out flat yet super durable and waterproof seeing as the top will be high traffic. I’d love your thoughts on what sheen you’d like to see. What do you think?
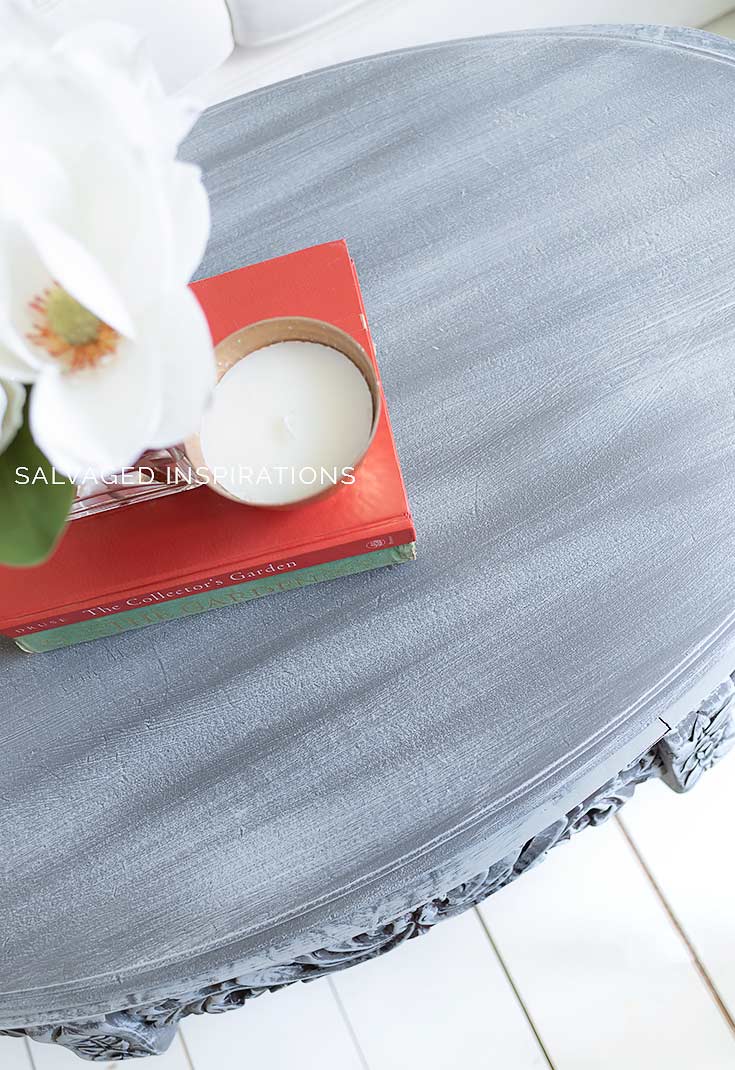


Just gorgeous! I love it and can’t wait to try it on my coffee table. The brush set is out of stuck I just checked. Do you have any other suggestion for the brush?
Thanks Amy! And ya, because of the covid situation, DB has been doing a fabulous job of keeping up with the additional orders but their brushes fly off the shelves! Here’s a great alternative!
What a lucky curbside find with amazing details! Excellent idea to highlight them with dry brushing, Denise. Truly stunning!
Thanks Jen! XO
Just beautiful, Denise!
Thanks so much Larissa! And lovely seeing you here…. thanks for dropping by.😊
Denise , Love the colors. I recently did a side board using 3 Dixie grays. I love,
Layers with a dry brush look.
As for top coat., I usually always go with
Semi . That said …lately i’m on a gator hide
Everything. I just love the finished look and feel.
Thanks for being you!
Roseann, thanks for being YOU! 🙂 And ya, DB grays and that Gator Hide especially is kind of addictive, isn’t it!
What beautiful details and the dry brushing was the perfect technique to highlight them. Love it Denise!
Thanks so much, Kathy! The beautiful details take all the credit on this one. Made this makeover super easy. 🙂
Stunning! Love it.
thanks Linda! x
This was the perfect technique on all that gorgeous detail. You did it again my friend. It looks amazing. 🙂
… and SO easy…lol!😉Thanks, Do! XO
Hi Denise. I am totally and absolutely IN LOVE with this coffee table. I can’t believe it was originally two different tables that you and your sister found in the trash! I wish I could find such beautiful free furniture around where I live. Although, only someone creative like yourself would think of amalgamating two broken coffee tables to make one gorgeous piece. Truly AMAZING! BTW, it sounds like you and your sister have so much fun together. I’m sure she would haul furniture with you even without the payment in soda. Lol
thanks, Monique! I’m so happy you love it. It was a really fun project. And ya, Andrea and I ALWAYS have fun no matter what we do. Sisters are the BEST! XO
Beautiful table. I totally love the color Gravel Road and the dry brush application is just icing on a beautiful cake. I bet it sold in a flash. As always…pinned. XO
I haven’t listed it yet but I hope so. 🙂 Thanks so much, Susie!
Great video, thank you for doing it.. Table turned out great, plus you have some spare legs leftover!
Aw, thanks. I wasn’t going to do it because I wasn’t looking or feeling my best (hence the sniffles…lol) but I thought who cares. I have to start putting myself out there sometime and seeing as a cold isn’t contagious through video I think we’re safe 😉 And YES, I’m looking forward to using those sexy legs on another piece. Happy Canada Day to you my friend. XO
I wondered what you were going to do with the second coffee table. How lucky that the other top fit, The coffee table makeover is gorgeous, Denise, such a beautiful piece! Totally agree that the dry brushing technique on ornate details make them pop beautifully. To answer your question, I’d be more inclined to use the water repellent Gator Hide on the tabletop to protect that lovely finish.
Thanks Marie! XO And that’s what I’m thinking too. When I first finished it down in my studio I thought a satin sheen might really make it pop, but now that I see it in my living room I really like the flat look! Happy Canada Day weekend to you!🇨🇦
love this finish! it looks like stone! You can never go wrong with a dry brushing 🙂
Yes, it does! And ya, I love dry brushing. Brings out all the yummy details. 🙂
The table is beautiful and you make it look easy!
Thanks Kitty! And this paint technique is easy however when you’re new to a technique, it can feel a little intimidating. I remember the first few pieces I dry brushes – I couldn’t help but think I was going to ruin them but thankfully they turned out really good and I was hooked. 🙂
This is my favorite technique! I just love the look it gives so I Love this!! I also love the pieces behind you in the video. I think I would like a solid (not dry brushed) top tho with a satin finish? That’s my vote. But I Love this look and most all you do!! 🙂
Thanks Megan, and I agree, dry brushing is one of my fav’s too! Yes! The solid top looked amazing (because I tested it with just the Gravel Road on top). But because this oval isnt a PERFECT match, it didn’t blend in with the bottom enough. The contrast made it apparent that the top was a few centimeters off on the ends. Thanks for chiming in re the satin finish.😊
Aaaaah gotcha now! That makes sense! Is beautiful!!
Hi, this is a great project, and it looks lovely. So, for these two table pieces that you combined, you didn’t sand anything. You only painted and dry brushed, correct? Is the entire table made of wood, or are the sculptured areas made of something else? You didn’t have to be concerned with any bleed through of the dark finish? Thanks!
Thanks Elizabeth! Yes, both the tables are wood. I didn’t sand for the exact reason you mentioned – I didn’t want any bleedthrough. I once I started sanding back the finish, I knew a sealer would have been required. Luckily the top and bottom were not a shiny or slick surface so the DB paint adheres perfectly. 🙂
Stunning as always! How cool that the top of one fit the other so nicely? LOVE the staging! XOXO
Thanks so much, Christy! Only took me a good few years to see they matched…lol.