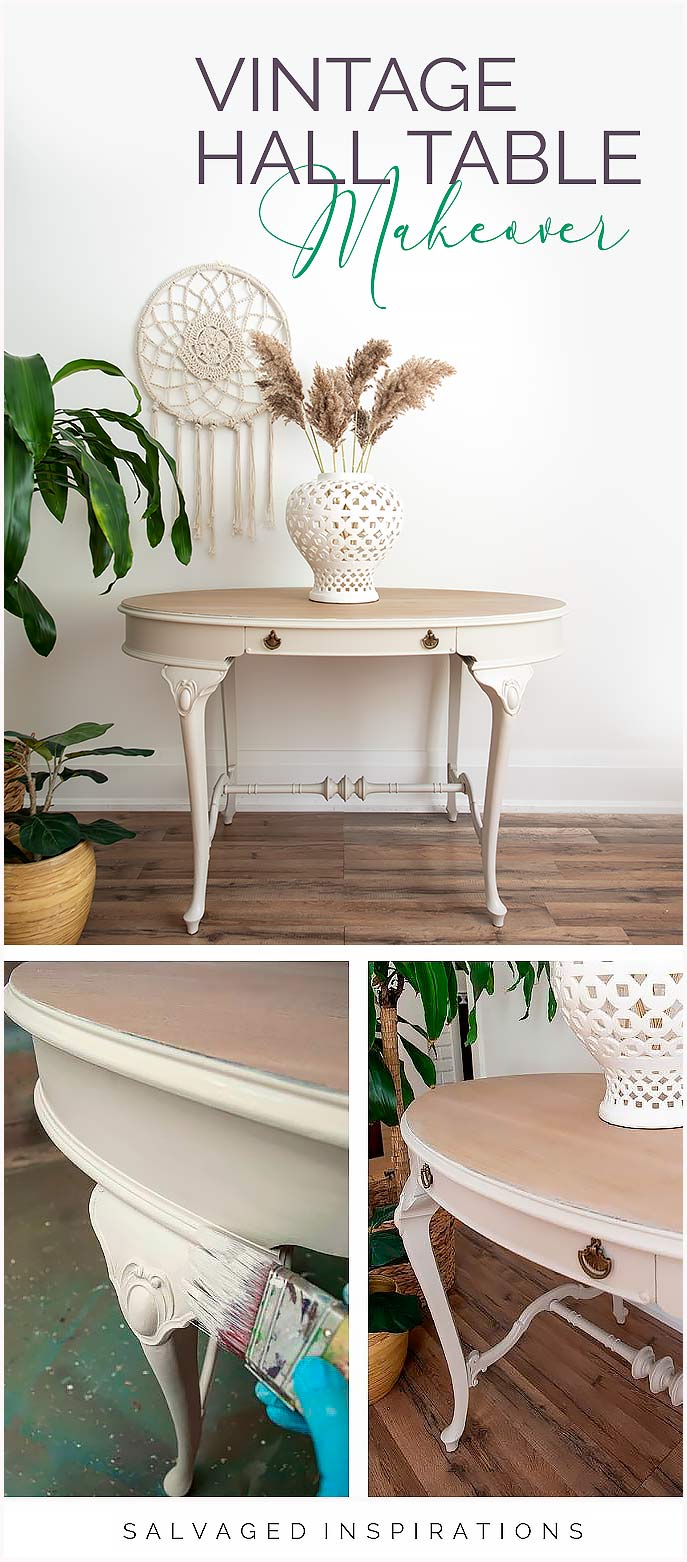
THIS OLD HALLWAY TABLE GETS A STUNNING MAKEOVER USING JUST *ONE* COLOR! | VIDEO TUTORIAL
 Hi, creative #sifamily! It’s Furniture Fixer Upper day – one of my favorite days of the month! I’m joining my furniture painting besties and linking to their makeovers below… so be sure to check them out. But first, today I have a gorgeous Vintage Hallway Table Before and After to share with you! I’ve included a step-by-step and Youtube tutorial sharing how ONE neutral paint color totally transformed and updated this piece… including an easy paint wash stain using the SAME color!
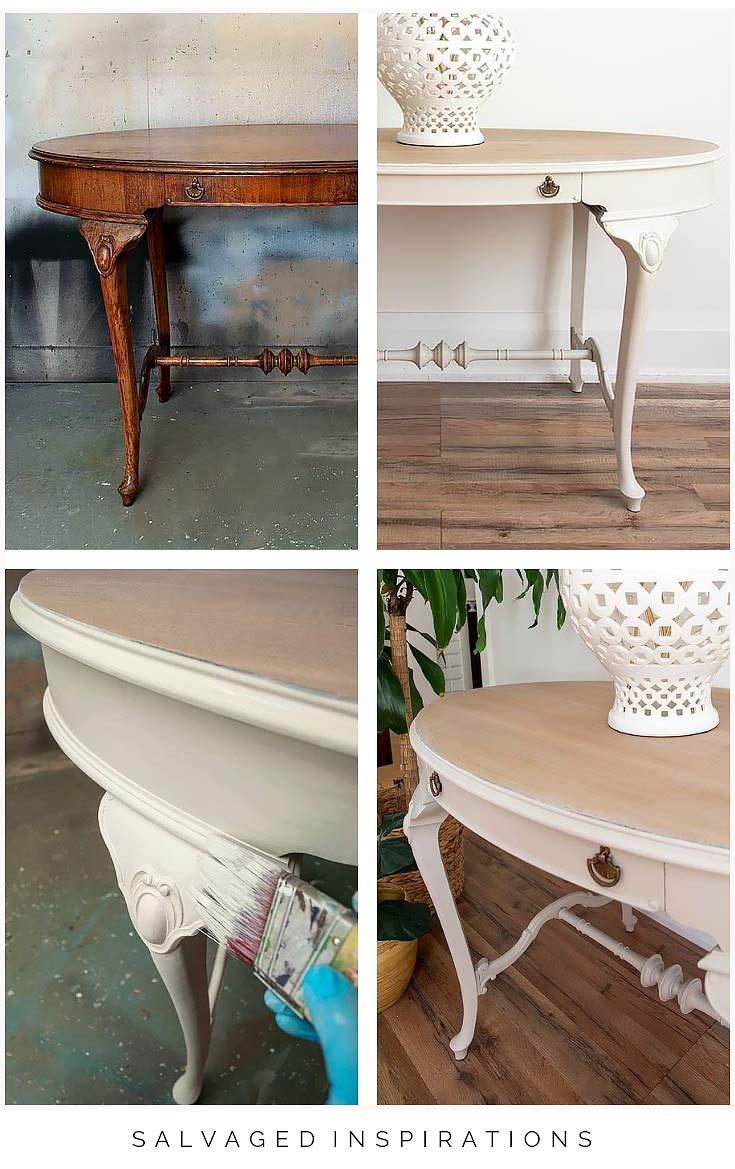
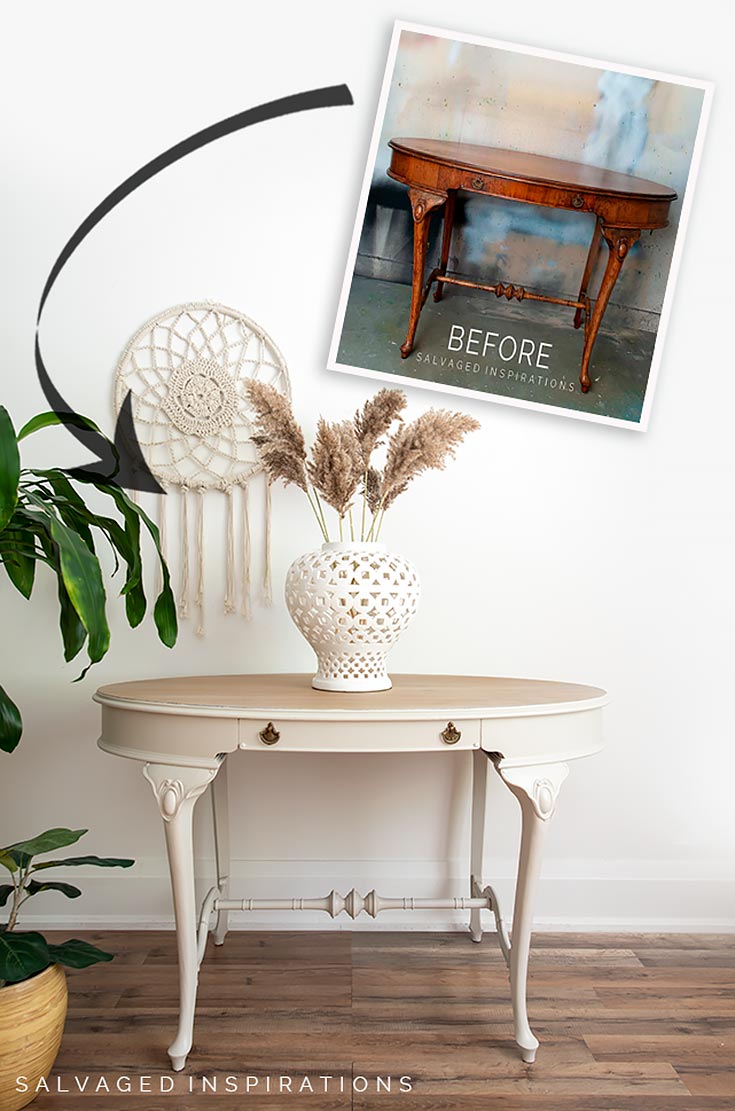
Here’s the vintage hallway table I started with.

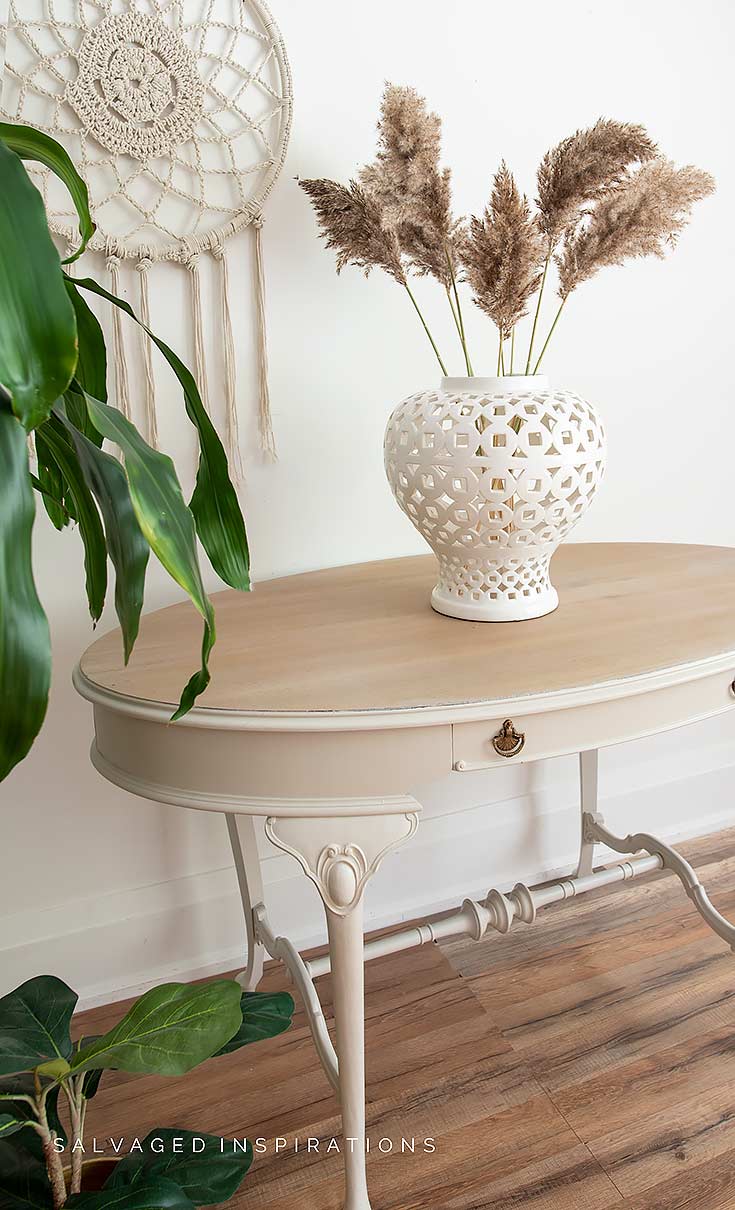
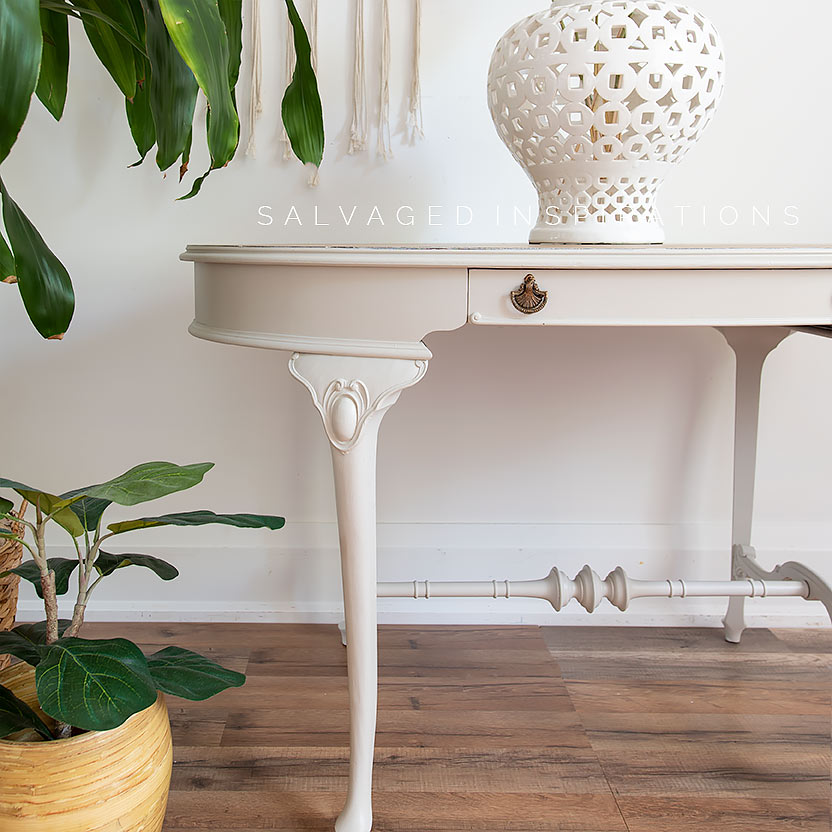
Here’s her new look. So much better… don’t you think?!

And here’s a close-up of the stained top — that isn’t even really stain!
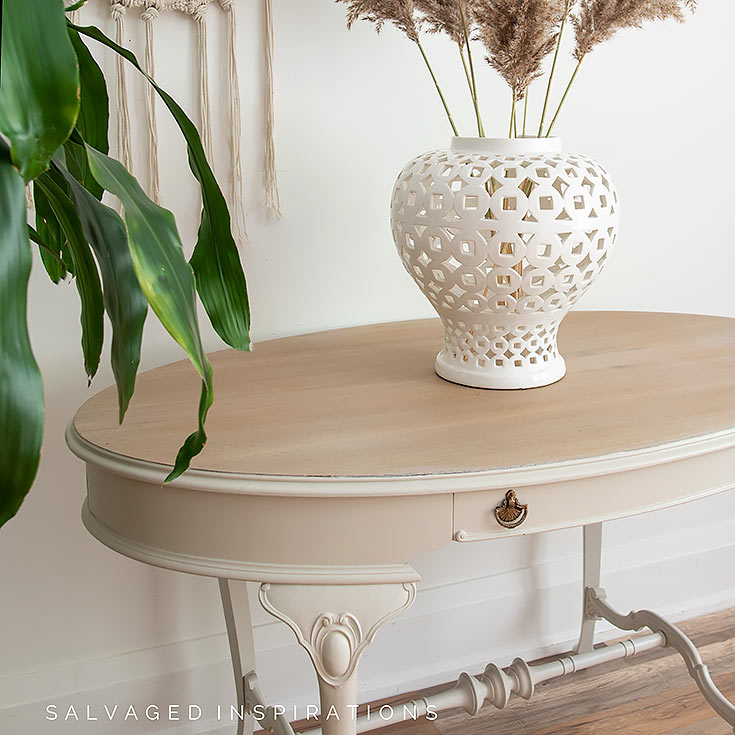
It’s amazing how ONE color of paint can totally transform and update a piece!
THIS POST IS SPONSORED/CONTAINS AFFILIATE LINKS TO PRODUCTS I USE. YOU CAN SEE MY FULL DISCLOSURE HERE.
SOURCE LIST
Vintage Hallway Table – SALVAGED
Paint Brushes
Shop Towel
White Lightning (Cleaner)
Dewalt Orbital Sander
Sandpaper | Tack Cloth
Water Mister
B-I-N Shellac Base Primer
Sawmill Gravy Chalk Mineral Paint
Satin Clear Coat
VINTAGE HALLWAY TABLE
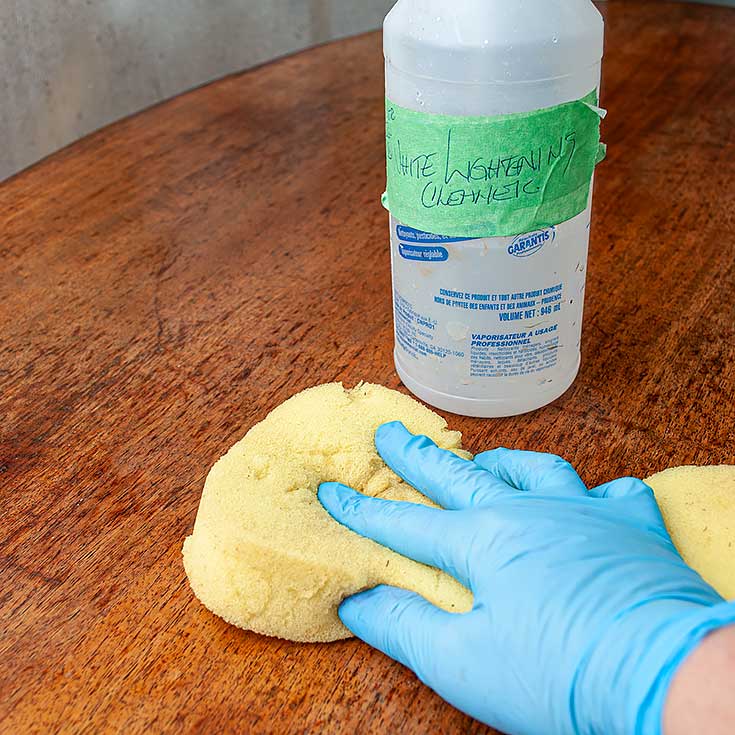
I found this table listed on Kijiji. When we went to pick it up, I noticed the seller used some sort of oil on the entire piece. I’m not exactly sure what he used but it felt like baby oil. And a lot of it! It nearly slid right out of our hands when we loaded it into the FUV. 🙂
Once we finally loaded it in and brought it home, here’s how it all came together…
PREP
Because it was so greasy, I gave it a really good cleaning with this White Lightning.
SAND
I had no idea what direction I was going to take when I first started this makeover but I did know I wanted a wood top. I used my favorite orbital sander to remove the varnish and showcase the beautiful veneer underneath being careful not to sand through the veneer. There were a few areas that were chipped along the edge but I can work with that. It gives the piece a little more vintage character even after the makeover IMO. After the top was sanded down using 80, 120, and 220 grit (in that order), I hand-sanded the body to give the primer something to stick to.
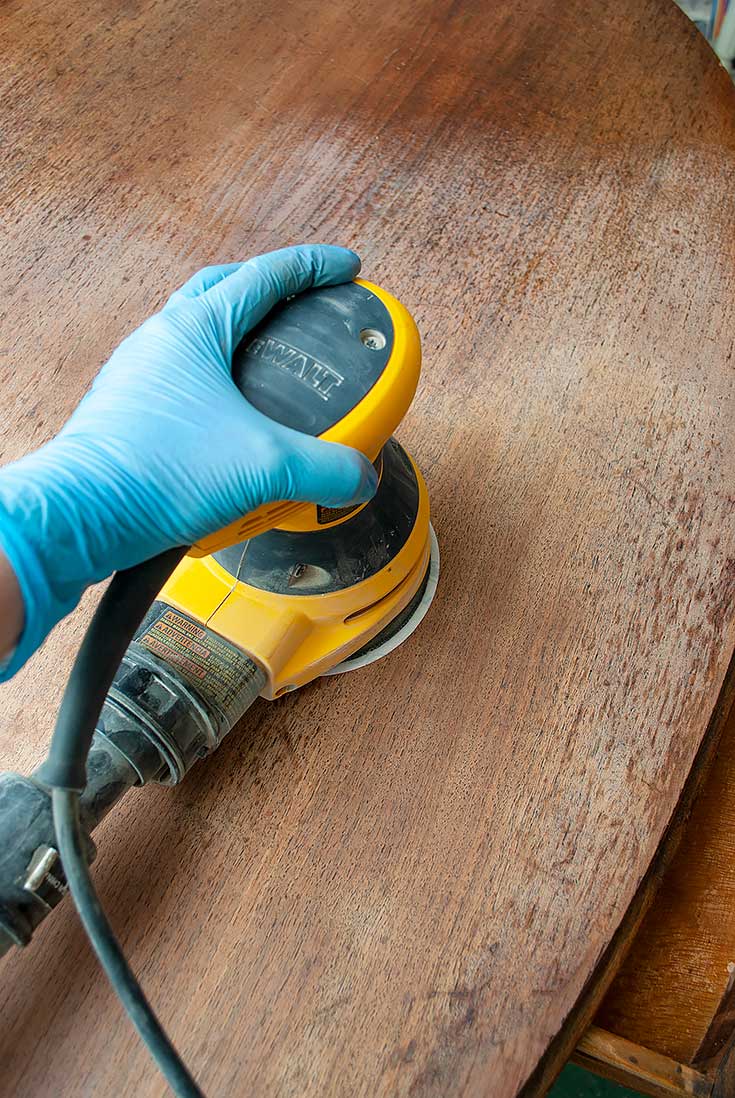
PRO TIP – I like using these tack cloths to remove all the sanding dust. If you ever see reddish dust on your cloth, you KNOW the piece will be a bleeder and a stain-blocking primer will be required before painting.
PRIMER
I used my go-to BIN Shellac Based Primer to prime two coats on the base and legs. I have a full tutorial on how to use this stain-blocking primer here. I like to give a light sanding with a 220 grit after I prime. This knocks down any uneven primer and creates a perfectly smooth surface for the paint.
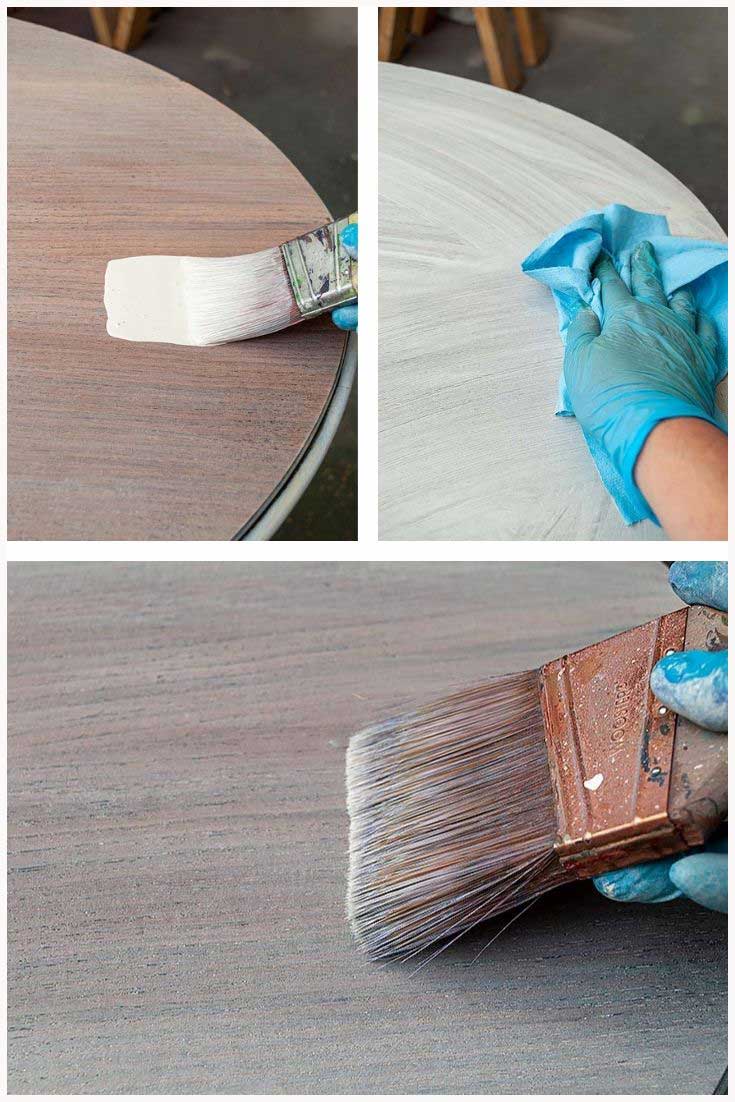
PAINT WASH ‘STAIN’
To lighten the top, I made a paint wash using this Sawmill Gravy and water. I didn’t measure but it was around a 50/50 mix. Using a paint wash to “stain” wood is super easy. I brushed it on with a paintbrush and then wiped it back with a shop towel. While working, to keep the wash wet in between wipe backs, I use my handy water mister to keep the paint wet and wipeable. I applied two coats of this wash but you can keep layering the wash to get a more opaque look. You can also adjust your ratio of water to paint to create more or less of an effect.
PRO TIP – If I have any visible streaks after wiping back the paint, I like to use a large soft brush to feather out the lines.
PAINT
I painted two coats of this gorgeous neutral Sawmill Gravy on the body and legs. I love the way it really brightened this table up!

TOPCOAT
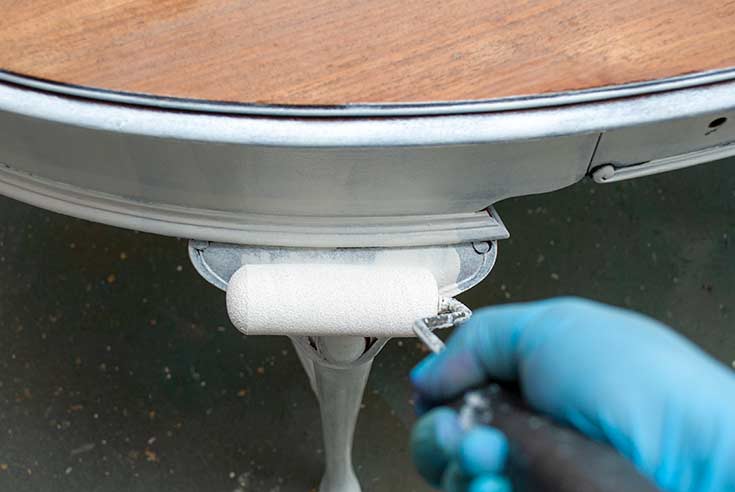
To finish this table with a beautiful sheen, I sprayed three coats of this Satin Clear Coat and then added the original hardware.
YOUTUBE TUTORIAL
Here’s the step-by-step on Youtube. If you have any problems viewing below, feel free to watch it on my Youtube Channel here… and don’t forget to subscribe! 🙂
Here are a few more after pics. I really wish I had a large enough entranceway. I’d be keeping this one for myself!

It turned out really really lovely. I can also see it being used as a small desk.
These vintage pieces have so much character!
AND NOW FOR SOME FURNITURE FIXER-UPPER FUN!
You’re going to LOVE what my creative team of Furniture Fixer Upper ladies do! Below are their BEFORE photos. Visit the links underneath to see the amazing AFTERS and learn how they did it! I’m heading over to take a peek as well! x
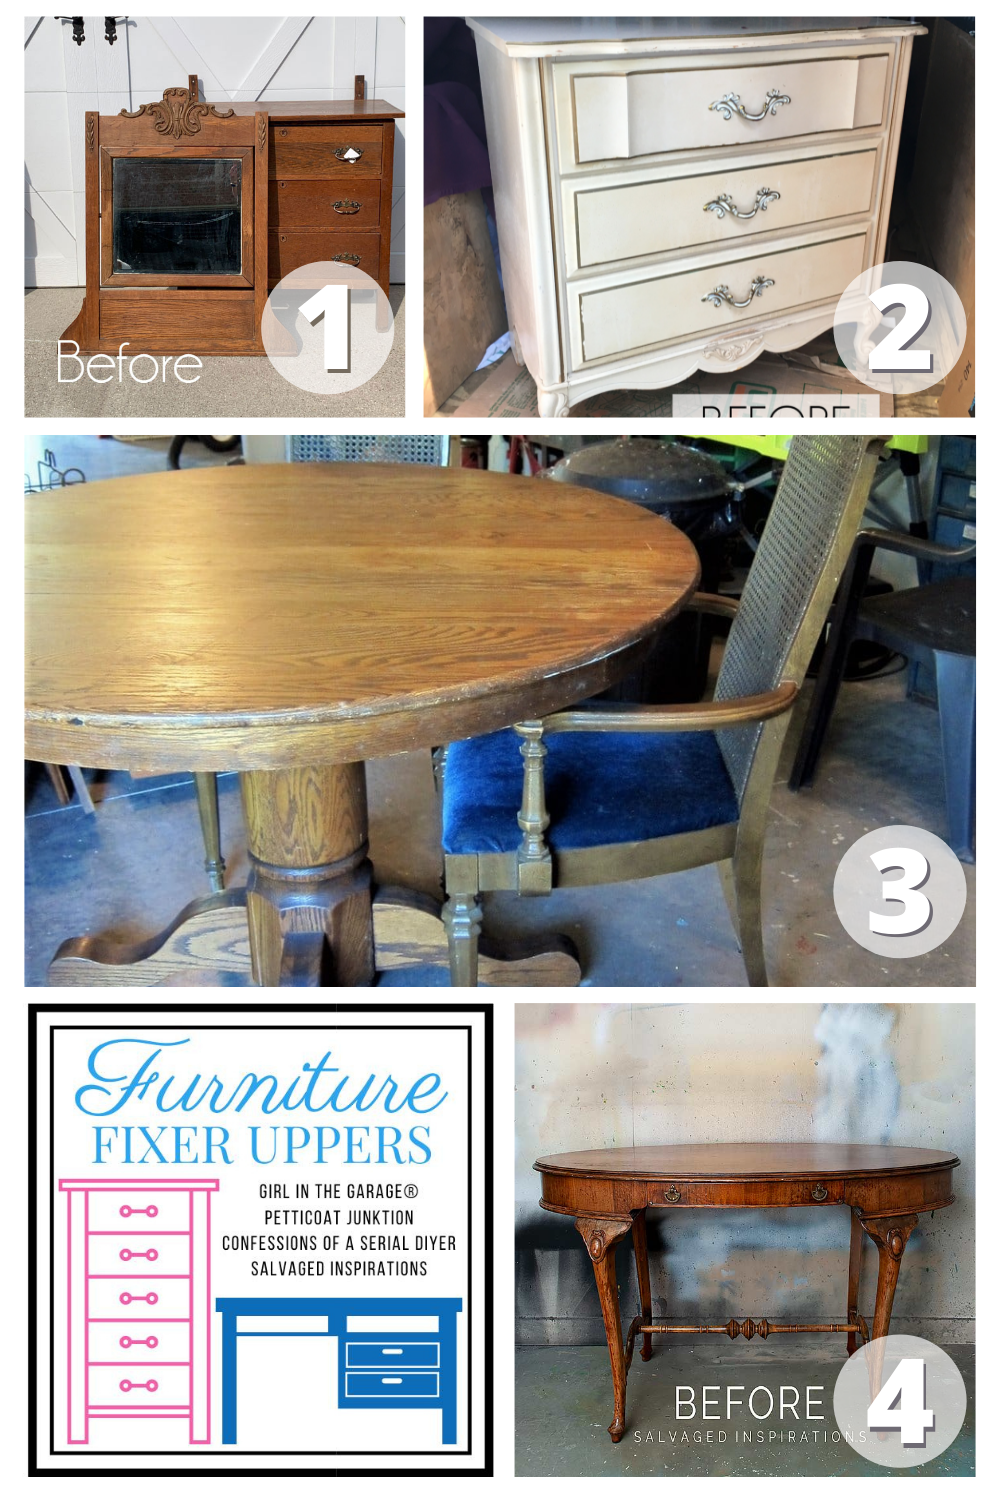
1. CONFESSIONS OF A SERIAL DIYER
2. GIRL IN THE GARAGE
3. PETTICOAT JUNKTION
4. SALVAGED INSPIRATIONS (HAPPY YOU’RE HERE!)
Here’s another look at this before and after. I hope it’s inspired you and given you some new ideas for your projects.
LET ME KNOW WHAT YOU THINK OF THIS REDO. FEEL FREE TO ASK ANY QUESTIONS YOU MAY HAVE… I ALWAYS LOVE HEARING FROM YOU. IT MAKES MY DAY! 🙂
Happy furniture painting friends!
Denise x
RELATED POSTS::
TRAY TABLE MAKEOVER
RESTORE ENTRY HALL TABLE
FAUX DRIFTWOOD NESTING TABLES
SINGER SEWING TABLE MAKEOVER
PAINTED KITCHEN TABLE DIY
PIN AND SHARE!

It looks beautiful. I like the decorative shavings at the top of the legs and cross spindle. To further SUBTLY enhance these areas would slight coloured waxing work or would it stand out too much from the rest?
For sure! There are no rules. Whatever looks good to you. I would suggest using very little product with a light hand and see if you like it. It’s always easier to add a little more if needed. 🙂
They look wonderful! Good job. Thanks for sharing!
Hi Denise.
Would you consider making a tutorial about how you put together your DeWalt dustless sander, it’s a great idea and I would love to see how you did it. I always look forward to your next video. Thanks for the all the”inspirations”!
Hi Cathleen! I have an old post on dust-free sanding here. This is a great idea for a quick tip video tutorial tho so thanks! 🙂
Another great piece Denise! Really love the subtle but striking color.
Thanks so much Donna!🤗
Denise, this table is so rich and the spools on the bottom add the finishing touches!
I love them too…they really add a lot of character! Thanks my friend. 🙂
I love the simplicity of all of your videos. Thank you so much for sharing.
Thanks so much for visiting and watching Gina! 🙂
What a beautiful new look, Denise! I especially love the new “stained” top!
Thanks my friend! Hope you’re having a relaxing weekend. XOXO
This is a great makeover, but… it all depends on one’s style and needs- the original table would have looked gorgeous in a Victorian style home, and the makeover would go in a more modern design house.
But, the ideas you gave me today, I can apply on less valuable, original items I find. And you always encourage everyone to look at everything with a fresh eye and as a challenge to be creative and rescue abandoned beauties,
Thanks, Sue and I’m SO glad you’ve found this makeover encouraging!
The after looks so much better than the before. So fresh and clean looking.
Thanks Annie! 🙂
Love this table! What kind of sprayer do you use for the clear coar?
I’ve been using this Husky Spray Gun since 2013… still works amazing!
Seriously awesome!!!!
Aw, thanks Denise! XOXO
I love your work, your so knowledgeable, I have a question on how to prepare my wood grain bathroom vanity. Ready to paint a dark blue gray.
I know first sand then what would be the product I need to use next prior to paint?
Thank you
Lucille
Hi Lucille! That’s a loaded question as I’m unsure of what type of wood your bathroom vanity is. However, after sanding, a good stain blocking primer like this B-I-N Shellac Based Primer would be ideal in a bathroom that gets high traffic and a lot of steam. Hope this helps.
Truly an elegant piece, and it looks amazing with the new look. Very nice.
Thanks my friend! XOXO
Beautiful piece. I love the color and finish.
Thank you Lizzy! XOXO
That is a beautiful table-even “before” in its oil slick! You did a lovely job and the color is nice and neutral. Love it!
Thanks Laura and I agree… I fell in love with its curves. 🙂
Beautiful piece of furniture and you made it even more beautiful! Just lovely! It’s an unusual piece to me.
Thanks Liz! And I agree, I haven’t seen an entryway table quite like this one before. 🙂
You were able to spotlight all the delicate details. Amazing how stunning with a simple process.
Truly lovely !!
p
Yaaay.. thanks P! XOXOX
This piece is so chic and elegant now! I love that you used the paint as a wash!! XOXO
Thanks my friend! Easy peasy and I love it too! Hugs 🤗
Hi Denise, I just love this makeover. Subtle but so classic…it really highlights the details 💕
Thanks Karen! 🙂
What a wonderful job you did. So elegant! Thanks for sharing. 🙂
Thanks Donna! xo
Beautiful. I love that you don’t measure! Too much trouble, right??
I’m too right-brained to measure!😆
Hi Denise. What a beautiful table to put in a foyer. I’m in love. It must have been a nightmare cleaning off all the baby oil. Yuck!
Thanks my friend… and I don’t know if it was baby oil, veg oil, olive oil… I have no idea but it was slick! hehe.