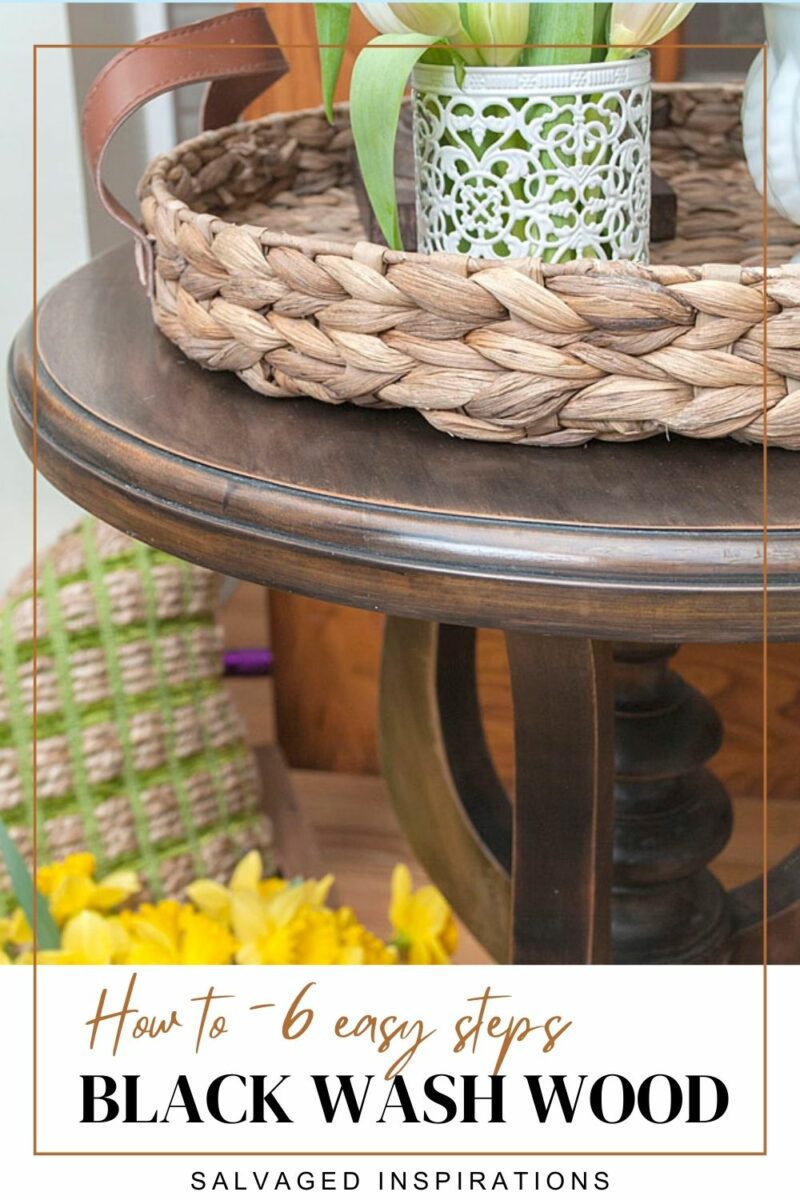
 Hello, creative friends! I have an easy-to-follow step-by-step Black Wash Wood Paint Finish to share with you today! A quick way to transform your old, worn-out wood furniture into an updated piece. This will give you a ‘stained’ look without having to use stains!
*This post was originally published on April 13, 2017. As an Amazon Associate, I earn from qualifying purchases. There may also be affiliate links in this post to other companies/products I use and love as well. You will never be charged extra when you purchase through these affiliate links. To see my full disclaimer, click here!
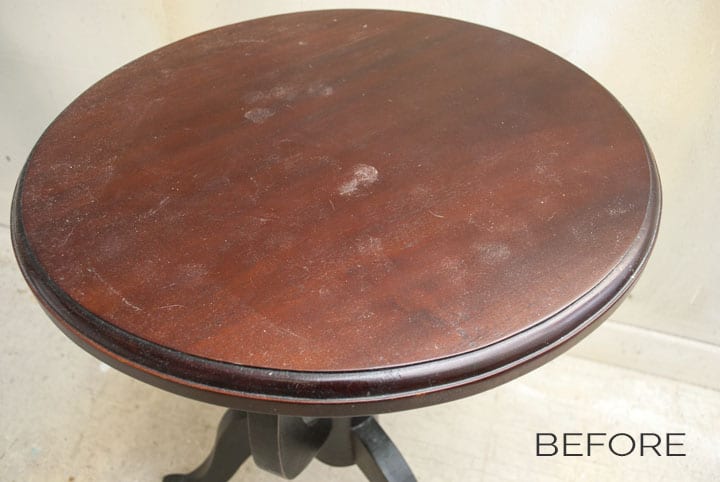
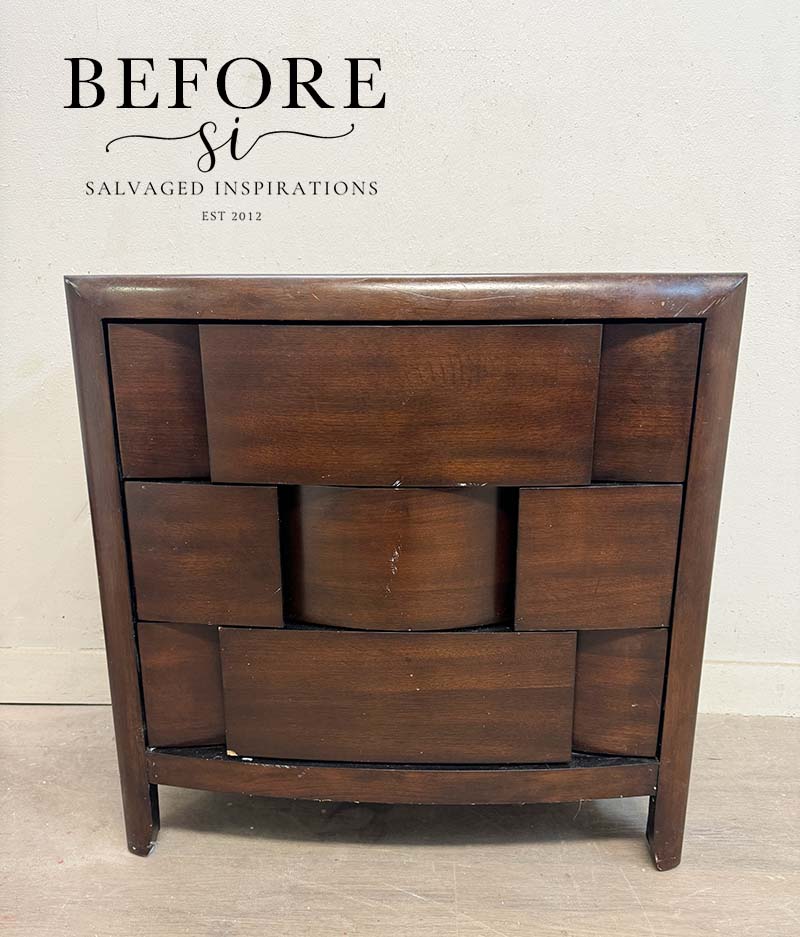
Here’s what I started with. This little side table is a piece from my own home. I was eager to get started so I unscrewed the top and then remembered to take a before pic with my phone. Not the best pic but you get the idea. I’ve had this table for over 15 years and still love the shape and style, but I wanted a more rustic look without the cherry finish.
THIS POST IS SPONSORED/CONTAINS AFFILIATE LINKS TO PRODUCTS I USE. YOU CAN SEE MY FULL DISCLOSURE HERE.
WHAT IS A BLACK WASH?
“Black washing” wood is an easy paint technique used to darken the appearance of wood while still allowing the natural grain to show through. This process involves painting a black or dark color water-based paint onto the wood and then wiping off the excess paint while it’s still wet. This allows the paint color to settle into the wood grain. The result is a darker finish that enhances the wood’s texture and patterns. The amount of darkness can be adjusted based on personal preference by controlling the amount of water-to-paint ratio applied and the amount of wiping off the excess.
WHEN TO USE A BLACK WASH?
A black wash paint technique can be used to create an antiqued, distressed, contrasted and/or modern and industrial finish. It’s easy to customize your DIY projects to personalize the style you’re after. I always recommend a test patch. Try it on a small, inconspicuous area or a sample piece and this can really help you decide if the wash is the look you want before applying it to the entire project.
WHAT PAINT TO USE?
For a beautiful black wash finish, water-based paints, such as latex, acrylic chalk, or mineral paint are the best choice. Water-based products are easy to work with, have no odor, dry quickly, and can easily be diluted with water.
WHAT YOU’LL NEED:
- Wood Sidetable
- Gloves and Mask
- Shop Towels or Rags
- Sander (25% OFF as of Writing this Post!)
- Stripper
- Water + Container
- Black Water Based Paint
- Paint Brush
- Topcoat / Wax or Poly
HOW TO BLACK WASH WOOD FURNITURE – 6 EASY STEPS
STEP 1 – SAND & STRIP
I started by removing the top and then stripping and sanding the entire piece. In the pic below, you can see I wasn’t too worried about getting off ALL the original finish because I wanted my washed piece to look a little more rustic. However, if you want a more uniform look, removing all of the original finish is recommended. After it was stripped and sanded, I cleaned and wiped away the dust.
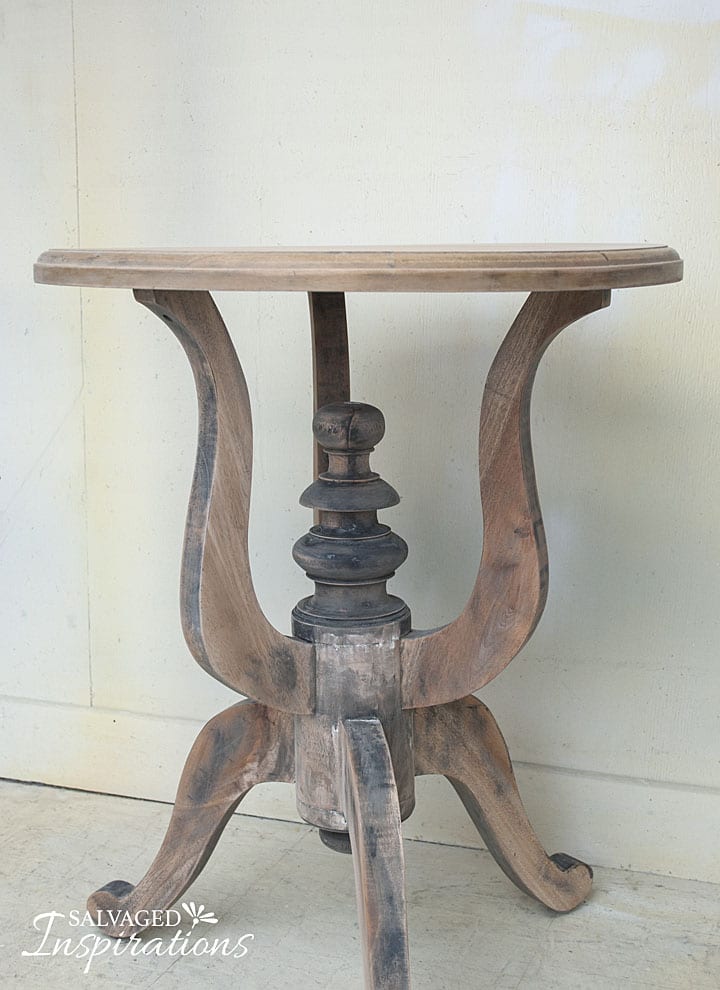
STEP 2 – MIXING A BLACK WASH
To mix my black wash I used General Finishes Lamp Black mixed with water. Some other amazing paint colors for a beautiful black wash are this Caviar Black and this Coffee Bean if you prefer a black with warm brown undertones.
I eyeballed the proportions, but I’m guessing I used around a 3:1 ratio – 3 parts paint to 1 part water. This ratio is adjustable. The more water you add, the lighter the stained effect will be. The less water you add, the darker the stained effect will be.

STEP 3 – APPLYING A BLACK WASH
Applying the wash is the same as whitewashing furniture. Using an appropriate-sized paintbrush for your project, brush it on as if you were painting a piece and then wipe it off. Work in small areas so the paint wash does not dry before you wipe it off. I have more details on wiping off below.

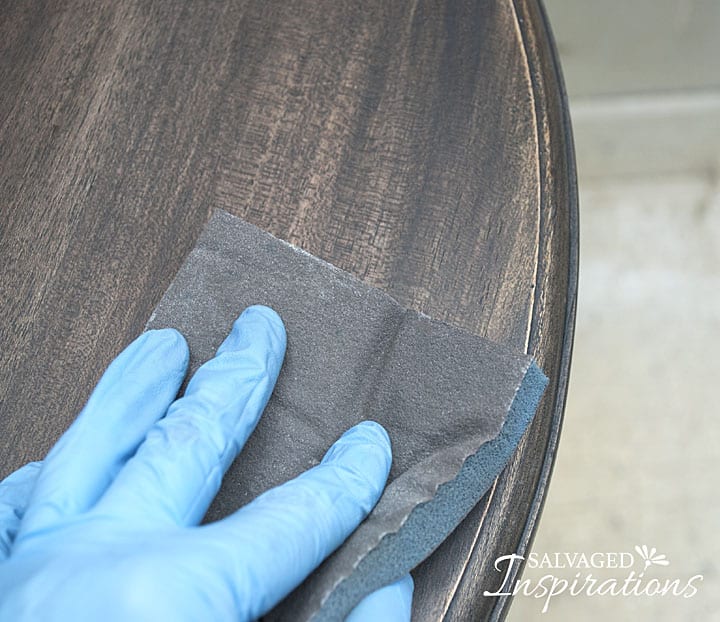
STEP 4 – WIPE OFF
Once you’ve brushed on the wash, wipe it off with a shop towel or old rag. This is a messy process so it’s a good idea to wear gloves, otherwise, your hands will turn pitch black! Work in small areas so the wash doesn’t have a chance to dry.
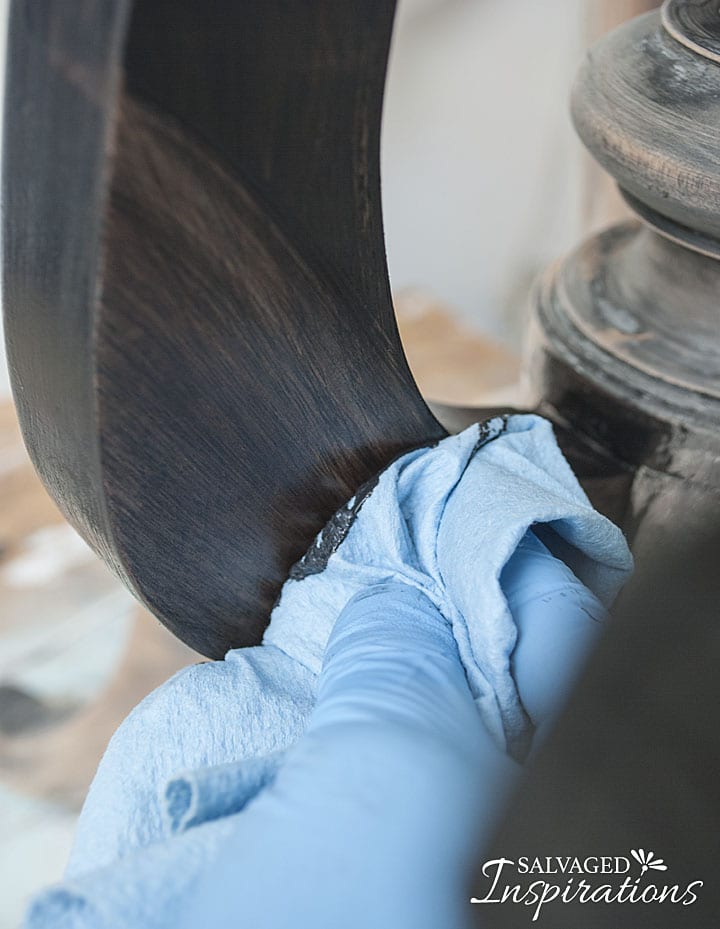
If your first coat isn’t dark enough, add another. Below, you can see the first coat is applied and wiped away on the tabletop. This table took 3 coats before I was happy with the finish.

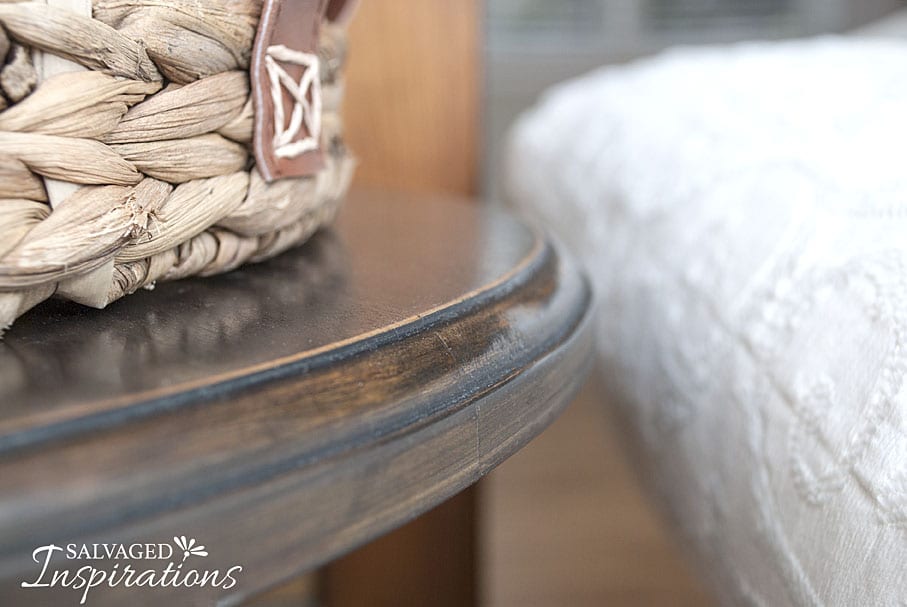
STEP 5 – SAND AND DISTRESS (OPTIONAL)
I wanted a more rustic look for this side table so I sanded the edges and the top to add some lighter and darker areas. This step is optional depending on the look you want. If it’s a more modern finish, no sanding or distressing is required.
STEP 6 – TOPCOAT & PROTECT
The final step is to protect your work with a top coat of your choice. I used a Clear Wax to give it a lovely satin finish, but a poly, tung oil, hemp oil, or whatever topcoat you like will work nicely.
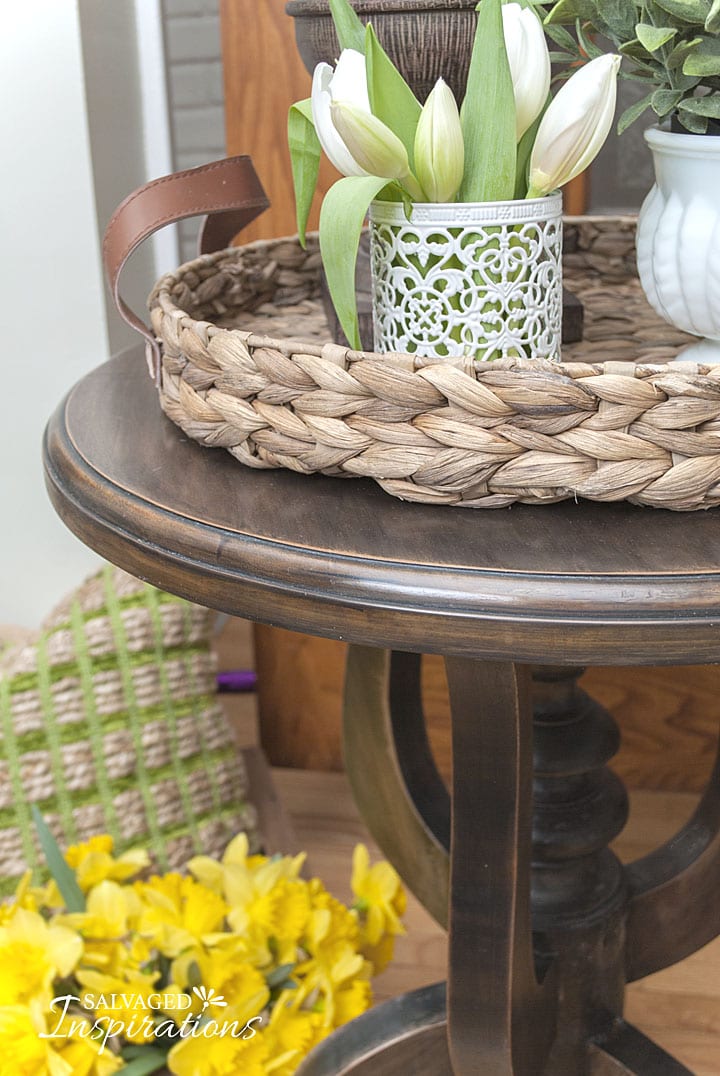
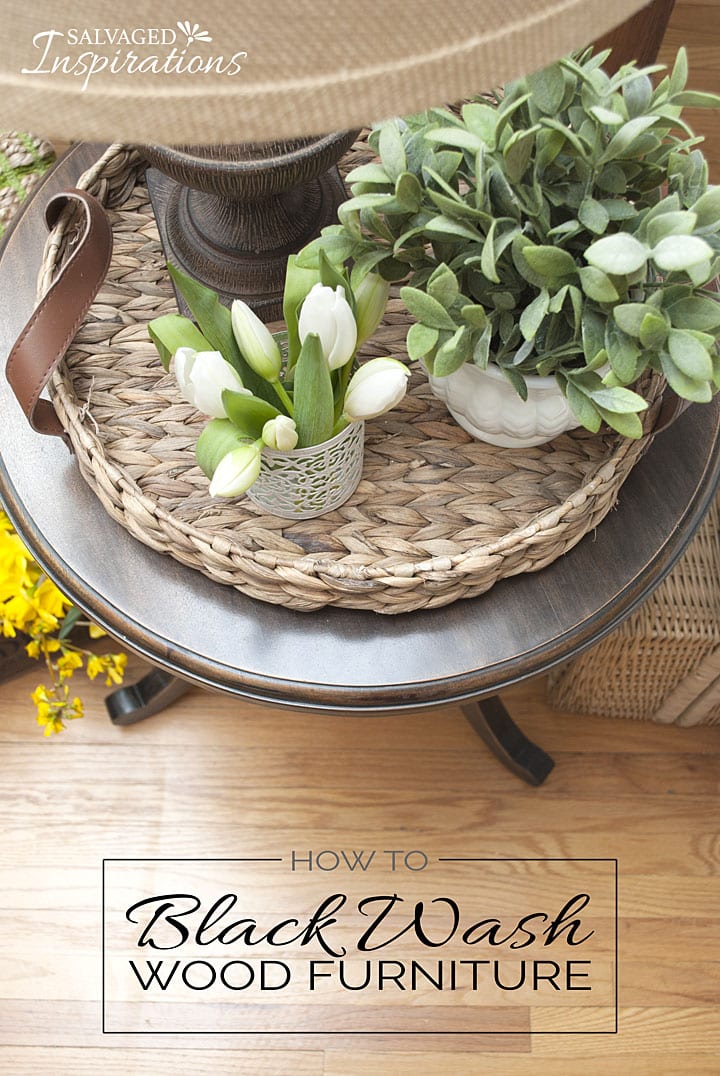
FINISHED LOOK
Here’s the finished look. What do you think?
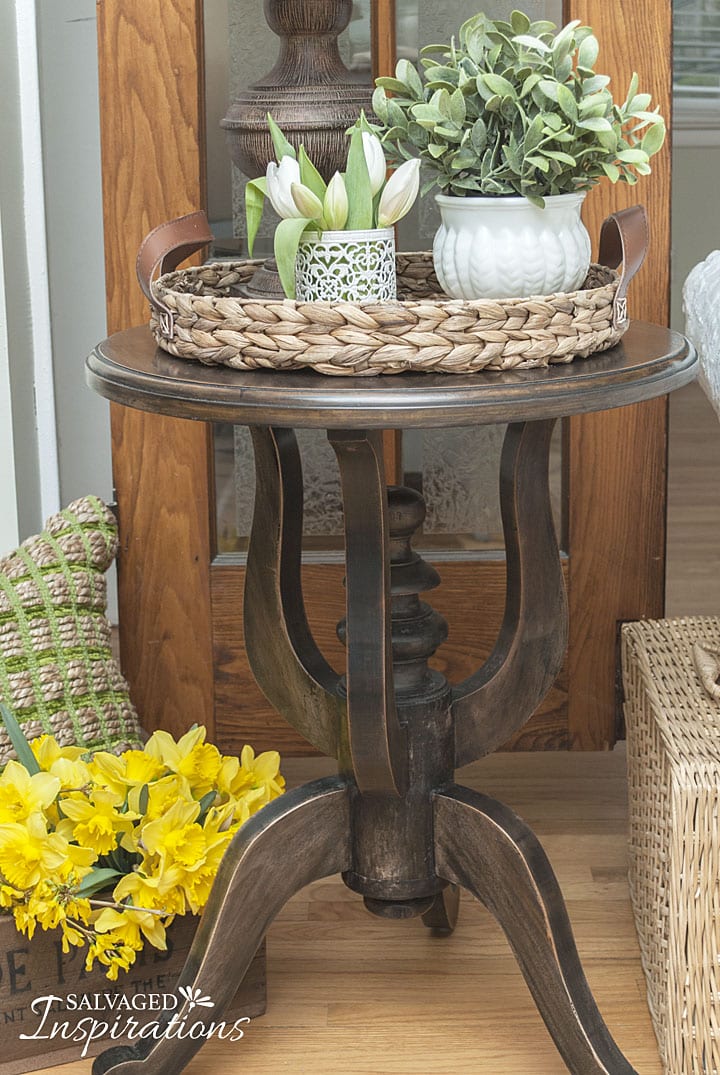
The wash turned this table into a nice espresso and the sanding created tonal variance which adds a lot of interest.
It’s similar to the Brown Acacia Restoration Hardware finish but has a modern farmhouse feel because of its irregularities.
I’m really happy all the cherry finish is gone!
Here’s another look at the before and after. I hope this has inspired you to give it a try. By applying a simple black paint wash, you can give your wood furniture a rich dark tone – while still showing off some beautiful grain!

What are you up to this week? I’m going to be busy cleaning and restyling this thrift table for this coming Thursday’s Furniture Fixer Uppers. I hope to see you then!
LET ME KNOW WHAT YOU THINK OF THIS SIDETABLE BLACK WASH MAKEOVER OR FEEL FREE TO ASK ANY QUESTIONS YOU MAY HAVE… I ALWAYS LOVE HEARING FROM YOU. IT MAKES MY DAY! 🙂
Happy painting my friends!
Denise x
RELATED POSTS::
BLACK WASH NIGHTSTAND SET
10 WAYS TO CREATE DISTRESSED FINISH
HOW TO WHITEWASH WOOD WITH PAINT
PAINT WASH WOOD PLANT STAND
PIN AND SHARE!


Can I ask you what the difference Is with this method vs the other method of full strength paint and misting it with a water bottle and then dry brush. Are the outcomes different? Thanks
They can be different Carla. The water misting allows you to manipulate and feather and/or blend whereas the wash (thinned paint with water) gives a more translucent finish even if you’re manipulating it. Hope that makes sense. 🙂
This is so beautifully subtle yet rich. I remember one of your earlier similar tutorials with DB’s Coffee Bean which inspired me to use this finish on a small table, with lovely results too. I’d appreciate your input regarding a vintage display cabinet with inlay marquetry on the top, which would be a shame to cover. I’d planned a bit of an Art Deco restyle with gold inside and black outside, but can’t imagine integrating this wooden top cohesively. Any ideas, or should I change my vision? Thanks for a wonderful website and sharing your considerable experience!
Hi Denise! I remember this table. I loved it then and I still live it. For some reason I thought you used Caviar from DB. I have both GF and DB. Where you happier with the “milk paint”?
I think when I did this one I wasn’t even aware of DB paints but that said, both are high-quality AWESOME brands. 🙂
Hi Denise,
I love the way your table turned out. It is so “today.” What a great way to update something. I am going to try this technique on something really small. I’m timid. If it works,, I have a little table that I will try. Thank you.
Marian
Thanks, Marian and have fun with your projects! And starting smaller with a new technique is the BEST way to start imo. 🙂
Would it be possible to give this a sanding, particularly along the edges and wear areas and then black wash? I am trying to avoid stripping. I loathe stripping! I love the look of this table. Thanks for sharing.
Of course… that would work just as well. 🙂
Excellent job. I have learned so much from you. I get started on a project and find it hard to be patient waiting for it to dry so I can continue unto the next coat.
Barb Tutty.
That’s enthusiasm! 😉 so happy you’re finding the #siblog helpful Barb! Have a super day.
Denise
I am refurbishing a music stand and your table is the finish I want. Can I use Dutch boy satin in little black dress and get the same results as with general finishes black??
Hi Eileen! I’ve never used Dutch Boy Paint but any water-based paint brand should work with this technique. 🙂
Thanks for your quick response
Hi, I was so happy to find this. I’m wanting to make my 2006 era mahogany traditional dining rm table look more updated/casual.
I want to get a more casual modern sideboard I can use with it. I think this will work perfectly!
That sounds amazing Denise! I’m sure it will look gorgeous! x
This piece looks beautfiul. The piece I am going to be working on is veneer. I am not wanting to use paint stripper. I have asthma so the fumes are too much for me. Will it work to lightly sand the furniture and then apply the paint?
Thank you,
Karen
Hello,
I was wondering if your table was real wood? I have a kitchen table I would like to try this on, but I dont think it is solid wood.
Hi Misty! This black wash painting technique can be used on real wood or veneer… it’s doesn’t have to be a solid wood table. 🙂
Wondering if this could be done in a grey wash also? I have old pickled pink pine bedroom furniture wondering if this would work? Wondering if I would have to remove the existing stain or just sand it and mix the washes? Your thoughts?
Hi Mary! Gray wash also looks amazing! It’s really hard to comment or make any suggestions without seeing what you’re working with though. I would suggest sanding slightly and then trying a grey wash in an inconspicuous area and see if you like the results.
That looks great and a easy to follow tutorial…thanku very much 😊
Super easy. 🙂 Happy Easter to you Kaz.
That finish is absolutely gorgeous!
Thanks, Janine! x
I love your table and would like to try this on a maple phone bench.
Do you think the black wash would look alright on that type of wood?
I think blackwash looks good on almost any type of wood… so yes I do! 🙂
I was dreading staining my new countertops because of the fumes, but with this method, I can “stain” in any color I like. I plan to finish with a durable urethane — probably 4-5 coats. Thanks for sharing this idea!
I love this idea.iam going to give it a go.
Very easy tutorial, and table looks so updated.
Thanks Robin! x
You have made me a believer! I have had a small secretary that is in dire need of TLC, but could never find a finish that appealed to me until I read this post. Your instructions are so in line with my skill set, but the black wash never occured to me. Thank you, Thank you, thank you.
I have to run = my shop is calling me………………
I believe in you, Judith! You can do this! I’d love to hear how it turns out on your small secretary. 🙂
Love it I think I might try this on 3 stools for the kitchen that are painted cream currently. Want them dark to go in my kitchen. Thanks for making it look so easy
Thanks, Kim and have fun with your kitchen stools! 🙂
Hello,,,, what a great idea. Looking forward to trying that soon but what I really wanted to say is how easy & simplistic you put the process in order. So easy to follow your steps. I will be following you for sure. Thank you again. Sincerely Patricia
Hi Patricia! You just made my day. I really do try to make the step by steps easy to read and understand so I’m so happy it works for you! Look forward to chatting again and happy painting! 🙂
I really like the look of the black wash you did on your table. Do you think it’s crazy to try a dark brown wash? Thanks for sharing.
Hi Nancey! I’m guessing a dark brown wash over certain types of wood may look really good! If you give it a try I’d love to hear how it turns out for you. 🙂
I did a Dixie belle coffee bean wash instead of stain came out beautiful and no smell
Simple but stunning transformation! Well done Denise! Carolina at Hamilton Billiards.
Would this work with oak? I have 1980’s yellowish oak bookcases that I would love to redo but have been concerned about what type of stain or paint finish will work on such an open and coarse grain. Any suggestions?
Me too! The reason I read this article was to see if it would work for my honey oak cabinets.
I love this look! I would like to do this to an older cherry finish piano I have but thinking of sanding and stripping the whole thing is a bit overwhelming. Is stripping and sanding absolutely necessary? The piano is in fair shape.
Here’s another way to create a blackwash finish with paint that doesn’t require stripping off the original finish yet looks amazing!
I think I’d like to try this on my wooden staircase! I think it would make a beautiful railing!
Never thought of using this black wash technique on a railing but I totally agree!
Hi Denise! Beautiful table. I’d like to try this on a little bench I have. It has a wood veneer finish on two side panels. Would your tutorial still apply as is? Strip first, etc? Am new to refinishing wood furniture! Thanks 🙂
Hello…just found this on Pinterest (and LOVE IT!!!) I would like to ask you which strip product you prefer to use? Can it be used indoors or only outdoors? I have chemical sensitivities now, so I’ve not stripped furniture in over 20 years. I have a really beautiful (but damaged) old drop leaf table that I’d like to keep the woodgrain showing, but have it blend in with my rustic/shabby/beach themed decor.
Thanks for your help!
JJ
Hi JJ! Using smelly strippers is NOT one of my favorite things to do either… believe me, I get it! I’ve been using this CitriStrip lately and it’s one of the better ones I’ve found. The odor isn’t as harsh and something about the smell is even kind of/sort of nice??? If you give it a go, I’d LOVE to hear what you think! And thanks for the kindness btw. Glad you like the table. 🙂
Hi Denise! Beautiful finish on the table!! We are building a farmhouse table for our kitchen and wanted a unique finish. This is going to be perfect with the linen French cushions and the black chairs. Since we are starting with raw wood (pine) think I should stain it with maybe Minwax Early American and poly some areas?
Thanks so much for the tutorial.
What a wonderful compilation of inspiring ideas and links, thank you for sharing this resource!
Wow that’s a cool idea ! I always learn something from your posts ! Thanks for always sharing with us ! ❤Cynthia
Thanks Cynthia! And can’t wait to see those custom night tables – love that hardware from Zara Home!
Loved the fretwork redo! Just started subscribing recently. You have great ideas and work! Beautiful. Thank you! I have been involved with repurpose furniture for a few months and learning more every day. I will continue to follow you…thanks for sharing!
Thanks for the follow Harold, and all the best on your repurposing adventures. It’s a lot of fun! 🙂
I really love the transformation! Beautiful 🙂
Thanks Annie! x
Love this and I already have a little table that is in dire need of a little freshening up. I’ve tried the chalk paint but this looks like so new for me to try. Thanks for sharing!
Hi Jennifer! Glad you like it and it’s sparked some ideas. It’s a different look than painting in chalk paints for sure. Have fun freshening up your table. 🙂
Hi, The first black wash I did was a mess, but eventually I got up courage and had another go and the result was fabulous! I did on the top of our entry console with the black wash and the lower part in an old white, lightly distressed. It came out even better than I hoped. Your piece is beautiful and has inspired me to do a whole piece in black wash. Many thanks!
Cheryl
Hi Cheryl! I can tell you’re a ‘real’ diy’er if you got up the courage to give a technique gone wrong another try! Good for you! 🙂 And so glad your entry console table turned out gorgeous.
Gorgeous, gorgeous, I love ❤️ everthing you do , because of you I’m so inspired to stating my table tomorrow! Happy Easter and I’m so happy I found your blog
Welcome Eliane…So glad you’ve found us too! Have fun with your table and Happy Easter! 🙂
Started my first chalk painted piece two weeks ago but the garden called so I’ve been out there since the first coat of paint!! Almost done with the new flower beds new raised beds. Can’t wait to get back to my craft room. You r an inspiration. Just love the black wash. I have several old tables n dressers. At least one will get the black wash.
Hi Fran! My garden is calling too but I haven’t mustered up the gusto to get out there and start spring cleaning yet. I have to add that on my ever growing list. 😉 Have fun gardening …and with the black wash technique. If you get the chance/time, I’d love to hear how it turns out for you.
Thank you, Denise ~ for so graciously sharing the wealth of your creative expertise and experiences with others! I am constantly amazed and inspired to try new things after reading your blog ~ as well as happily surprised to find (thanks to the candid ways you take us through your process of creative discovery) that I too can successfully re-design & transform otherwise unlovely or cast-off pieces into treasures! It’s soooo exhilarating and gratifying — and fun! Keep those creative juices flowing, girl: I look forward to your every post. Bless you 😉
Hi Suzy! This wouldn’t be any fun if I couldn’t share with you. And your comment has made my day because that’s exactly what I hope this blog does! A fun place for creatives like YOU to come and take a peek at my shenanigans – successful or otherwise – then read comments and ideas from other creative SI Readers, and feel inspired to salvage something of your own. LOVE IT! Happy Easter to you… and thanks again for this. 🙂
Very nice change up! I really like the idea and hope to try it on something I have. Thank you and Happy Easter.
Thanks Marie! Happy Easter to you too. x
” I loves it ” I never thought of doing a wash on furniture. I did it on a wooden fence in my yard and planter and I’ve always loved the look. Thanks for this and I wish you a Happy Easter!!!
Thanks Nancy! I also love the washed look. When we think of wash on a fence (or furniture) – it’s usually the Whitewash Method. I don’t think black wash is quite as common, but you can get some really beautiful results.:) Happy Easter to you!
I love this look. I have a couple of end tables I would like to try this on. As always thank you for your unique twist on the old furniture..
Hi Lorraine! This would look great on an end table set. 🙂 And like I was saying to Denise (earlier comment), if you apply the wash and aren’t 100% happy – it’s SO easy to paint over it!
I love this and all of your work. I can’t wait to get started on my own pieces! I am
just learning so a little nervous. Trying to wait until the pollen is gone so I can work
in the garage. Your work is great!
Thanks so much Sandy! And I get it – when I first started out I was nervous too. I didn’t want to ‘ruin’ any of the pieces I was working on. But the best way to learn (and I’m STILL learning new things everyday!!!) is to crack open the paint and start painting. You probably will make a few mistakes but that’s okay! I’ve learned waaaaay more from my mess-ups than my achievements. 🙂
Now THAT is a TABLE!! WOW. Never, ever thought to do a black wash, but how beautiful! Am pinning this to copy stat!!
What’s that saying?…Imitation is the highest form of flattery! 😉 Thanks for pinning/sharing and I hope you get a chance to try this Linda. 🙂
Hi Denise!
Love this look! Thank you for sharing. I have a 1940’s dining room table and buffet I’m about to start on. I’m planning to use General Finishes for the tops and use a mix of ASCP French linen and graphite for the bottoms. Thinking maybe I can use a black wash on the tops rather than use the General Finish straight from the can after seeing your post. Your table looks awesome!
Hi Denise! Love old sets from the 40’s! What a great project. And yes, if you do a GF black wash on the top and for whatever reason aren’t pleased with the look, it’s SO easy to paint right over it. So nothing lost!
Gorgeous!! A piece for your own home this time, huh? 😉 Great alternative to stain.
Thanks Zovesta! Yes, little by little I’m trying to switch up my own decor. 🙂
This is a good look. Much better than the original finish. I quite like it ! Thank you for sharing it with us. I’m sure there are many of us who will be looking for pieces to experiment on! Have a lovely Easter weekend!
Thanks Patty! It fits into my decor much better now for sure… or I should say the “vision’ for my upcoming decor…not there yet. 🙂 Happy Easter Patty. x
Beautiful as always!
Thanks Julie! And can’t wait to watch you on Hometalk LIVE! Congrats! x
Marvelous job. The restyle is fantastic. You took something that was ordinary and made it extraordinary!! I can see lots of people wanting to purchase that. Thanks for sharing.
Thanks Julie. It’s fun to salvage in your home. 😉 Hope you have an amazing long weekend. x
Just perfect!
Happy Easter!
Thanks Marg and Happy Easter to you too!
Great look & just the right amount of distressing. Great option for not having to figure out oil/water base stain & oil/water base top coat. Very pretty table. Thanks for sharing & have a Happy Easter.
Thanks Tracy! And Happy Easter to you and your family. xo Hey, has a cool music enthusiast nabbed up your table yet? I’m still having fun imagining that piece in a hip artists studio apartment.;) Love it.
I’m stripping a table top right now for a painted bottom, stained top look , but I am totally doing this black wash with distressing instead. So glad I haven’t picked up the stain yet. Love this look!! Thanks for sharing!!
I just went to take a peek on your FB page Carla. I think that’s going to look amazing! And love the base on that table.
Love this! I’m now looking for a piece I can try it on!
Great job Denise and great pictures.
Thanks Lynda! 🙂 And I hope you have a beautiful long weekend. I’m hoping the nice weather hold for us. 🙂
Thank you Denise! You couldn’t have posted this at a better time for me. I recently bought a rough looking claw foot table where someone had sanded one area the wrong way. I was contemplating doing some thing quite drastic and use multi color paints but you saved me – and the table….
Yaay! I’m glad you found this helpful Rita. And if you like this look, this wash technique is probably less time consuming than multi-color painting. The layers sink in and dry super fast. By the time I was finished one coat, I started on the next. If you give it a try, I’d love to hear how it all turns out for you.
Hi Denise. Happy Easter to you and your family. I am also planning to do things around my house this long weekend. My to-do lists are incredibly long (and often unrealistic) as well!
I must say….I LOVE this cute little side table. The black wash looks amazing.
Happy Easter Monique! Glad you like the table, and good to know I’m not the only one who has unrealistic to-do lists. 🙂 I hope you have a beautiful long weekend and take some time to do something fun and relaxing. xo
I love this look Denise!
Thanks Carole! And thanks for the speedy share my friend. 🙂