 Hi guys! I hope you had a great long weekend celebrating President’s Day and/or Family Day. The first long weekend of the year always feels like the most needed, but for me, always ends up being the laziest! Over the weekend we spent time with Dad, did some shopping, had good meals and sprawled out on the couch with some Netflix.
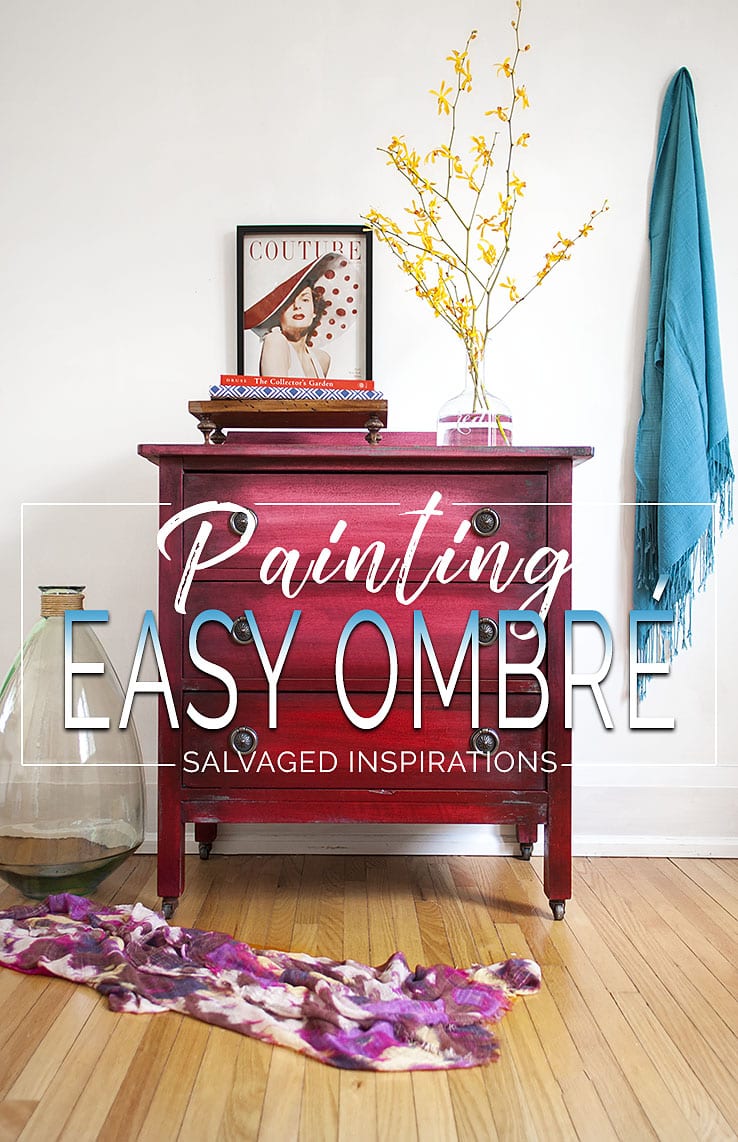
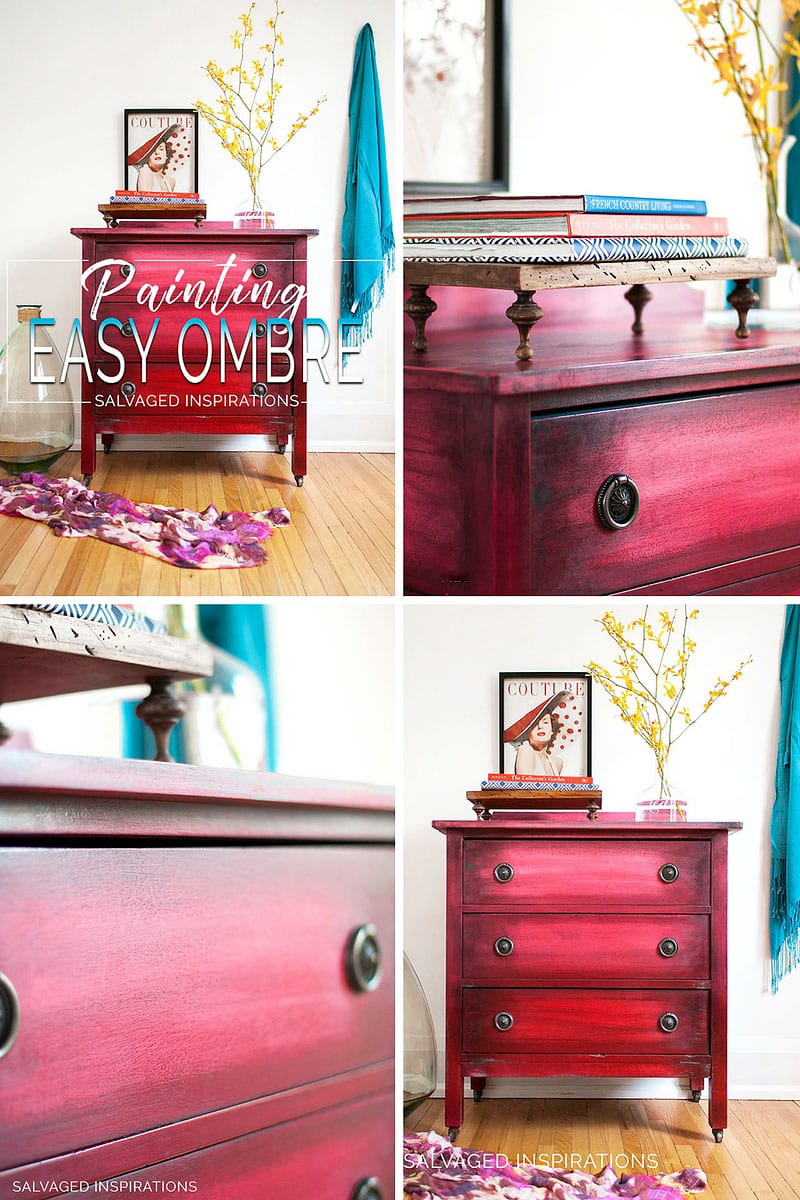
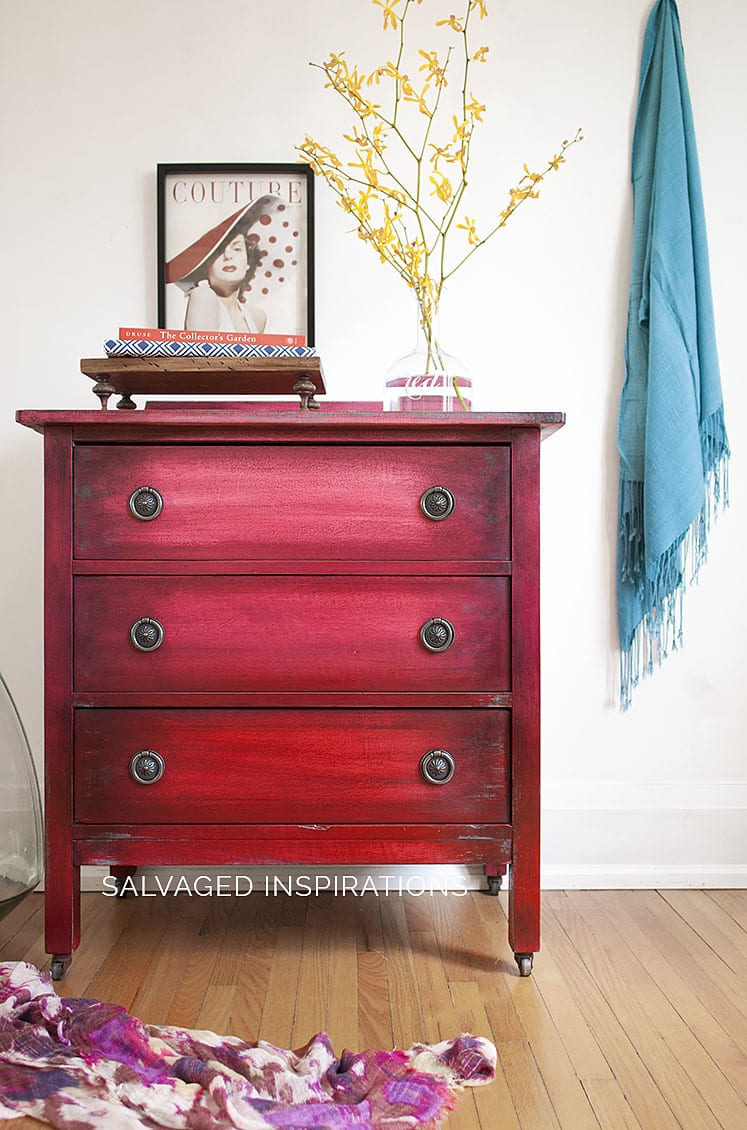
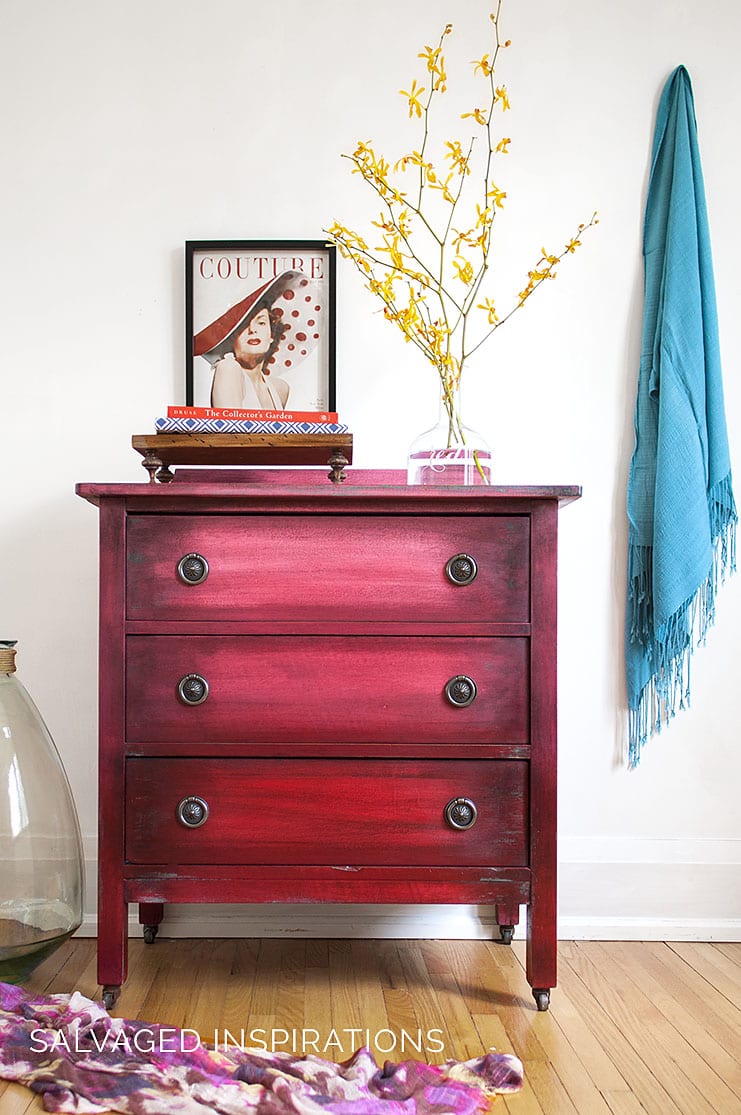
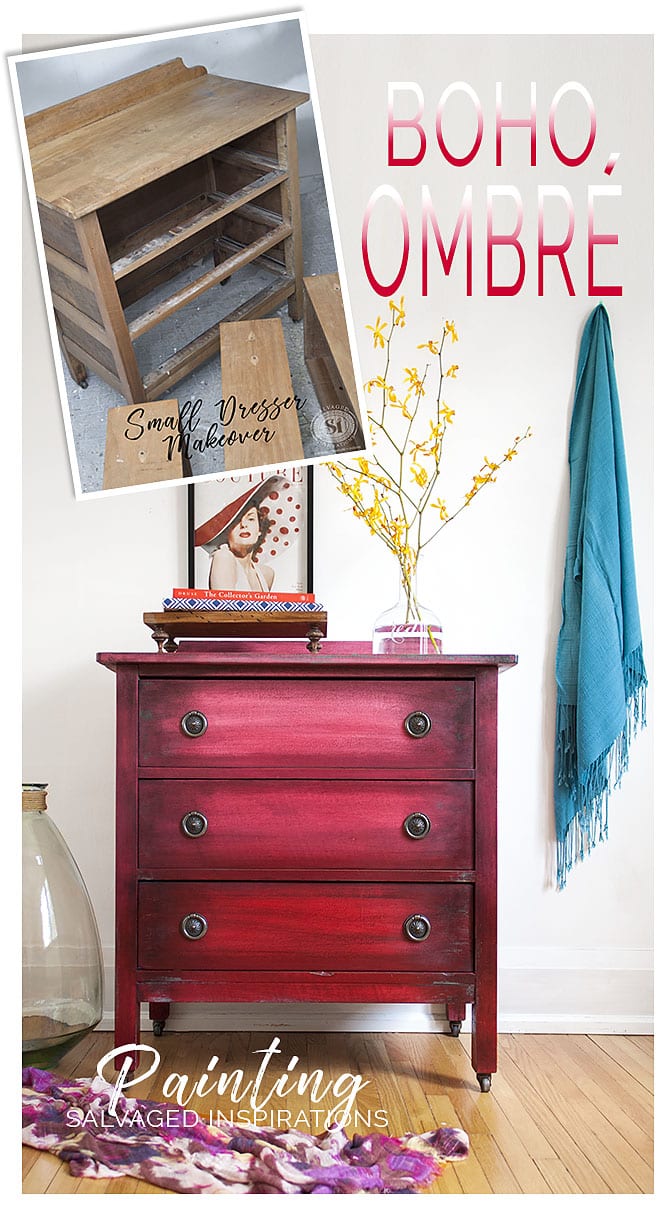
I’m excited to share this easy ombré paint effect I used on this salvaged dresser. This was my first time painting an ombré piece and I put a little boho twist on it. It was a fun process mixing the paint, spraying and blending – and I have to admit, I’m always thrilled when a new technique turns out like I hoped it would. I hope this inspires you to give this shading technique a try!
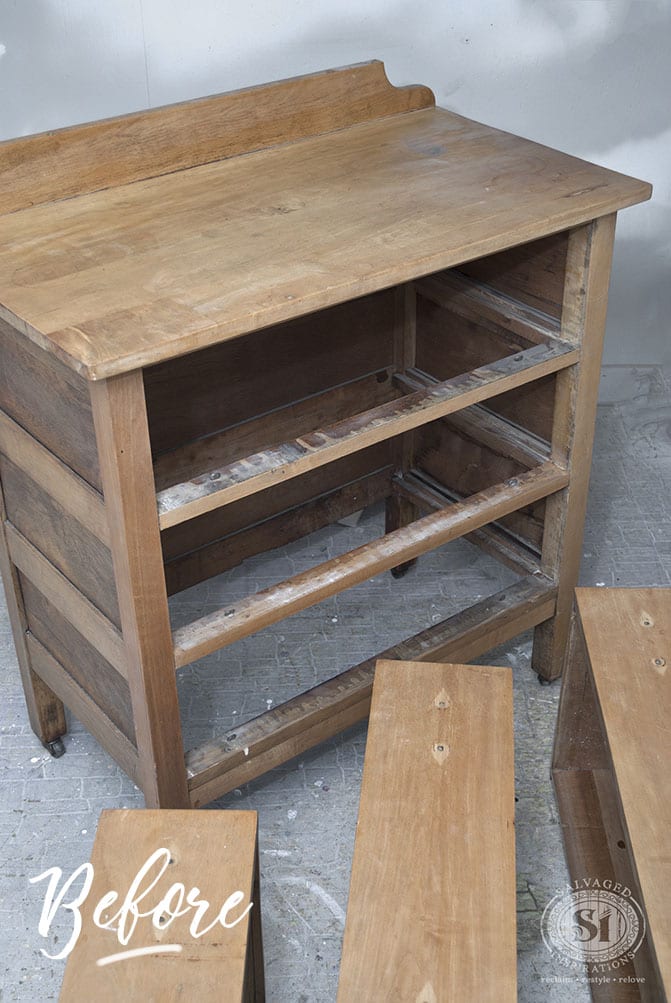
Going back a few years, you may remember this piece. It was originally painted and stenciled with milk paint. This little dresser ended up with a stain on top and never sold. It hung around and made its way from room to room until I was inspired by my friend Marie at Interiorfrugalista redoing her chalkboard project. Sometimes you just have to bite the bullet and realize it’s not going to sell for one reason or another and re-do it!
Here’s the original ‘before’ and if you’re curious, you can check out the first painted version here.

THIS POST CONTAINS AFFILIATE LINKS TO PRODUCTS USED. YOU CAN SEE MY FULL DISCLOSURE HERE.
SOURCE LIST::
- Small Dresser (Curb Shopped – Salvaged)
- DeWalt 1/4 Sheet Palm Sander
- Sand Paper & Tack Cloth
- Paint Brush
- Water and Spray Bottle
- Annie Sloan’s Empire Red & Pure White Chalk Paint
- Annie Sloan’s Black Wax
- Shop Towels
- Hobby Lobby Hardware
HOW TO – OMBRE PAINT EFFECT
I should warn you, this is another one of those pieces that looks a whole lot ugly before it starts looking good. 😉
Step #1. Sanding and Prepping
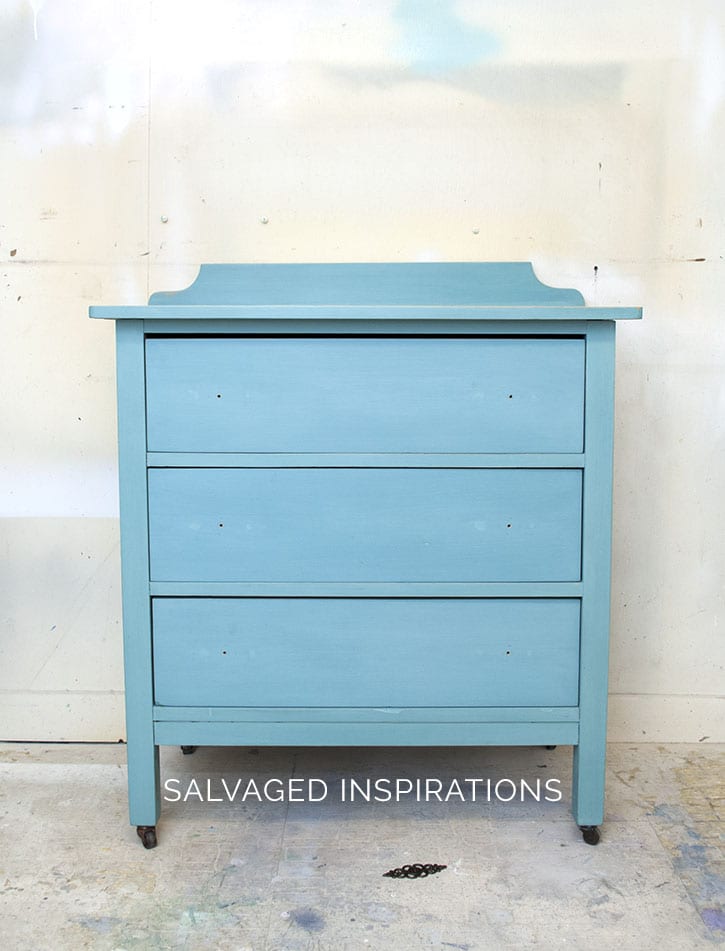
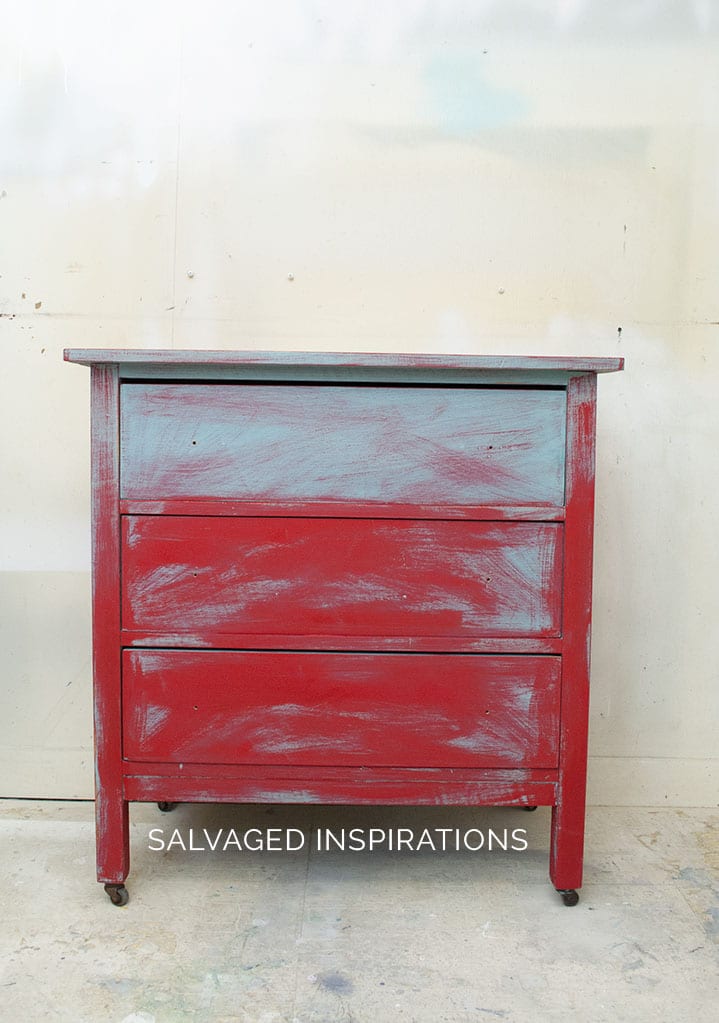
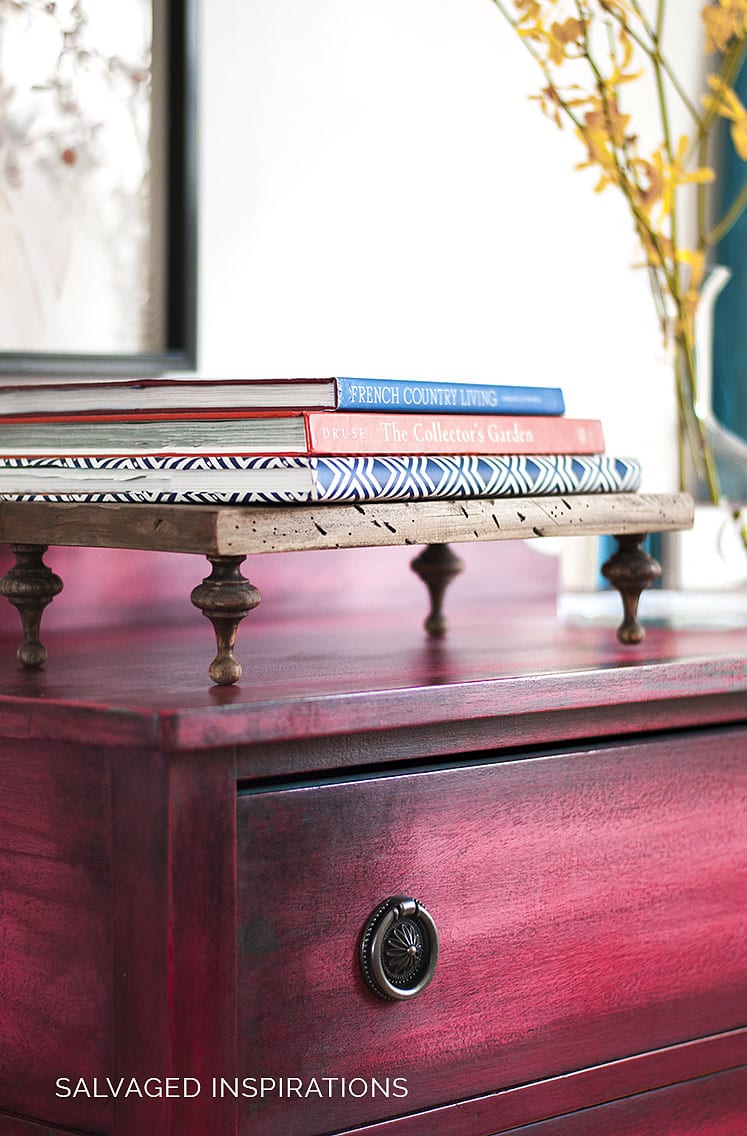
I started by sanding down the entire dresser with my palm sander and 150 grit sandpaper. As you can see below, I didn’t sand off all the paint! Just enough to knock off the original wax topcoat (and ugly stain!) and create some tooth for the new paint to cling too. I wanted to keep this vibrant base color so it peeks through the distressed areas. Once it was sanded, I wiped away all the dust with a tack cloth and now it was ready for the chalk paint.
Step #2. Painting 1st Color
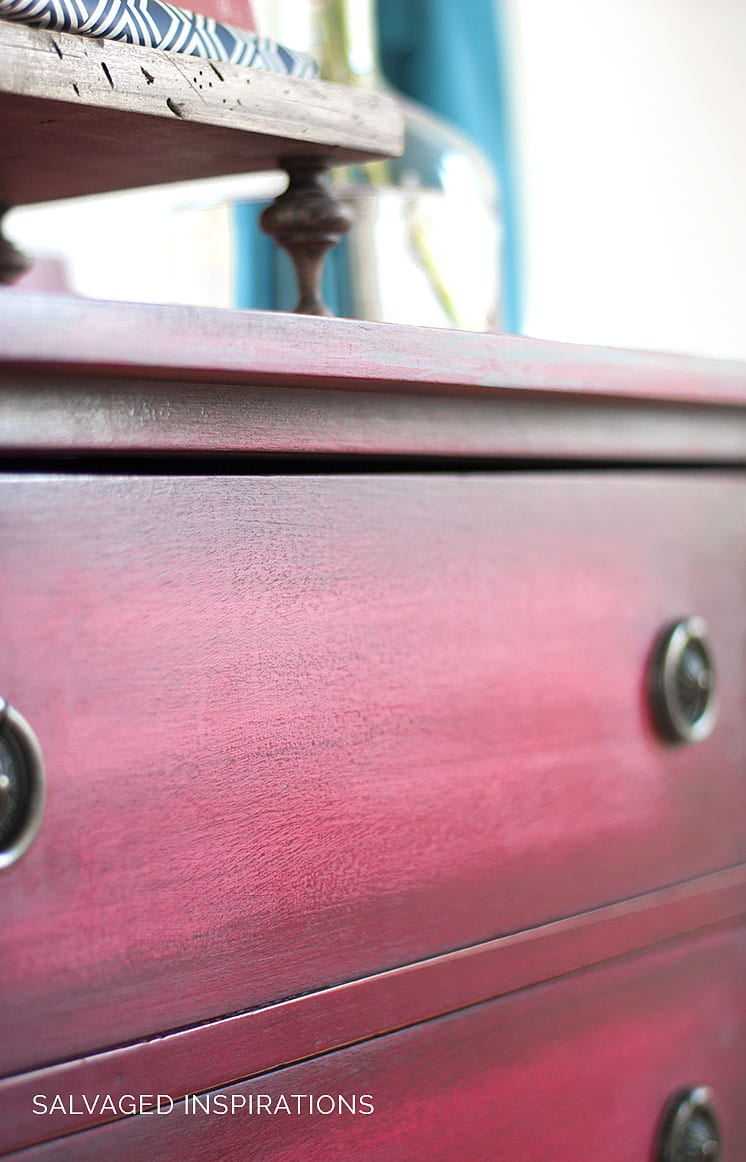
I painted a base color of Annie Sloan’s Emperor’s Silk Chalk Paint in random brush strokes. The chalk paint was applied heavier on the bottom and light on the top while leaving a fair amount of the base color showing through. This vibrant red was perfect to give this dresser depth and rich-blended-jewel-tones while looking a little boho chic.
Step #3. Ombré Paint Effect
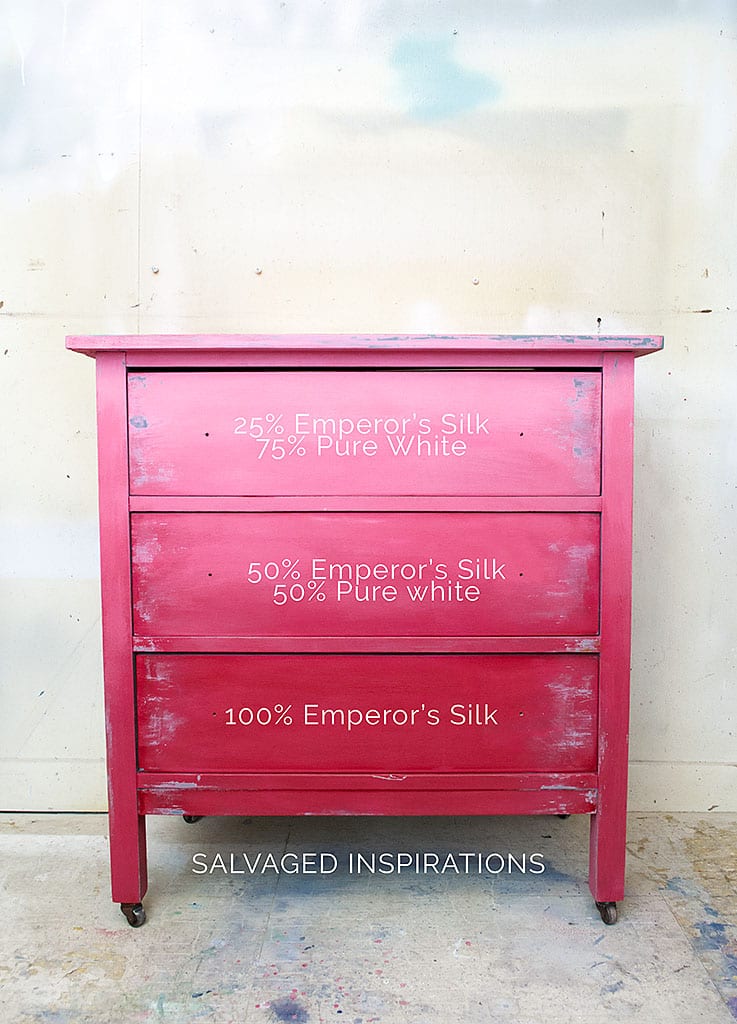
Now for the fun transformation! While the paint was still wet, I mixed Annie Sloan’s Pure White into the Emperor’s Silk in various ratio’s to create the ombré paint effect. To blend one into another, I sprayed a little water and brushed the wet paint together. It doesn’t have to be exact, just play with it and move the paint around until your happy with the effect.
Bottom = Annie Sloan’s Empire Red 100%
Middle = Annie Sloan’s Empire Red 50% and Pure White 50%
Top = Annie Sloan’s Empire Red 25% and Pure White 75%
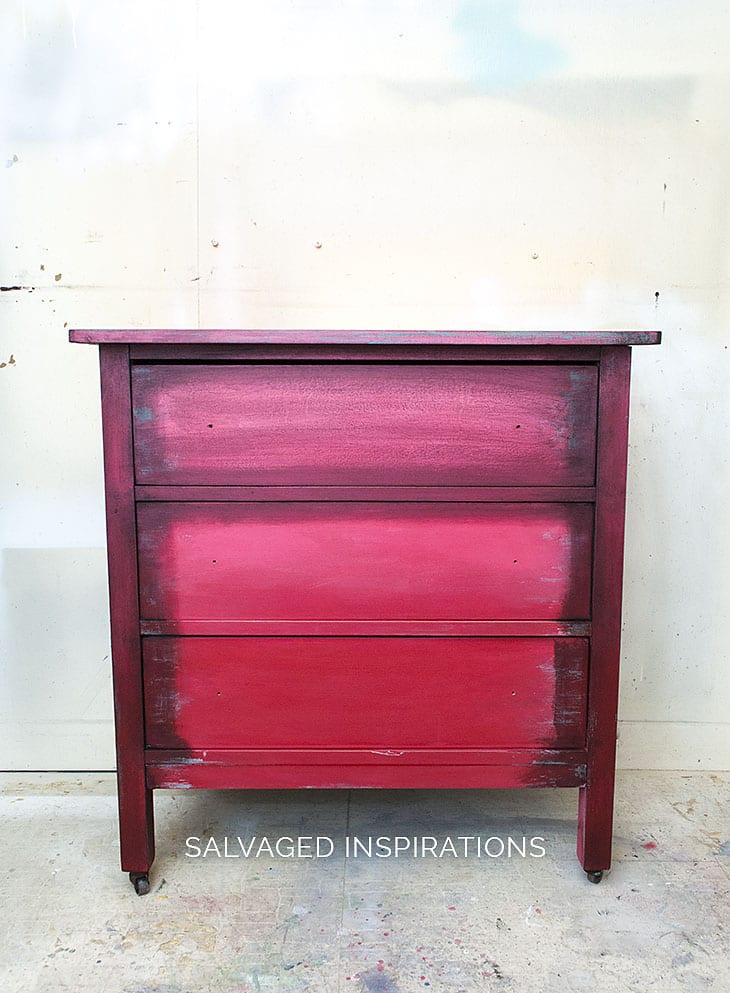
Step #4. Sand and Wax
Once I was happy with the shading, I gave the piece a final sanding smoothing all the paint and revealing some of the original blue base coat. After wiping off all the dust with a tack cloth, I black waxed and buffed the piece using the same waxing technique I used here and here.
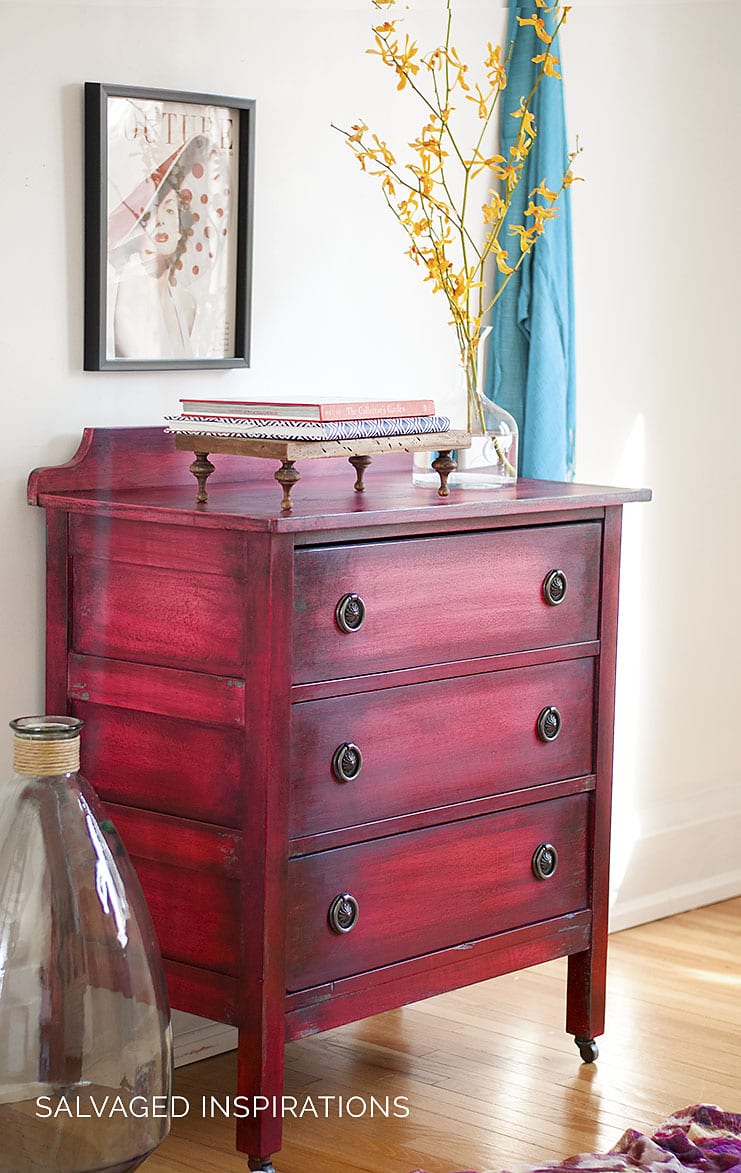
Step #4. Add New Hardware
I added new hardware from Hobby Lobby and I’m loving this makeover. What do you think?
I’D LOVE TO HEAR IF YOU’VE EVER TRIED AN OMBRE PAINT EFFECT BEFORE? IF YOU HAVE ANY COLOR COMBO’S YOU’D LIKE SHARE OR HAVE ANY QUESTIONS, FEEL FREE TO CHIME IN… I ALWAYS LOVE HEARING FROM YOU!
Thanks and have an inspiring day my friends!
Denise x
![]()
LIKE WHAT YOU SEE? SUBSCRIBE TO SALVAGED INSPIRATIONS SO YOU’LL NEVER MISS A POST!
FOLLOW ALONG ON PINTEREST, GOOGLE+, AND FACEBOOK FOR MORE INSPIRATION!
PIN AND SHARE!

I am trying this look for the first time. The small dresser is going in my sewing room, walls dark olive. My plan was to use deep chocolate brown to dark green to light white-green. I’d like to make the middle of the front the focus (lightest area). Any suggestions to make this a success?
Stunning! Maybe I missed it but I’ve reread this several times and tried to follow the italic “here” but couldn’t find how what looks like fading black wax around the dresser. How did you achieve the dark shaded areas around the dresser?
You had me at red. Then had me swooning over the lovely ombre effect. But you wowed me with the moody depth and texture created by the dark wax! Then you double wowed me with the beautiful styling, as you always do. Pinned and sharing
Aw, thanks Marie! The ombre effect was a lot of fun! Thanks for the share. XO 😀
I have just found your blog and I love your layered pieces. I have long admired this type of finish and have read a lot of blog posts about how to do it. Your blog has made me want to try it again. I did one piece and it came out really terrible. After three coats, I was devasted and done! I will go back to it someday and re-do again, but I want to try your technique on a different piece. I, too, don’t normally like an ombre finish, but yours isn’t over the top. It turned out great. I also just read your blog post about the green layered Empire piece. That one, too, is just gorgeous.
Thanks for the renewed inspiration! I am signing up to get your posts in my inbox.
Sue
Hi Susan! Thanks for signing up and a big welcome to you! 🙂 Seeing as you like this look, I hope these tutorials inspire you and give you the help/info you need to give layering another try. 🙂
Lovely job Denise! I have been dying to do a piece like this but have been working on only clients pieces recently and not anything of my own. Once I get a chance to do one of my own pieces I’m going to give it a try. Thanks for sharing, as always!
C 🙂
I can see why you’re in high demand, my friend. 🙂 And if you ever have the time to give this a try, you’ll have a lot of fun Carole! The mixing and blending …it feels like playing. 🙂
Oh my gosh….what a vibrant and richly colored piece of furniture. I love that you kept the original blue base and painted the red over it. How clever! Thanks for sharing.
Thanks, Monique! And I really like the blue/red contrast too… looks even better in person! 🙂
Another beautiful piece! Its like I’m at the museum looking at a gorgeous painting…all the details, the strokes and areas of dark and light. And the color! Geez..Stunning! Thanks so much for sharing you are so talented!
I’m smiling from ear to ear reading your comment Melanie. Thank you! XO
Luv it! Very Cool!
Thanks, my friend! XO It was a fun piece to work on. 🙂
It’s so different from what I was expecting for ombre painted. Love, it! You’ve created an amazing, unique piece. Thanks for the inspiration! I’d like to give this technique a try.
I’m so happy it’s different from what you were expecting Debra! If you decide to give it a try, I’d love to see/hear how it turns out for you. 🙂
Yes I did a piece that from the top went mint green, turquoise to navy. It was all on a little vanity for my granddaughter. Super fun project. Over the mint green I splash some coral and over the turquoise I splashed hot pink. It’s one of the favorites on my Instagram. Best of all my little Pengwen loves it.
With those amazing color combo’s, I’ll bet your little Pengwen (so cute!) loves it!
I LOVe the looks of this paint technique! You are always an inspiration and such a talent.
Thank you, Janette!
When you first mentioned Ombre as your painting technique, honestly, I was ready to delete and move on. Then something told me to not, because you haven’t let me down yet on your artistic taste. and talent 😉 Oh my goodness I love it. I’ve pinned it for future projects. I have a dresser that my son left when he moved out. That may be the perfect specimen. Thank you for sharing.
Hi Cindy, SO glad you clicked through!! 😀 And honestly, the reason I took so long to try an ombré piece is that the ‘traditional’ ombré has never really done much for me either. There have only been a couple of pieces on Pinterest that have really grabbed my attention. I guess that’s why I had to do something a little different with this paint effect. 🙂 I’m so glad you like it and thanks for pinning!