HERE’S HOW TO STAIN OVER AN EXISTING STAIN | 12 TIPS TO HELP YOU ACHIEVE A PERFECT STAINED FINISH FOR YOUR FURNITURE AND STAINED WOOD PROJECTS | YOUTUBE TUTORIAL
Hi sweet friends! Do you have an existing piece of stained furniture that you’d love to restain but don’t want to strip off the old finish? Or maybe you stained a piece of furniture and thought you picked the perfect stain color/shade but then realized it wasn’t what you wanted. Did you live with it? Or decide to sand it down and start from scratch? I’ve had both scenarios happen and I’ve learned that re-staining furniture isn’t much different than dying my hair. I’ve been blonde, strawberry-blonde, streaked-blonde, red-head, black, and brunette so I know what I’m talking about. 😉
Like any good hair stylist will tell you, you can apply a dark hair color over a light color, but not light over a dark. To go from a dark shade to a lighter shade, you must strip and remove the dark shade first. When it comes to furniture and wood, staining over stain works exactly the same way and today I’m sharing 12 Tips for Staining OVER an EXISTING Stain!
THINGS TO KNOW BEFORE RESTAINING WOOD
Even though it’s possible to stain over an existing stain there are a few things to watch for and keep in mind.
#1. Condition of the Original Stain
Just like painting wood, the original condition of the base and original stain will affect the new stain. If it has any water damage, cracking, peeling, or worn-away color spots, stripping it and starting from scratch is recommended. For example, the table in the pic below was NOT a good candidate for staining over the existing stain. You can see the existing stained finish is in really poor condition. I did end up stripping it and you can see the full before and after here.
#2. Stain Compatibility
The new stain you are applying over the old stain should be compatible. For instance, if it’s an oil-based stain, apply another oil-based stain. If it’s a water-based stain, apply another water-based stain. Incompatible stains can lead to poor adhesion or blotchy and uneven finish. If you’re unsure how to test if an existing stain is oil or water-based, check out this article here.
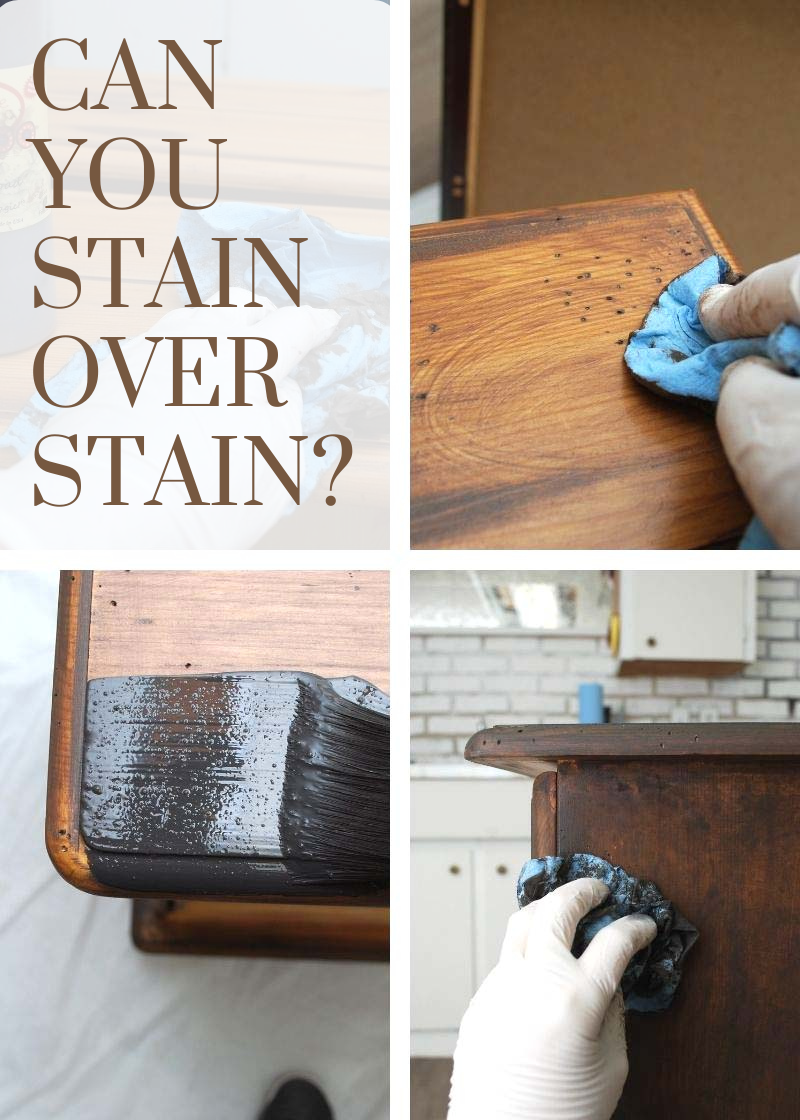
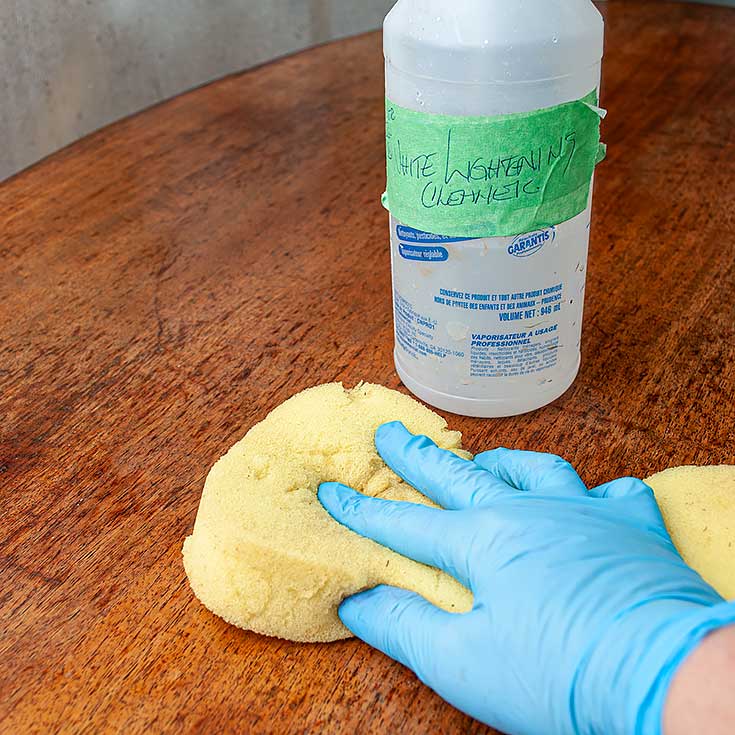
#3. Prep
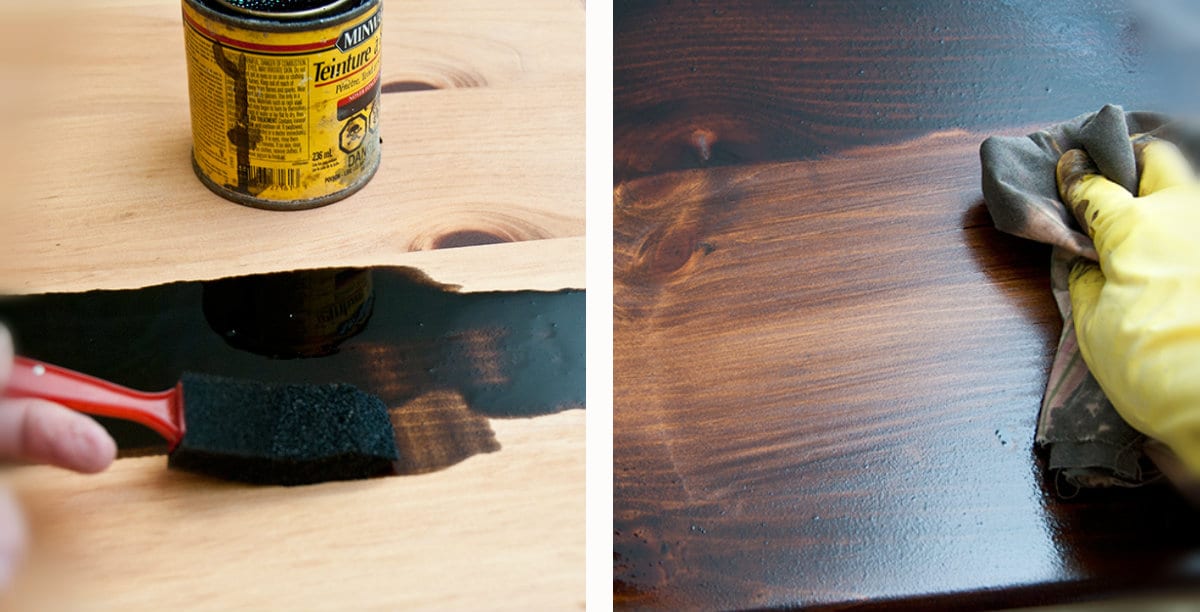
A total stripping of the finish is NOT required, but even so, a little prep is needed for a professional finish. A good cleaning to remove any oils, dirt, or dust is a must. I like to use my handy White Lightening mixed with a little water in a spray bottle which is a TSP substitute. A light scuff sanding to rough up the existing finish will allow the new stain to adhere better.
#4. Test First
I always test in an inconspicuous area before applying my stain over the stain. This lets me see the ‘new’ color and shade the stain will create. Keep in mind it will NOT be the exact shade or color that is depicted on the can because you will see some of the old stain finish coming through.
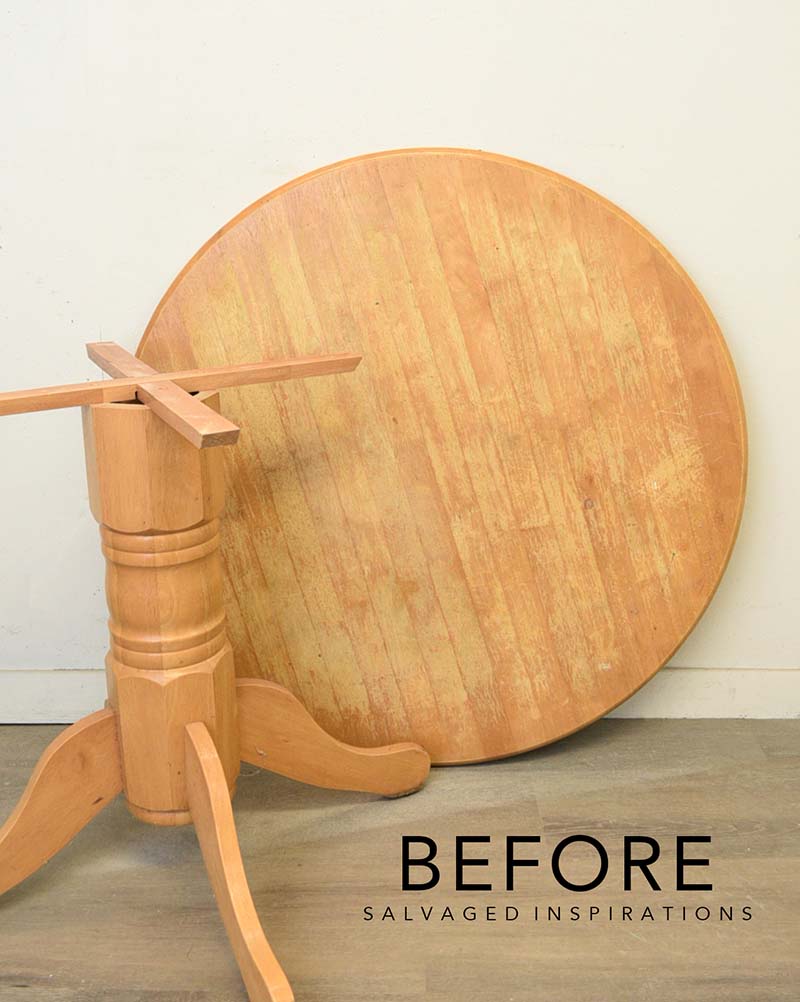
I’ll add the other 8 tips below but first here’s what happened with these road-rescued tables! [Updated June 27/2023]
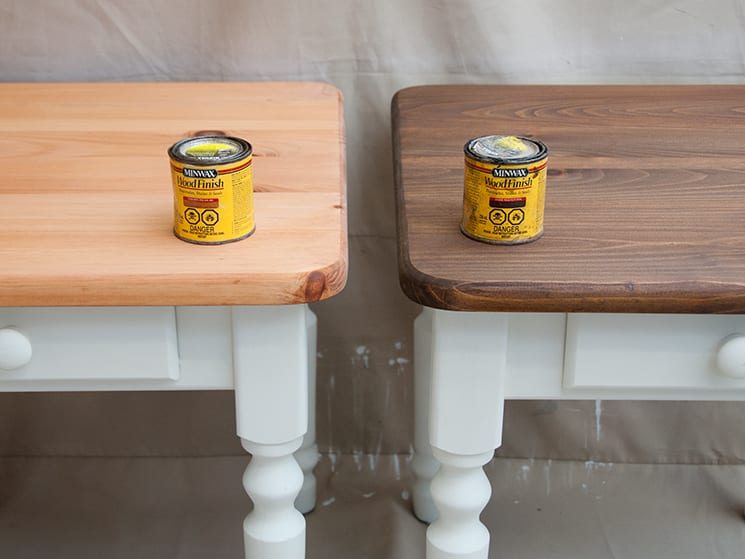
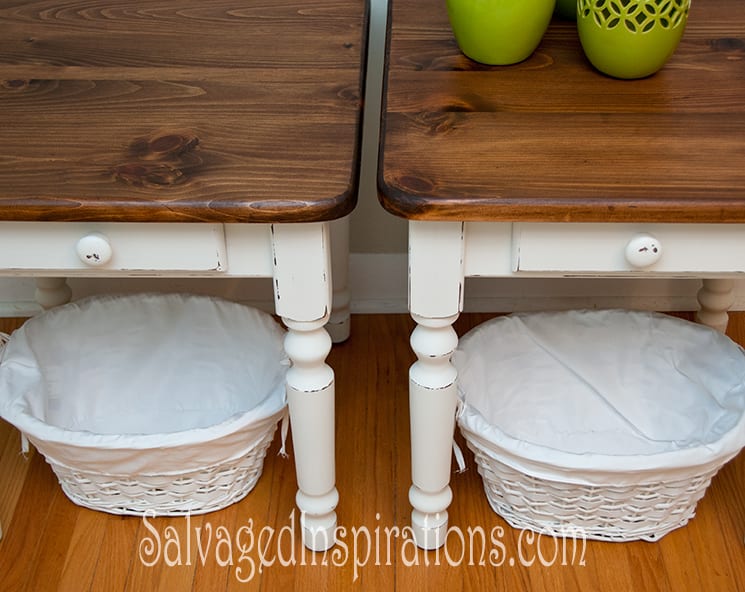
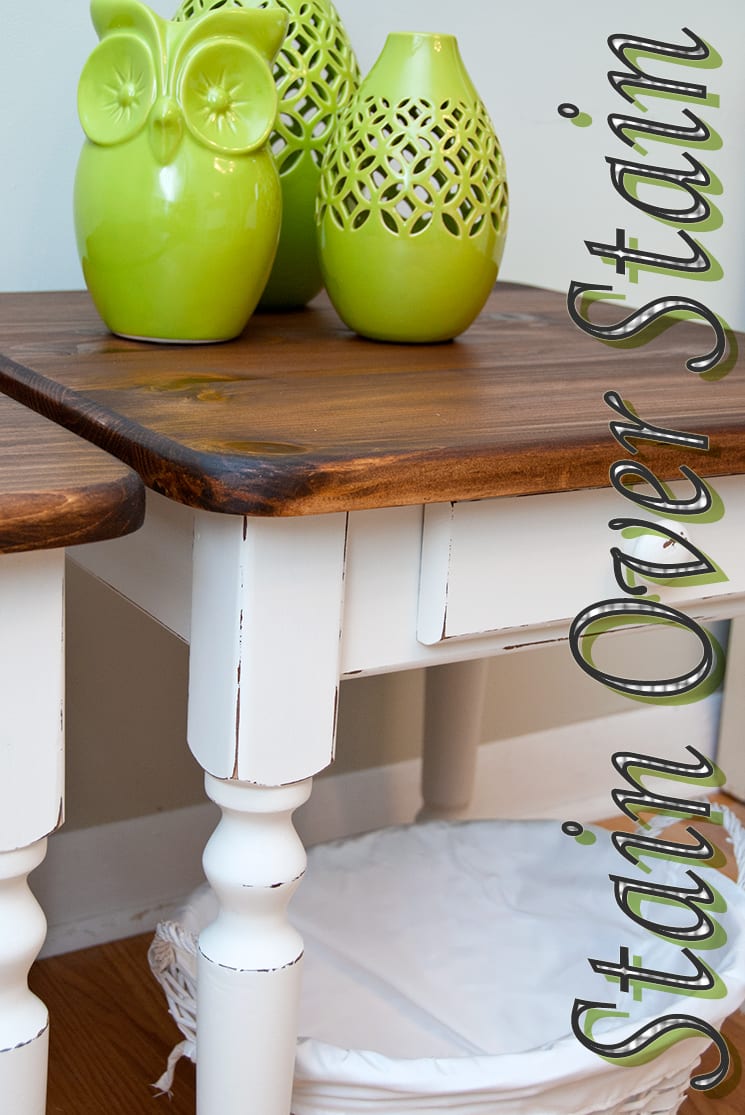
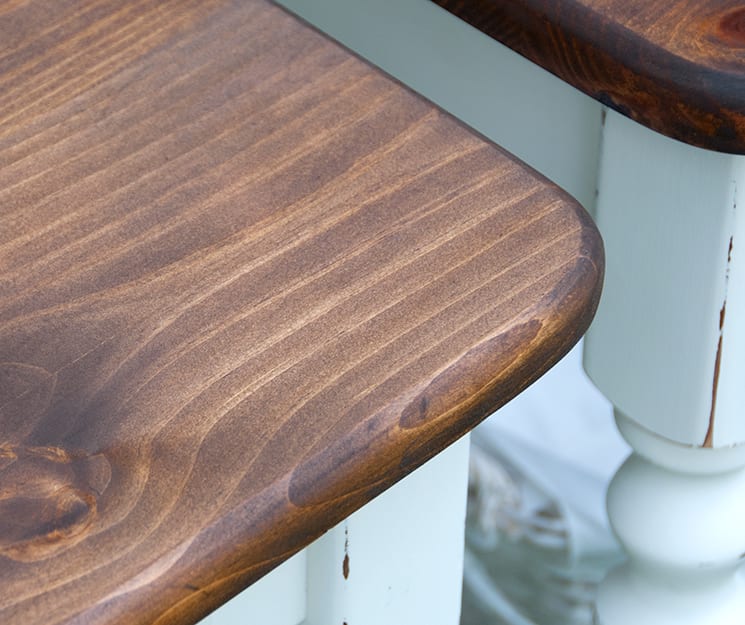
Today, while trying to turn two dirty scratched road-rescue tables into “Country-Charm”, I chose Peacan Minwax for the tops. Once applied, I decided I wanted to stain the tops much darker. What I didn’t want was the hassle of stripping and sanding all the wood over again.
I was feeling adventurous so I applied Dark Walnut Minwax stain over the already stained Pecan wood. It worked beautifully!
STAINS I USE & RECOMMEND
Varathane Gel Stains
Applicator Pads | Gloves
Lint-Free Shop Towels
Chip Brush | Paint Brush
Dixie Belle Gel Stains
Minwax Stains
DB Waterbased Stains
The end result didn’t turn out the exact shade/color which is shown on the Dark Walnut Minwax label, but, somewhat warmer due to the golden tones of the Pecan underneath. Seeing as I’m not trying to get an exact match to any existing furniture, no biggie… and I quite like the warm tones coming through.
THINGS I’VE LEARNED FROM RESTAINING WOOD
#5. Dark Stain Over Light Stain
Staining over stain is easy and works beautifully if you’re applying a dark stain over a lighter stain on the wood. Remember, it’s the same principle as dying your hair! This rule applies to oil-based stains, water-based stains, and gel stains.
#6. Mixing Stains
You can mix 2 or more stains together to make DIY custom stain color and shade. So long as you are mixing the same type of stains. eg water-based with water-based, oil-based with oil-based, and gel stains with gel stains. You do NOT want to cross-mix stains!

#7. Be Aware Of The Undertones
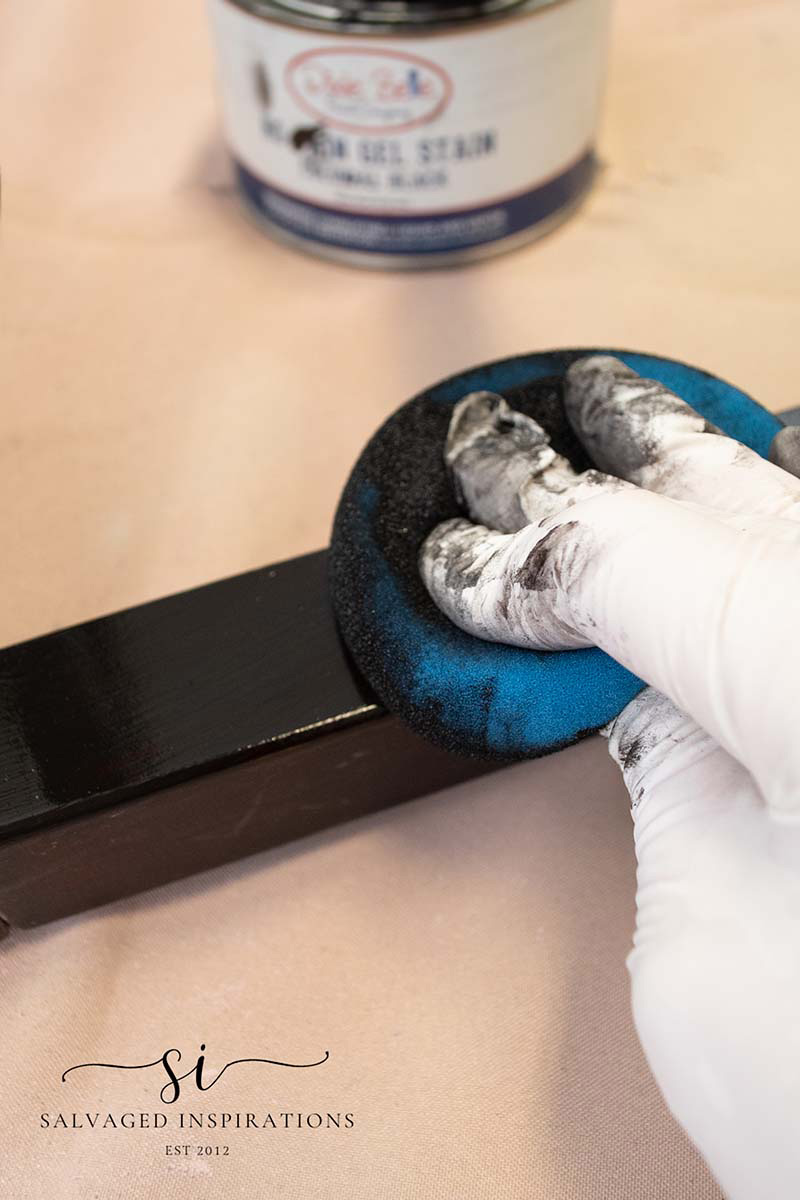
Once you become aware of stain color(s) undertones, you can mix and create gorgeous results! Warm-toned stains (stains with yellow or red undertones) work great to slightly warm up cooler-toned stains. For instance, if you have a table with a grey-stained top and you want to create a warm wood look, you would pick a stain with red or yellow undertones. This also works in reverse. Recently I curb-shopped this 2 in 1 table which had a very red warm base. To create a cooler/richer tone, I gel stained with a Black Gel Stain.
#8. Know Your Topcoats
It’s not advisable to stain over polyurethane or any other protected finish such as wax, varnish, or shellac. Removing the topcoat before staining (when using a traditional stain) is a must because it has nowhere and nothing to absorb into. (unless working with Gel Stains – see tip #9 below)
Here’s why. Last summer I tried touching-up scratches on a head & footboard by applying a matching cherry stain over the finish. Big mistake! After applying it, it did help camouflage the scratches but; the end result was horrible. Regardless of how many times I tried wiping it down, it felt tacky to the touch and rubbed off on my hands and clothes every time I was near it. Oil-based stains will sit on top of a finish and be oily to the touch rather than sink into the wood as they are intended to.
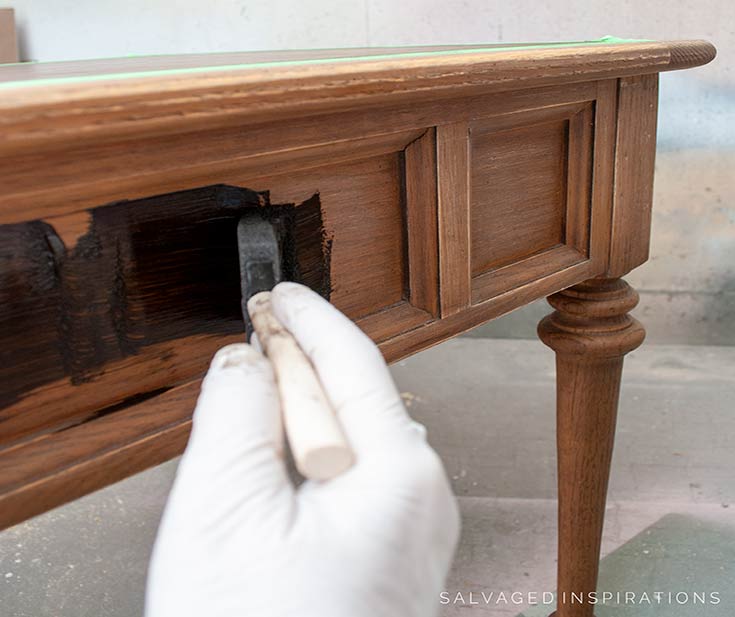
#9. How To Restain Wood With Gel Stains
Gel stains can be applied over an existing finish with just a light scuff sanding. This is because Gel Stains are topical and don’t penetrate the wood as traditional stains do. They work more like paint with the ‘look’ of a stain by sitting on top of an existing finish. I have a full tutorial on How To Apply Gel Stains Over an EXISTING Finish here.
I totally transformed my French doors using a gel stain – WITHOUT stripping them down! You can see the before and after in the image below. I also have a full video tutorial in the post if you click on the image.

HOW TO APPLY A STAIN OVER ANOTHER STAIN
#10. Application
Once I’ve prepped, picked my stain color, and tested it to make sure I like the results, now comes the FUN PART! I make sure I mix the stain thoroughly, then using either a shop towel, foam brush, chip brush, or applicator pad, I apply a nice light even coat in the direction of the grain working in smaller manageable sections.
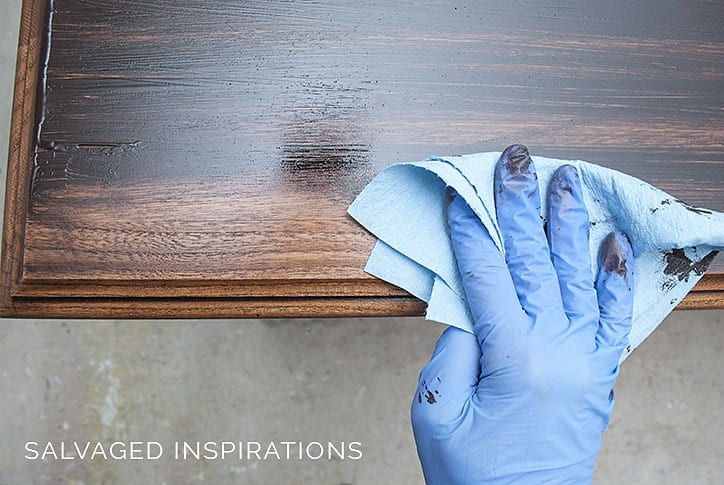
#11. Wipe Off Excess
Once I’ve applied the stain as above, I let it sit for a minute to absorb into the wood (depending on the brand’s instructions) and then I wipe back the excess in the direction of the wood grain and move on to the next area. I prefer using these shop towels to wipe back the stain, but a clean lint-free cloth works just as well. Be sure to read the manufacturer’s instructions on application, dry time, and recoat time.
#12. Recoat
Once the first coat is dry, it will look slightly different than when the stain was wet. I like to take a look and see if it requires another coat to get the finish I want and like. You can recoat repeating steps 9 and 10 as many times as necessary to get the look you’re after.
BONUS #13. Topcoat and Protect
Once the project is dry and looks fabulous, I recommend top coating to protect all your work. I like to spray my topcoats but brushing them on works just as well.
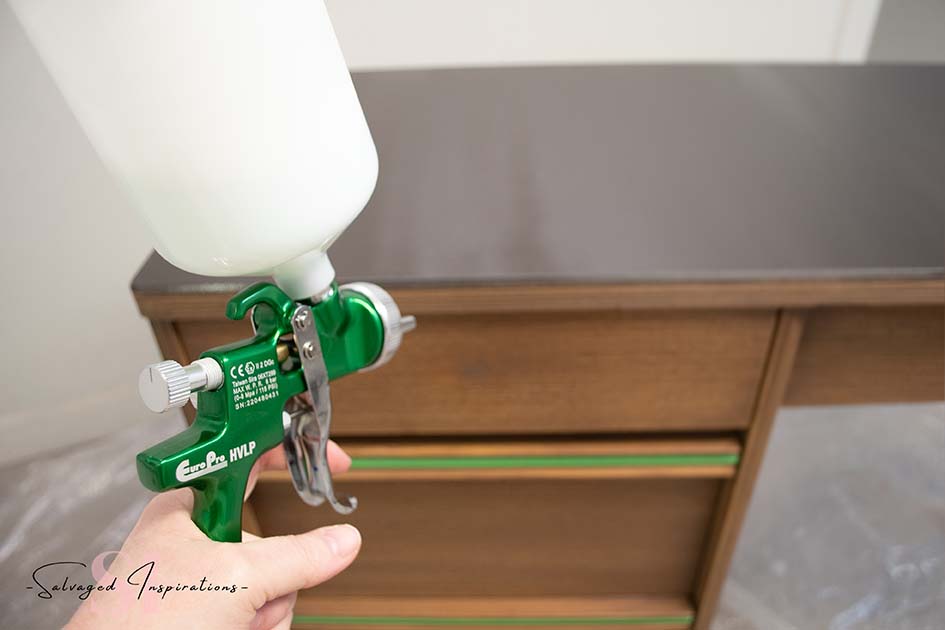
[Updated June 27/2023] Also, I just want to add safety first! Remember to work in a well-ventilated area and follow all safety precautions mentioned by the stain manufacturer. Using appropriate protective equipment and ensuring proper disposal of used materials is super important! I don’t typically work with traditional stains anymore as I find the Gel Stains are SO MUCH EASIER to work with. For the lighter-stained projects I do, I prefer working with these Water-Based Stains. Easy clean up, no smell and they give beautiful results as well!
YOUTUBE TUTORIAL
Here’s a step-by-step tutorial on How To Stain Over Stain | 12 Tips on Youtube. If you have any problems viewing it below, feel free to watch it on my Youtube Channel HERE. Our #siyoutubefamily is already a community of 39.2K so don’t forget to subscribe if you haven’t done so already! So exciting, thank YOU! 🙂
I hope you’ve enjoyed today’s tutorial and it will help you with all your staining projects!
LET ME KNOW OF ANY TIPS YOU HAVE WHEN RESTAINING WOOD OR ASK ANY QUESTIONS YOU MAY HAVE… I ALWAYS LOVE HEARING FROM YOU. IT MAKES MY DAY! 🙂
Happy furniture painting and staining my friends!
Denise
RELATED POSTS
HOW TO APPLY GEL STAIN | STEP BY STEP
WEATHERED GRAY STAIN TUTORIAL
10 TIPS FOR STAINING FURNITURE
STAINING PINE WITH GEL STAIN
STAIN OVER STAIN | HOW TO TUTORIAL
PIN AND SHARE!

This site is awesome! Against hubby’s wishes (he wants to hire someone) I would like to re stain double front doors myself. The previous homeowner must have had dog(s) who scratched lower area of both doors. My question is (I want to go from a red cherry to walnut) do I have to do anything to the scratches? (they aren’t too deep). I bought the citrus stain remover and plan to remove the original stain as best as possible, so maybe the scratches will lesson with the stain removal? Hoping this turns out nice and prove that we didn’t need to pay a pro 🙂
Amazing project Erin! I have a new front door in the works too. I’m trying to decide whether to stain or paint? If you’re okay with the scratches, you don’t have to do anything. If you’d like to smooth them out, a light sanding after you use a stain remover will make a big difference! Good luck! 🙂
I have just put one coat of my poly top coat over my stain but notice it looks cloudy possibly fibers from my cloth when I wipped my last coat of stain?? I noticed my cloth sticked a bit but I thought it would be okay.. It looks terrible! Do I need to re strip the top of my dresser or can I just re sand a little bit past that layer of varnish that got some cloth fibers in it?
I would try giving it a light sanding Audrey. Often, if a little dust (or fibres) have marred the surface, a light sanding and reapplication fixes it right up. 🙂
I sanded some cabinets, but apparently not well enough before I stained. They look beautiful, but its been over a week and the stain hasn’t dried yet, probably because I didn’t sand the prior off completely. Is this salvageable? Do I just wait and Poly over and call it good? Do I have to undo everything? HELP!
Sorry to hear this Vince..frustrating I know.. I had this happen to me with a table! Humidity can play a roll in dry time or possibly it was applied thick.. or couldn’t penetrate past the existing finish. Oil penetrating stains get sticky if they can’t penetrate and the excess just sits on the surface and causes a tacky mess. I don’t advise to poly over. You could try applying another coat of stain and then wipe off after a minute. This may dissolve any excess tackiness which you can then wipe away. If this leaves streaks or an uneven finish, you could also try wiping down with mineral spirits (following safety instructions!), let dry and then start over by sanding to bare wood. All the best with your cabinets.
I stained over paint instead of glazing and I do not like the result. Any suggestions about what I might do. The paint was gray and the stain was Danish Walnut(oil). I was just trying to tone down the paint job. Perhaps I applied the stain too heavily. I did wipe down immediately so it did not stay on the furniture very long. The item is a nightstand so could I just start over with another coat of paint? And if I do so, how should I prep the stain before I paint.
If it’s an oil based stain, the best bet may be to lightly sand down… and who knows, you may like the end results. This happened to me when I applied a dark stain over red. It was way too dark but once I gave it a sanding I LOVED the finish. If you’re not pleased after sanding, you could always apply another coat of paint and then glaze or choose another technique.
When applying stain over paint should I sand before I apply the stain?
It really depends what type of surface your staining over Gloria. In my above example, it’s raw wood so NO additional sanding was required when I used the darker stain over the previous light stain. If you have a finished and topcoated surface eg, bathroom cabinets, yes sanding is recommended. If you use a product like a darker General Finishes Gel Stain, only minimal sanding may be require. Another words it’s not necessary to sand right down to bare wood.
Hi Denise,
My wife and I want to pull up ugly carpet and put down hard wood flooring on our stairways and hall but the floor trim and bannister is a honey oak. Can we use this method to cover the dated oak with a darker, richer color to match the new hardwood overlay?
You sure can Kerry. However I would do a test patch first to make sure the darker stain you’ve chosen (applied on top of the dated oak color) will be a close match. Also, if your banister/trim has topcoat, a sanding may be required. Sounds like a great project. Good luck. 🙂
All my furniture is a warm cherry brown and i want to go to chocolate brown, which is cooler. Do I have to strip or can I go over it?
Cherry brown is saturated with a lot of red Bek so it will create warm undertones. I would try lightly sanding and then applying a dark chocolate brown on top. See if you like the effect. If it’s still too red, then start from scratch and strip it down. Worth a try in an inconspicuous area.
I glazed my kitchen cabinets and did it right over my existing polyurethaned (or lacquered) cabinets. They turned out beautiful, but i did first degrease them with a good spray that I bought at Walmart, which got all the grime off of them first. I did not have to strip or sand them at all.
Denise,
I want to stain a headboard and footboard black. It is currently a stained medium brown like a pecan color. Would I be able to get this to be a black color by using a stain or will I have to paint it to get the black color?
If I was after an opaque black, I would paint. If I wanted a black with some grain showing, I would stain. Just depends on the look your after Regina. Just keep in mind if you decide to stain over the existing pecan color, you will get the warm tones of the pecan showing through your new finish.
I moved into an older home that has a “galley” type kitchen. The cabinets are older, knotty pine. Quite dark as well. I’d like to retain them, male them more rustic. Do I need to strip them? Afraid it will ruin them.
Susan, if you want your knotty pine cabinets to be lighter than they are – yes, stripping/sanding is the way to go for a nice finish. If you’re looking to darken them even more, you may be able to give them a light sanding to remove the topcoat and then apply a darker stain. And I totally get your ‘fear’ because a lot of Diy’ers feel the same way! 😉 Redoing kitchen cabinets is a big job – even for an experienced refinisher. If you’re hesitant to take on the entire job because you’re unsure of the outcome, maybe try testing in an inconspicuous area (the back of one of your cupboards) to see if you like the results before taking on the entire kitchen.
Hey I’m looking to re-stain my kitchen cabinets, are you saying that I don’t have to sand them first? or is that still a must?
Thanks 🙂
Hi Jennelle! If there’s an existing finish on your kitchen cabinets, a sanding is required. If you chose to use a product like General Finishes Gel Stain, you won’t need to sand right down to the original wood. A light sanding will suffice but this only works if you are staining your cabinets darker. Also, if you take this route, the color of the dark stain won’t be 100% true seeing as your existing stain may slightly change the hue.
I put a thin coat of minwax stain over finished wood to cover scratches then cover the piece with a fresh coat of polyurathane.
I am looking for a heavy pigmented stain to apply like paint. There was a product called Carver Tripp. Know of any substitute?
Hi Rob. Carver-Tripp is no longer in business but I see that you can still buy this stain on Ebay if you don’t mind shopping online. I’ve never tried Carver-Tripp stains so I have nothing to compare it to – but if you’re looking for a water based heavy pigmented stain, I really like General Finishes Gel Stains. Easy to work with, covers beautifully, and if 2+ coats are applied, you can achieve a ‘painted’ effect.
I want to refinish my table. I am hoping to use a darker gel stain over the current red colour finish. My question is that my table top has grains in different directions. I know you are supposed to sand and stain in the same direction of the grain. What do you do if the grains are in different directions (different pieces of wood must have been used to make the table top)?
Thanks in advance!
I know exactly what you mean Michelle because I’ve worked with tabletops with the wood/grain laid in various patterns. Same rule applies. To get a nice finish, sand in the same direction of the grain so a little more care and time is required. Amazing look after though!
Dear Denise,
I just discovered your blog and just want to tell you that I LOVE how your directions are so clear and thorough and also that you are quite adventurous in your quest to find cheaper alternatives. Thank you for the effort you make and for sharing. I have been repurposing furniture from garage sales and thrift stores for many, many years. I am in my 60s and retired from teaching.
Sincerely, Lynn from Colorado
Hi Lynn from Colorado! Welcome – and so glad you’re finding some of the posts helpful. 🙂
Can I use a dark wax over my finished oak table to darken it ? Or do I need to totally strip the surface first?
Missy, you can apply wax over varnish, lacquer, or polyurethane but I’m not sure a dark wax will provide that much darkening to a finished oak table. And keep in mind, if you’re not getting the dark result you like, NOTHING can be applied over the wax. The wax will need to be thoroughly removed with mineral spirits/sanding before using any other darkening product. I would try a test area first to see if you’re happy with the results before taking on the entire table. General Finishes has wonderful Gel Stains you can apply over a lightly sanded table. 🙂
hi, i applied a stain over a stain, and now its feeling tacky to the touch, should i apply polyurethane over it so its able to dry?
Oscar, applying poly over tacky/sticky stain is not recommended. If the stain has had ample time to dry and it still feels sticky, the stain has not penetrated the wood… exactly like my headboard scenario I mentioned above!There may have been an existing topcoat on your piece that required sanding prior to applying the stain, or possibly the stain was applied heavily and not fully wiped off. It could also be as simple as the environment has high humidity and it needs a little extra time to dry. If it doesn’t dry in the next few days, a wipe down with mineral spirits to remove the stain or a sanding and reapplication may be required. You can also try adding another coat of stain (which will dissolve the existing) and then wipe down, however this may or may not lead to streaky results. Worth a try if your going to sand it anyway though. 🙂 Good luck with your project.
Hi Denise,
I’m loving this post. I was wondering what paint was used on the legs of the piece. I don’t think it’s chalk paint. It may be a satin or eggshell Latex paint? Is it paint and primer in one? I looked through all of the comments and I don’t see the white paint mentioned anywhere and I really like the look of it. I’m new to painting furniture and am not sure what paint you use?
Thanks again!
Hi Dean! So glad you’ve found this post helpful. 🙂 I restyled these side tables a while ago and unfortunately, I don’t recall the brand/color of the paint I used…my apologies. (I’ve learned to include color in my more recent posts for this exact reason..lol!) Love your blog btw!
Hello Denise, I have a staircase that I am thinking about redoing. The handrail is a dark stain almost a black as well as the treads, the spindles are painted white. I am wanting to restain, using a dark stain, as close to the same color as the previous owners used. The hand rail seems to have a sticky feeling to it, more so on the underneath side. Is this something I can restain over or do I need to strip and sand it? The treads don’t have the sticky feeling at all… Thanks for any help, this will be my first time using any stains :/ so I’m a little nervous and want the best outcome.
Amber, if the previous owner used an oil stain, the sticky feel could be stain build (not wiped off properly) or maybe it wasn’t sanded down nicely prior to the staining so the wood couldn’t absorb the stain properly. Either or would leave stain feeling tacky. Seeing as you want a similar color finish, {in a test area} apply another coat of stain. Let it sit for a minute or two, then wipe off. Any ‘tacky’ stain should dissolve and wipe away leaving a nice even color. If all or most of the color comes off when you do this, try wiping with mineral spirits, re-sand, and then re-stain.
I just applied minwax stain to a piece of raw unfinished furniture I bought. I lightly sanded the piece because it had already been sanded. However, after I stained it, some imperfections in the manufacturer’s sanding job became apparent – circular sanding marks and glue. How long should I wait to sand the whole thing down to raw wood again and reapply stain? I did use a conditioner before I applied the stain (the wood is rubberwood). Thanks!
Jan
Hi Jan! Once the stain completely dries is best. Then all steps can be repeated. I know it’s frustrating after all that work.
I stained a night stand with a cherry stain but really wanted it mahogany color. Cherry stain looks like a dark wood on night stand. Do I have to resand it or can I stain over it to get a mahogany color
Cherry wood stain has strong red undertones. If you apply mahogany stain over the cherry, it will have distinct red tones showing through. I would test a small area to see if you are happy with the outcome, however if a “true” mahogany tone is what you’re after, re-sanding would be the way to go Kim.
Hi, if I have a solid oak bookshelf finished in golden oak stain with clear coating, do I need to strip off anything if I want to re-stain it a darker color? Or, can I just paint over the whole thing with the new stain I want?
If you’re staining it darker, it doesn’t require you to sand right down to the raw wood, however a light sanding to remove the clear coating is recommended Rachel.
Can you mix stain into wax to get darker color vs. buying the dark wax? Thx
Most definitely Katie! Stain, paint… I’ve even heard of using shoe polish although I’ve never tried.
I have a large outdated kitchen with oak cupboards that are stained and clear coated. What would be the simplest solution to cover them or update the color without painting and taking away from the wood look?
Sherry, if you’d like to keep the ‘wood-look’ and stay away from paint, sanding and then applying a darker stain would definitely update the look. I’ve seen some GORGEOUS kitchens that have been updated this way for a minimal cost!
HI,
CAN YOU RECOMMEND ANY BOOKS THAT SPEAK TO CREATIVE IDEAS USING CHALK PAINT. I ASSUME WHEN YOU ADVISE MIXING CLEAR WAX WITH PAINT, THE MIXTURE IS APPIELD DIRECTLY ON THE WOOD FINISH, OR IS THE WOOD FINISH PAINTED FIRST WITH A SOLID COLOR AND THEN THE WAX/PAINT MIXTUREIS APPLIED OVER THE SOLID COLOR.
Annie Sloan has some wonderful books with creative furniture painting and ideas Sandy! When I mix my own DIY Dark Tinted Wax, I apply over a painted surface to give it an antiqued look.
How long did you leave the dark walnut stain on for before wiping it off? Thanks!
I work in small sections and it’s pretty much wipe on wipe off Christine. If you let stain sit to absorb, it will start to dry and get very tacky. Then there is no easy way to wipe it off evenly. If you stain your first coat and notice it’s not as dark as you would like, you can always apply the stain a second time.
I used “Zinsser Bulls Eye Traditional Finish & Sealer, Amber stain” on a new outside door for the basement. It is orange. Is there a way I can darken the color without totally removing it?
Tricia, if this is the Shellac Finish Sealer product I’m thinking of, a light sanding would be required and then you can apply a darker stain over top. Keep in mind there will be a color variance once the two shades are blended, but this can darken up your existing amber. I would test a small inconspicuous area before taking on the entire door.
Very useful article! The comments were great as they lead to more information on the subject. Looking forward to your future posts.
Actually you CAN put stain on scratches for a touch up! After you touch up your scratches spray the area with Pledge or like product. It will remove the extra stain, and tacky feeling. It will have filled in the scratches!!!!
If you find yourself with sticky stain that just will not dry, try putting a coat of Minwax waterbased sanding sealer right on top of it. I have done this several times it will dry your stain and you can add your poly right on top 🙂
Hi, I have a golden oak table that I want to refinish and stain a dark walnut. I think I will strip the table top before staining/polying but was wondering if I could just sand and stain the legs rather than get into the mess of stripping.
Kelly, if you totally strip the top but only lightly sand the legs, your stain top and legs may not be a cohesive color. I’ve used General Finishes Gel Stains (on top of lighter stains with just a light sanding) and the results have been gorgeous.
I am re-finishing my, kitchen table. the striping went fine, but when finishing, I had trouble with one spot matching the rest. it was very light, so I used a darker stain on that spot. now I see it was the wrong choice, and that spot is too dark, and doesn’t have the same golden hue. I have not put polyurethane on it yet. can I use stripper on the stain so I can re-stain the spot? thoughts?
Very normal Dawn… this has happened to me too. Sometimes wood does not take stain evenly. If you don’t like the look of variances in your finish, using a pre-stain wood conditioner can often make a huge difference in the stain looking more uniform. Yes, you can strip/and or sand and then re-apply.
Hi! Trying to refinish a table in fairly good used condition. I’m really scared to do this can I send you a picture of it and can you please help me???
For sure… feel free to email it to [email protected]. I do receive a lot of email but I will do my very best to respond as quickly as possible! 🙂
i want to apply dark stain over light stain ( as you advise)
Problem is that I have areas that I puttied, …in two different color putty and the 50 year old door has some areas darker than others.
Can I still use the same dark over light?
PS I dont dye my hair..lol
lol…yes Jacob, dark over light still applies. However, from what you’ve described, my concern would be a possible uneven application. I once re-stained a table that had variances in the ORIGINAL stain. The uneven light/dark areas showed prominently even with the darker stain applied on top. Also, not sure if the putty’s are stainable/matching the existing stain or how much or little has been applied, but this could also lead to uneven application depending on what product(s) you used. If you’re after a rustic look, variances in your darker stain may look great! If you want a perfectly smooth stained finish, stripping the door may be the best bet.
Hi! My husband and I recently purchased a home that had a “library” with pine paneled walls. We ended up having to replace the electrical throughout the house and unfortunately that meant they had to replace some of the wood panel boards. So now we have a mix of old and new. The original wood panel boards appear to have been stained and possibly waxed or varnished. I really would like to stain the wood panel boards to make them all the same color. However, I’m not at all confident that the stain will ‘take’ the same between the 60 year old boards and the new ones. Any advice on blending new with old? Or should I just abandon my desire to stain and paint over the boards?! I so appreciate your help!! Thanks!
Valid concern Molly but matching stains is done all the time so it is possible! Just be prepared…it may take a few attempts before you get a match you like. You can purchase a wood stain in a matching color to the original boards and with pine it’s likely you may need to apply a wood conditioner to except the stain more evenly. (or if the old boards look unevenly stained… it may look more coherent if a wood conditioner is not applied?). These are the things you can test on one of your new boards before taking on the entire project. If you’re not pleased with the results, painting is a great option!
Hi! Love this finish on the tables. I have sanded down a headboard to raw wood and started to stain the back but I’m not liking it. It’s very dark, seems to soak a lot of stain up. I only sanded to 120 grit. My questions: 1. what grit do you sand to before staining? 2. Does wood conditioner make a big difference in stain evenness? Thanks!
Hi Amanda! 120 grit is considered a “Fine” Grit sandpaper and is often used prior to finishing furniture. I like to use a “Very-Fine” Grit 220+ for my last sanding. It makes the wood silky smooth prior to staining. Then I use an “Extra-Fine” Grit 320+ in between my topcoats. I’m guessing your headboard is a very soft wood. Soft woods (such as pine) absorbs stain like crazy. A wood conditioner on hard wood (such as oak) is not necessary but with soft woods its very beneficial. Here’s a short vid which shows you the difference wood condition makes. https://www.youtube.com/watch?v=pcL3v5Qe-AI
This is the best article I’ve found on staining furniture. I’ve had so many questions on the process, and you’ve done a great job putting it simple. The hair die analogy was perfect, and now it all makes sense. Thanks for sharing 😀
Denise, thank you for the help on my stain mess. All is well now. My question today is, after painting my table top and doing a stencil I want it to look aged. How can I “antique” the top to not look so light. I also want to sand the stencil to look worn. I have not applied a top- coat yet. How and what product do you suggest. I’m gun shy about using stain to a painted surface. Again, thank you
Hi Renee! To antique the table top and stencil, yes…sand the stenciled area to “wear” it away in places and then darken the table top with a tinted wax or tinted glaze. Either of these methods are easier to control than just applying straight stain to the top. If you decide on the tinted wax, as an extra precaution, wax with the clear wax first and THEN apply a tinted wax. This way if you don’t like the results it can easily be wiped off.
Rather than sandpaper to antique it, I’d suggest steel wool. It doesn’t leave lines like sandpaper.
Denice please help. I purchased a older dining table. Thinking it needed some cosmetic help I applied a matching stain without sanding. I noticed it still has a tacky feel and comes off on every thing. How can I fix this mess?
This is EXACTLY what happened to me with my headboard Renee. It remained tacky and messy because I didn’t sand the existing topcoat off before applying the matching stain. So frustrating! To fix this, (in a well ventilated area) use a cloth dampened with mineral spirits and clean the table. Once the tacky excess stain is all removed, sand the topcoat down and then reapply the stain in thin coats until you have the desired effect. Don’t let the stain sit but wipe as you work. Once absorbed and dry, apply your topcoat.
Wow so glad I came across your site. Thank you for all the knowledge you have shared. I have just built a chicken coop… I used all new pine boards. I had planned to stain it darker and do some sanding to give it more of a rustic aged looked but our hardwood store didn’t have a dark stain for exterior purposes and with really needing to get it done so I can move it outside and get our growing chicks in it; so I just decided to get a clear wood protectant. I applied two coats it turned the wood a by of an orange tinti :/ and now I am wishing I had done the dark stain… So what I used was Flood CFW-UV on their website it says that it is an oil based finish. Do you have any advice on staining over it? I am thinking maybe staining over it would work with an oil based stain? This is the link of the product I used flood.com/wood-care-solutions/product/2/details Thank so much in advance!!
Kimberly, there should be no issues applying your dark oil stain over the natural stain. Just keep in mind the dark stain you choose, the color will not be an exact match. Your darker stain will likely have warmer/orange undertones. I hope the chicks love their new home!
hi Denise I just retired and I’m looking into restaining a dining room table, do I need to sand it down to the bare wood or can i just send it down and put the same color back on thank you very much
Hi Duane – congrats on your retirement! It really depends on the look your after. If you want a “flawless-brand-new” stained top, sanding to the bare wood and using a wood conditioner for even stain spplication is the way to go. If you prefer your table top to have some character/variences and you’re staining with the same color OR darker, you can get away with sanding up the topcoat and then applying the new stain. If you’re unsure, it’s a great idea to do a small test in an inconspicuous area before taking on the entire project.
We received a VERY nice, new Daniel’s Amish china cabinet from our parents. Unfortunately it is a reddish oak and all of our dining stuff is a darker golden/red color. Advice as to not upset the family, but have it match other furniture.
Thank you,
Chuck
Chuck, without seeing your piece I’d be hesitant to give advice… especially since it is such a cherished heirloom. If you’d like, feel free to email me a picture to [email protected] and I can take a look for you.
my wood table is stained and originally waxed, but I have not re waxed it for a long time. could I simply stain it a darker colour without prepping it.
Most likely yes Jill. However, to be safe I would test a small area inconspicuous area before applying the darker stain to the entire top. If anything, a very light sanding may be required to remove any remaining wax.
I have a stained oak railing on my stairway ,I sand it down to apply a darker shade stain , but i am not sure if i got all the finish coats off, i ran the nail polish test and nothing change, my question is if the wood is ready for new stain and if so what you suggest. Thanks!!!
Larry, if your oak railing had been sanded evenly, you won’t see any variance in the shade/texture (ie. no shine, sheen, or darker spots). For the darker stain, I really like the Minwax Stain Products and have also heard rave reviews on Gel Stains which is on my list to try.
I want to restrain the top of a desk in the same colour. Can I get away with just sanding ? Thanks
Yes Mary, you may get some slight variation but if you sand away the top coat and re-stain with the same color it should be fine.
We just bought brand new wood windows from Andersen. We started to stain them but the stain soaked in very quickly, like a sponge. Do we need to wait and let the wood “cure”? Also we were told they were of oak, but not 100% sure. Wonder if they are pine. Does this make a difference in our staining process? Also having a very hard time getting a color of stain to match the existing wood trim around the windows. Even took a piece to the hardware store to try and match. Any help would be appreciated.
Contacting Andersen windows to determine whether the wood as been treated will determine if the wood needs to “cure” before staining. I’m apt to believe your windows are Oak as Pine is a very soft wood. Pine or Oak, the staining process is identical. If your stain is soaking in like a “sponge”, you may want to try a Pre-Stain Wood Conditioner. A Pre-Stain Wood Conditioner penetrates the grain of the wood and this promotes uniform acceptance of stain. Color.. now that can be tricky! Sometimes mixing 2 stains together results in an exact match but this is done through trial and error. Hope this helps Peg and enjoy your new windows!
Hi ,I would like to stain my ceiling a darker color.The ceiling is coated with a clear coat acrylic polyurethane,water based, I would like to use minwax wood stain,do I need to sand everything or is there a easier route.
Barb, unfortunately sanding would provide the best result and that’s not the “easy route”… I know because sanding is one of my least favorite things to do. If you apply wood stain directly over poly, most likely it will end up tacky to the touch (like my headboard example) and possibly have an uneven finish.
Hi! I came here via Pinterest for your tinting wax post. Saw this. I wanted to volunteer something I’ve learned about removing stain (vs. paint).
I have been stripping antique doors with Citristrip. The stuff is AMAZING & I’d do ads for them for free.
If you find you don’t like the stain after paint stripping, or just as in your example above, put a thick coat of Citristrip on it and leave it alone for a couple hours. Even if it’s dry, don’t worry about it. It’ll turn to BBQ sauce. Squeegie it off, then take water and a scrubbie and scrub off the rest of the sludge. I have brought my 100 year old doors back to bare, gorgeous wood.
So if you want to go dark to light, don’t damage and lose wood by sanding! Try this stuff, because you don’t need safety equipment, it smells good, and does NOT burn you. I absolutely love it and what’s going on with these doors!
I hope this helps you in your beautiful transformations!
Excellent info… thank you! Using a stripper “like” product which smells good would be fantastic!
Thanks so much for your tip on the stripper! I’m a consignment shop junkie and I know this will come in handy one day.
Unfortunately, to the best of my knowledge, Citristrip is not available in Canada. Please share if you know where to buy it here.
Thanks
I’m a newbie and would just like you to clarify for me…do you need to totally strip the furniture or just take off the finish to apply a darker stain to a lighter piece of stainer furniture?
Patti, if you want the EXACT colour depicted on your can of stain, your piece will need to be TOTALLY stripped. If you’re ok with a variant of the colour, you can ‘get-away-with’ applying a dark stain over a light stain if the finish has been properly removed. Test, test, test on an inconspicuous area before you go ahead and refinish your entire piece!
How do I know whether my piece is waxed, varnished, or shellaced? It’s not particularly shiny; it’s a coffee table.
Great question Leonora! Waxes & Oils are identifiable by look & touch. They feel/look natural and NOT glossy. A clear gloss finish is one of 3: shellac, lacquer, or varnish. Lacquer and shellac are mostly HIGH gloss finishes where as varnish can be applied in satin etc. To test the finish, use denatured alcohol or lacquer thinner. Rub on an inconspicuous area. If the finish dissolves, it’s shellac. If it cracks or crinkles, it’s lacquer. If it doesn’t effect the finish at all, the finish is varnish.
I love that you compared this to dying hair. I am a hairdresser that is transitioning into having a furniture repainting and up cycling business. A lot of the painting tips are new to me, but this one I won’t soon forget!! Thanks!!
… this analogy is right up your alley…lol! Good luck and all the best with your furniture up-cycling business Shelbey. It’s a lot of fun!
They look terrific! I love to stain my furniture but it is a lot of work to get the wood to the right state to apply the stain. Great job!
Thanks Suzanne! 🙂
HI DENISE –
i HAVE SOME VERY DARK CABINETS I WOULD LIKE TO STAIN A CHERRY COLOR… iS THIS POSSIBLE?
THANKS
Hi Chris! It is possible pending on HOW dark your cabinets are. If your cabinets are darker than the cherry stain you want to use, there may be little to no difference. I would suggest testing a small area to see if the cherry stain shows up and what kind of tone/hue results.
I bought a coffee table at bernie and phyls.The top of table wood is light maple and the bottom is white washed.I want a darker wood . Whst do I do?
Pending on what type of topcoat the table has, you can give it a light sanding and then apply GF Gel Stain in a darker color of your choice. I would do a small test area first though.