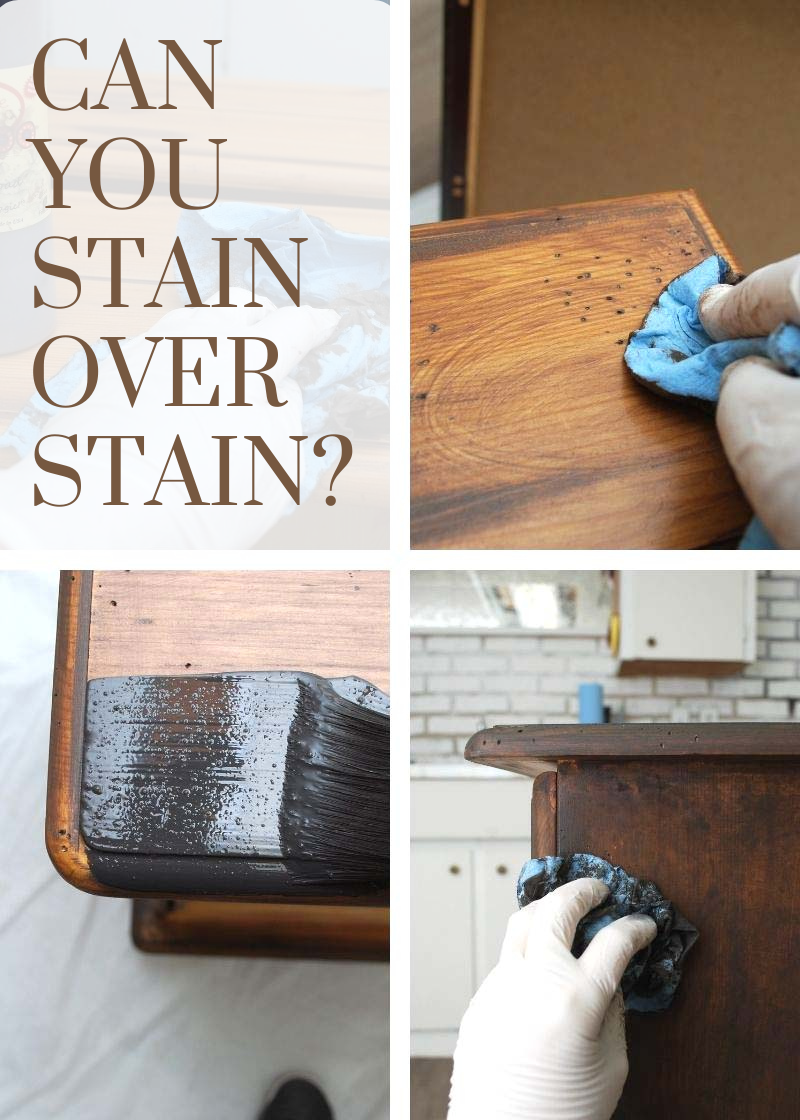
HERE’S HOW TO STAIN OVER AN EXISTING STAIN | 12 TIPS TO HELP YOU ACHIEVE A PERFECT STAINED FINISH FOR YOUR FURNITURE AND STAINED WOOD PROJECTS | YOUTUBE TUTORIAL
Hi sweet friends! Do you have an existing piece of stained furniture that you’d love to restain but don’t want to strip off the old finish? Or maybe you stained a piece of furniture and thought you picked the perfect stain color/shade but then realized it wasn’t what you wanted. Did you live with it? Or decide to sand it down and start from scratch? I’ve had both scenarios happen and I’ve learned that re-staining furniture isn’t much different than dying my hair. I’ve been blonde, strawberry-blonde, streaked-blonde, red-head, black, and brunette so I know what I’m talking about. 😉
Like any good hair stylist will tell you, you can apply a dark hair color over a light color, but not light over a dark. To go from a dark shade to a lighter shade, you must strip and remove the dark shade first. When it comes to furniture and wood, staining over stain works exactly the same way and today I’m sharing 12 Tips for Staining OVER an EXISTING Stain!
THINGS TO KNOW BEFORE RESTAINING WOOD
Even though it’s possible to stain over an existing stain there are a few things to watch for and keep in mind.
#1. Condition of the Original Stain
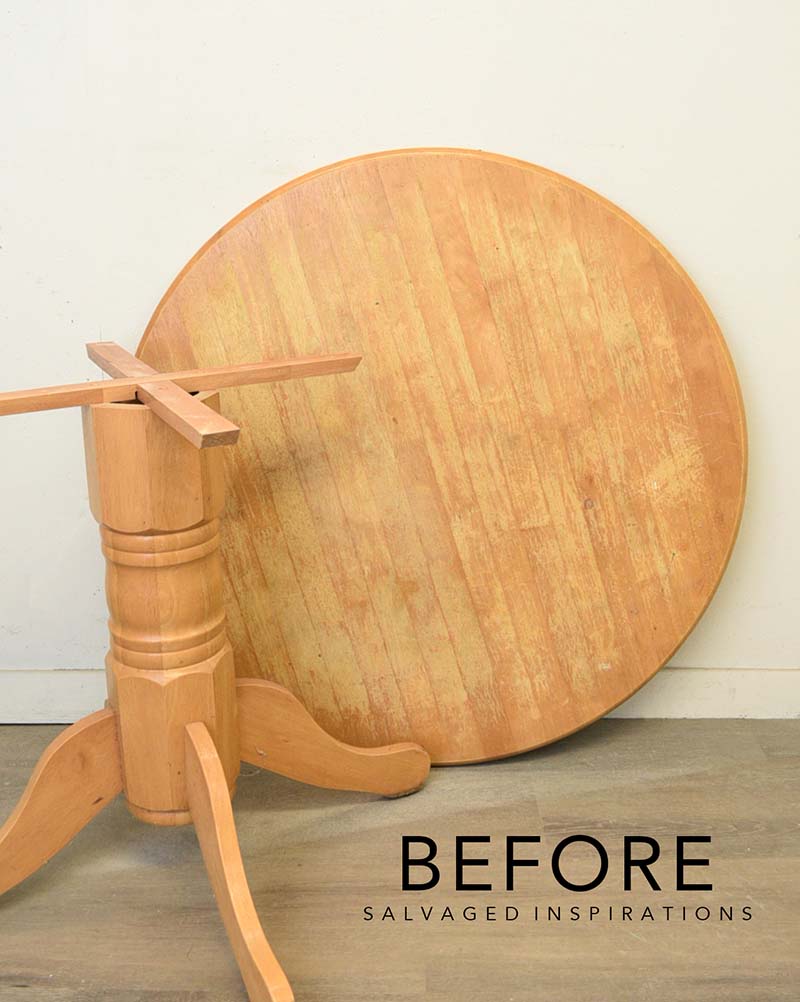
Just like painting wood, the original condition of the base and original stain will affect the new stain. If it has any water damage, cracking, peeling, or worn-away color spots, stripping it and starting from scratch is recommended. For example, the table in the pic below was NOT a good candidate for staining over the existing stain. You can see the existing stained finish is in really poor condition. I did end up stripping it and you can see the full before and after here.
#2. Stain Compatibility
The new stain you are applying over the old stain should be compatible. For instance, if it’s an oil-based stain, apply another oil-based stain. If it’s a water-based stain, apply another water-based stain. Incompatible stains can lead to poor adhesion or blotchy and uneven finish. If you’re unsure how to test if an existing stain is oil or water-based, check out this article here.
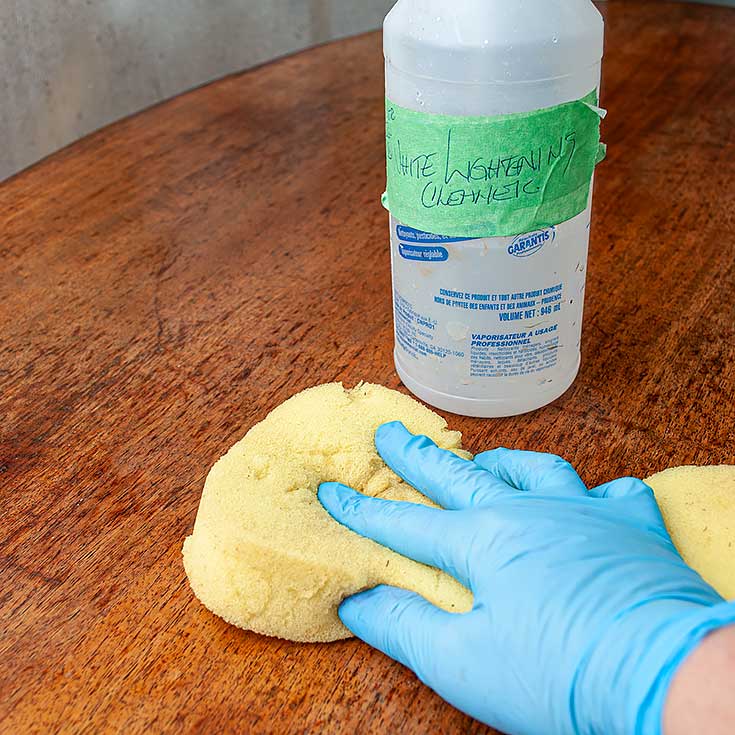
#3. Prep
A total stripping of the finish is NOT required, but even so, a little prep is needed for a professional finish. A good cleaning to remove any oils, dirt, or dust is a must. I like to use my handy White Lightening mixed with a little water in a spray bottle which is a TSP substitute. A light scuff sanding to rough up the existing finish will allow the new stain to adhere better.
#4. Test First
I always test in an inconspicuous area before applying my stain over the stain. This lets me see the ‘new’ color and shade the stain will create. Keep in mind it will NOT be the exact shade or color that is depicted on the can because you will see some of the old stain finish coming through.
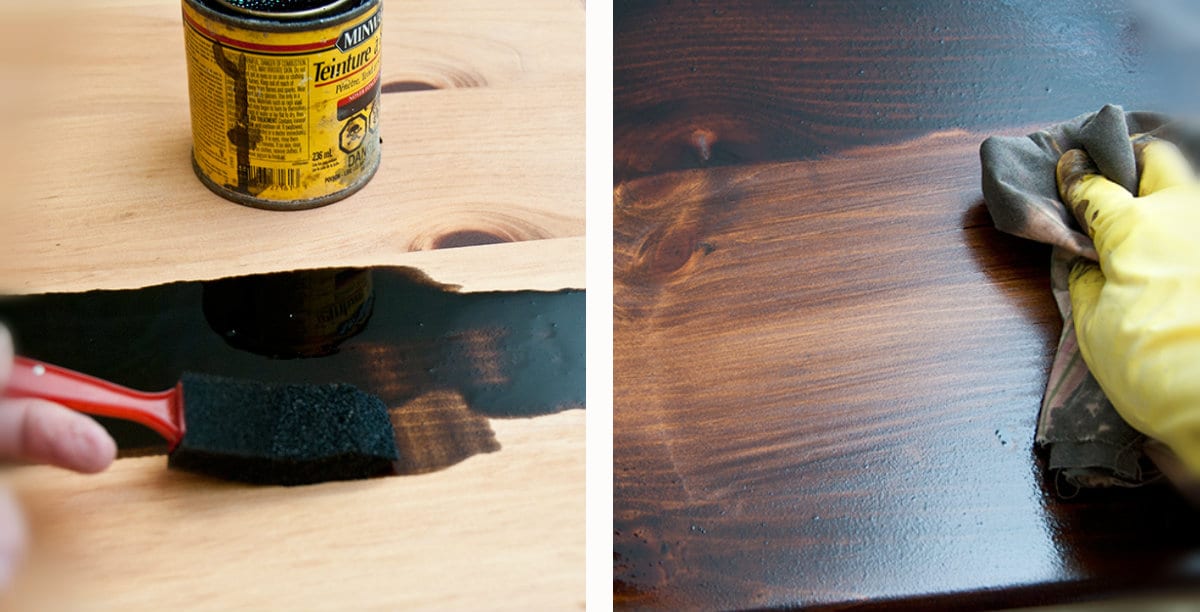
I’ll add the other 8 tips below but first here’s what happened with these road-rescued tables! [Updated June 27/2023]
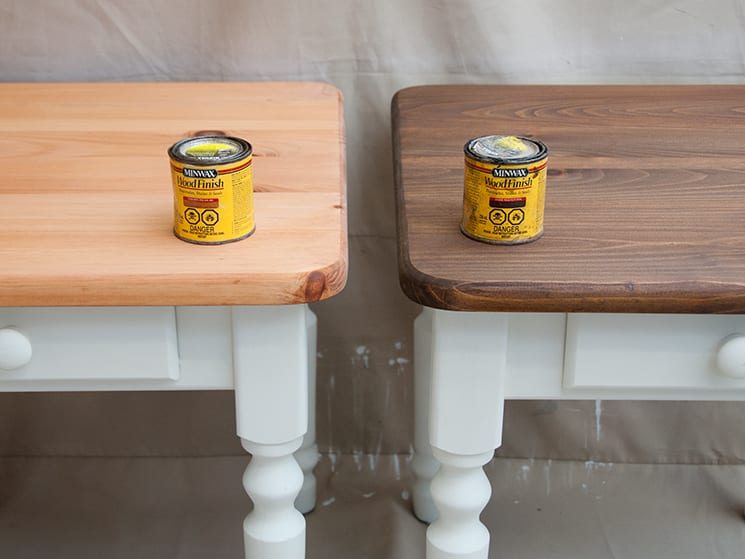
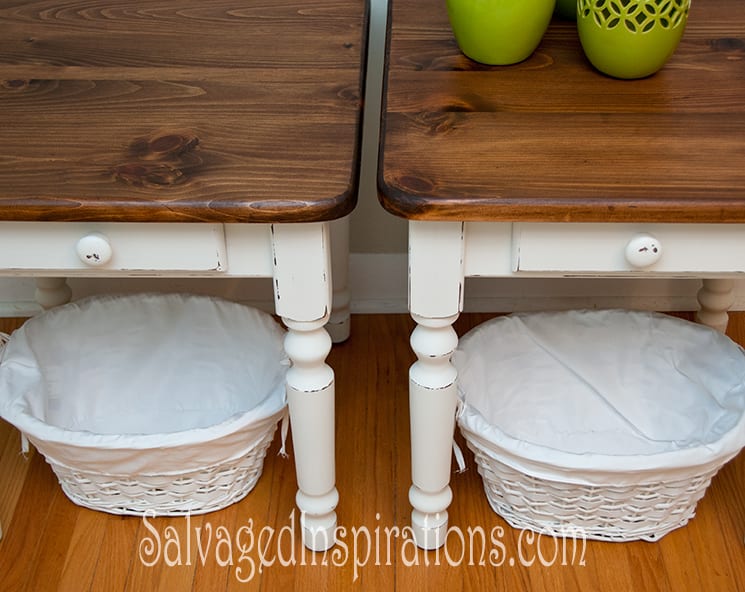
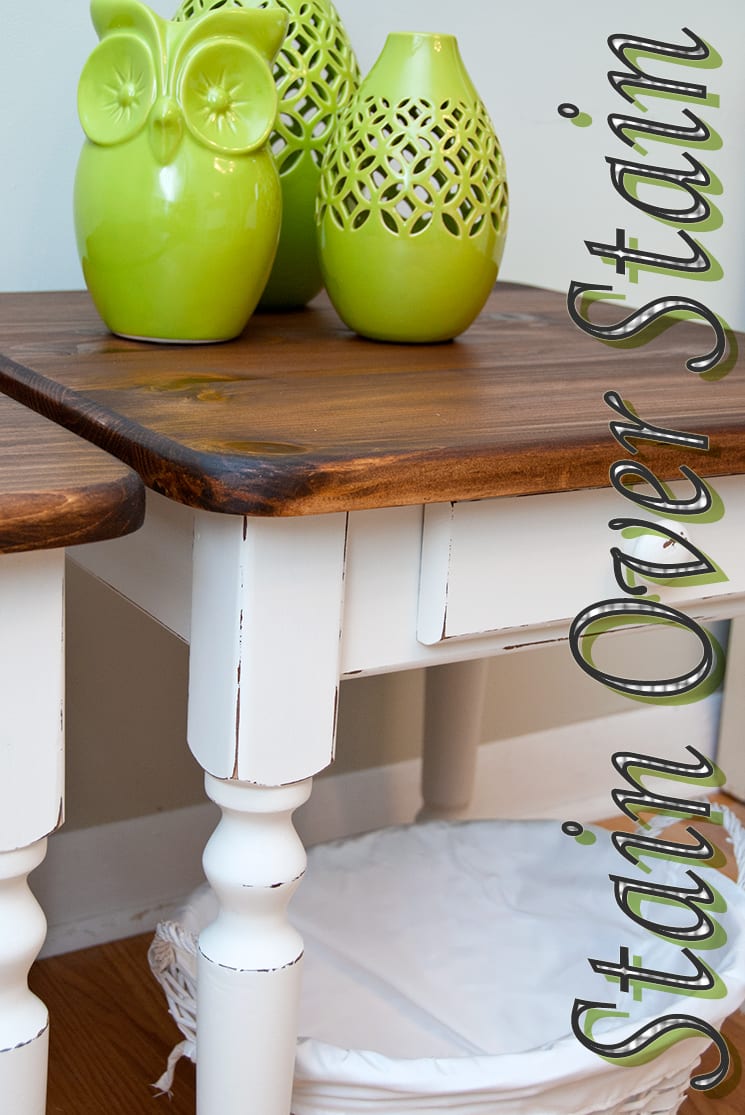
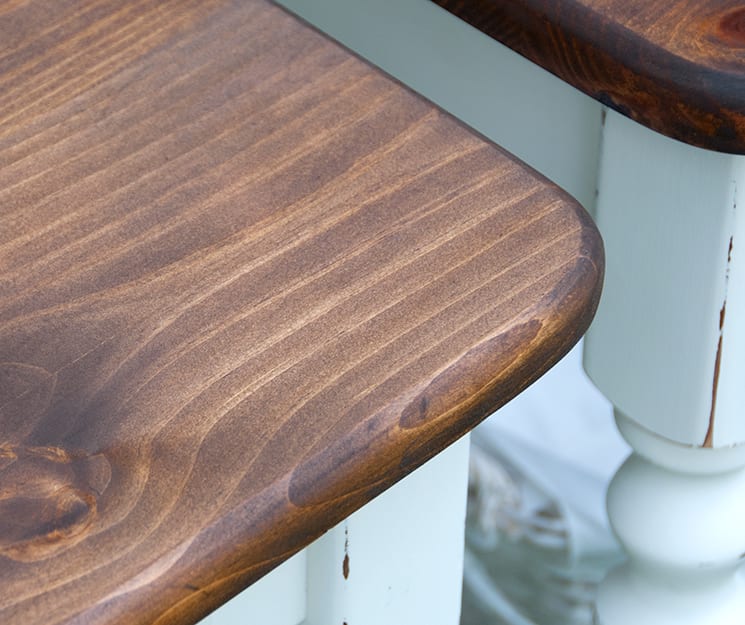
Today, while trying to turn two dirty scratched road-rescue tables into “Country-Charm”, I chose Peacan Minwax for the tops. Once applied, I decided I wanted to stain the tops much darker. What I didn’t want was the hassle of stripping and sanding all the wood over again.
I was feeling adventurous so I applied Dark Walnut Minwax stain over the already stained Pecan wood. It worked beautifully!
STAINS I USE & RECOMMEND
Varathane Gel Stains
Applicator Pads | Gloves
Lint-Free Shop Towels
Chip Brush | Paint Brush
Dixie Belle Gel Stains
Minwax Stains
DB Waterbased Stains
The end result didn’t turn out the exact shade/color which is shown on the Dark Walnut Minwax label, but, somewhat warmer due to the golden tones of the Pecan underneath. Seeing as I’m not trying to get an exact match to any existing furniture, no biggie… and I quite like the warm tones coming through.
THINGS I’VE LEARNED FROM RESTAINING WOOD
#5. Dark Stain Over Light Stain
Staining over stain is easy and works beautifully if you’re applying a dark stain over a lighter stain on the wood. Remember, it’s the same principle as dying your hair! This rule applies to oil-based stains, water-based stains, and gel stains.
#6. Mixing Stains
You can mix 2 or more stains together to make DIY custom stain color and shade. So long as you are mixing the same type of stains. eg water-based with water-based, oil-based with oil-based, and gel stains with gel stains. You do NOT want to cross-mix stains!

#7. Be Aware Of The Undertones
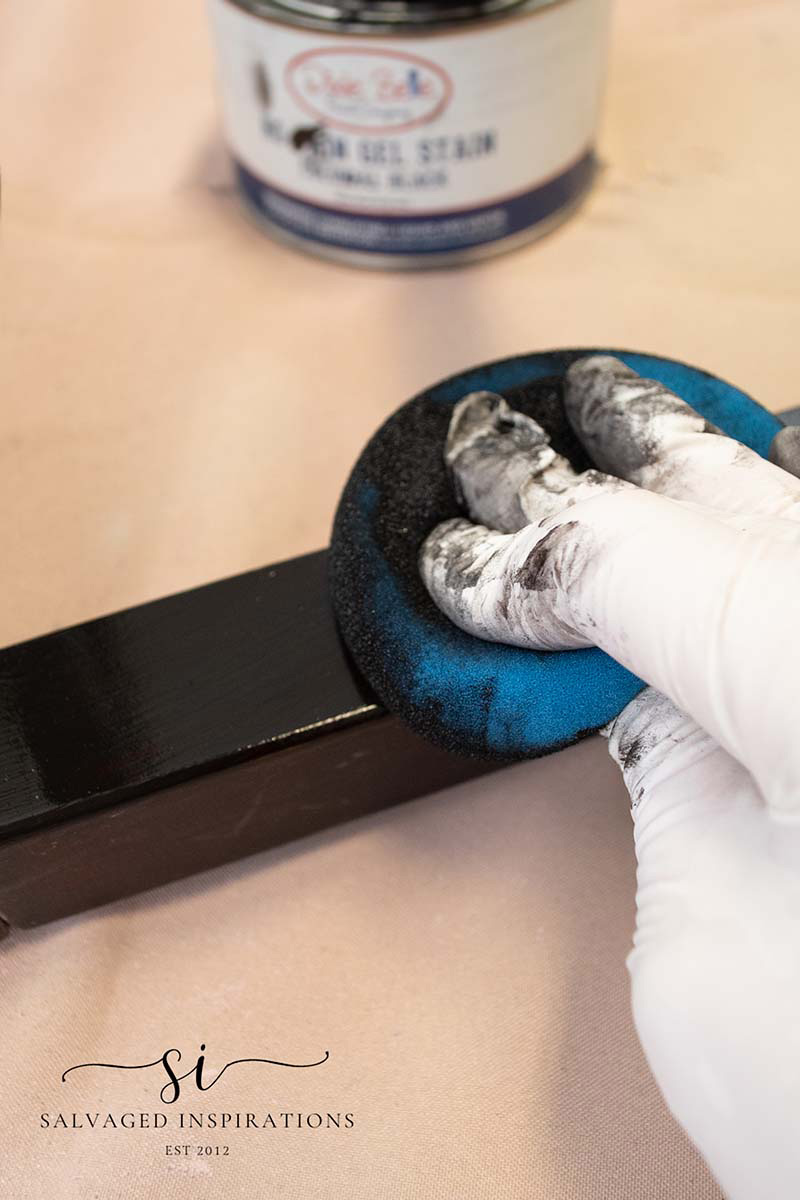
Once you become aware of stain color(s) undertones, you can mix and create gorgeous results! Warm-toned stains (stains with yellow or red undertones) work great to slightly warm up cooler-toned stains. For instance, if you have a table with a grey-stained top and you want to create a warm wood look, you would pick a stain with red or yellow undertones. This also works in reverse. Recently I curb-shopped this 2 in 1 table which had a very red warm base. To create a cooler/richer tone, I gel stained with a Black Gel Stain.
#8. Know Your Topcoats
It’s not advisable to stain over polyurethane or any other protected finish such as wax, varnish, or shellac. Removing the topcoat before staining (when using a traditional stain) is a must because it has nowhere and nothing to absorb into. (unless working with Gel Stains – see tip #9 below)
Here’s why. Last summer I tried touching-up scratches on a head & footboard by applying a matching cherry stain over the finish. Big mistake! After applying it, it did help camouflage the scratches but; the end result was horrible. Regardless of how many times I tried wiping it down, it felt tacky to the touch and rubbed off on my hands and clothes every time I was near it. Oil-based stains will sit on top of a finish and be oily to the touch rather than sink into the wood as they are intended to.
#9. How To Restain Wood With Gel Stains
Gel stains can be applied over an existing finish with just a light scuff sanding. This is because Gel Stains are topical and don’t penetrate the wood as traditional stains do. They work more like paint with the ‘look’ of a stain by sitting on top of an existing finish. I have a full tutorial on How To Apply Gel Stains Over an EXISTING Finish here.
I totally transformed my French doors using a gel stain – WITHOUT stripping them down! You can see the before and after in the image below. I also have a full video tutorial in the post if you click on the image.

HOW TO APPLY A STAIN OVER ANOTHER STAIN
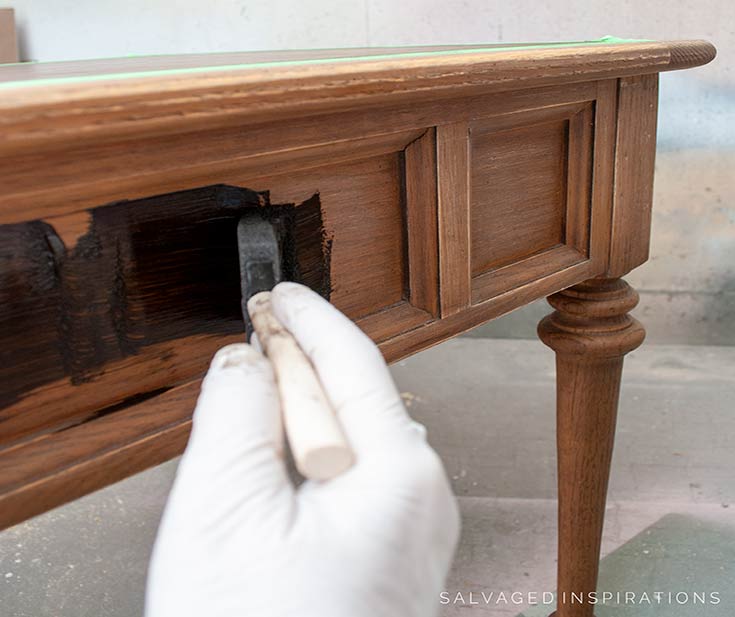
#10. Application
Once I’ve prepped, picked my stain color, and tested it to make sure I like the results, now comes the FUN PART! I make sure I mix the stain thoroughly, then using either a shop towel, foam brush, chip brush, or applicator pad, I apply a nice light even coat in the direction of the grain working in smaller manageable sections.
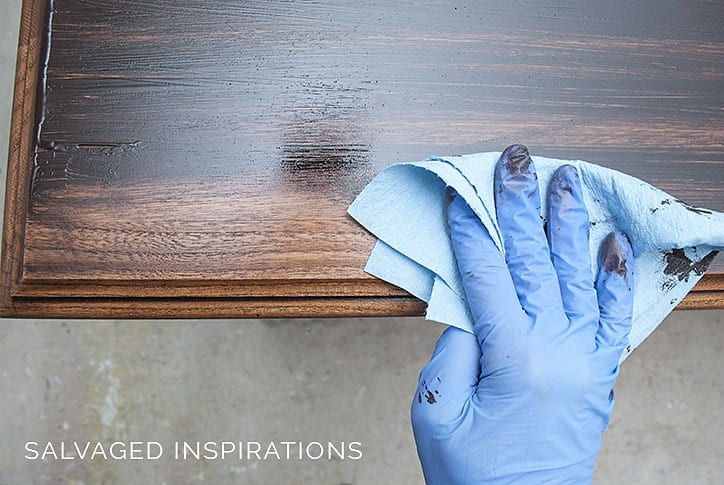
#11. Wipe Off Excess
Once I’ve applied the stain as above, I let it sit for a minute to absorb into the wood (depending on the brand’s instructions) and then I wipe back the excess in the direction of the wood grain and move on to the next area. I prefer using these shop towels to wipe back the stain, but a clean lint-free cloth works just as well. Be sure to read the manufacturer’s instructions on application, dry time, and recoat time.
#12. Recoat
Once the first coat is dry, it will look slightly different than when the stain was wet. I like to take a look and see if it requires another coat to get the finish I want and like. You can recoat repeating steps 9 and 10 as many times as necessary to get the look you’re after.
BONUS #13. Topcoat and Protect
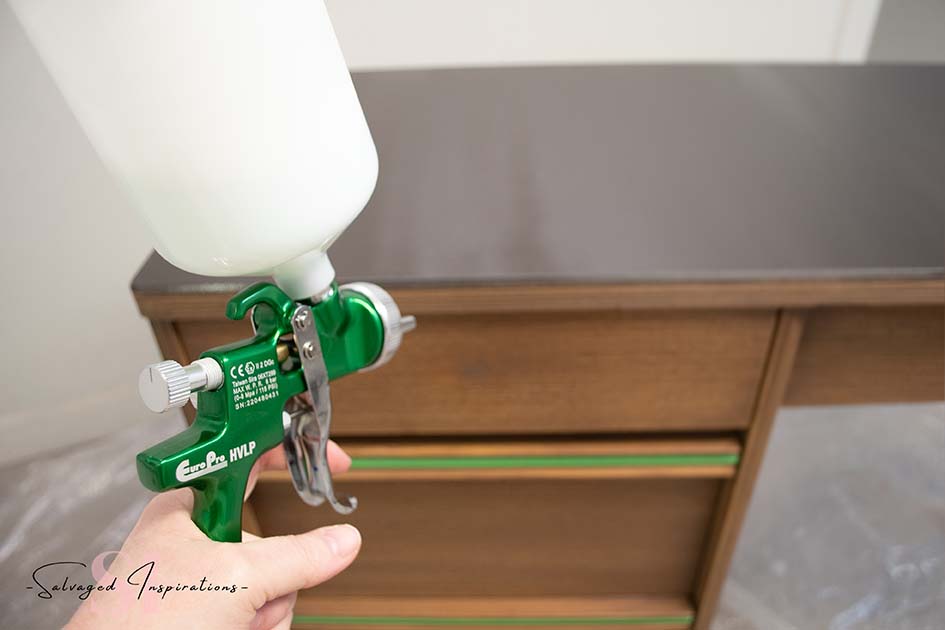
Once the project is dry and looks fabulous, I recommend top coating to protect all your work. I like to spray my topcoats but brushing them on works just as well.
[Updated June 27/2023] Also, I just want to add safety first! Remember to work in a well-ventilated area and follow all safety precautions mentioned by the stain manufacturer. Using appropriate protective equipment and ensuring proper disposal of used materials is super important! I don’t typically work with traditional stains anymore as I find the Gel Stains are SO MUCH EASIER to work with. For the lighter-stained projects I do, I prefer working with these Water-Based Stains. Easy clean up, no smell and they give beautiful results as well!
YOUTUBE TUTORIAL
Here’s a step-by-step tutorial on How To Stain Over Stain | 12 Tips on Youtube. If you have any problems viewing it below, feel free to watch it on my Youtube Channel HERE. Our #siyoutubefamily is already a community of 39.2K so don’t forget to subscribe if you haven’t done so already! So exciting, thank YOU! 🙂
I hope you’ve enjoyed today’s tutorial and it will help you with all your staining projects!
LET ME KNOW OF ANY TIPS YOU HAVE WHEN RESTAINING WOOD OR ASK ANY QUESTIONS YOU MAY HAVE… I ALWAYS LOVE HEARING FROM YOU. IT MAKES MY DAY! 🙂
Happy furniture painting and staining my friends!
Denise
RELATED POSTS
HOW TO APPLY GEL STAIN | STEP BY STEP
WEATHERED GRAY STAIN TUTORIAL
10 TIPS FOR STAINING FURNITURE
STAINING PINE WITH GEL STAIN
STAIN OVER STAIN | HOW TO TUTORIAL
PIN AND SHARE!

Hello! I have an angled wood ceiling in a family room extension (pitched with the roof line in a slope from one end to the other) and it was stained by the prior owner. The stain is uneven, lighter in some areas and darker in others, some evidence of water leaks that have been repaired. I want to stain over it but I’m worried the new stain will still have the same light/dark areas copying the old stain. It’s not varnished. Do I just add more stain to the lighter areas? Is there a brand/type you’d recommend? Are there low VOC stains? Thanks for any advice you can give. Trying to DIY whatever I can because it’s that or we have to wait until I’m working full time again to finish our house off. I’m dying to get the rest of it updated! I hate the gold carpets!
Hi – we just had the first coat of minwax natural applied to 2200sqft of red oak – and it’s too orangey for me. For the second coat, would a brown stain tone it down? I’m so upset with myself for not researching more. 😩
How did they turn out after stain? I’m having the same problem
My cabinets are very old and an orange color I want to stain over them with a darker stain I sanded the shine off of them but they are still the Orange color will a dark stain cover the Orange looking stain that has been on there for years
I suggest you do a test spot in an inconspicuous area Paula. Depending on how dark of stain you are using, it may cover enough of the prominent orange for you to be happy with the look. But it’s my guess, some ‘warmth’ will still show through. It’s best to test before you start the entire project.
bookmarked!!, I love your site!
Hi, I purchased two lovely old church pews. My friend, thinking she was helping, rubbed stain on them to restore them but as they were already urethaned kind of left me with a sticky mess. Can you advise how i can fix them?
Thanks!
Hi. I just ran across your dilemma and was wondering what method you ended up using. I just bought an antique church pew and it’s going to be outside. I was planning on going over the old stain with polyurethane. In your opinion, is that advisable?
Thanks😀
Hello I have a raw wood window sash I wanted to paint like a white tarnished look I have 4 of them originally I thought I could paint a lite coat of white and just kinda smear paint differently to give it that look turns out the wood color was to light, so then I moved on to a new one though maybe if I paint it with a dark stain give it a base and then paint white I could get it to appear tarnished. The stain I used was red mahogany if I paint white over it can I get it to look tarnished?
Hi Denise!
I purchased an awesome bar piece from Facebook Marketplace this summer. The problem is that it’s a very warm toned wood, almost has a red to it. I am looking to stain it with a gray stain, same color level is fine but I’m worried if I don’t prep it first the cool tone of the grey will warm up and look weird with the red tone under it. What’s your thoughts? I can send a photo!
Hi Hanna! You’re more then welcome to send a photo but it’s challenging to predict what the 2 stains will do because every wood/stain combo reacts differently. I would suggest testing in an inconspicuous area to see if the grey ‘cools’ down the red undertones. If you like the look – then take on the entire piece. sounds like a great piece btw. 🙂
Denise this is only place i found to ask questions.. i just stained a door in Alder wood and i haven’t put clear coat yet and i don’t like color it has too much red in it so i want to redo i want dark walnut do i have to sand down the door or can i apply over the lighter color
Hi Gaylene. You can do a ‘test’ area and apply the dark walnut right over the lighter stain seeing as it’s not top coated. But I suggest a ‘test’ first because the dark walnut is not going to be a true dark walnut because you will have the undertones of the first stain you used. It’s my guess it will darken it up and cut down on the red though. 🙂
Hi!
My painter recently stained our Mahogany front door a cedar type color to match the cedar beams. Sadly it came out wayyyy too orange. I’m at a loss as to how to fix it. Should I go over with dark walnut? I worry about it becoming red now! Please help!
I just wanted to say I know this is an older question but when i stained a door and it turned too orange I used a greenish brown stain overtop think it was called Special Walnut?? It worked! The greenish tinge counteracted the orangy redness.. Best to test first where you won’t see it.
Hi Denise,
I found a solid wood table and bench, sanded them down, and painted everything except the top surface light gray. I was planning on staining the tabletop and bench top with a gray stain, but my husband said he liked the regular wood and told me I should just put Polycrylic on it just the way it is. I did what he wanted and now I regret it. I do not want to have to sand it all back down to the wood again. Is it possible to use the gray stain on top of the Polycrylic and still get the stained effect, or will it not work now?
Hi Linda… great project! Unfortunately, stain won’t penetrate the poly’d finish. A glazing technique over the poly could give a grey washed look over the wood, but it wouldn’t be a solid grey stained look.
Hi I wonder if you can help I stumbled across your blog and have been reading all morning!
I painted an old pedestal kitchen table and chairs with chalk paint, bottoms white top “black”. Except the black is not really black but gray. In hindsight I should have probably tried to stain the top of the table and chairs but I didnt. Before I coat it all in Poly can you suggest how I can achieve a true black or what you would do? THanks
Getting a true black isn’t difficult but it’s a matter of meticulous finishing, if you intend to stain the wood you’re going to get the undertones of the wood coming though in the grain. If you’re looking for a flat black then you’ll want to paint the surface in a high gloss and then sand with a fine grit sand paper (200+) the finer the better to make the surface uniform. Apply your desired finish of polyurethane, I always like polycrylic clear satin. Apply at least two coats with a foam or fine brush being careful to smooth out any bubbles. Always sand in between coats and work in a dust free temperature controlled environment.
Hi, Denise!
Beautiful job! I am attempting the same look on an oak dining table I found at a yard sale. But I ran into a bit of a problem. The day of the yard sale it rained a little. I examined the table and it looked good. A very heavy solid oak table for only $20. Wow! Right? Wrong? After getting home and drying it off I put it away for the refinishing day, which was today. My husband and I carried it to the garage and I noticed all these raised spots on the table’s top. I knew right then that this was water damage but I have never seen solid wood bubble up like that. So I decided to go ahead and sand down the high spots before I sanded the rest of it. To my surprise, well not really, I discovered that the oak table had a veneer over pressed wood. (compressed sawdust) The underside of the table was the same way, a layer of real wood covering a core of pressed wood.
Really, what purpose did that serve? You don’t have to answer that. When I finished sanding the high spots I exposed some of the pressed wood. I sanded the rest just taking the varnish off, I was afraid to sand all the stain off, I didn’t want to expose any more of the pressed wood. I scraped out some of the PW and filled it in with stainable wood putty.
Sorry about the long story. Here is my question. I am using a Black Oxide stain to cover the top. With some of the old stain still there and some of the wood bare will I be able to achieve a uniform color since it is so dark? Or do I need to get the rest of the stain off?
Hi Mary! I know exactly how frustrating this is because I’ve sanded through veneer and have encountered water damage more times than I care to admit. My concern isn’t really with getting all the stain off (if you’re looking for total uniform look, it may be better to start with a uniform sanding), but rather the spots filled with stainable wood putty. After trying a good few brands, I STILL haven’t found a stainable putty that enables me to get an even stained finish, regardless of the dark tones of the stain. I always end up painting when I’ve gone this route! If you find a decent stainable putty PLEASE let me know what it is.
Can i stain on my staircase using woodstain on it and after which i will apply a top coat to look glossy finish? I spoke to a person and told me it’s not possible because it will take away the stain you applied. Pls help me..in only using brush. Not the air brush. I need answer. Thanks a lot
IM SANDING MY OAK STAIR RAILING. I WANT TO STAIN IT DARKER. DO I HAVE TO USE A PRE STAIN CONDITIONER ON THE WOOD PRIOR TO STAINING? NOTICED THERE ARE A FEW SPOTS THAT ARE LIGHTER OR DARKER IN PLACES AFTER SANDING. THANKS FOR THE HELP !
Hi Chuck! If it has been sanded and you’re noticing light and dark patches, a pre-stain conditioner is a great idea. It will give the stair railing a more uniform stained finish.
Hi there! I am always to happy to come across your blog posts! I am currently trying to determine a new look for 20 year old solid oak cabinets. They are a medium orange color. I would like to give them a rustic country look with a grey. Is it possible for a grey oil stain to be applied if I just degloss them and sand them some? I’d really like to avoid stripping them completely if possible. I know I can test this on a small section of a door but I’m just wondering if it’s even possible to stain when you don’t get down completely to bare wood. Thanks for any help!
Hi Ashley! Yes, it is possible to stain when you don’t get down completely to bare wood. A few things to keep in mind. If the topcoat is unevenly sanded (gone in some areas and remaining in other areas), the stain may be blotchy and uneven. It might even rub off in areas depending on what the original top coat was. Also, grey stain over orange stain, I’m unsure of what ‘color’ or effect this will yield. So testing is the best idea Ashley! Good luck. I’d love to hear how it all turns out for you. 🙂
Hi, I’m trying to match a stain to the one in the home I’ve recently moved into. I think I have the right colour, but how do I tell if it’s been sealed, or ifor I can just apply the stain right over the old stain?
thanks!
In most cases, stains are sealed/top coated. However, you could apply a small amount of the new matched stain in an inconspicuous area, and see if it is at all tacky after 24hrs. If so, a sanding would be beneficial for a nice finish.
OOOPS! I just made the mistake you mentioned at the very end of your article! On our cabinets and wooden towel holders, I touched up some spots that had worn bare with Minwax stain, and it seemed to fill the only the scratched or bare areas. I rubbed it onto a lot of the cabinet surfaces and it seemed to only soak in where needed, like I’ve done in the past with Old English Furniture Scratch Cover. Later, however, I found that the parts of the surface where the varnish had been in tact have now become slightly sticky. Any tips for recovery without sanding everything down?
Mineral Spirits may help clean it up Susan, but try first in an inconspicuous area to make sure it doesn’t mark the finish.
Thanks for the quick reply! I’ll try that.
I love your analogy about hair color. It truly is similar.
Just to follow up… I waited a week and luckily, the surfaces dried to their normal finish. Whew!
I’m so glad! And thanks for the update Susan!!!… I’m usually left hanging. 🙂
Hi, Denise!
I have a bedroom set of two large nightstands, a very large dresser, and a California King size bed. It is currently a reddish brown color, but I really love the way light grey furniture looks. How would I achieve this color?
Hi Ashlee! A little more work is required when changing from a dark stain (in your case a reddish brown) to a lighter stain. Sanding/stripping the furniture down to remove the old stain and then starting fresh with your light grey would be the way to go.
Hi, I made a jewelry box out of wood and stained it and glued a stained decorative design made of wood on the top of it. I found that stained wood doesn’t stay glued to stained wood. Now, I sanded it where the 2 surfaces meet and glued it on again but should I apply more glue along the edges of the design – or is there a spray glue or glaze that I can put on the entire top without changing the color too much? Thanks
Hi Greg! A quality wood glue has great adherance on raw to raw wood, so I would have done the exact same thing. Because you sanded and and adhered, nothing else is required. I wouldn’t add more glue around the edges if it is already sticking because it will squeeze out and make a mess of your nicely stained finish. Also, spray glue or glaze – not necessary. Great project. 🙂
I want to stain a bed without stripping,can I do this if I sand lightly and stain a darker color,
O
Hi Donna! Lightly sanding the existing topcoat off should enable a darker stain to take. Keep in mind, the new dark stain won’t be an exact match because it will ‘mixed’ with an existing stain. So testing the ‘new’ color combo in an inconspicuous area before applying it to the entire bed is a great idea. 🙂
Help! I used General Finish Java gel stain on a table top. I let the stained table top sit for 2 days before I applied General Finish Clear gel top coat.
I noticed two dark streaks just after I applied a second coat of gel top finish.
Can I mix General Finish Java gel stain with General Finish gel Top Coat to darken the color and blend in the dark streaks?
Tom, my guess is no. I wouldn’t mix the gel stain with the gel top coat. Because to get optimal results, stain should be 100% dry before applying ANY topcoat – so mixing the 2 doesn’t sound right. Having said this, I would recommend emailing/calling General Finishes and asking them. Or even heading on over to their FB Page and pose the question there… you can say I sent you! 🙂 They have AMAZING customer service and are always SO willing to help.
Thank you …again! I really like Java gel stain, even though I had to go through multiple learning curves. I have lost track of how many mistakes I made getting here, but each error was a lesson. So by now I am feeling very confident about my next staining opportunity.
Thanks again for all your advice!
Pleasure Tom… and I love GF Gel Stains too. I’ve heard great reviews about their Gel Topcoat, but I haven’t got around to trying it yet.. you beat me to it…lol. But it’s on my list to try for sure. 🙂
I stained some red oak with Black gel stain. The next day I allpied General Finishes Clear coat. The following day I inspected the clear coat and noticed that the black color seemed faded and there were several light streaks in areas I knew were well stained. I touched up the light areas and the streaks. I plan on applying several layers of clear coat. Will I have a problem?
Hmmm, sometimes if topcoat is applied too soon, the stains solvents haven’t totally dried/evaporated and this can happen. I always wipe ALL excess stain off after applying and wait for it to dry 100% before applying the GF. It’s should be okay then regardless of how many coats you apply. Good luck Tom. 🙂
Thank you very much! I appreciate your reply.
Pleasure… and good luck!
I have a bachelor chest from 1952 and the top is patchy worn. It’s a maple look but I don’t think the wood is actually maple. Can I just lightly sand the whole top and match side color with a new stain or should I heavy sand all the finish off the top and then stain.
Thanks Pinky
I’m guessing if the top is patchy and you only lightly sand, the new stain job will not come out 100% even because they stain will absorb differently in the patchy areas. In this case, if you’re looking for a totally uniform look, sanding it down will give you the best finish.
Hi Denise! I somehow stumbled across your blog and so glad I did! Great info! I have a few knotty pine pieces I would like to update. One is a very large Mexican pine Armoire. The stain is very warm and on the yellow side. I’m sure you’ve seen them. I thought about chalk paint, but not sure it would look good painted because it is such a large piece. I like a more rustic look, so thought about a gel stain to allow the wood grain to show through. I don’t think it has a wax coating. Should I still sand? It’s huge so I was hoping I could skip that step, but want to do it right. Thank you!
Hi Tess…welcome! My motto is when in doubt – sand. Having said that, you could try a test area in an inconspicuous area. See if the stain absorbs and gives the result your after. If it feels tacky or it doesn’t take, then you’ll know sanding is definitely required.
Hi I have a question. I am making and staining a cross for my fiances vigil on the first. I have four inch thick hard maple. I bought cognac to stain and it looks blotchy which is how i wanted it…so it looked antiqued! I have ebony that i would like to antique over the cognac! any suggestions? I have no clue wat im doing! thank u!
Sounds like you’re doing great Jilliene! I would suggest glazing the ebony over your existing stained finish because if you just add the ebony over the cognac, the wood will drink it up and change your base color. If you’re looking for a more antiqued looking finish (being randomly streaked over you cognac) mix some ebony stain with glaze and manipulate it to create the look you like. Hope I explained that ok. 🙂
We recently had some cedar pillars stained a Red Mahogony (Old Masters) and the sample turned out perfect! When the guys stained the cedar pillars it came out very red, quite different than the sample. What do you suggest I do? Can I use a more brown stain on top of the Mahogony to “brown” it up? It’s not sealed yet…
Yes, a fresh existing red stain can be toned down by giving it a light sanding/cleaning and then applying a a brown or black. The key is to test the two stains combined in an inconspicuous area (before applying to a full project) because results can really vary. All wood excepts stain differently (like your sample piece turning out different than your pillars) so make sure it’s the result you like. Good luck Kellie. 🙂
I found a great road side rescue coffee table that I stained and I am not happy with the drip marks on it and how it has water marks (even though no water touch it) I tried to achieve a really dark look and tried something I did with another piece that turned out great but didn’t get the same result, I sanded the table and put the stain on and let it sit to dry without wiping it off, when I tried it the correct way with wiping it off it was just not getting dark enough. How do I achieve the really nice dark chocolate drown without my bad process of layering stain without wiping it off?
H Nicole! All wood absorb stain differently so it’s not uncommon to get varying results. To get a dark stain finish, you might try using a wood conditioner to prevent unevenness and then apply a few layers of your chocolate brown stain. (applying and wiping – repeat). If it’s still not as dark as you’d like, you could do a test area with a black stain to see if you like the results. Possibly the chocolate brown mixed with black may do the trick.
Hey Denise,
I made a step platform out of pine and stained the base without the wood conditioner . It turned out blotchy and I am not happy with it. Do I have to
start over and sand it down to the bare wood ?
I await your reply. Thanks !
Regards, Ruth.
Hi Ruth! Yes, when I work with pine and want a uniform stained look (opposed to rustic), I always use wood conditioner because it really does make a noticeable difference. So yes, sanding and starting from scratch with a wood conditioner prior to staining will make a difference. Because unfortunately if you were to apply more stain to your pine now, it’s just going to highlight the blotchiness even more.
I recently stained my shelf, not realizing that I mixed the same amount of both colors leading the shelf to look fairly blue-gray. I actually wanted the classic grey/weathered oak look.. is it possible to stain over the blueishgray color with the weathered oak alone to ket the full affect? Or would you recommend me using a complete darker color?
Hmmm… I’m guessing that if you added full strength grey over top of the existing blue-grey, it would help cut down on the blue but not eliminate it. It’s worth a try though! I would test a few coats in an inconspicuous area to see if you like the results before going the darker route. Good luck Julia. 🙂
I have a dresser with a maple stain on it. I want to go darker. Do I need to use a wood conditioner before I apply the stain? Or do I just need to sand it first? Do you sand before applying the wood conditioner?
Wood conditioner really helps create a uniform stained finish but is best applied on raw sanded wood. So yes, you do sand before applying a wood conditioner Nancy. 🙂
I have a nice pine kitchen table that has a waxed finish. I would like to stain it with the Java gel stain you recommend how do I remove the wax
To remove the wax top coat, mineral spirits or sanding down work nicely. 🙂
I am about to gel stain 2 end tables I have. There are 2 areas in which some of the old finish has rubbed off off the bare wood is exposed. Will this be a problem when trying to gel stain? Will the areas of bare wood look different than the rest of the table?
Yes they will Shelby. The gel stain will absorb differently into the raw wood than it will on the rest of the end table.
I just stripped and sanded a pine table that had been spray painted. I stained it and I am finding it’s not dark enough. I did another coat of a darker stain and it didn’t make much of a difference.
Any other suggestions as to how to make it darker without having to sand it again?
Thanks!
Is it possible the wood is not absorbing the stain evenly (sitting on top rather than sinking in therefore not giving the depth of darkness you’d like). A pre-stain wood conditioner often really helps Michele.
I would really like to tone down the warmth in my existing kitchen cabinets. Will it work if I stain them cool grey over the existing warm stain? Or is it advisable for me to strip the existing stain first? Thanks
That’s a challenging question without a visual Jane. If there’s an existing topcoat, it would benefit from a sanding regardless. The best advice is do a test area to make sure you like the grey over the existing stain before deciding.
I have stained new deck chairs in a maple bark colour , they are pine, but they have come out yellowish and I don’t like the colour. Can I stain them another deeper colour maybe deep red, without having to strip them, I know I would have to rub them down again before another coat
Yes, if there is a topcoat on them, a sanding is required. Then applying another stain will/can change the original color.
i used watco danish oil (cherry), for my first coat on a sanded table that was never stained before.
I am finding the cherry to be a little too red.
If I used another color stain for a second coat can that red be toned down?
Thanks
Hi Mark. Yes for sure. I would stick to the same product (Watco Danish Oil) maybe in the dark or medium walnut (or something with very little red in it) and apply over top to cut down the red in the cherry. Having said this, test, test, test before applying to the entire table! It will tone it down but also change the color to some degree. I would just make sure I’m happy with it before applying it all over.
I recently had a custom counter made from salvaged pine. The piece has been waxed, but I wish it were darker with more variation in the wood. I want to stain – but not sure how to prep first. I’d appreciate your advice! (this is not a food prep area).
Hi Elisabeth! There are a variety of products that you can buy for wax removal but I like to use Mineral Spirits. I pour some on a soft cloth and gently wipe the surface. The wax accumulates/melts onto ther soft cloth. Repeat. And then apply stain or paint etc. I always suggest testing this on a small corner or inconspicuous area before you tackle the entire job. Sounds like a great counter btw. 🙂
Thanks for the tips. I have an old dinning set that I would like to give a fresh stain to. If it had a protective coating on it, it’s long gone now. Do you need to put a coating on after you stain? I’m always afraid of air bubbles, especially since there are lots of decorative details. What type of coating do you use and how to prevent bubbles?
A protective topcoat is always a good idea to protect the new stained finish. I like Minwax Polycrylic, Varathane or General Finishes Topcoats…and they are all water based. And a few things to prevent bubbling are a) don’t shake your poly, stir it! b) make sure the stain is 100% dry before applying the topcoat c) apply once and move on…don’t over brush. Good luck.
I am refinishing my kitchen table. After doing two thin coats of polyurethane I had white crystalized looking marks. I read it was caused by the dulling agents in the semi gloss and that I didn’t mix it enough. Apparently the only fix is to sand it down and start again. I decided that maybe I could just sand down the areas with the white marks. While doing this I ended up standing away part of the stain as well. I am wondering if I could just re-stain those areas, wait 24 hours then continue on with my polyurethane top coats. My concern is that while applying the stain, some of it is going to end up on the surrounding polyurethane. Do you think this will prevent the next coat of polyurethane from sticking?
Unfortunately, it is tricky to do spot areas like you’re describing and get consistent results Natasha. And yes, if the stain overflowed to the poly, your next coat may not adhere 100%. However, if you’re thinking you may have to sand the entire table down anyway, it doesn’t hurt to do a few spot areas (if time allows) and see how they turn out before starting all over again. There have been a few occasions when I’ve thought, oh I’ll just try spot fixing…not thinking it would work and it looked amazing!
Can I use a gel stain over a stained bathroom vanity?
For sure Kerri but a sanding may be required depending on the existing topcoat.
I’m expecting a dark tone storage bed, I have two dressers that are maple-stain. I will want to covert the latter tosomething quite dark (Ebony I think. Allowing for a light sanding, should I be able to staine over the maple?
Thank you
I would try a test patch in an inconspicuous area Daivid. If you’re using an ebony over the maple stain it should be fine, however you may have some warm undertones showing through.
I am trying to remove a dark stain off a small table. I used Citristrip and it removed the finish, but not the stain. I want to stain the bottom of this table a antique white color with a darker top. Any suggestions on how to remove the dark stain? Is the white portion of your tables stained or painted? Did you use sandpaper to get the “weathered” look?
Hi Julie. If your Citristrip didn’t remove the stain, possibly a harsher chemical based stripper will do the job. If you don’t want to use harsh chemicals, a sander will remove any dark stain and get down to the original wood. These tables have a stained top and painted bottom. And yes, I used a sanding sponge to distress. 🙂
I have made the mistake of putting a dye on my bed frame over a satin based finish,like you say it goes on everything that touches it,any idea how to remove the dye?
I’m not sure what type of dye you used but does it list clean-up method/removal method on the packaging Billy? You could test spot by trying mineral spirits?
I want to stain some T-111 panels in a dark black walnut – they were previously stained in a champagne-colored stain (don’t ask…I was young)?
Have a MDF topped table so planning to use a gel
Stain. Can I use regular stain over that to darken it or add extra color? Gel stain colors are limited.
Sur, there are numerous gel stain products available so I would suggest sticking to one product for your table project. Pick a dark stain you like and then apply multiple coats to darken the tone. 🙂
Want to refinish or poly coat a table?? I have a table I got on Craigslist, only thing it says is made in Mongolia. So don’t know what the wood it, it appears that the top have a very thin ironed on veneer, it has bubbled at the edges in a few places and is scratched up and a circle, kind of water mark? the top does not absorb orange oil, just sits on top. Do you think I can coat the top with poly to help protect, strengthen it? or sand and refinish, I am concerned that the wood will not take stain??
I had a similar table and I tested how the wood excepted the stain from the visible woodunderneath the table. If you end up with a nice stain then I would remove the ironed on veneer to get rid of the bubbling/water marks/scratches etc. Worth a try Lynne!
Can I apply a black stain over a table that was spray painted black? Also I have 2 night stands that are currently painted a very pale yellow, can I lightly sand tge surface than apply a black stain over them or do I need to completely remove the paint first before applying.
If you want a wood stained look, removing all the paint so the wood grain shows prior to staining is the way to go Celina. The only time I’ve used stain over paint is when I want a distressed/antique look over my paint color.
I love the stain on the tops! What did you apply over it to get that nice glow? Also on the painted legs, what kind of paint did you use?
It’s been a few years since I refinished these tables but I believe I used a satin or semi-gloss poly to protect the tops and the bottoms where definitely painted with a DIY Chalk Paint Recipe using Behrs ‘Cottage White’ in Eggshell.
I am refinishing a dresser that I bought a few years ago that someone had painted white without sanding or stripping off the old stain. I stripped off the paint and sanded it down, but the cherry-colored wood stain that was underneath the paint is still showing through. It’s pretty dark already and I don’t want to go much darker. Do you have any suggestions on what stain I could do to make it look okay?
If you can bring a drawer to your local Home Depot (or wherever you purchase your stains) they can help you match up a stain Kathleen. There are cherry-colored stains in various brands that may be an almost exact match so you won’t have to worry about going much (if any) darker.
I recently restained my dining room & i am not happy with the results. It doesn’t look terrible, its just not what i wanted. Its too dark & no wood grain shows through. The man at lowes had suggested a minwax gel stain. Since this was my first staining venture i tried it. It didn’t absorb into the table that i sanded for 3 hours, it just kind of sat on top of it. And after applying a generous amount and then wiping excess like the directions stated, it was streaky. Long story short i applied a couple of coats to cover the table evenly. Its too dark though. Can i possibly use an electric sander to sand it & rub off some of the gel atain to make it appear lighter? Or is it hopeless & i just need to accept it or start over? I have not put any poly on it yet…
If you haven’t applied a topcoat, you could try using a paint remover, lacquer thinner or Acetone to lighten the darkness. Work in the direction of the grain Dana. It’s also a good idea to do a test area (in a well ventilated area) on an inconspicuous spot to test results before taking on the very visible table top! You can also try sanding the darkness down, but unfortunately, either of these techniques may or may not give you an even uniformed stained looked. Did the Minwax Gel Stain mention anything about using a wood conditioner prior to staining. A wood conditioner can really make a huge difference when you want a nice uniform stain job!
i am staining my pine dining table with the candlelite general fifnishes gel. I have applied 4 coats but it still doesn’t have a smooth look. Can I apply 1 coat of java? How long should I wait before applying the top coat?
Yes, you can apply Java over Candlelite gel stain. When possible, I prefer to wait 24hrs before top coating but if you read the GF instructions, it should give you a dry time guide.
I have a clear enamel coating on a bench that I sprayed on and wish now to try one of the darker spray on stains that are on the market. Can I spray this on over the clear enamel ?
If there is an existing shiny clear enamel coating, I would suggest sanding prior to using a spray on stain Trisha.