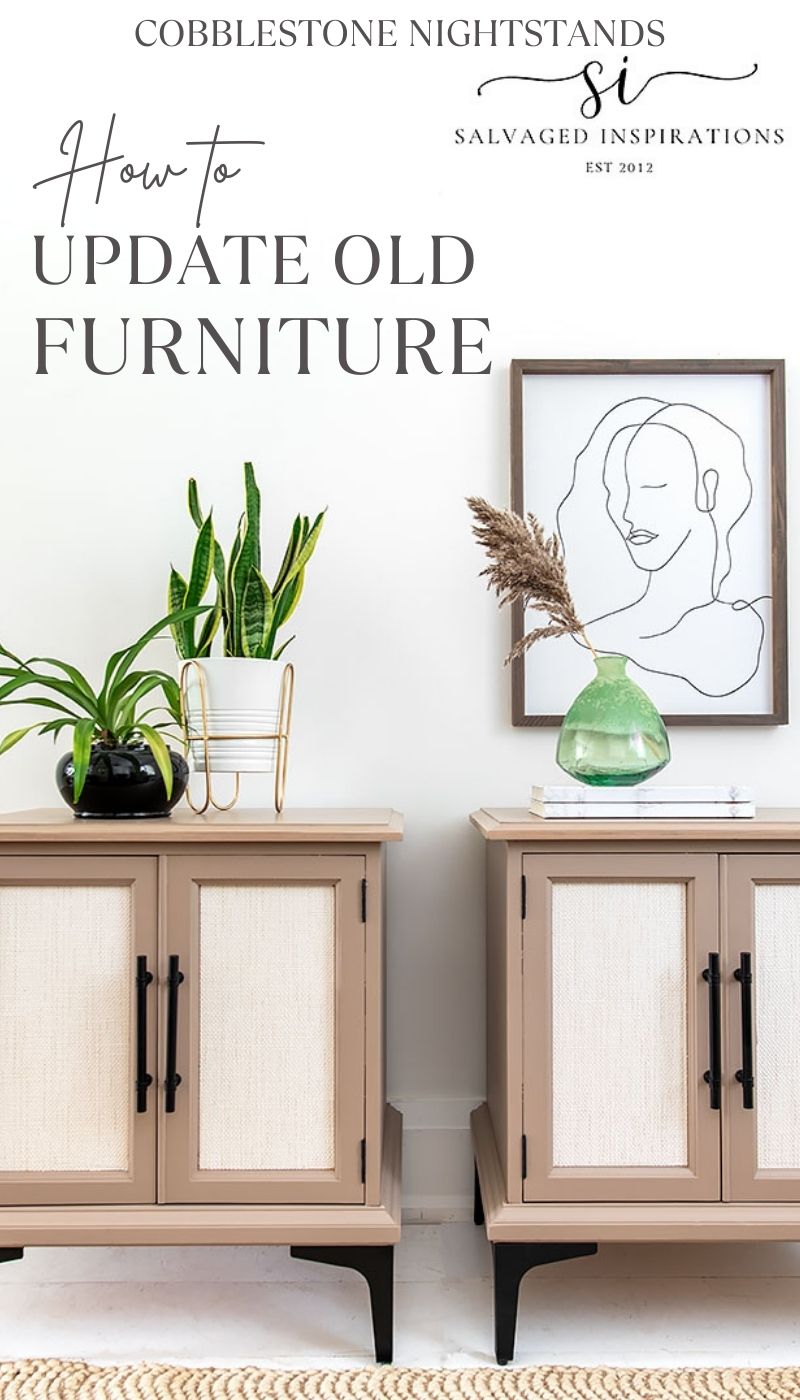
SALVAGED NIGHTSTANDS GET A BRAND-NEW LOOK AND YOU WON’T EVEN RECOGNIZE THEM NOW! | YOUTUBE VIDEO COMING THIS SATURDAY!
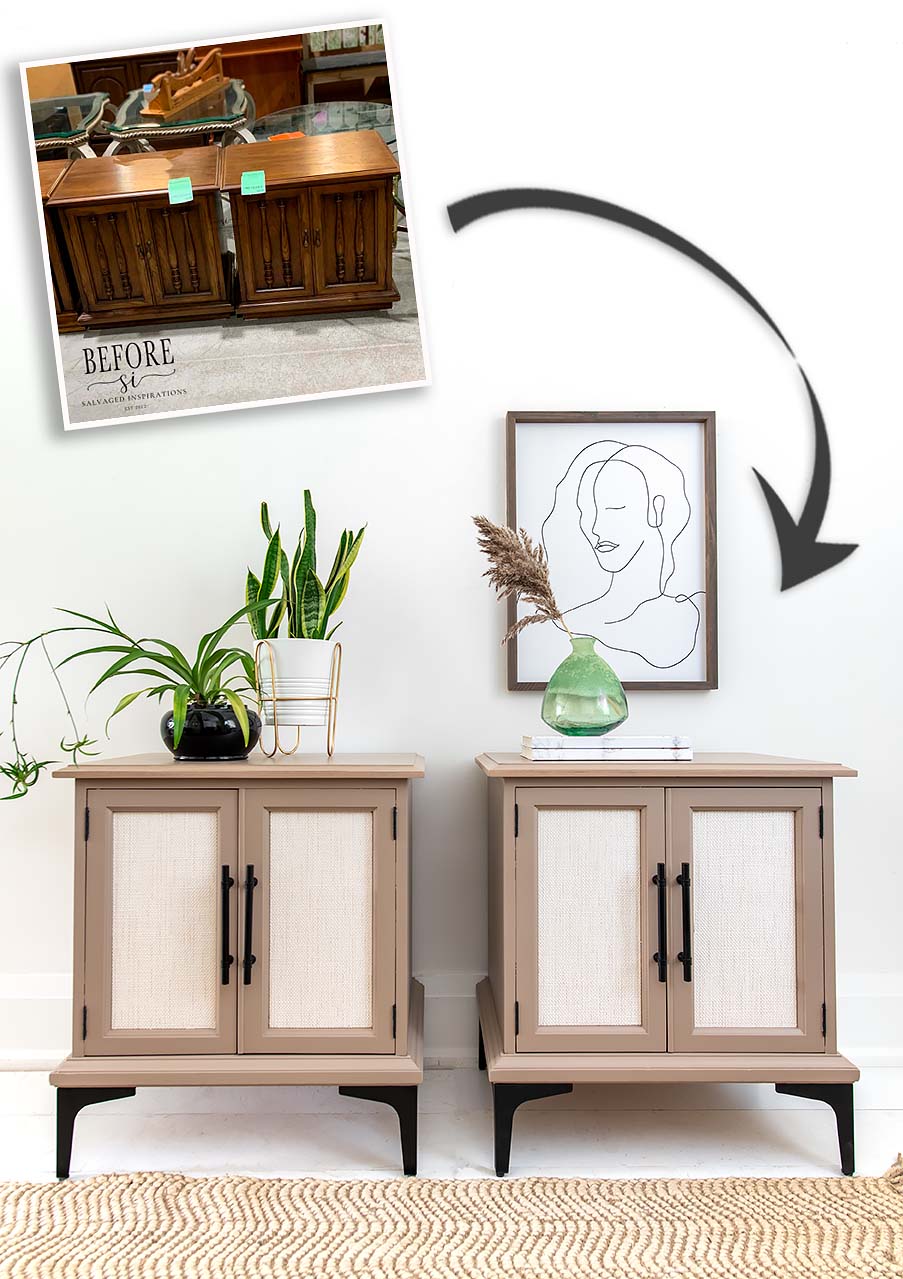
Hello beautiful SI family! Today I’m sharing an 80’s nightstand set before and after. I’ve turned these dated stands into modern beauties using an all-new color, new feet, hardware, and some thrifted wallpaper. I’ll bet you won’t even recognize them now!
It’s also the fourth Thursday of the month – Furniture Fixer Upper Day! If you’re new here, this means I’m joining my talented furniture painting friends and sharing their before and after makeovers as well. Be sure to click on the links at the bottom of today’s post to check out their furniture before and afters as well!
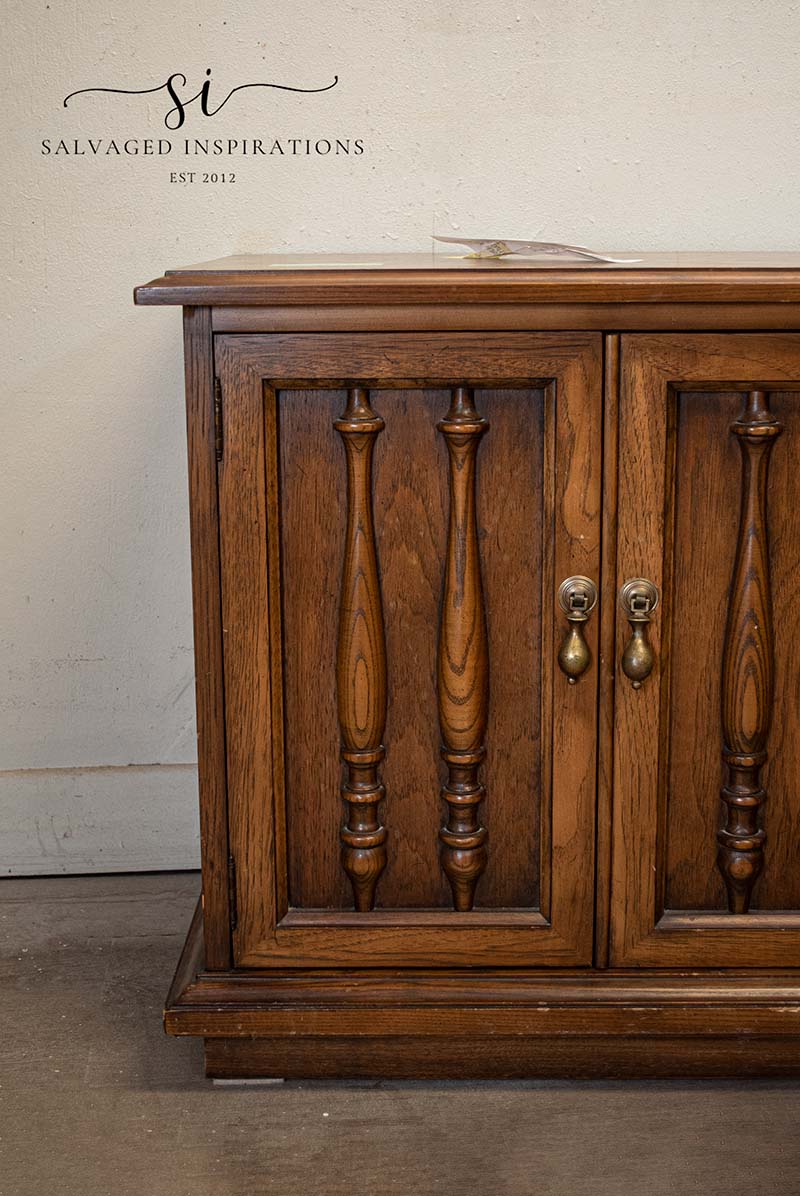
Here’s the 80’s set I started with. I found them selling at my local Restore for $20 each.
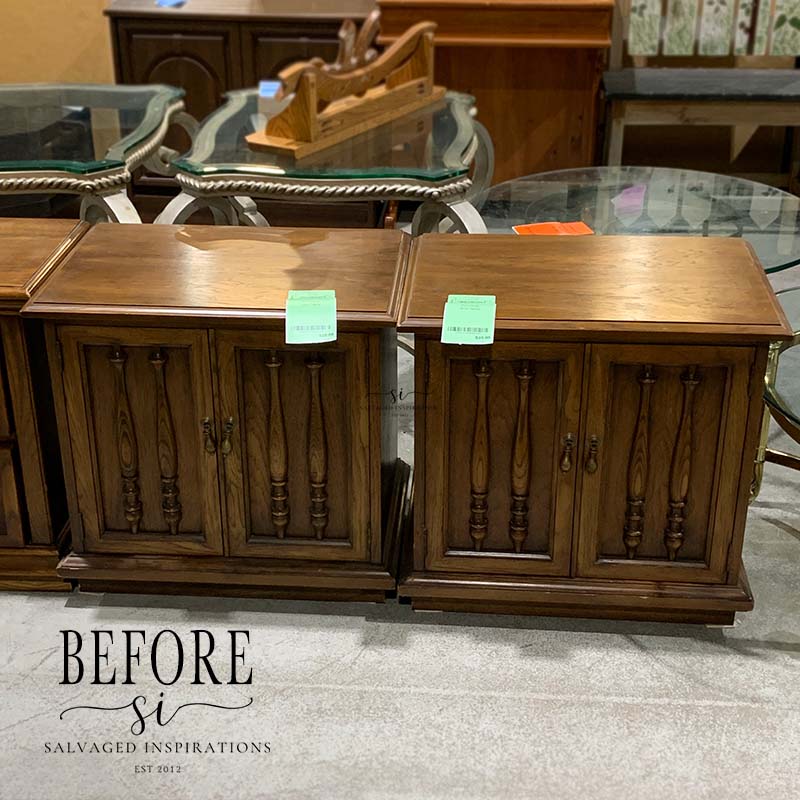
Both night tables were structurally sound but needed a little cosmetic TLC.
Once I brought them home, the first thing I wanted to do was remove the dated trim.
THIS POST IS SPONSORED AND/OR CONTAINS AFFILIATE LINKS TO PRODUCTS I LOVE AND USE. YOU CAN SEE MY FULL DISCLOSURE HERE.
HERE’S WHAT YOU’LL NEED
Nightstand Set – SALVAGED
White Lightning Cleaner
Sanding Sponge
Bondo
BIN Shellac Based Primer
Textured Wallpaper (similar)
Stick With Me Glue
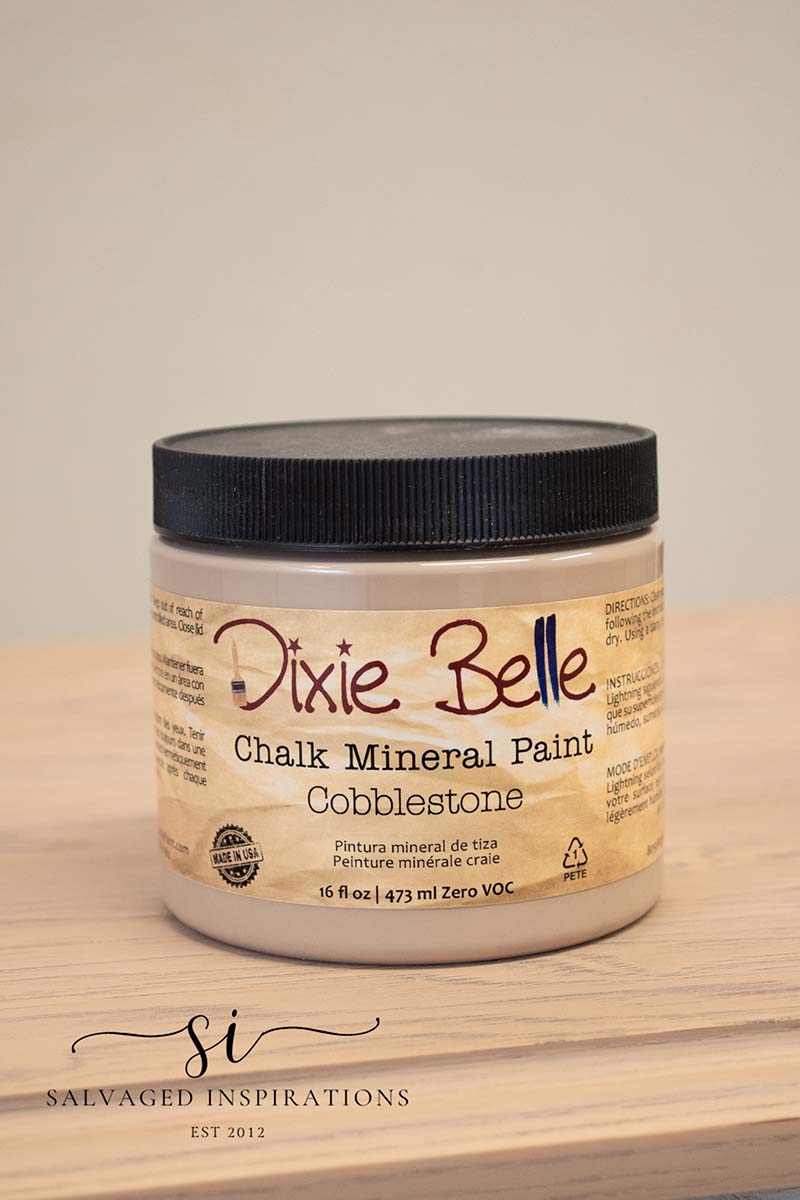
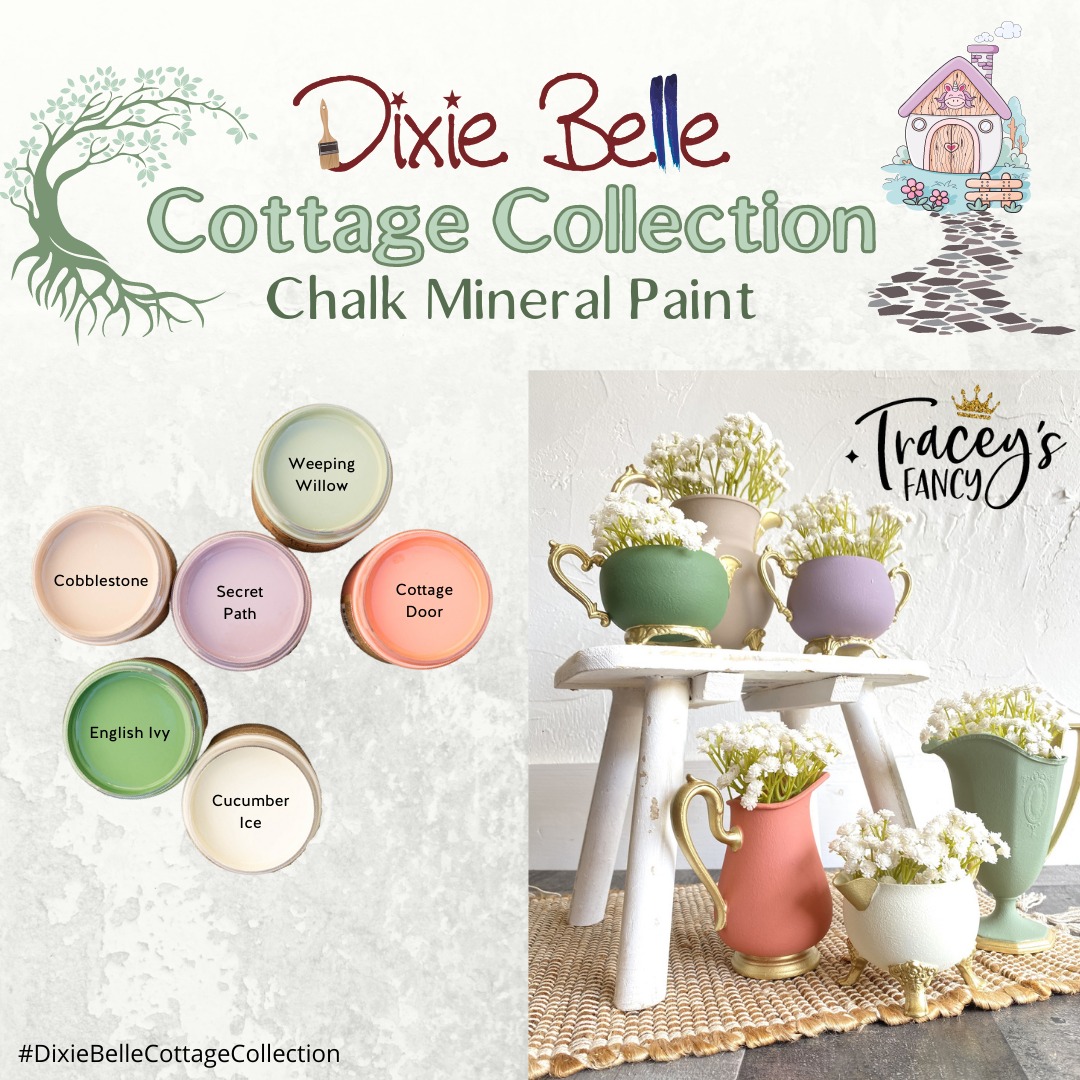
Cobblestone Chalk Mineral Paint
Paint Brush
Fine Mist Spray Bottle
Shop Towels
Gator Hide Topcoat
TOOL LIST
Pry Bar (44% off as of writing this)
Multi-Oscillating Tool
Rubber Furniture Mallet
Multi Screwdriver / Drill Set
Bosch Sander
EuroPro Paint Gun
COBBLESTONE NIGHTSTAND SET MAKEOVER
Here’s how I salvaged these nightstands into an ALL-NEW updated set.
CLEAN & MODIFY
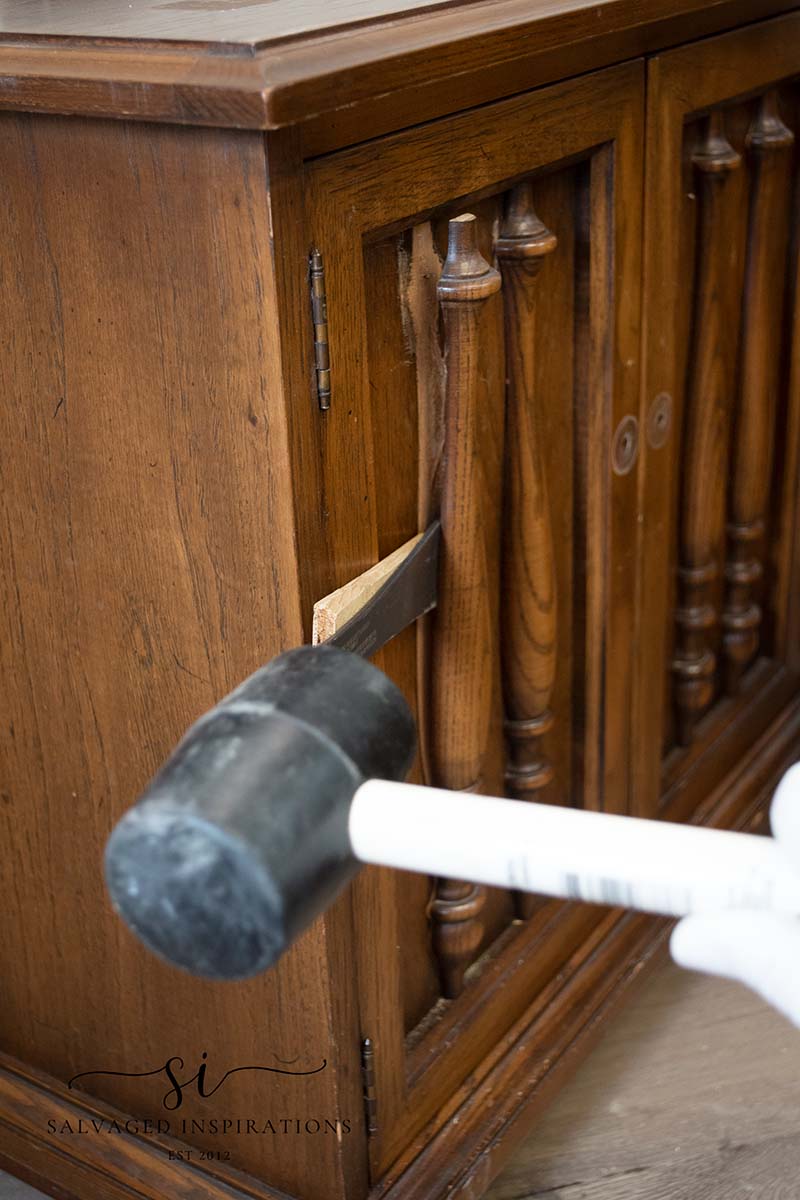
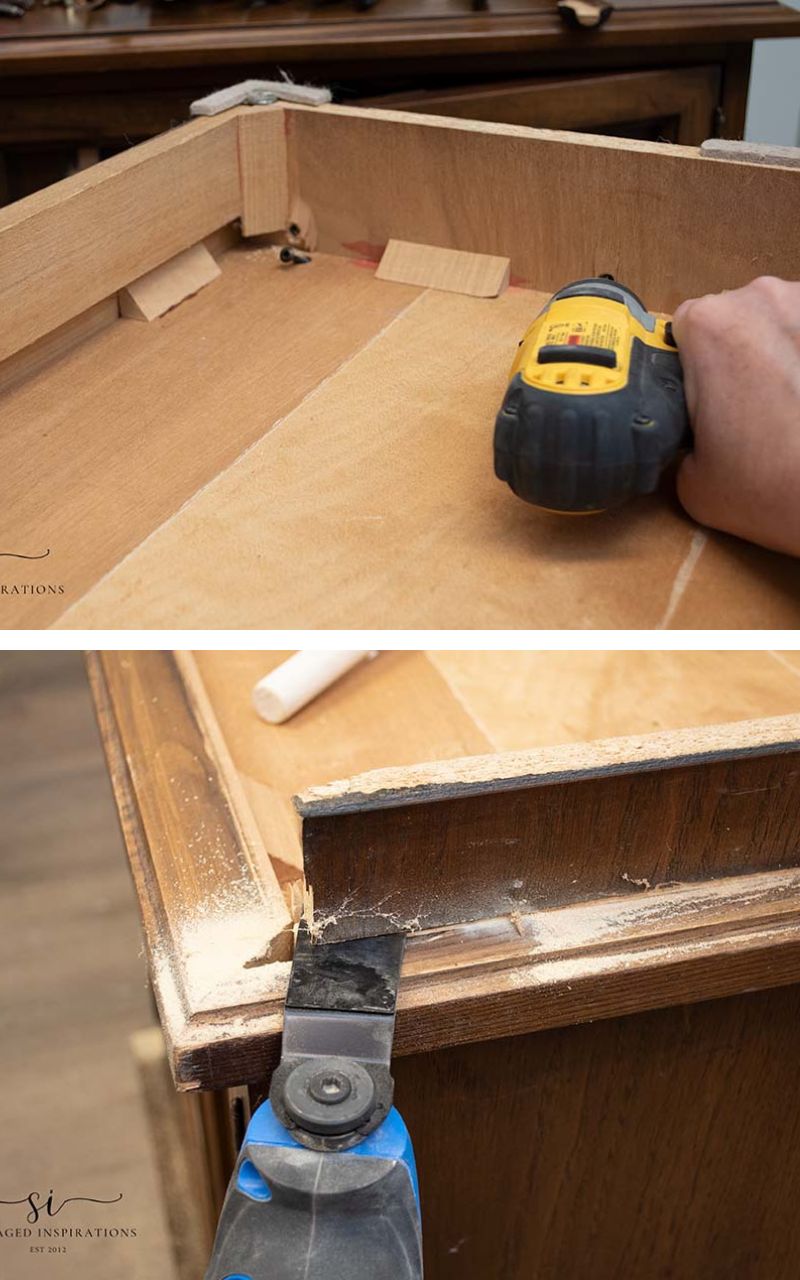
I started by cleaning, removing the hardware, and then taking the trim off the front doors. I used my pry bar to pry them off making sure to place a wood shim underneath the pry bar so I wouldn’t damage the nightstand doors. I’ve made that mistake before and it creates extra work to fix it. This trim was held on by trim nails so once I got the hang of it, they were easy to remove.
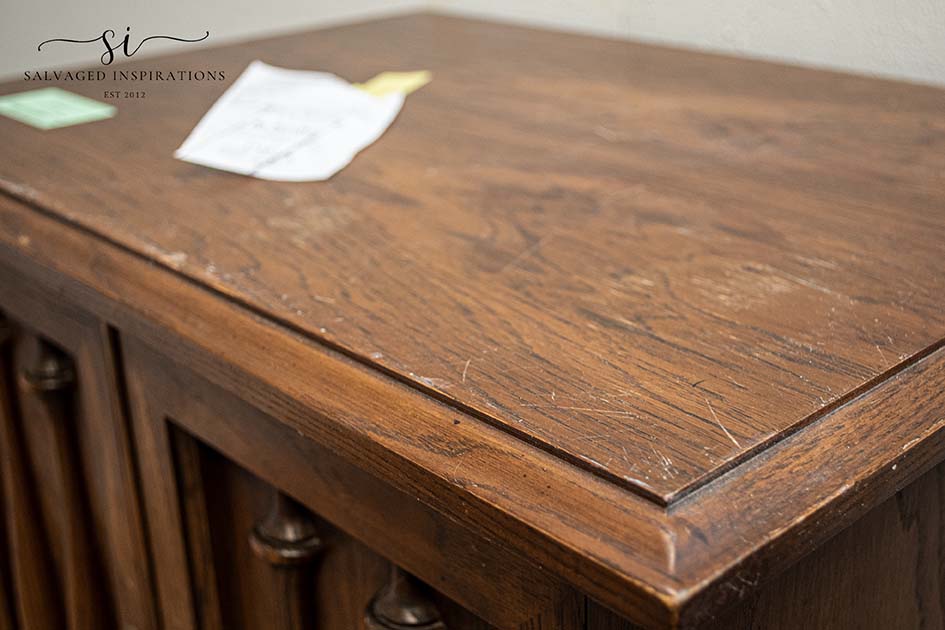
After the trim was removed, I filled the nail holes and imperfections with Bondo and gave it a good sanding. I also scuff-sanded the rest of the nightstands and sanded the finish off the top.
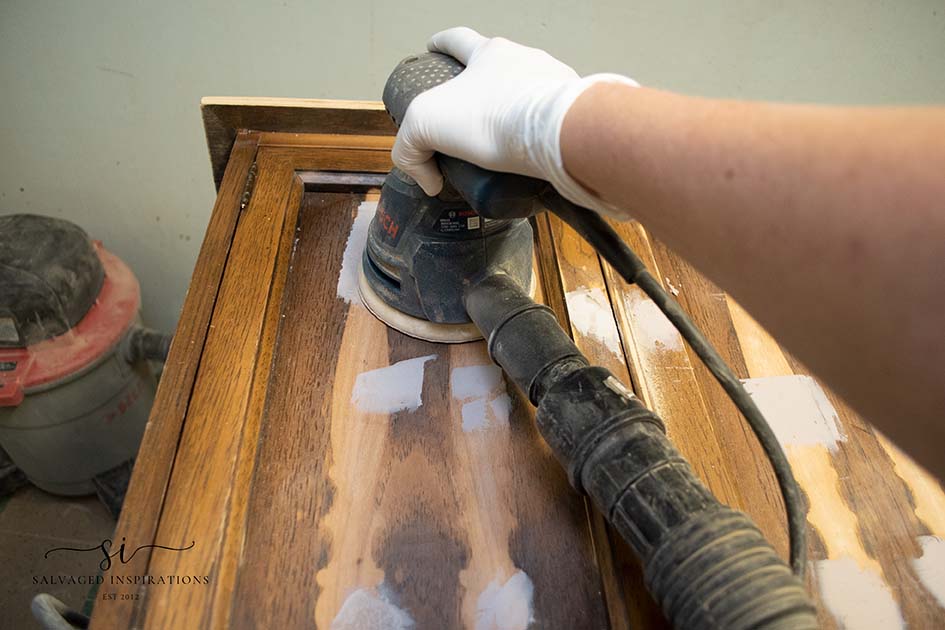
The next step was to remove the base so I could add new feet. I unscrewed the screws holding it in place. Then I used an Oscillating Tool to cut through the boards. These multi-purpose oscillating tools are amazing for sanding, cutting, cutting wood, nails, plastic, plaster, and so much more! I’ll demo this tool for you in this Saturday’s Youtube video.
PRIME
I used two coats of BIN Shellac Based Primer on the body of these stands and left the top natural wood. Here’s what they looked like after removing the door trim and base; and primed with the first coat. It’s still in the ugly phase…lol.
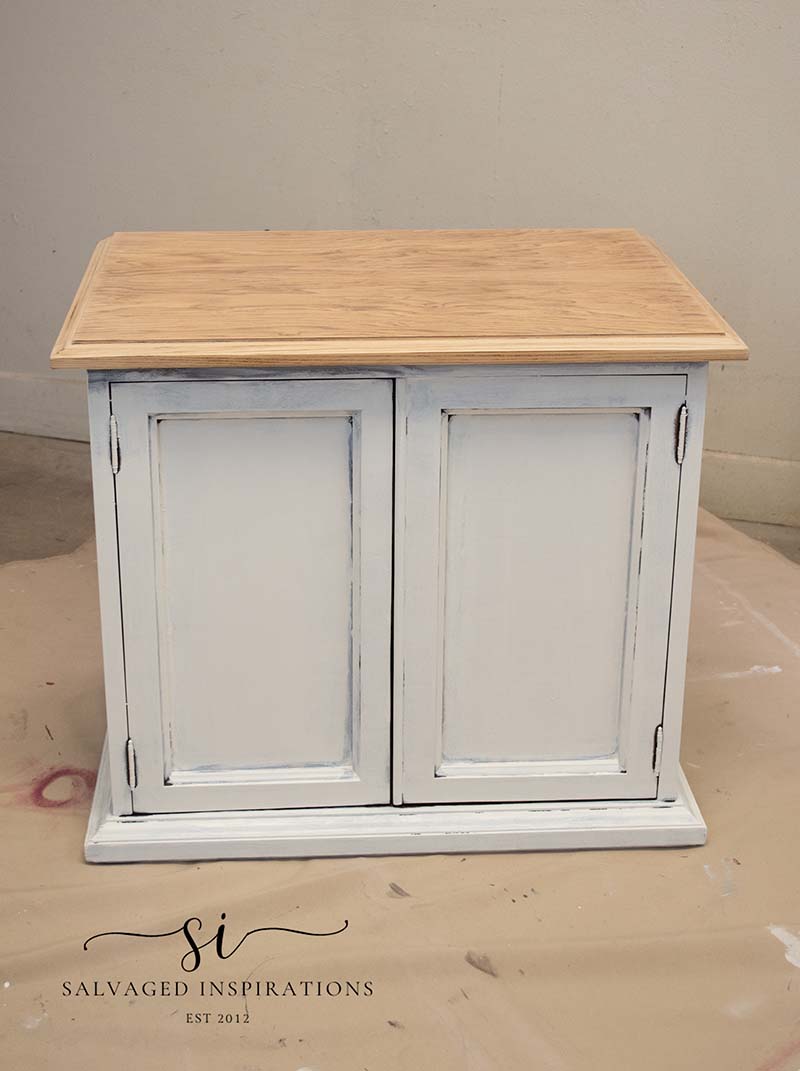
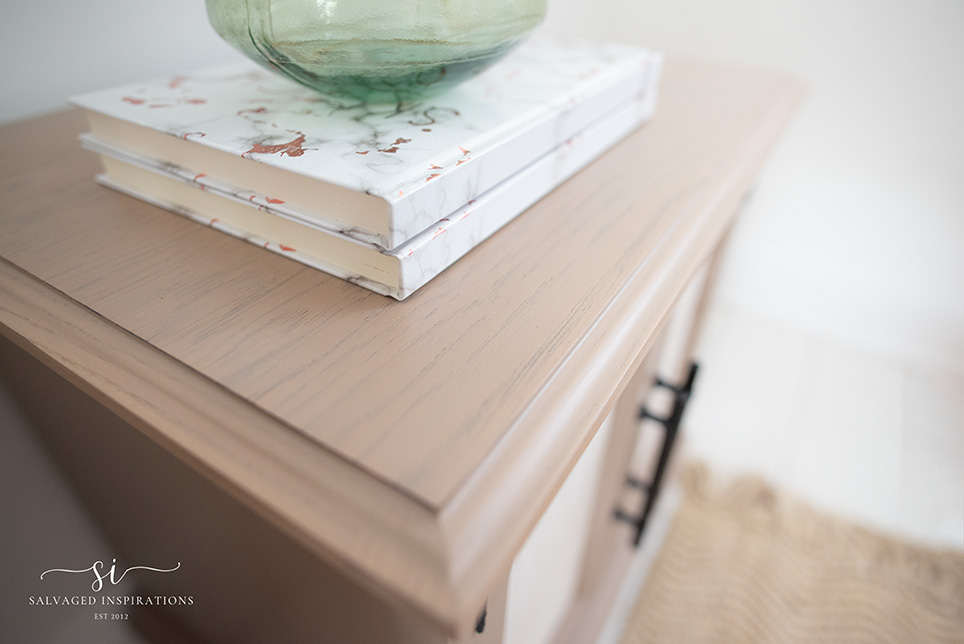
PAINT WASH TOP
I really like the look of the natural wood top. To tie it into this NEW Cobblestone color, I create a 50/50 wash of paint and water, and paint washed the tops of these nightstands. I have a full tutorial on How To Paint Wash HERE.
PAINT WITH COBBLESTONE
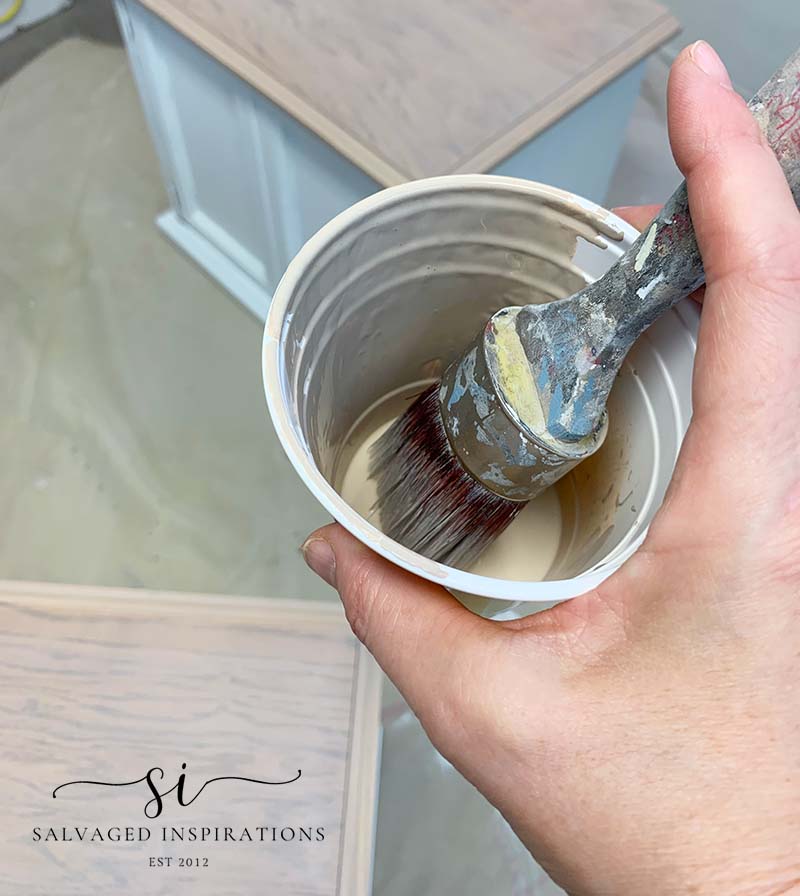
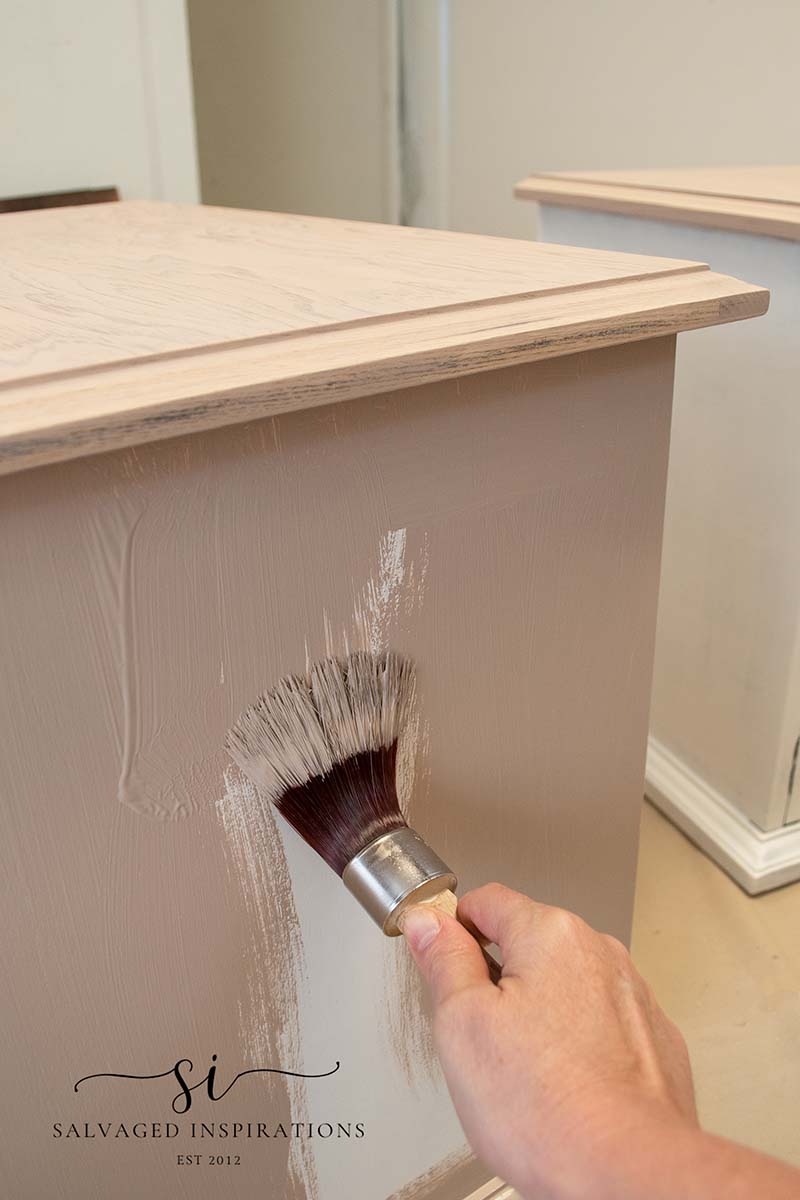
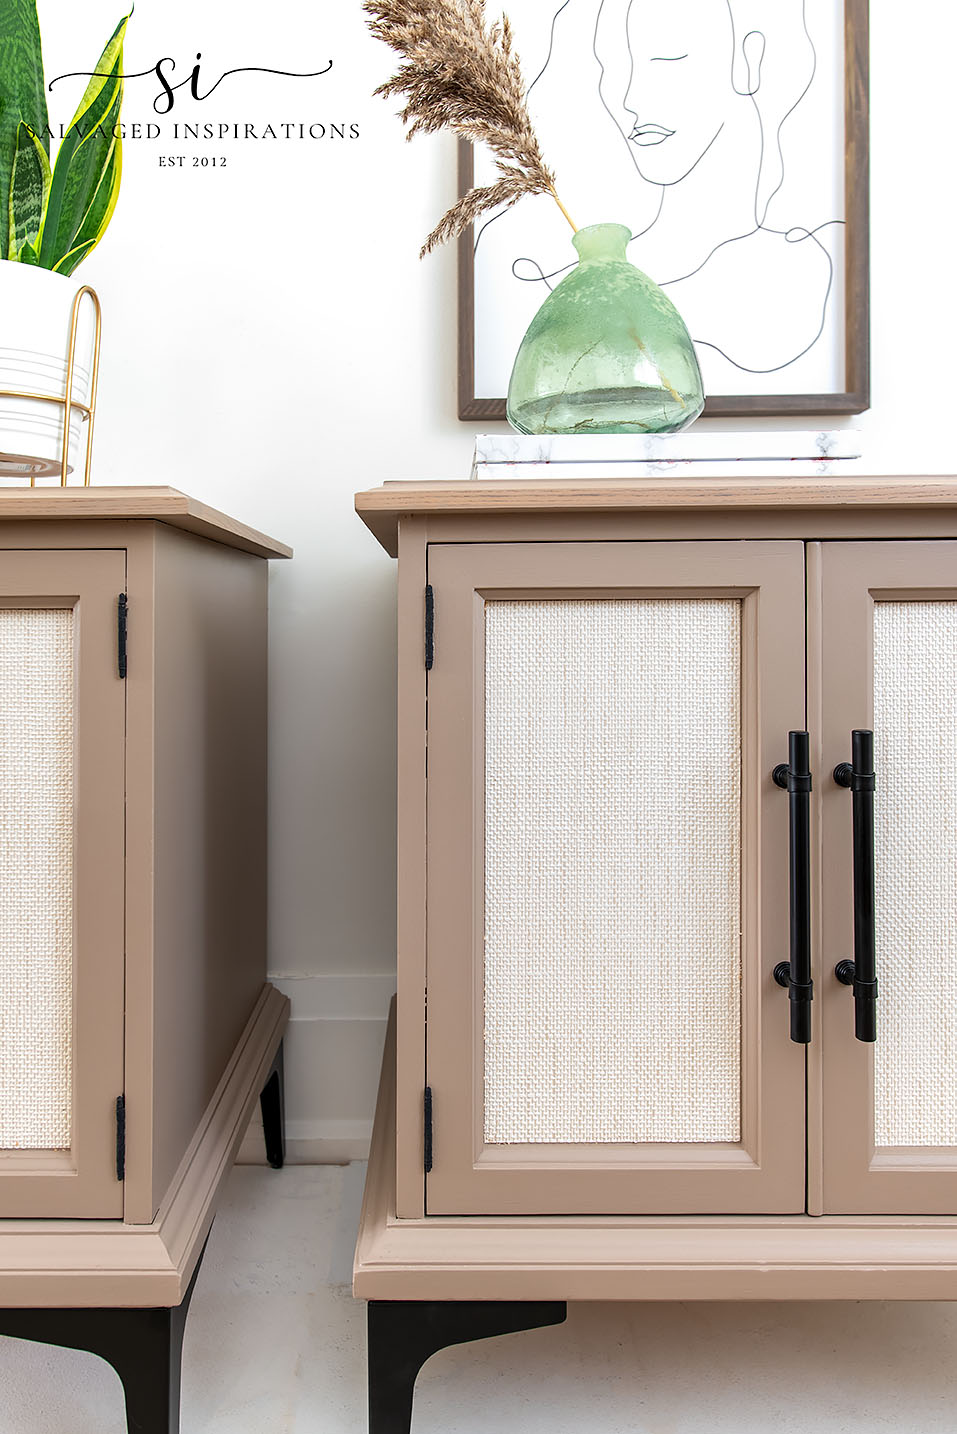
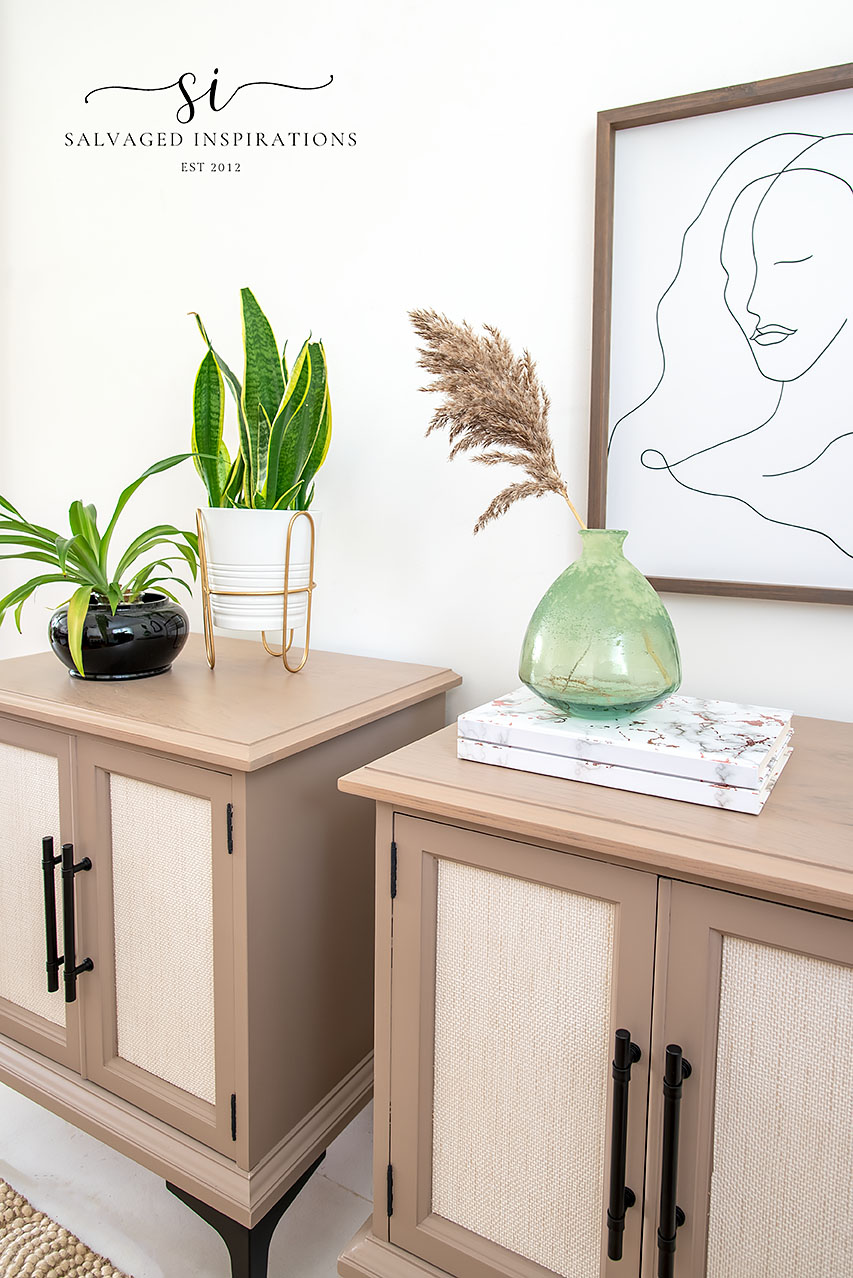
Now for the fun part! Painting with this new color! Cobblestone is one of the six new colors in the Dixie Belle Cottage Collection. I would describe Cobblestone as a light brown stone color with warm undertones. A warm and cozy neutral. Something you’d see in an old English cobblestone cottage but as you’ll see, can still be used on a modern restyle. I’ll include an image below so you can see the other five new colors which are equally beautiful. I picked this warm neutral to update these nightstands because I’m positive it will be a quick seller once I list them online.
As with all DB chalk mineral paints, the paint glides on beautifully and they are highly pigmented for great coverage. I used my Small Oval Brush for a smooth brush finish.
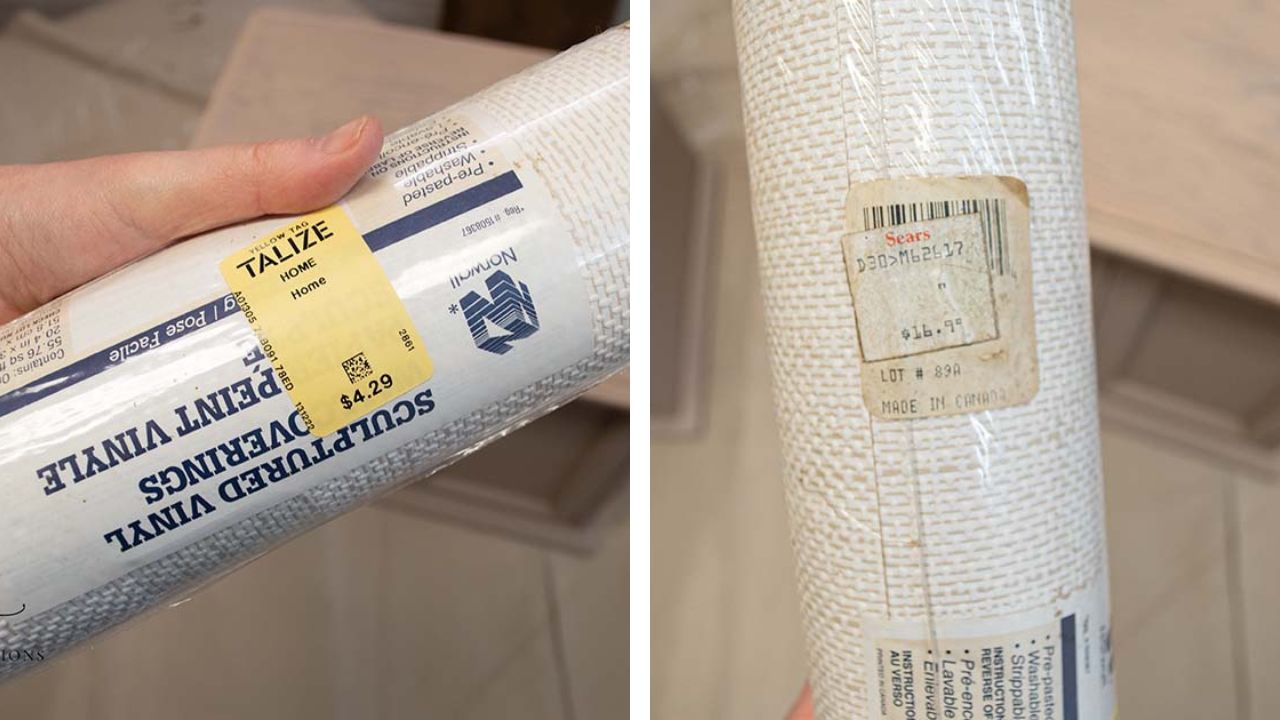
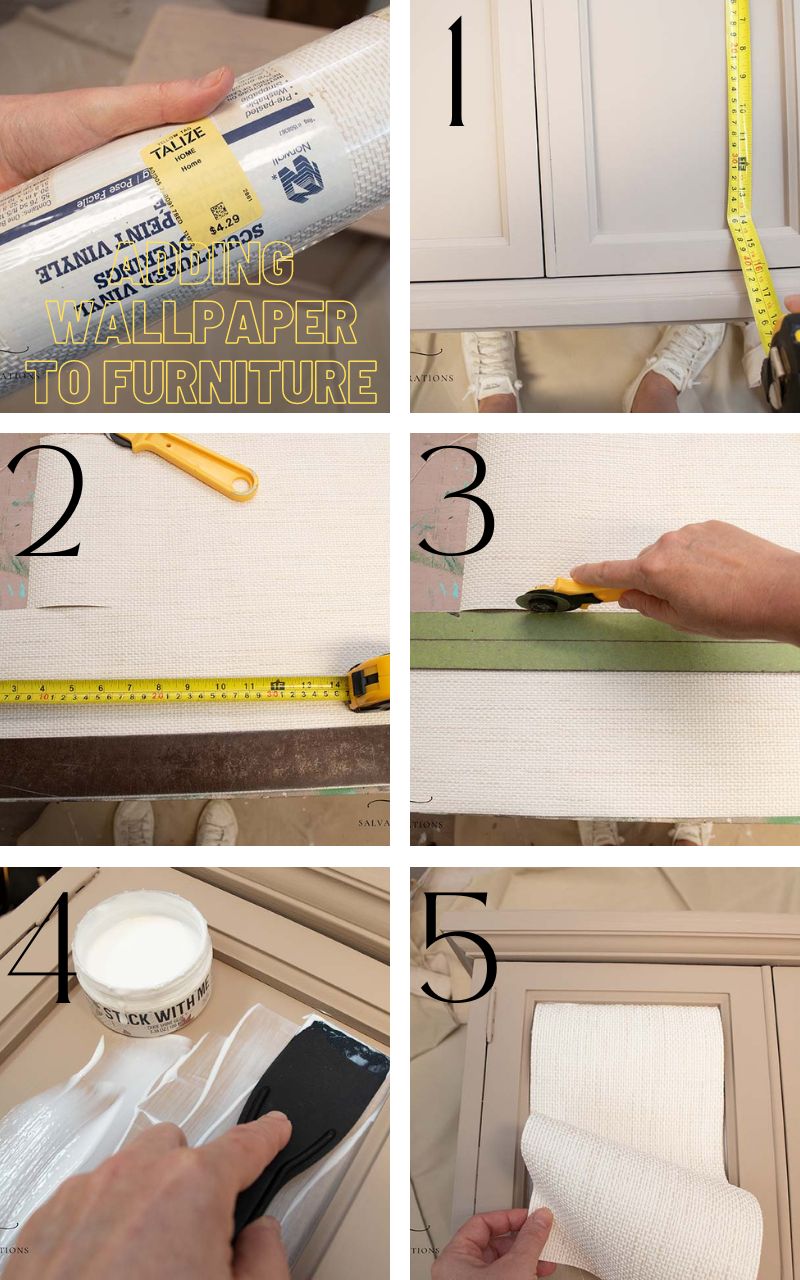
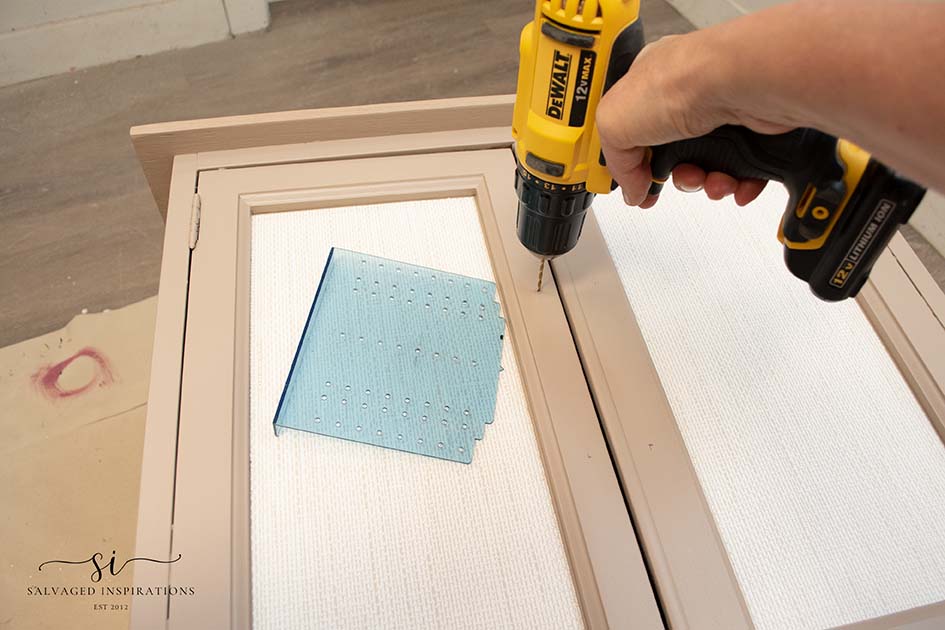
TEXTURED WALLPAPER
To create a textured front panel on the doors I used this old wallpaper from Sears. It was selling at a thrift store for $4.29 and the original price tag said $16.99. I haven’t seen a roll of wallpaper this size selling for any less than $50 these days!
Here’s the step-by-step on how I applied the wallpaper to these nightstands.
- I measured the door front panels
- using a square ruler I measured the same on the wallpaper
- I cut it with a rotary tool and made sure they fit into the panels perfectly
- Using this GLUE I spread it onto the panel using a putty knife making sure to get into all the corners and edges
- Then laid down the wallpaper and secured it making sure there were no bubbles and let it dry
HARDWARE
To complete the look, I added some long black statement handles I bought here.
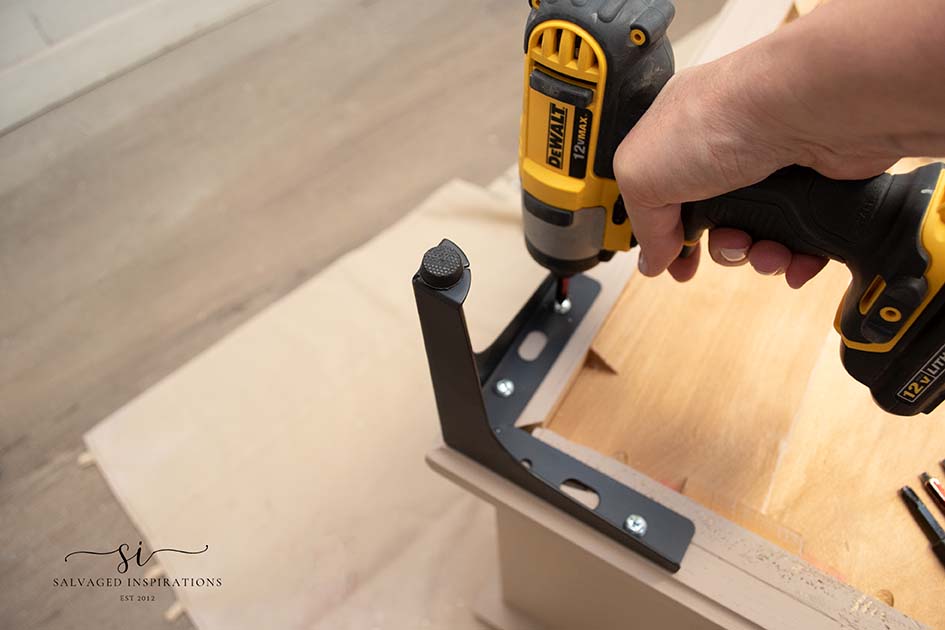
Then I added new modern legs/feet I bought off Amazon here.
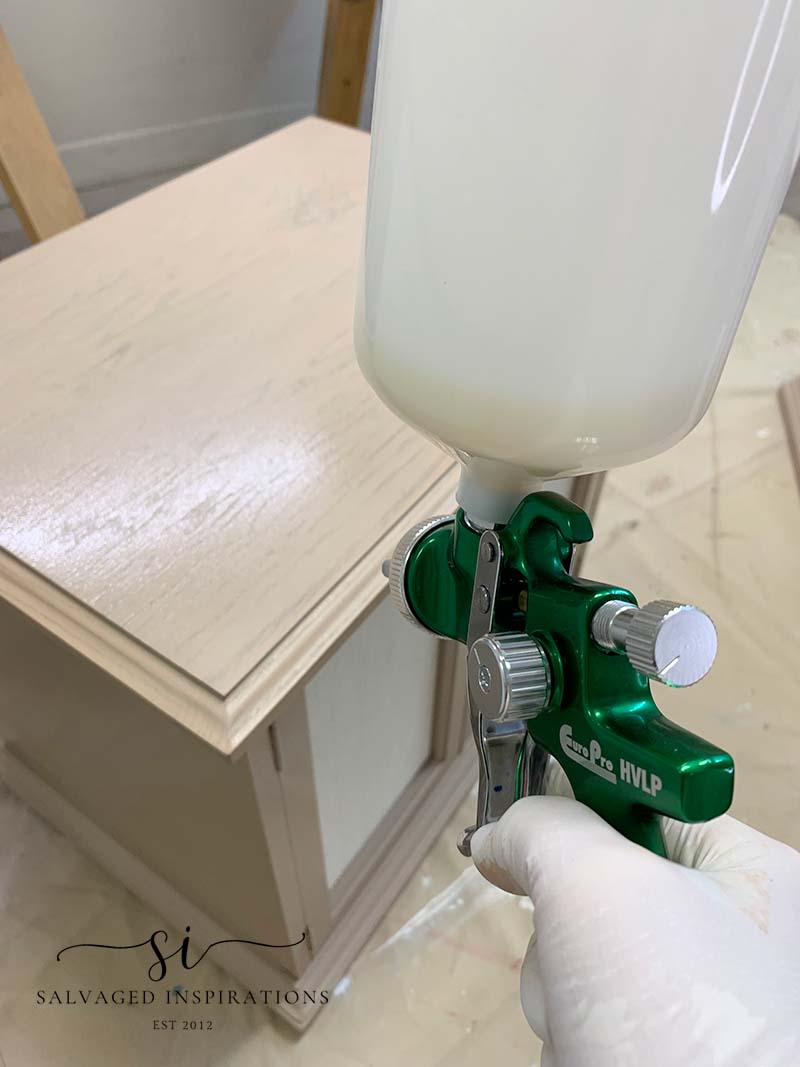
TOPCOAT
I sprayed three coats of Gator Hide to seal and protect this piece from dirt, grime, and scratches. This is my favorite topcoat and I’m loving my new HVLP Euro Pro Paint Gun as well!
FINISHED LOOK
Here’s how these salvaged nightstands all came together. They look like a brand NEW set — unrecognizable from what they previously looked like!
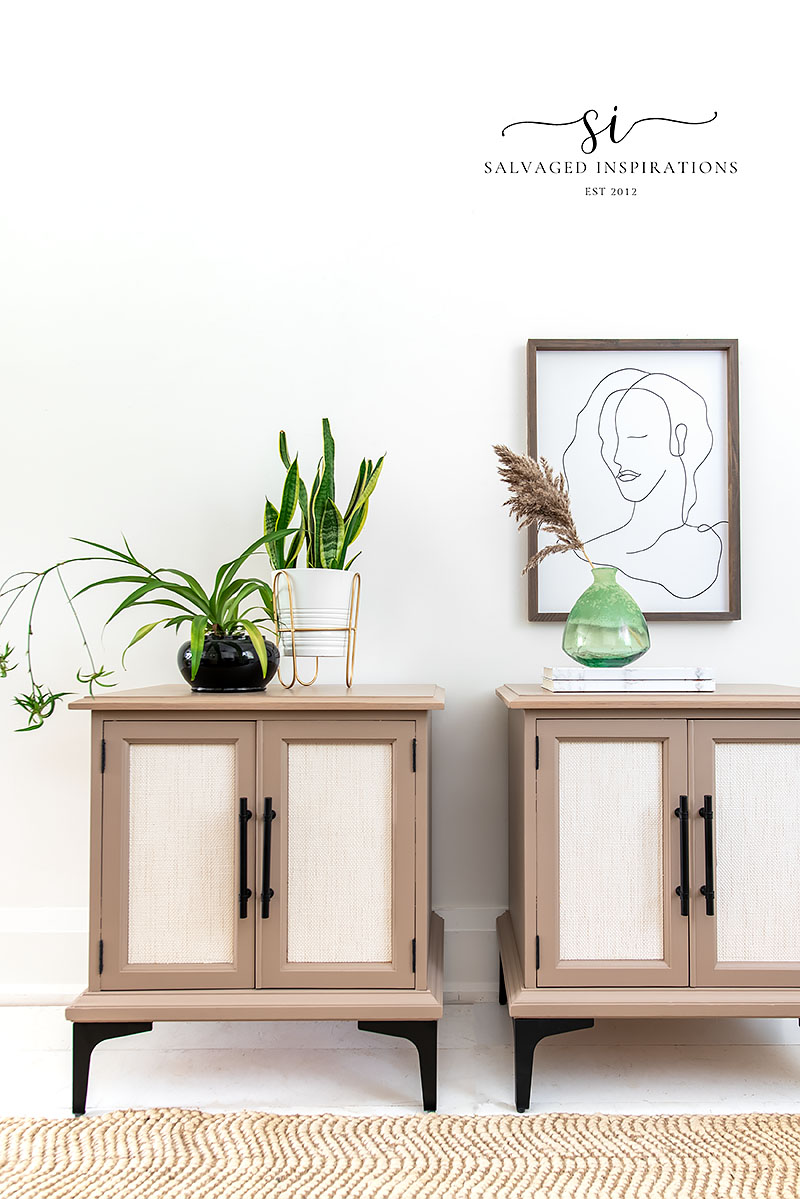
And check out this texture. I’m so happy I found this wallpaper and remembered I had it in my inventory to use on this piece.
I’m sure this neutral color will be a quick seller as well!
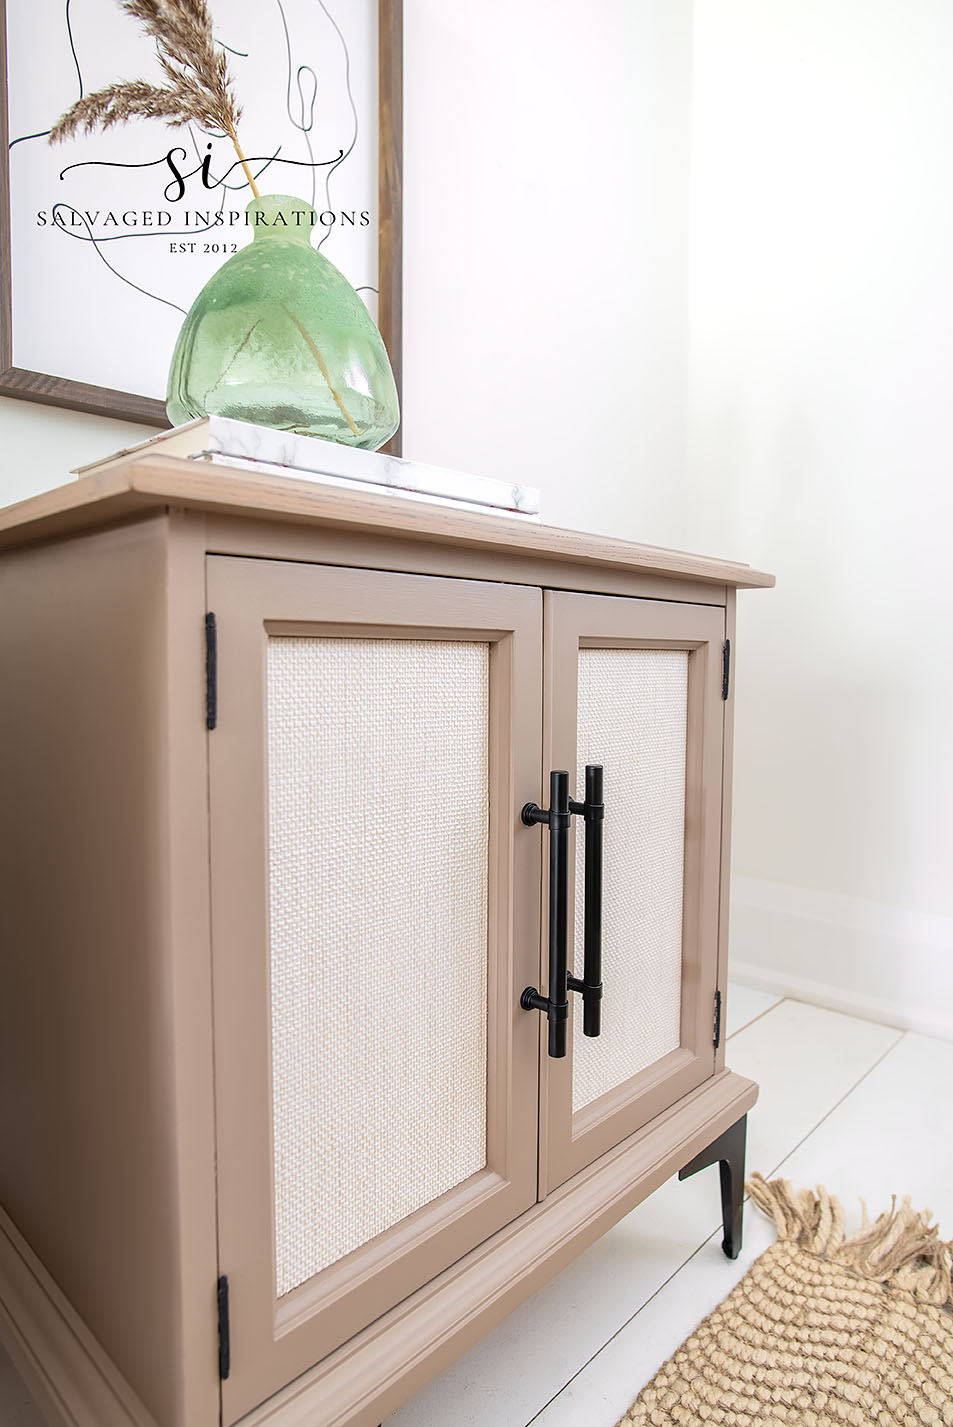
The Cobblestone wash really shows off the wood grain on the top as well.
I can’t wait to hear what you think of this makeover!
YOUTUBE TUTORIAL
Here’s a step-by-step tutorial on Youtube. If you have any problems viewing it below, feel free to watch it on my Youtube Channel HERE. Our #siyoutubefamily is already a community of 39.7K so don’t forget to subscribe if you haven’t done so already! So exciting, thank YOU! 🙂
6 NEW COTTAGE COLLECTION PAINT COLORS
Here’s a peek at the other colors in this Cottage Collection. I can’t wait to try them ALL!
AND NOW FOR SOME FURNITURE FIXER-UPPER FUN!
You’re going to LOVE what my creative team of Furniture Fixer Upper ladies do. Jen will be taking a break from the group while she focuses on her new home but we’re looking forward to seeing her back soon! Below are the BEFORE photos. Visit the links underneath to see the amazing AFTERS and learn how they did it! I’m heading over to take a peek as well! x
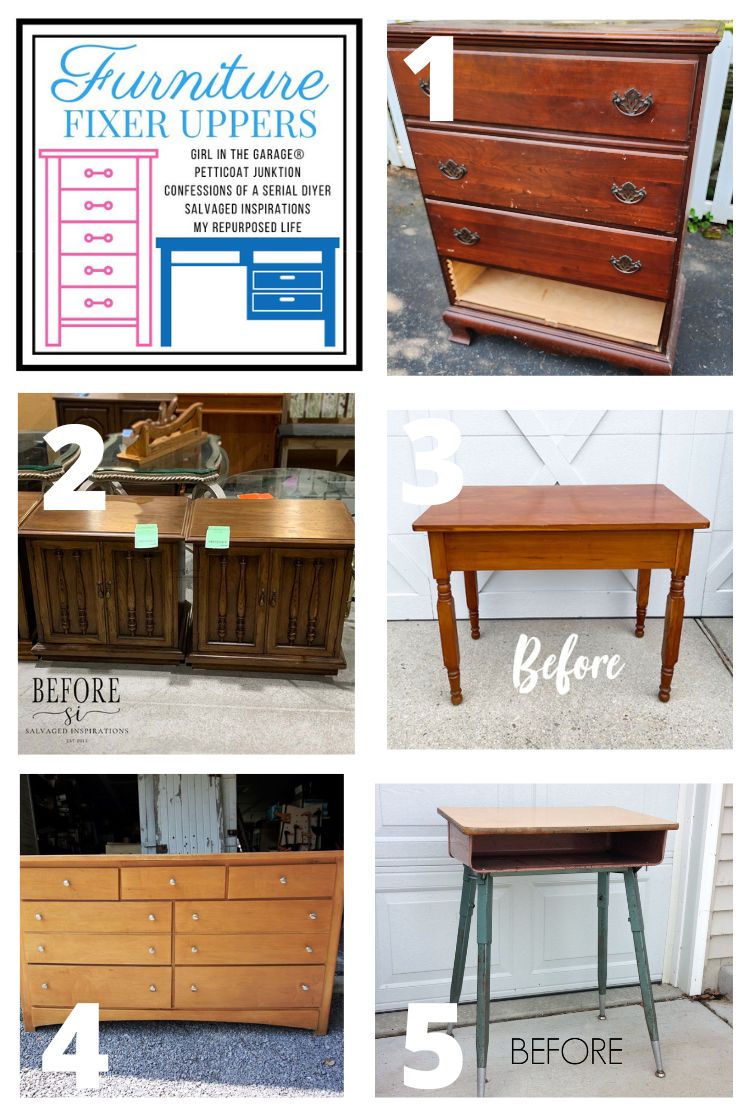
1. MY REPURPOSED LIFE
2. SALVAGED INSPIRATIONS (HAPPY YOU’RE HERE!)
3. CONFESSIONS OF A SERIAL DIYER
4. PETTICOAT JUNKTION
5. GIRL IN THE GARAGE
Here’s another look at this 2 in 1 table’s before and after. I hope this faux finish makeover has inspired you and given you some new ideas on how to paint your furniture.
LET ME KNOW WHAT YOU THINK OF THIS COBBLESTONE COLOR AND THE NIGHTSTAND SET. FEEL FREE ASK ANY QUESTIONS YOU MAY HAVE… I ALWAYS LOVE HEARING FROM YOU. IT MAKES MY DAY! 🙂
Happy furniture painting my friends!
Denise x
RELATED POSTS::
HOW TO PAINT FAKE STONE | GARDEN BUDDHA
DIY BOHO NIGHTSTANDS BEFORE & AFTER
FAUX STONE TABLETOP MAKEOVER
CURBSHOPPED DESK INTO NIGHTSTANDS
22 SALVAGED FURNITURE FLIPPING IDEAS
PIN AND SHARE!

What a transformation for those outdated nightstands, Denise! Great job! xo
Thanks so much Jen! XOXO
I just watched the YOU TUBE video on this gorgeous transformation. I’m going to share this with my sister, she has done several pieces to put in her home & done a pretty good job. She has more patience with this than I do. I am a photographer, that’s where my patience lies. We do what we do , right ??
Great Job !!
Thanks Janice and thanks for sharing with your sister! You’re photography is gorgeous btw! Thanks so much for dropping by. xo
Denise..smashing job!!! I can see you put in alot of thought with these cabinets. Love the idea of taking those knobs off.The color and the wallpaper makes the cabinets. Awesome redo.❤
I think the wallpaper ties in beautifully with this new Cobblestone color as well! Thanks so much Lorri! XOXO
Wow! What a transformation! Great work.
Aww, thank so much Lizzy! It took some time but it was such a fun project! Enjoy your weekend. XOXO
One Word…. STUNNING
YAY! Thanks so much my friend! XOXO
WOW, these are amazing! 🤩 You worked your magic on these ugly ducklings Denise! Thanks for sharing all your tips and the new color!
So glad you like them Nicki! Thanks so much! XOXO
Hi Denise. Wow, I am in awe. You transformed these REALLY UGLY night tables into something so beautiful I’d LOVE to have them in my own home. Well done.
Huge compliment, thanks so much Monique! Enjoy your weekend.XOXO
WOW. That looks amazing. I never thought of taking the ugly doo-dads off. Good call. That opens up all new possibilities at the thrift store
Hi Debi!🤗 Ya, we have so many of these old nightstands in our thrift stores around here, right?! Totally different look without the doo-dads! 😉
Absolutely beautiful! WOW !!! Removing the door trim made a world of difference ! Love the color of the tables , black handles but not crazy about the black tall feet . 😕 Use of the wallpaper was brilliant !
Thanks so much Shelby! 🙂
Amazing! I’m always awed by your vision, ingenuity, and craft. Even though I only occasionally refinish furniture anymore, I look forward to seeing what you’ve transformed. You inspire this (me!) mixed media artist. May you continue to be blessed and blessing.
Super huge compliment Meredith, thank you!!!
Hi Denise, I love the update! I have a question about the wallpaper. Do I understand you to say that you can paint this vinyl type wallpaper? Thanks.
Thanks Ellen and YES! It’s paintable and I even wondered if I should paint it in Cobblestone but then decided I liked it au’natural. I would use a slick stick or bonding primer first tho.
I LOVE these, Denise! The color is fabulous. Smart move removing the toe kick. I have those same legs in a box waiting on my next flip. Always inspiring. xo 😘
I know you’re going to do something fabulous with those legs Do! Thanks so much! XOXO
Hi Denise! Another amazing makeover! I love the textures wallpaper. Can’t wait to watch the video on Saturday. You have taught me so much through the years. Thank you!!
Hi Cheryl! I’m loving the texture as well, so glad you love it! And see you Saturday🤗… I REALLY APPRECIATE you supporting me here and on my channel. TY💕
Absolutely smashingly up to date. Love the look.
Thank you Kay! 🙂
What a lovely transformation. Textured wallpaper…would have never thought of it.
Thank you Lane! Now I can’t wait to use it on something else!
Use are beautiful! What a great transformation!
Thank you Marianne! XOXO
Girl, you are AH-MAZING! I knew if anyone could salvage those ugly ducklings, it would be you!! Absolutely beautiful now! And funny…Sears was my very first job when I was 16. I worked in the linen department for two year lol! XOXO
Awwww, thanks my friend! And no waaay! I nearly took a job at Sears Photo Studio back in my 20’s.😀 Now we don’t even have any Sears stores in Canada. They all shut down.
Stunning! I love that you lifted them and you reminded me that I have those “legs” in my stash. The black accents are truly inspired. You are the BEST!
These legs are great, right?! I know you’ll use them for something awesome Leslie! Thanks XOXO
Love them! I never would have even considered those tables could be simplified like you did!
Yay, thanks so much Cheryl! 🙂
Wow ,what a great make over .They look awesome!!Love all you do.
I appreciate this Barbara, thank YOU!
Nice save-they look great! I love using wallpaper when I can.
I don’t use wallpaper often but I should.😃 I can see why you like it Laura… so easy to work with and paintable as well! Thanks so much. 🙂
One of your best transformations!
Awwww thanks so much Christine! I’m so happy you like it! XOXO
It’s so amazing how this update looks now. New legs / hardware , and love the wallpaper texture !
Such a nice neutral color. A totally new look.
Is there some product that can be applied under paint to get a sand finish ?
I’m guessing with all your vast experience you have done it before !!
Thanks
Thanks so much P! XOXO And I’m not sure I understand what you mean by a ‘sand finish’. There is saltwash that gives a textured finish. Or are you looking for something that looks more grainy?
It would never occur to me to remove the dated trim on an old piece of furniture, but what a difference it makes, Denise. Even what you call the “ugly phase” looks better to me! The woven wallpaper adds great texture, too.
I thought the ugly phase was pretty ugly so what does that say about what you thought the original set looked like?😂😂😂 Now my brain is trying to figure out what to do with the leftover trim. I’ll come up with something. 😉 Have a great day Marcie! XOXO
Did you topcoat the wallpaper as well?
Hi Maureen, yes I did! I sprayed the entire piece front and back.
What a transformation! Just beautiful!
Thank you Jan!!
TRANSFORMED into BEAUTIFUL!!! 🥰 Now, could you do a transformation on ME!!! 😁 😉
Yay! Thanks so much Susan and huge compliment!..hehe. XOXO
Denise, I could not believe you were going to tackle those UGLY tables! What a great transformation – love the wallpaper, handles and the legs! What a great upcycle!
Thanks so much Gwen!🤗 They were super fun to tackle and I’m so happy with the end result… so satisfying!
These turned out beautiful! Question: why did you not take the doors off to paint? and afterwards did you remove the paint from the hinges since they look black at the reveal.
Thank you and GREAT question! It was a last minute change so I didn’t add it into the post but good eye Julie! I painted right over the hinges thinking I’d like them to blend in and NOT have them stand out. But once everything dried I wasn’t happy with the look so I blacked them out with paint.
Well I for one totally love what you did to this tables. You have inspired me!
Thank you Jaye! XOXO
Beautiful finish and I love the wall papered doors, looks like it has great texture. xx
Thank you so much Janette!😃