HERE’S HOW TO USE DECOUPAGE ART ON YOUR WOOD FURNITURE MAKEOVERS | YOUTUBE VIDEO
Hi creative friends and welcome or welcome back! Today I’m sharing how I used decoupage art on these two wood nightstands. Decoupage art can be sourced from napkins, wallpaper, rice paper, tissue paper, or even newspapers and magazines! It’s inexpensive and can make a dramatic difference on a plain piece of wood furniture as you’ll see in today’s makeover. I can’t wait to hear what you think!
It’s also Furniture Fixer Uppers Thursday. I’m joining my FFU crew and sharing links to their projects down below. And guess what? We have a NEW member on our Furniture Fixer Upper Crew! She’s a super talented furniture artist and I can’t wait to see what she’s sharing today. You’ll have to wait until the end of this post before I reveal who it is. 😉
*As an Amazon Associate, I earn from qualifying purchases. There may also be affiliate links in this post to other companies/products I use and love as well. You will never be charged extra when you purchase through these affiliate links. To see my full disclaimer, click here!
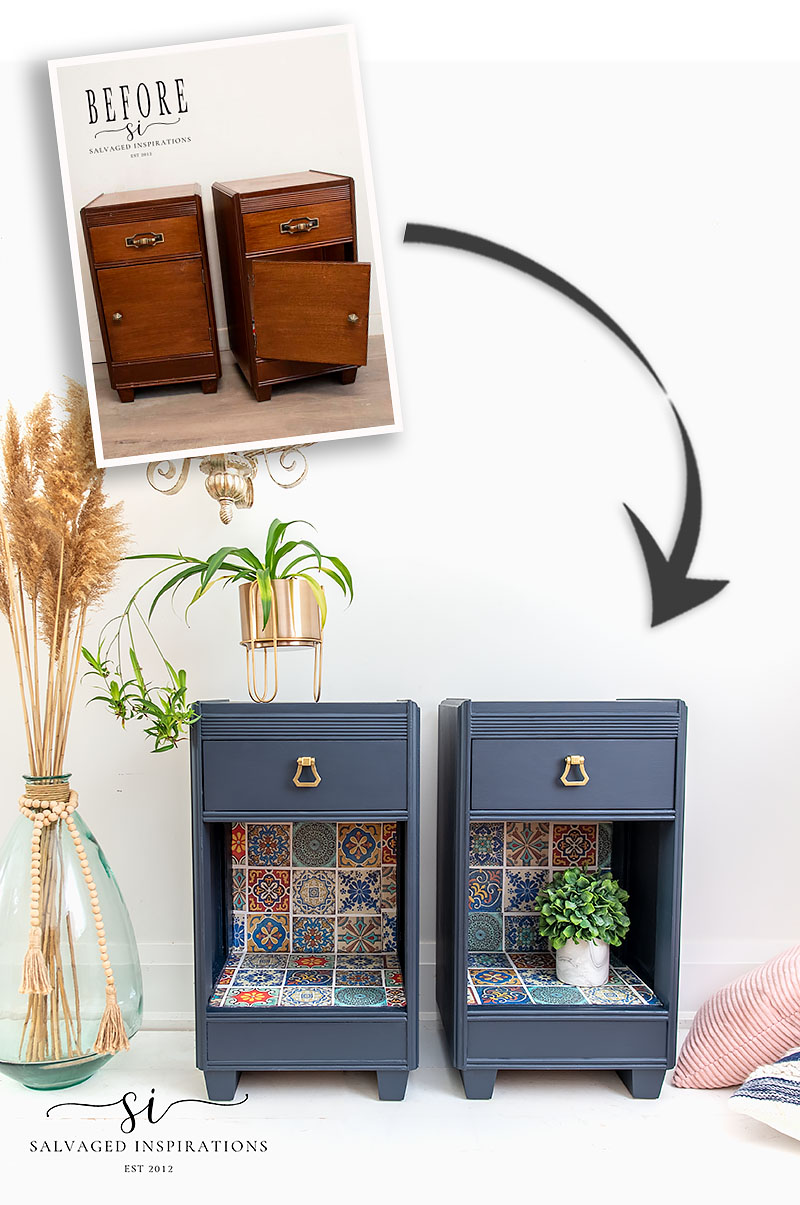
Here’s the salvaged nightstand set I started with. I believe this set was thrifted from the 70’s by my parents. If my memory serves me right, my Dad stained and refinished this set when I was in grade school.
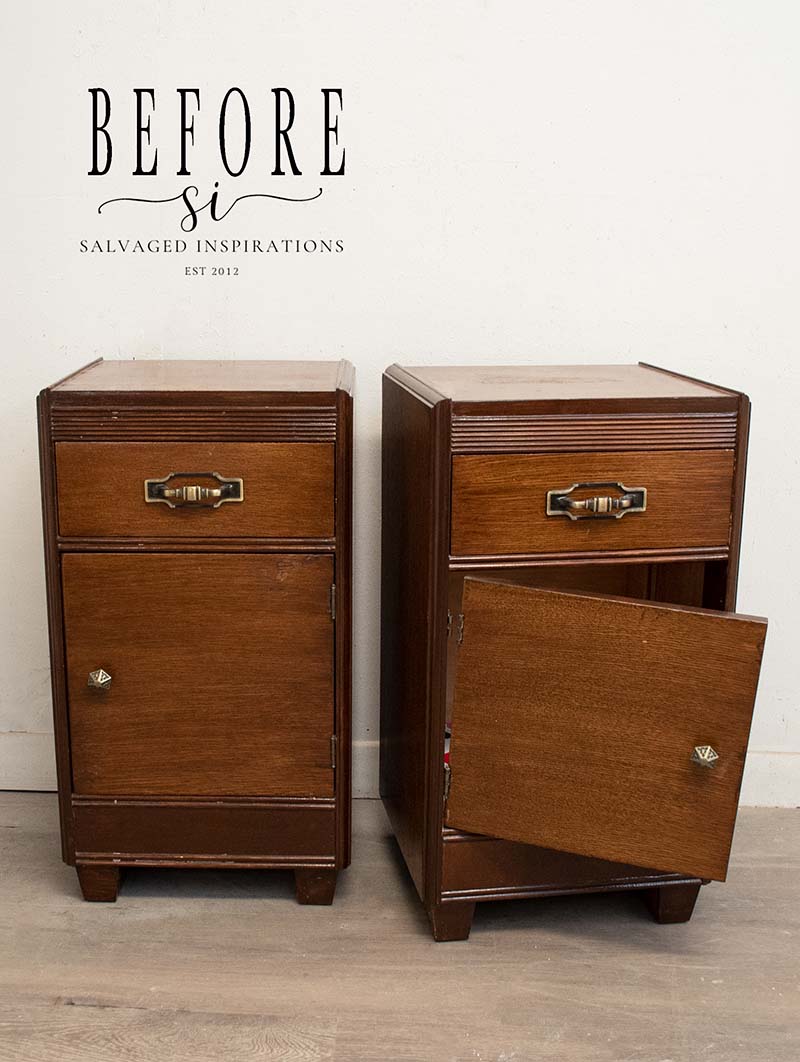
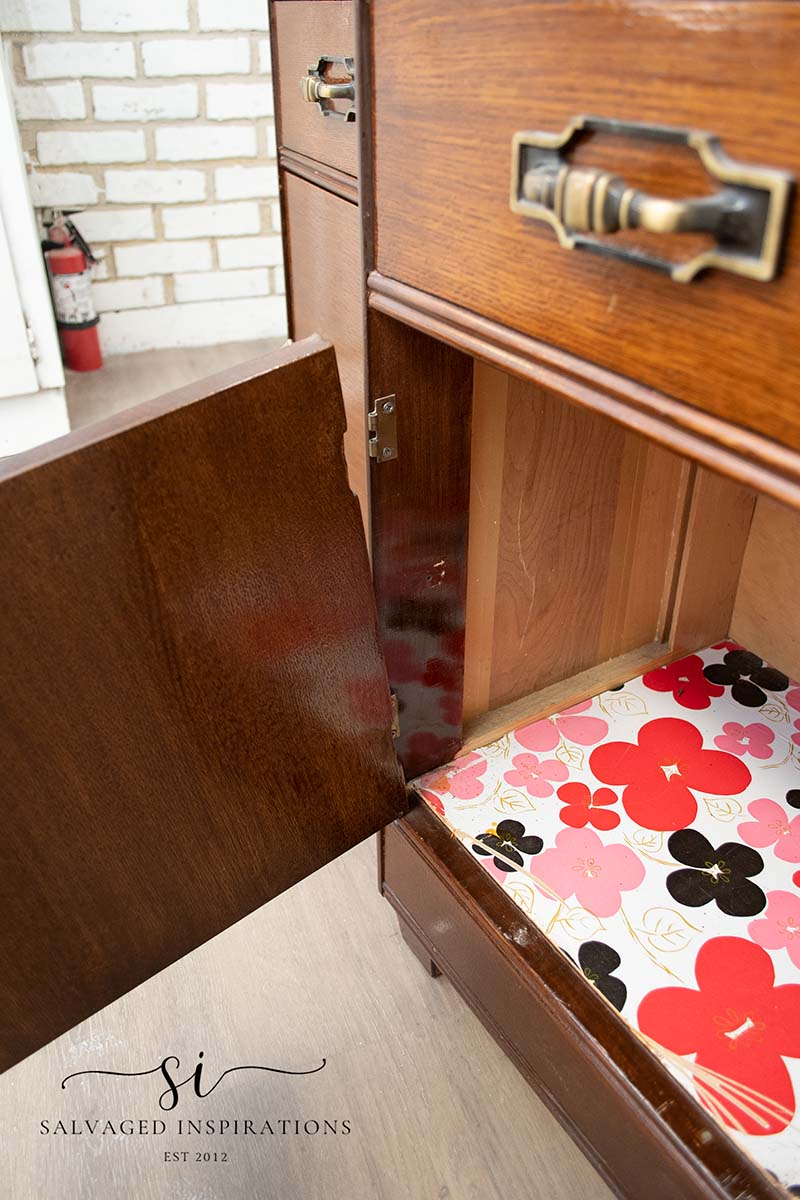
The front door hinge was broken and there was contact paper covering the inside. I’m guessing it was my Mum who added the contact paper.
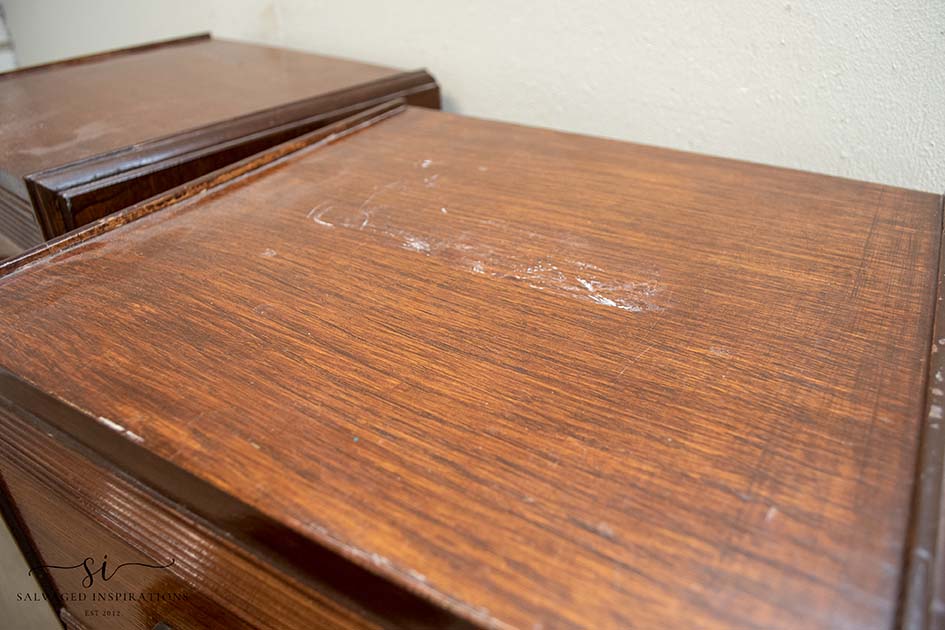
There were also some scratches on the top but overall these nightstands were still in awesome condition.
THIS POST IS SPONSORED/CONTAINS AFFILIATE LINKS TO PRODUCTS I USE. YOU CAN SEE MY FULL DISCLOSURE HERE.
WHAT YOU’LL NEED
Wood Nightstand Set – SALVAGED
White Lightning Cleaner
Bosch Sander
BIN Shellac Based Primer
Bondo All-Purpose Putty
Deep Sea Silk All-In-One Mineral Paint
White Cap Silk All-In-One Mineral Paint
Mosiac Tile Decoupage Paper (similar)
2″ Round Paint Brush
Clear Coat Satin
NIGHTSTAND MAKEOVER
Here’s how it all came together with the paint and decoupage tissue paper…
CLEAN & PREP
I started by removing the contact paper using a heat gun. It always warms my heart when I see lined drawers because it means someone took the time to take care of their pieces. In this case, it was my Mum. 💕
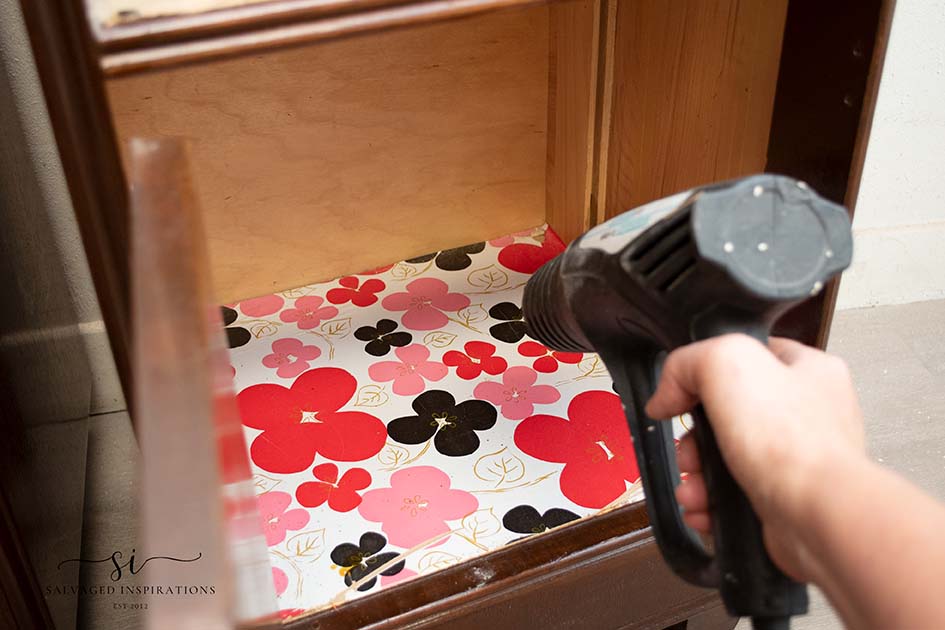
It doesn’t matter how many years the paper has been stuck on. Heat will remove it easily!

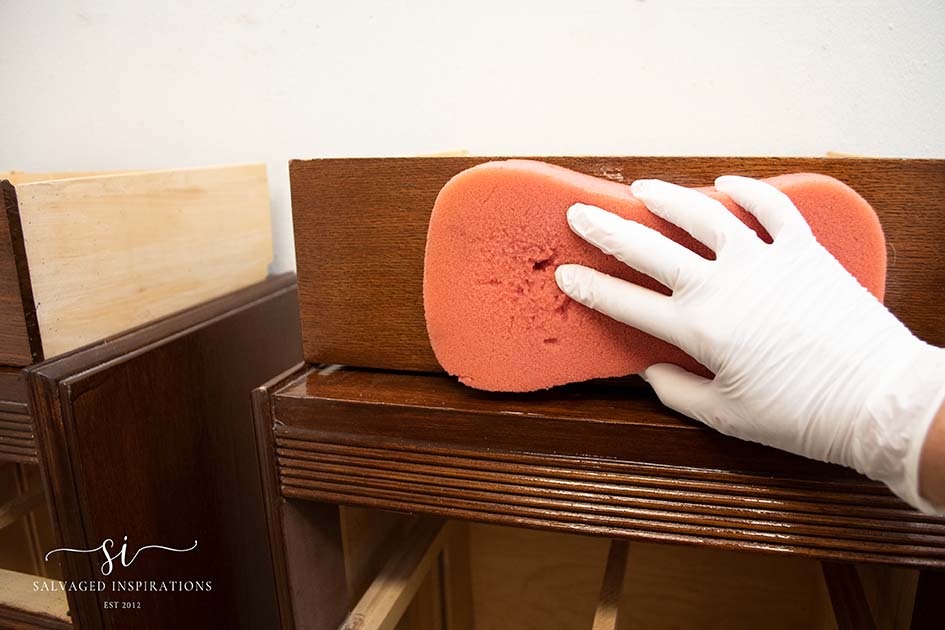
I gave these night tables a good cleaning with White Lightning. making sure to rinse my sponge and wipe with clean water to remove any residue before sanding and priming.
FILL AND SAND
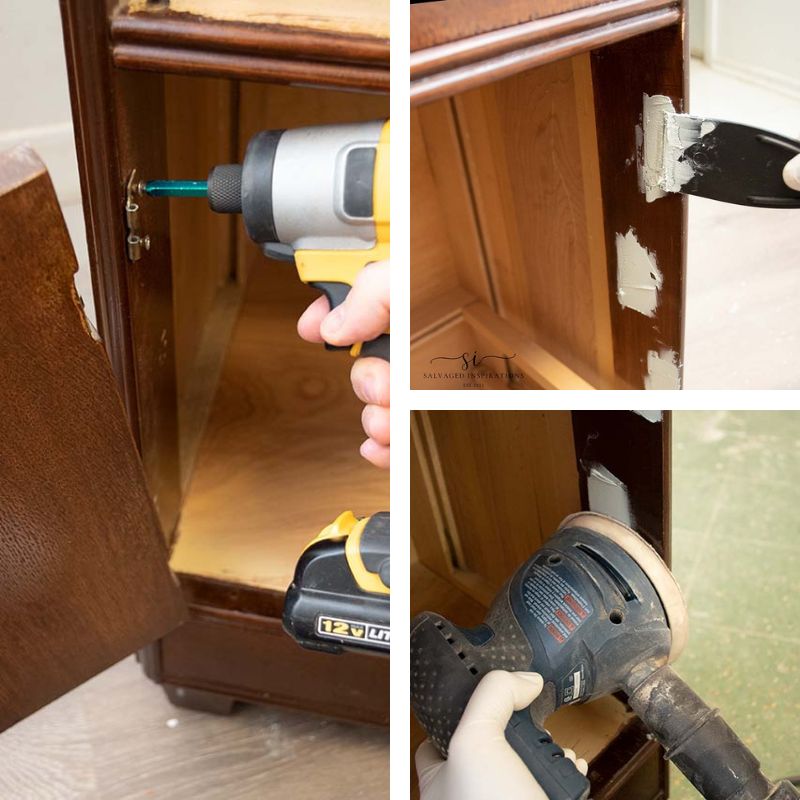
Once this desk was all cleaned and dry, I removed all the hardware, filled the holes with Bondo, and gave it a quick scuff sand with my Bosch Sander.
PRIME + PAINT
At this stage, I wasn’t clear on what color I wanted to paint them. So I went ahead and primed the outside of these nightstands with two coats of BIN Shellac Primer. But then I decided to use this Deep Sea Silk All-In-One Mineral Paint so priming wasn’t a step that was needed. Ugghhh. A waste of product really. Especially now that BIN Shellac Primer is selling for over $100 a gallon as I mentioned in another post.

This will teach me to pick my paint before priming…lol. I went forward and painted two coats of this gorgeous Deep Sea Blue.

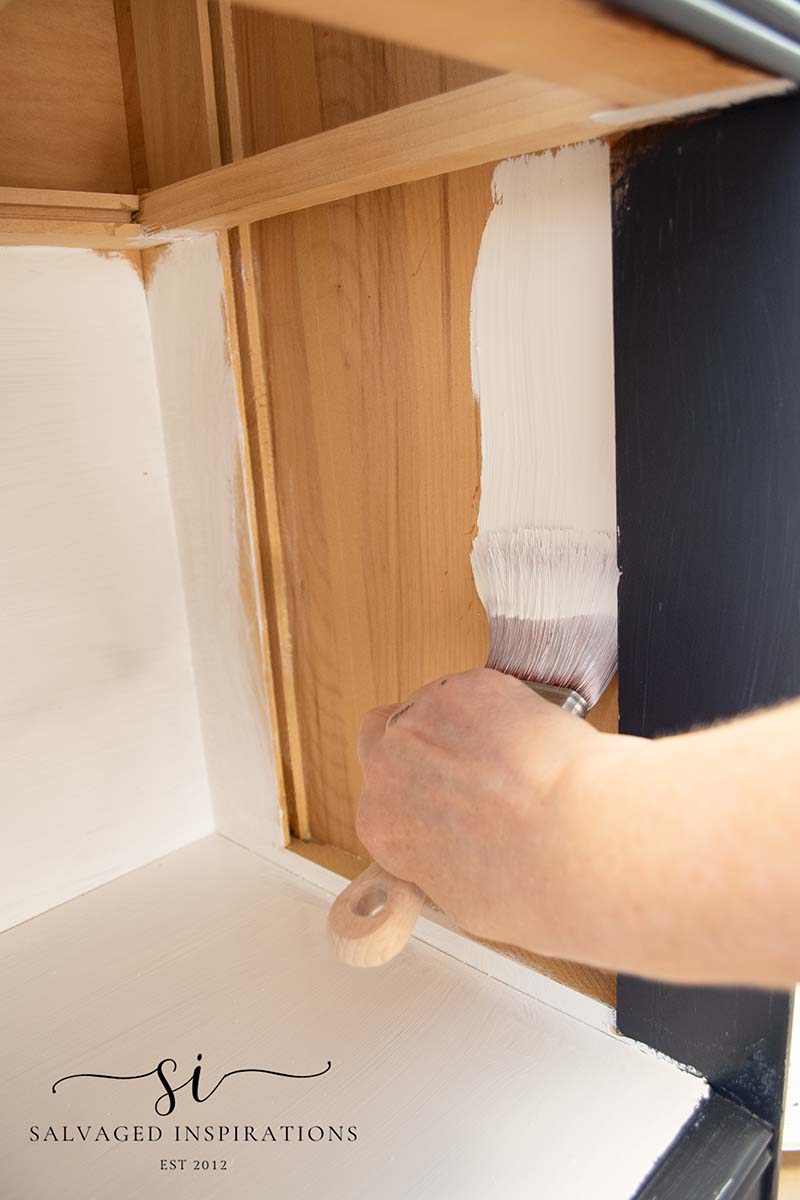
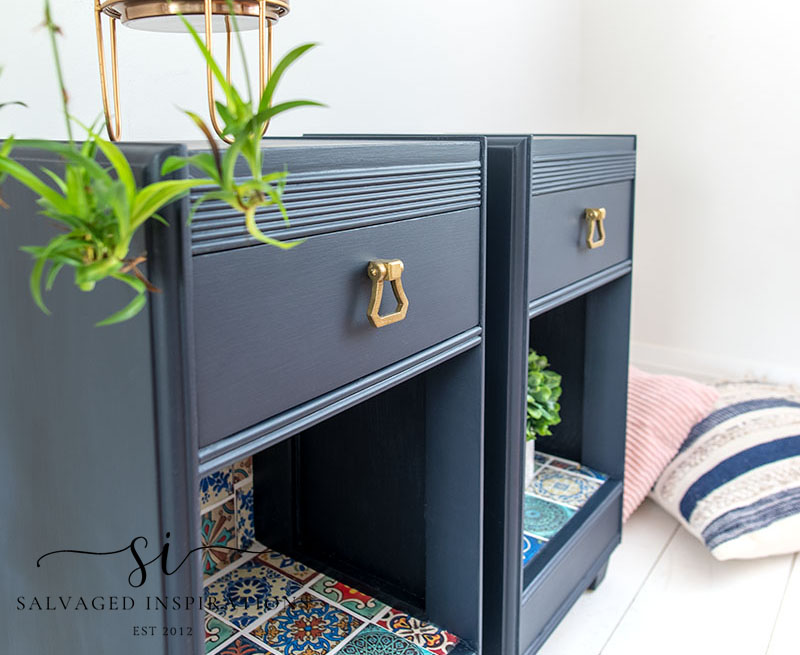
Then painted the inside in White Cap All-In-One Mineral Paint. No primer is required because the primer and topcoat are already included in this paint.
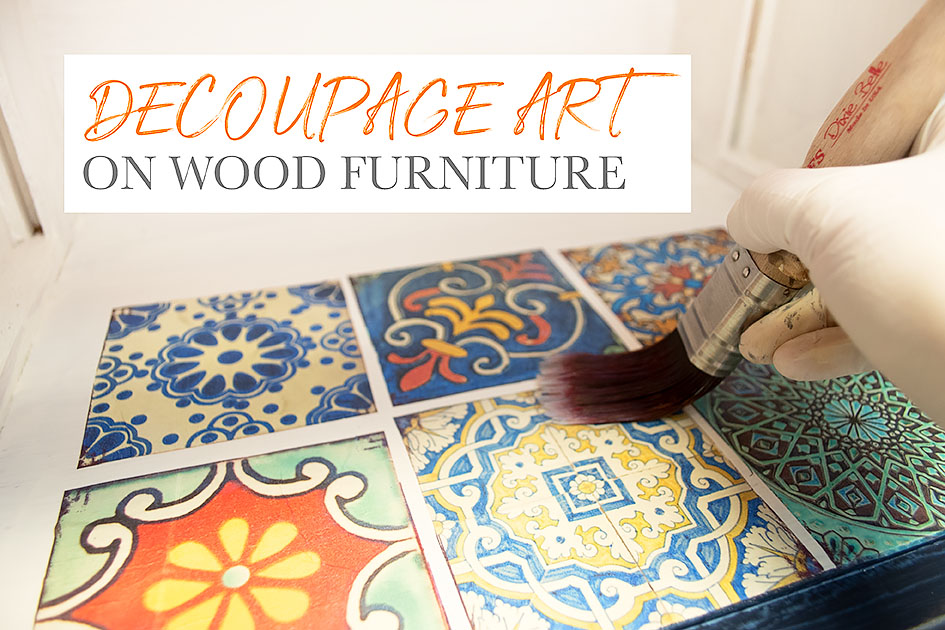
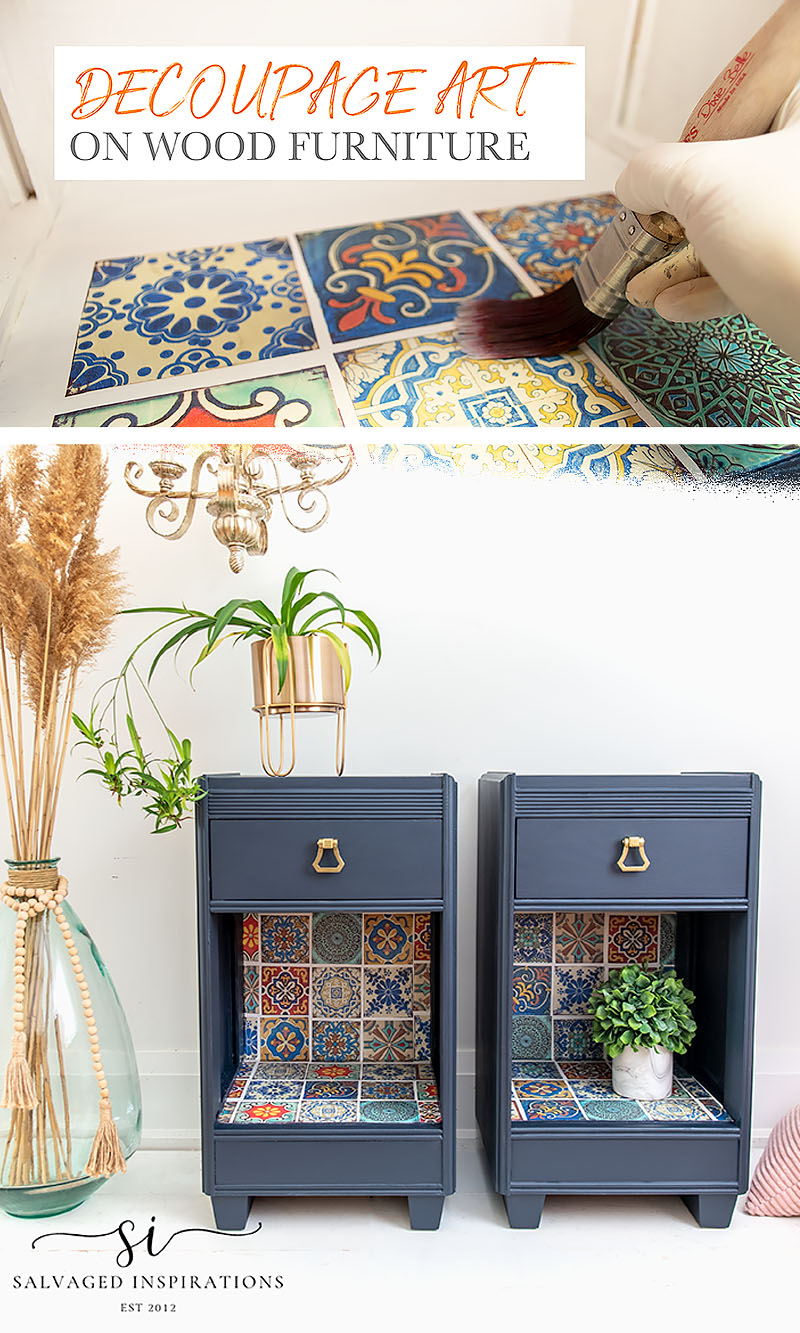
DECOUPAGE ART
Now for the fun part! I found this Colorful Tiles Decoupage Rice Paper in my inventory. I’m not sure this exact paper is still in stock or available from Dixie Belle but they have plenty of other gorgeous designs to pick from! I also found a similar tile design on Amazon here.
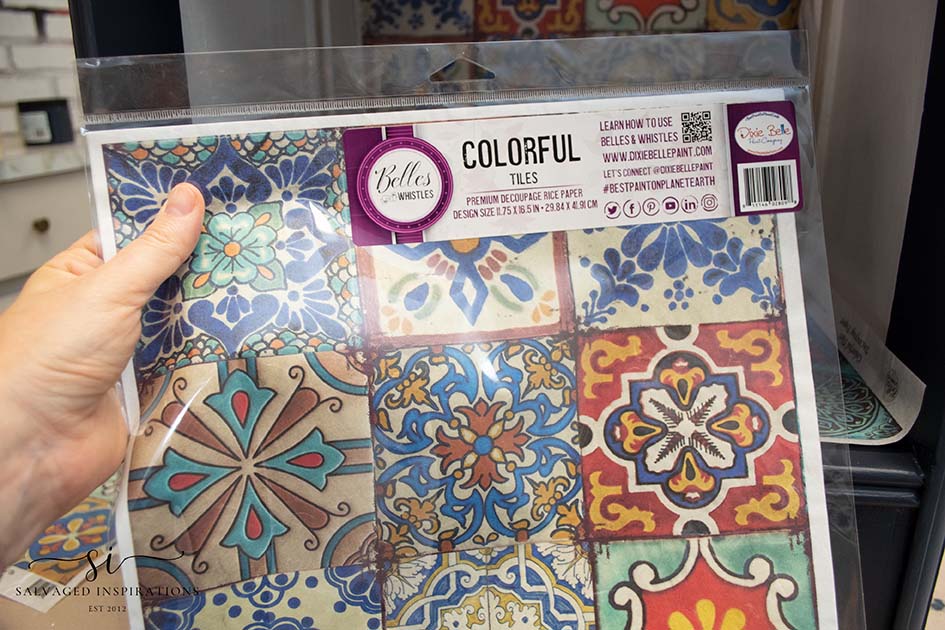
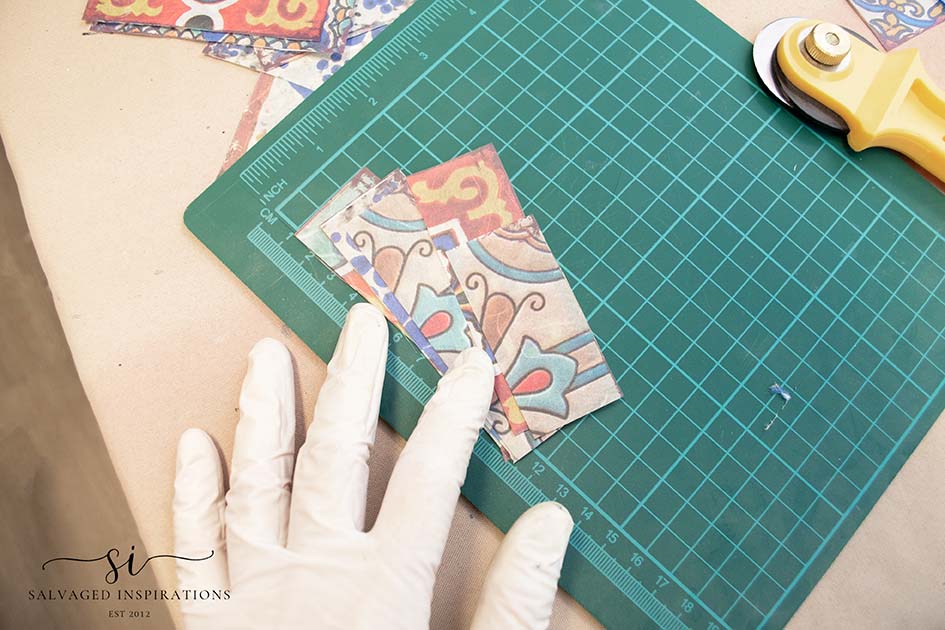
Because I can’t order more of this (and I didn’t think I had enough to cover the full inside of both nightstands) I cut the square tiles into pieces.
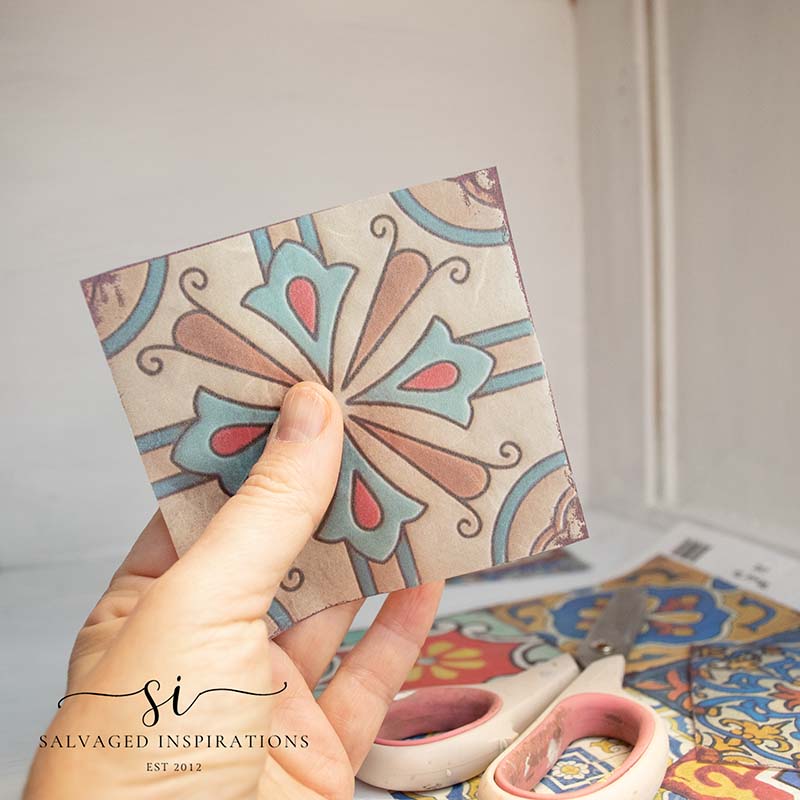
Pro Tip – Decoupage papers can be cut, torn, layered, wrinkled, smoothed, painted, waxed, etc… pretty much anything to get the look you’re after!
To apply this decoupage art, I brushed a Satin Clear Coat onto the surface. Then I laid the decoupage tissue over the wet topcoat positioning the tiles exactly where I wanted them. I pressed the paper down onto the drawer making sure there were no creases and wrinkles, and then brushed the topcoat right over the decoupage tiles to seal them in place. The Satin Clear Coat acts as the adhesive and the topcoat.
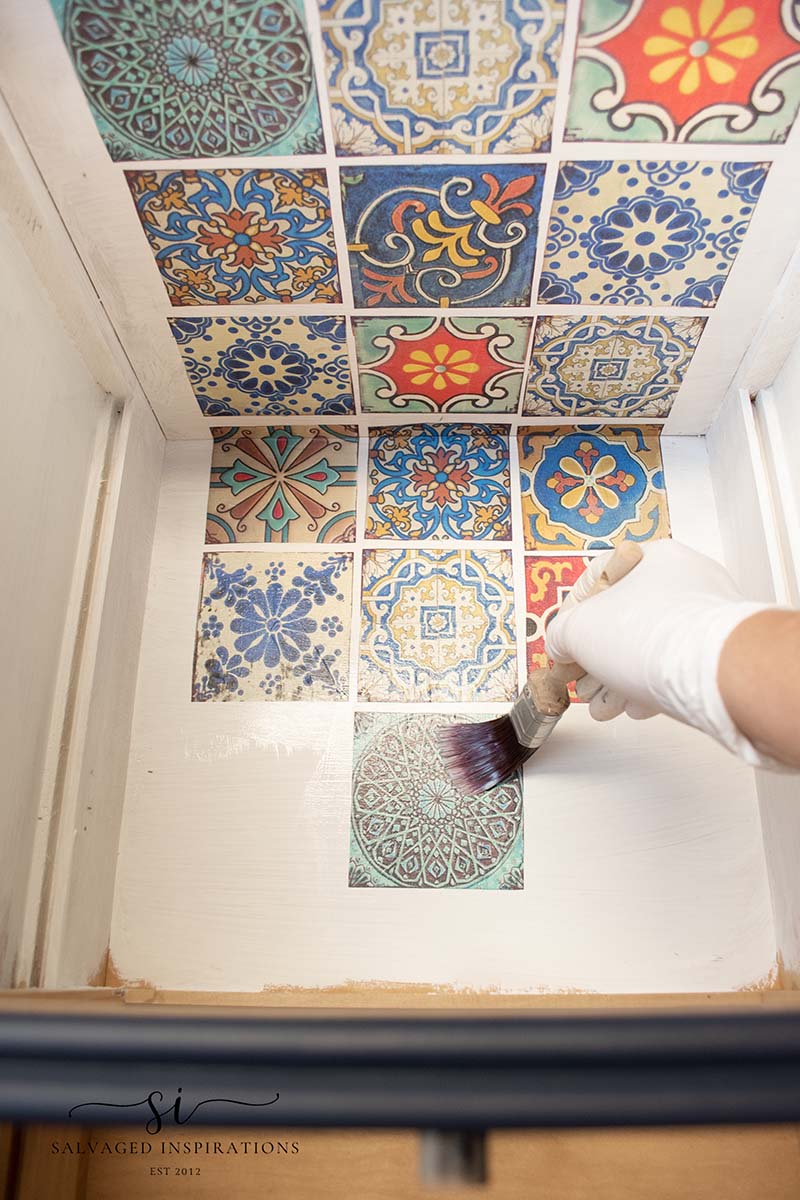
To fit smaller ’tiles’ around the edges, I cut one-inch pieces and adhered them the same way as above.
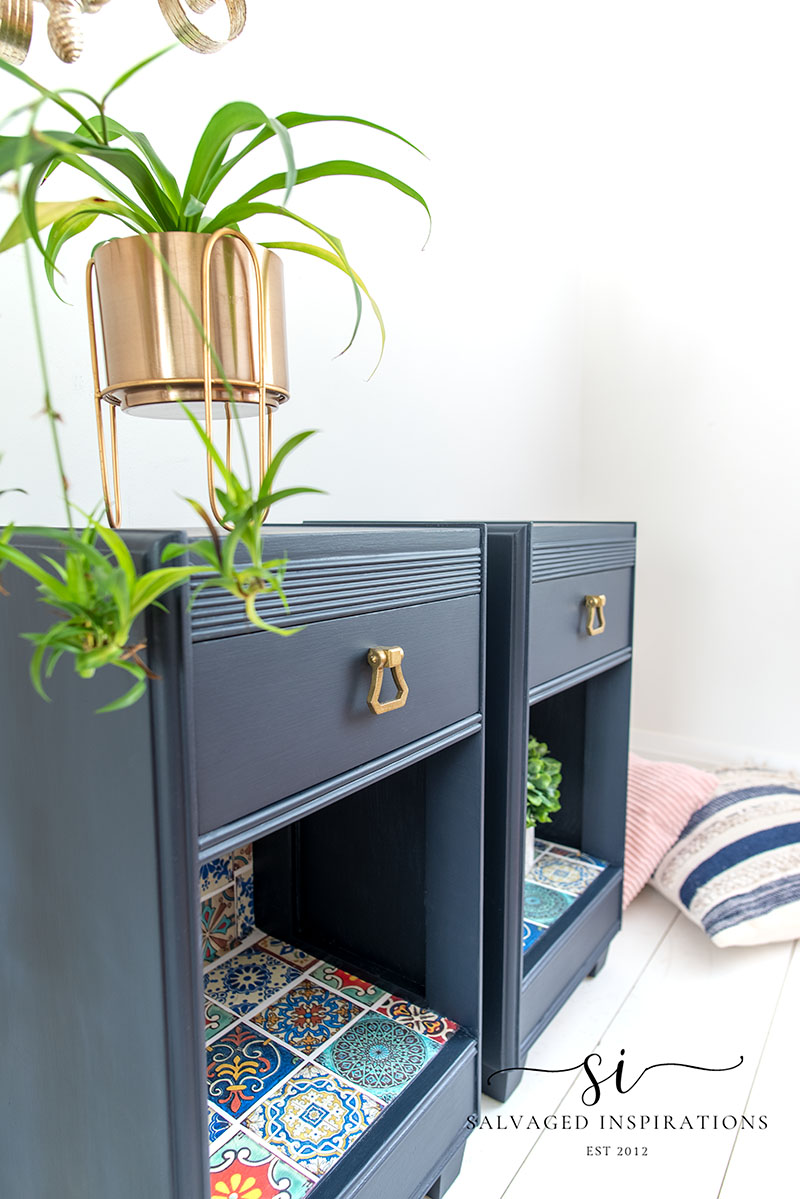
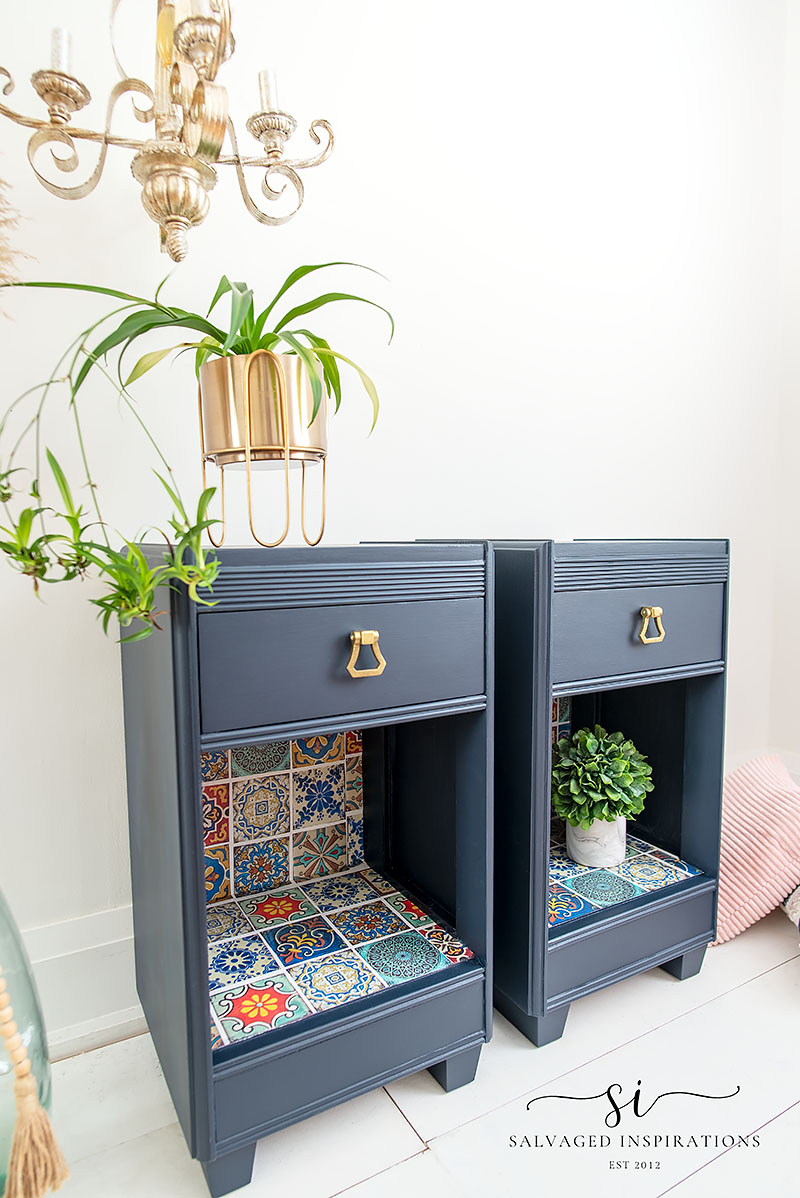
I was going to tile all four sides, but decided that would be a little much so I opted to paint the remaining two sides blue to match the outside. I added two new brass knobs and this set was finished!
FINISHED DECOUPAGED SET
Here’s the finished look. What do you think?
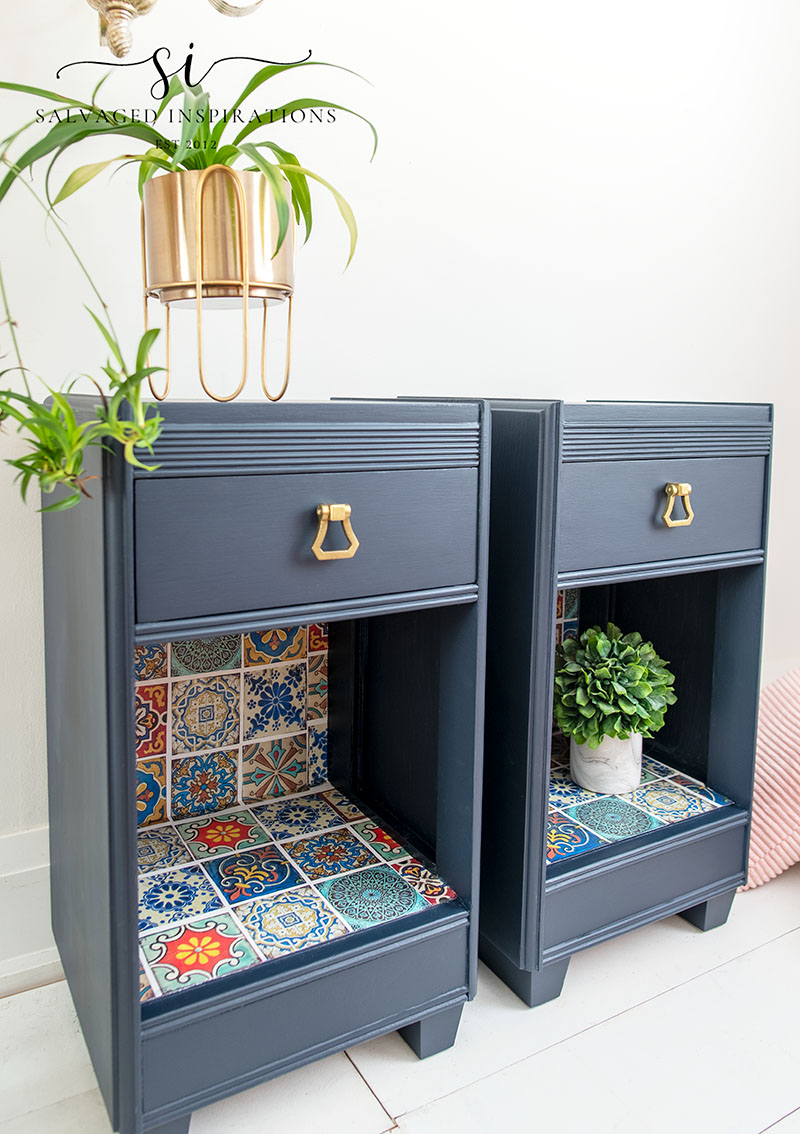
I’m really happy I opted to paint the two side panels on the inside because I think it might have been a bit ‘busy’ if I hadn’t.
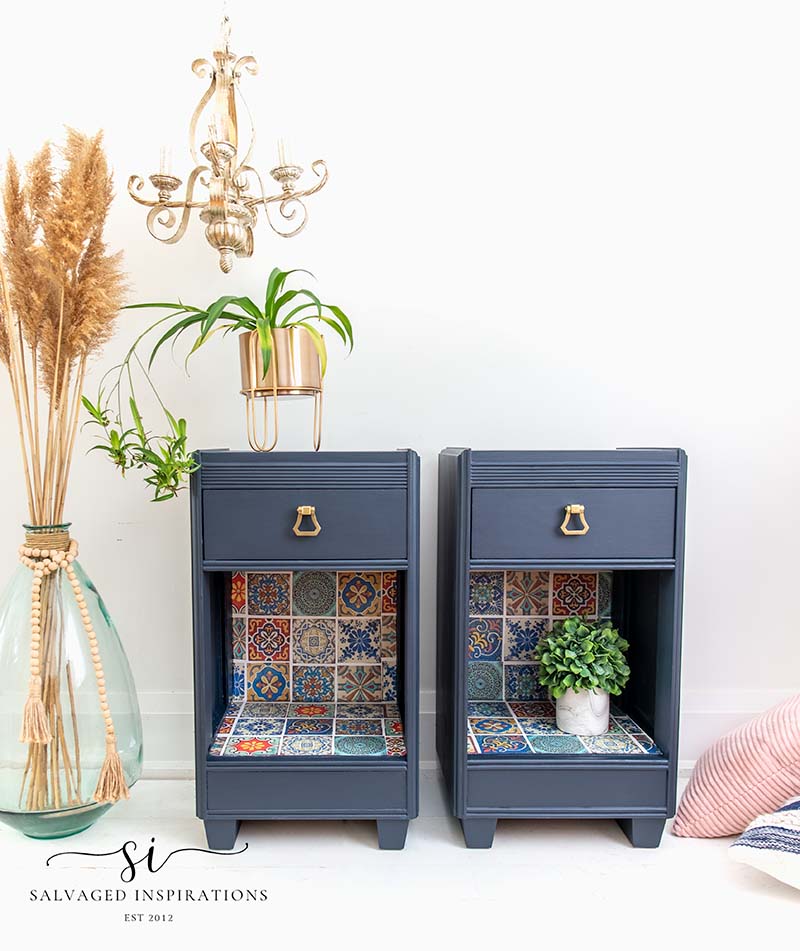
I’m loving the new pulls on this set as well. It gives this set a more updated fun look.
YOUTUBE TUTORIAL
Here’s the full step-by-step YouTube tutorial! Our #siyoutubefamily is already a community of 41.6K so don’t forget to subscribe if you haven’t done so already! So exciting, thank YOU! 🙂
And now for some FURNITURE FIXER UPPER FUN!
You’re going to LOVE what my creative FFU ladies do! As I mentioned, we also have a new member – Natalie from A Ray of Sunlight 🙌 woohoo! Below are the BEFORE photos. Visit the links underneath to see the amazing AFTERS and learn how they did it! I’m heading over to take a peek as well!
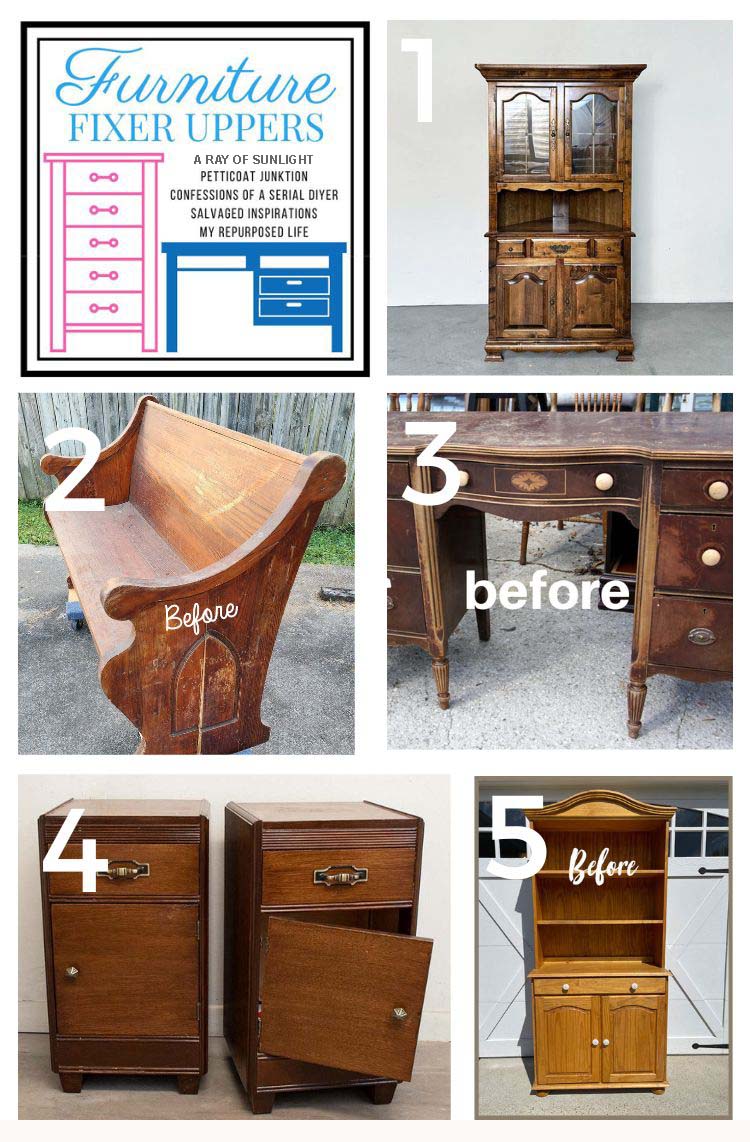
1. A RAY OF SUNLIGHT
2. MY REPURPOSED LIFE
3. PETTICOAT JUNKTION
4. SALVAGED INSPIRATIONS (HAPPY YOU’RE HERE!)
5. CONFESSIONS OF A SERIAL DIYER
Here’s another look at these decoupaged nightstands before and after. I hope it has inspired you and has given you some DIY ideas for your upcoming projects.
LET ME KNOW WHAT YOU THINK OF THIS DECOUPAGE ART ON THESE WOOD NIGHTSTANDS OR FEEL FREE TO ASK ANY QUESTIONS YOU MAY HAVE… I ALWAYS LOVE HEARING FROM YOU. IT MAKES MY DAY! 🙂
Happy painting my friends!
Denise x
RELATED POSTS::
HOW TO APPLY DECOUPAGE PAPER
HOW TO DECOUPAGE FURNITURE
ROYAL DAMASK PAINTED VINTAGE DESK
HOW TO DECOUPAGE WITH NAPKINS
HOW TO REVAMP AN OLD DESK
CHALK PAINTED & DECOUPAGED DESK
PIN AND SHARE!

How pretty! I love the colors in the “tiles”. A winner! Sorry, pair of winners, lol.
thanks so much Kathy! I had a lot of fun with these! XOXO
Fabulous! I’m so inspired by your colors. While I love color, I tend to be kind of bland in my work. Thanks for the inspiration!
Thanks so much Laurie! XOXO And not bland…C L A S S I C, right?!😉 I love the classic neutrals, blacks and beiges myself – you can’t go wrong. But I get bored so spicing it up a little is fun as well.
Beautiful makeover on these nightstands, Denise. I suppose Christy and I missed the memo about painting our pieces blue this month. 🙂
I love the decoupage paper. It looks fabulous. The color is soooo pretty. I’ve never tried this paint before.
pinning!
gail
lol…thanks Gail! And ya, I love this blue as well. Have a super weekend and thanks for the PIN! XOXO
Hi Denise. My mother also used to line furniture and cupboards with paper. Things were built to last back in the day and people took good care of their belongings. I bet those nightstands will outlive any IKEA furniture 20x over:). You did an amazing job updating these nightstands. Blue is my favorite color and the boho decoupage design is perfect. LOVE LOVE LOVE
I have a real soft spot for lined drawers just for this reason. It really speaks to caring for the piece. And I’m always amused and fascinated at the patterns I find in old furniture! so fun! I’m so happy you love them. Thanks Monique! XOXO
I think your refinish is very pretty. The only thing that bothers me is the cabinet on the left. The decoupage tiles in the back don’t line up. I would fix that.
They don’t line up perfectly and I’m okay with it because this set isn’t for sale. It was just a fun makeover for me to connect to the past.😊
Love, love, love the gorgeous blue! The tiles are perfect and I agree with you that putting them on the inner sides would have been too much. Great job Denise!
Ya, it would have been too much for me. It just goes to show how I can have a starting point in mind but it always seems to change as I’m working on a piece…lol. Thanks so much Caye! XOXO
I wasn’t sure I was going to like the tiled paper but these are so cute! I like the side painted in blug as well, beautiful paint color!
Thanks Nicki and so glad you like them! I wasn’t sure about the tiles either, that’s why it took me so long to use them but I agree, I think they’re fun and I love the colors!
That’s a Very pretty shade of blue. Not too navy, not to light. I’ll need to look into this one.
I’ve not yet tried the DB Silk mineral paint, but love lots of their colors.
Wow – I had no idea the BIN primer had gotten so pricey. It’s $75 here in CO.
YOU have an incredible eye for sure. I did not expect to like this decoupage paper….
but it looks fantastic. These nightstands now have a whole new life ahead 🙂
I sooo wish you did consultations ! I have a modular cabinet set I’ve been starring at for Years.
I have some thoughts… but can’t seem to pull it together. Your Pumpkin Spice cabinet inspired me to get that paint, but finishing the design…. ?
You are an artist, and your designs are so inspiring. I hope you never quit.
Thanks
You’d love the SILK line. I use it a lot. 🙂 And ya, I think I surprised some of you with this decoupage paper… I even surprised myself…lol.😂
Awesome makeover. Fabulous job.
Thank you Rebecca!😃
These turned out so beautiful! I didn’t think I would like the piece when I first saw the tiles. Almost skipped the post. I’m glad I didn’t! Love the way you put them on the inside!
I wasn’t sure I would like the tiles on a piece either…that’s why they sat in my inventory for so long.🤣 But I’m so happy I used them… this piece makes me happy with all the colors. Thanks for not skipping the post Shari 😉 and thank you!
So good! I love this one!
Thanks my friend! 🤗
Hi Denise!! I still have a couple of these tile papers. I love them and I’m waiting for just the right piece. I don’t understand why you cut them all up in single tiles. Did you do them all like that? Love that blue also. Thank you for sharing
Hi Cheryl! My original plan was to use this paper on all 3 sides in both nightstands. I didn’t have enough to cover all the surfaces. But if I cut up the tiles and spaced them a little further from each other – I did!😊 Have fun with your tile papers Cheryl… I know you’ll create something fabulous!! xo
Gorgeous, Denise! Very mediterranean! XOXO
Thanks so much Christy! XOXO
You did it again! You took a decoupage paper that I couldn’t see on furniture and you blended it perfectly. I would put these two nightstands in my guest room without hesitating. Gorgeous, Denise. xo 😘
Aw, thanks Do! Ya, this paper sat in my inventory for quite a while but I’m so happy I finally used it. Super cute, right?!🤗
You are so creative! I would have never thought to put decoupage inside of these nightstands! It turned out great! Pinned!
Thanks so much! And a big warm welcome to the FFU team! LOVED your corner cabinet makeover today. 😍
Il love what you do
Thank you! 🙂
You do very béatitufly thin il like whatyou do🙂
They look so pretty now, I would never have thought to use that colour paint but it worked, so nice that they belonged to the family too. x
Thanks Janette! XOXO