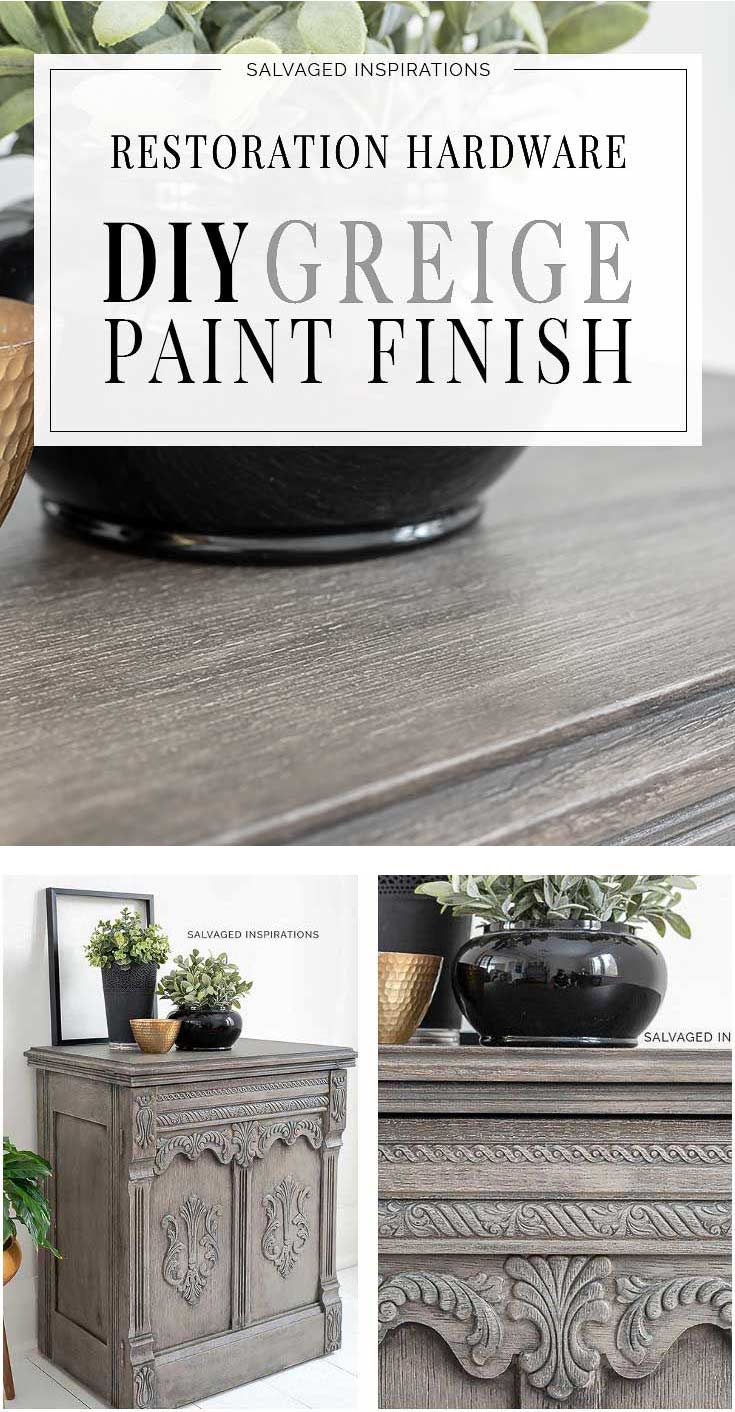
TODAY I’M SHARING HOW TO CREATE A DIY RESTORATION HARDWARE GREIGE PAINT FINISH WITH ONLY 2 COLORS! [WITH STEP-BY-STEP VIDEO]

Hi #sifamily, thanks for joining me! I’m so excited to share today’s makeover with you. This dated sewing cabinet has been reloved into a DIY Restoration Hardware Greige Finish using only TWO paint colors. And the best part — YOU control how light or dark you want your greige to be!
This post was originally published on Thursday, January 23, 2020, and has been updated on Tuesday, September 26, 2023.
But first, if you’re new to the #siblog, on the second last Thursday of every month I join my creative Furniture Fixer Upper Crew. This is a talented group of six DIY bloggers who share their expert tutorials and/or mishaps depending on the day. 😉 But I promise, we always deliver the best before and after! I’ll link to these fabulous ladies down below.
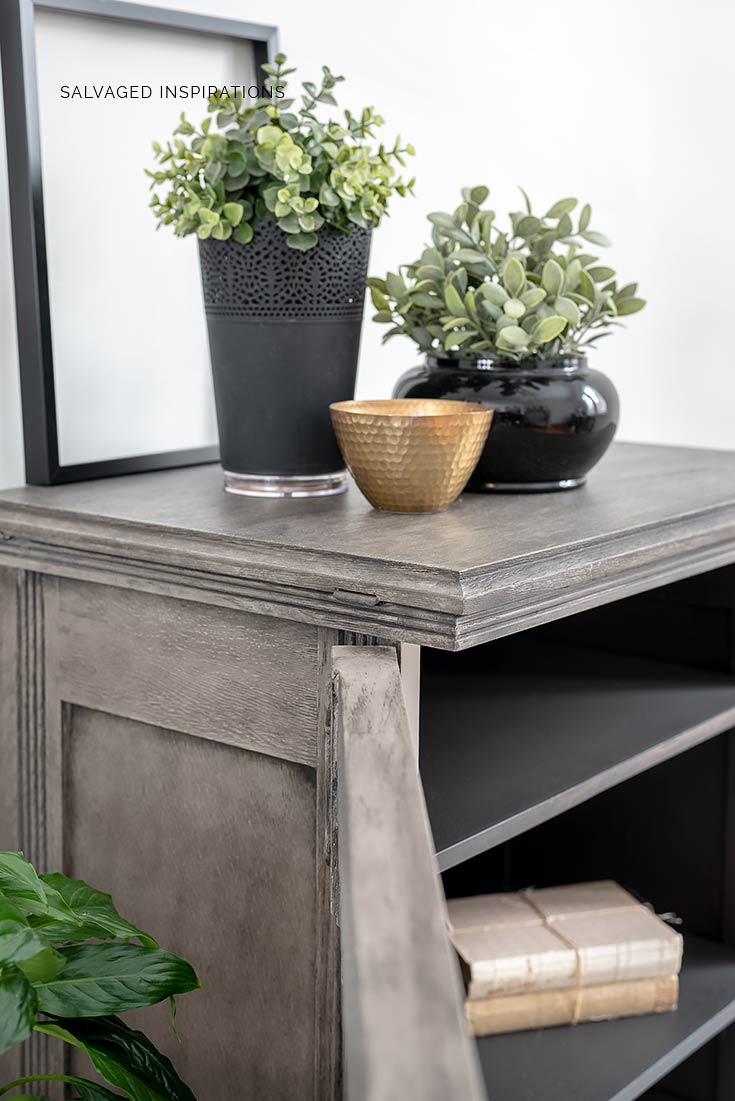
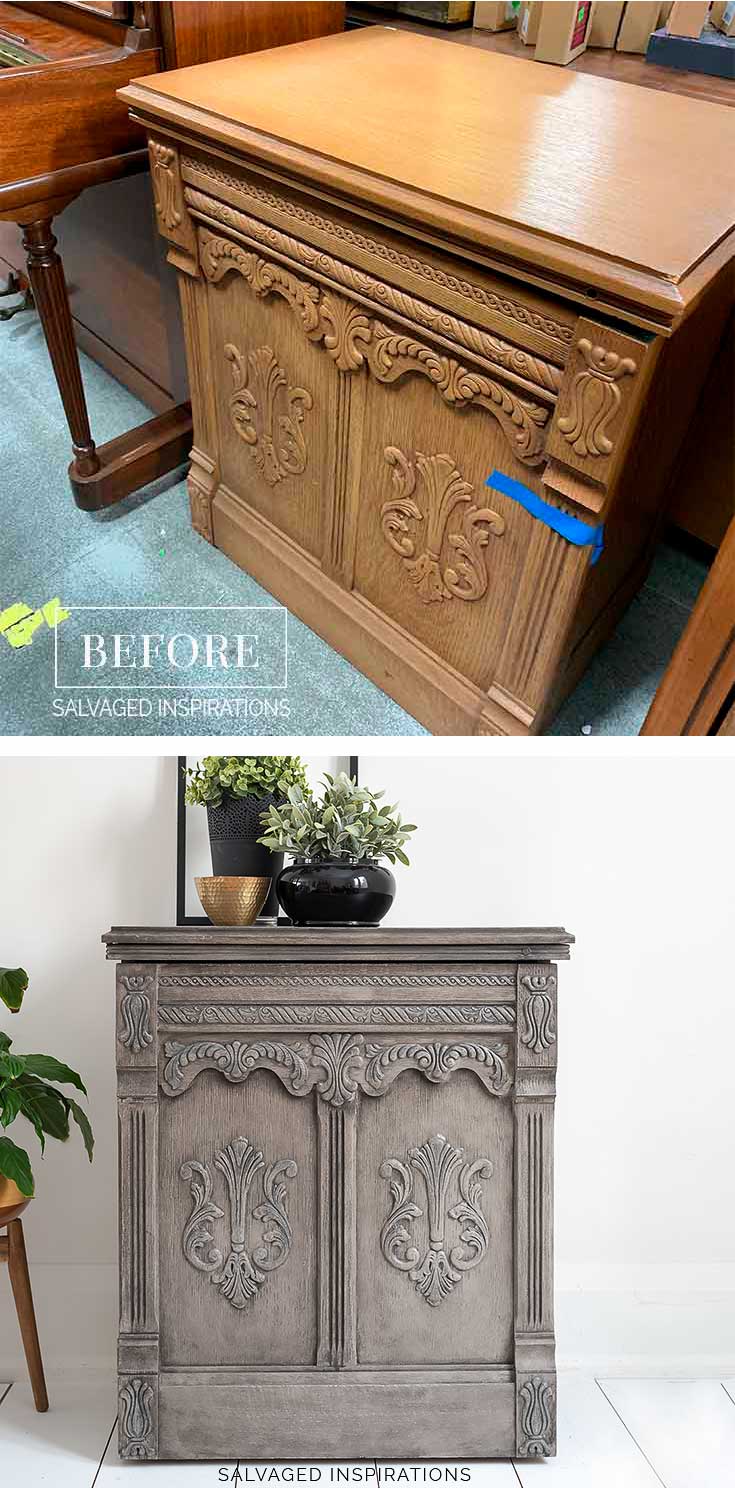
Check out this sewing cabinet I found at the ReStore. How old do you think this is? Judging from the finish I’m guessing maybe 70’s or 80’s? It’s a great piece of furniture.
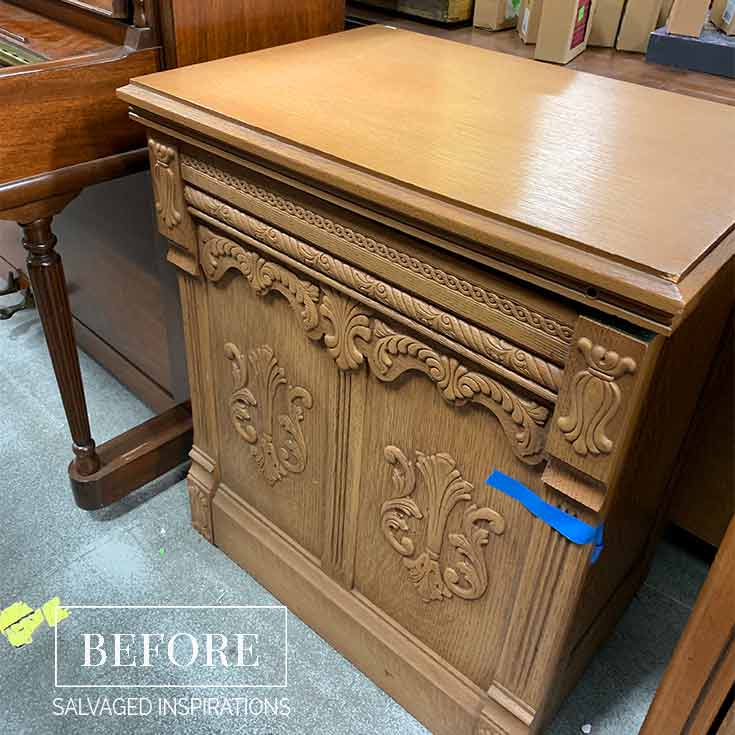
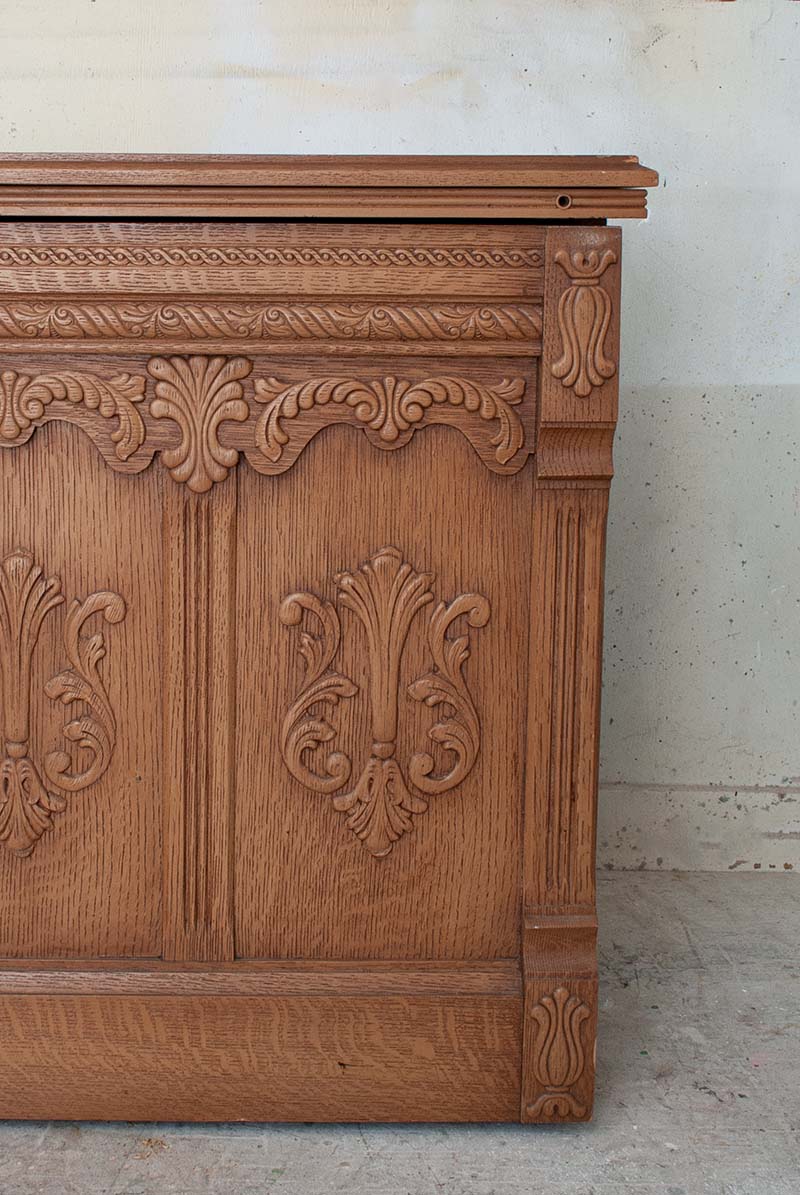
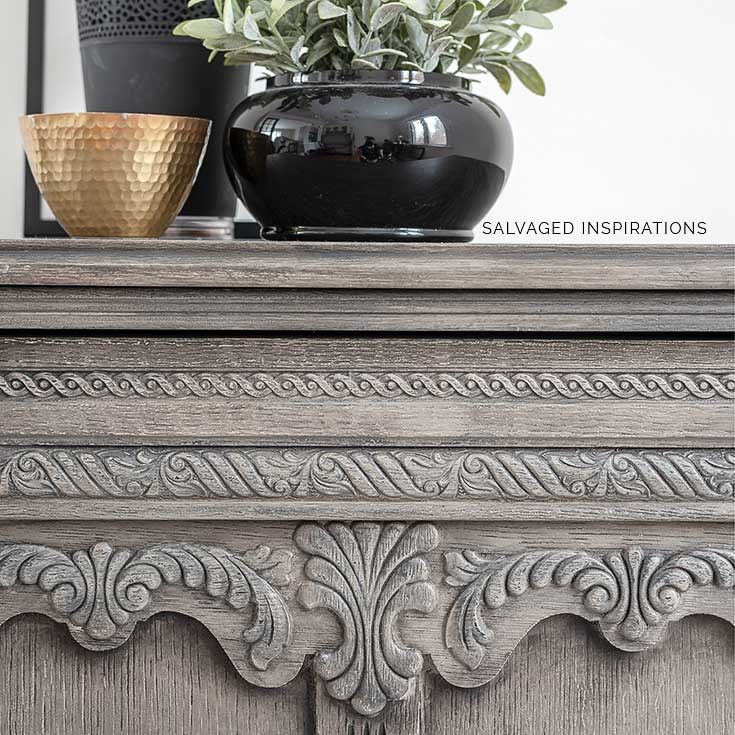
Here’s a closer look at all the textures and details. And even a hole for the sewing machine power cord, I’m guessing.
THIS POST IS SPONSORED/CONTAINS AFFILIATE LINKS TO PRODUCTS I USE. YOU CAN SEE MY FULL DISCLOSURE HERE.
SOURCE LIST
Sewing Cabinet – SALVAGED
Round Belle Paint Brush
Sandpaper | Shop Towels
Water Misting Spray Bottle
French Linen Chalk Mineral Paint
Coffee Bean Chalk Mineral Paint
Satin Clear Coat
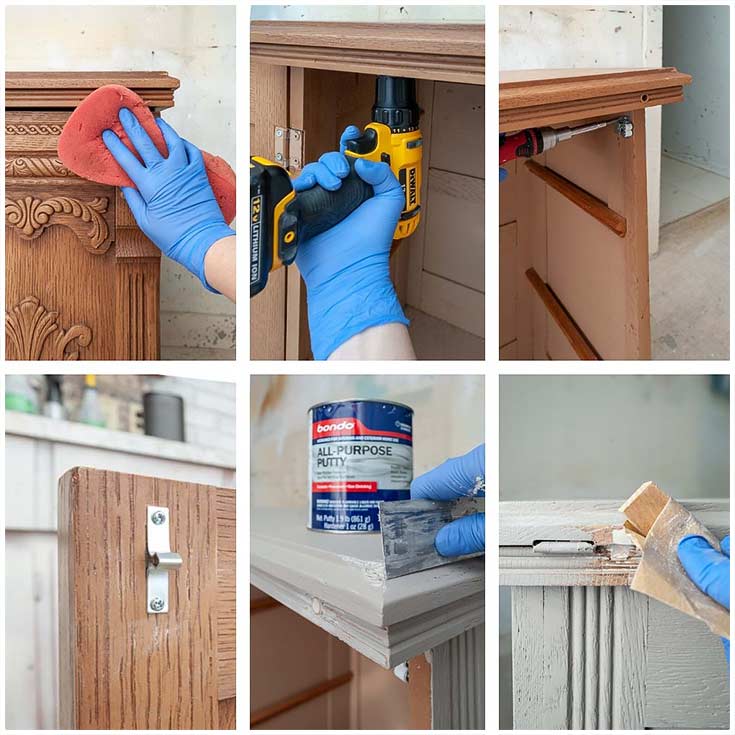
CLEAN AND PREP
Before I started painting this RH faux finish, I prepped the cabinet with a good cleaning and a few repairs. Sewing cabinets have a flip-top to access the sewing machine but since I didn’t want this for sewing anymore, I screwed the top down from below. New clips were added for easy opening and closing.
After I painted the first coat I filled the holes for the power cords with Bondo and then sanded everything smooth. I have no idea why I painted first. That said, you can use Bondo over primer or paint.
HOW TO PAINT RESTORATION HARDWARE FINISH
This finish works best if your piece has some wood grain/texture. This oak sewing cabinet was perfect!
WHAT IS A WARM GREIGE?
A warm greige is a color that falls between gray and beige on the color spectrum with warmer undertones. The coolness of gray with the warmth of beige can create a super cozy atmosphere. I’ve created a warm greige paint finish by using only two paint colors, French Linen and Coffee Bean. As you’ll see this paint wash technique allows you to customize the lightness or darkness of the greige according to your preference.
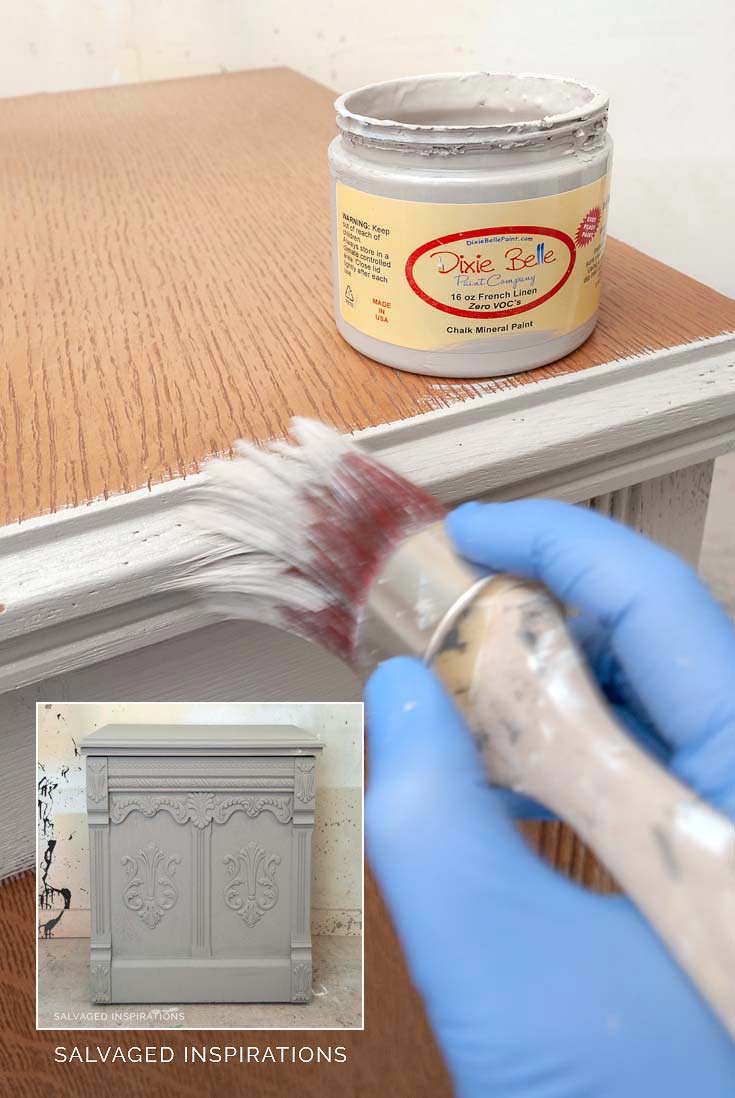
STEP 1 – PAINT BASE COAT
For my base coat, I painted two coats of this French Linen which is a mix of gray and brown or a very light taupe. You can also see this color on the headboard I painted back in 2019 with French Linen and Sawmill Gravy. This paint color is gorgeous!
STEP 2 – ADD SOME DEPTH
To add some depth and texture, I painted all the wood detailing in Coffee Bean. As you can see I wasn’t overly neat about it. Once another layer of French Linen was applied, it cleaned up any ‘overspill’.
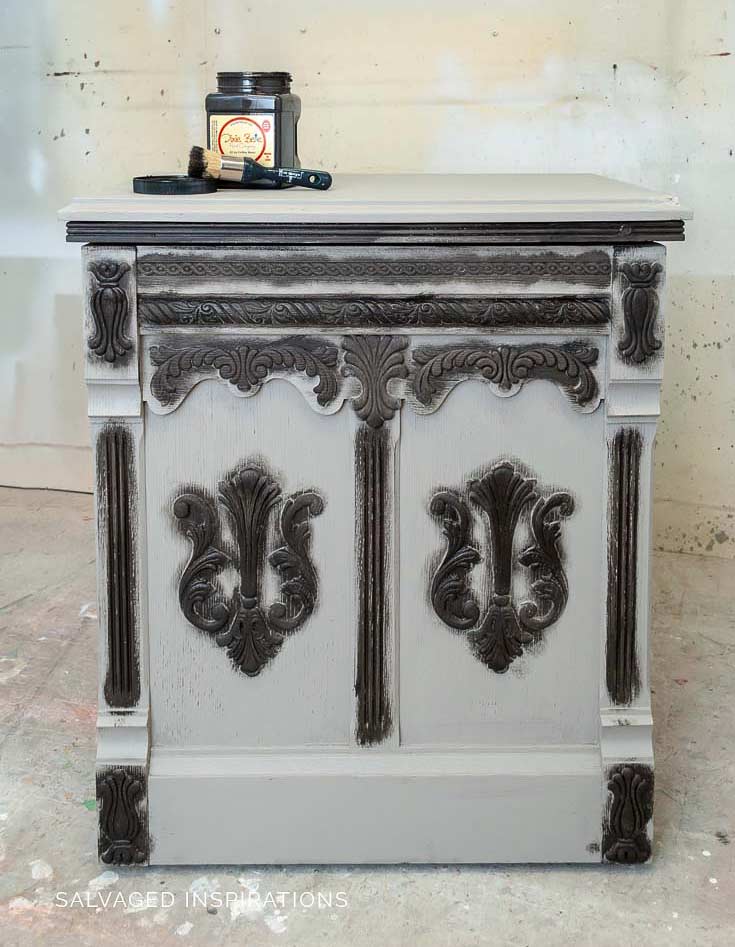
STEP 3 – DRY BRUSH FRENCH LINEN
To soften the details, I dry-brushed French Linen over the Coffee Bean and added another solid layer on the top and sides.
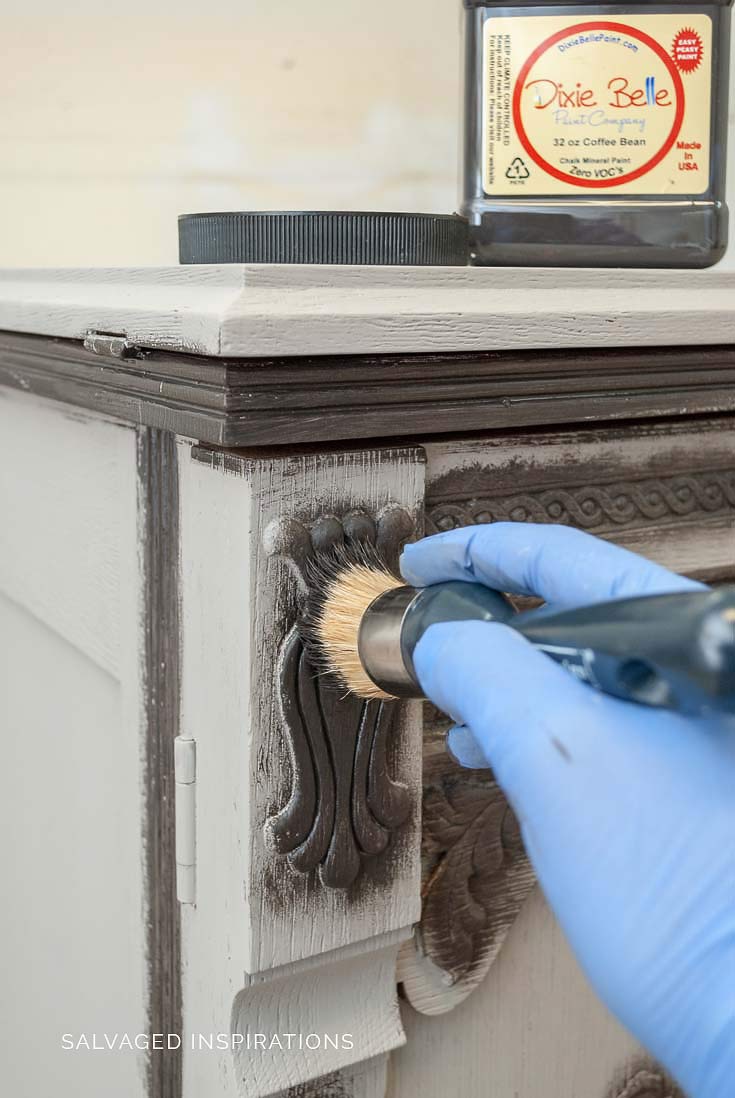
STEP 4 – APPLY A WASH
After step 3 dried, I applied a Coffee Bean paint wash. To do this, I dipped my brush in water and then dipped it into the paint. Working on one side at a time in small sections, I brushed on the watered-down paint. There’s no right or wrong way to do this. I left it heavier in some areas, lighter in others making sure the wash covered the entire side and got into all the crevices and details.
Tip~ This is where you control how light or dark you’d like your greige wood finish. For a lighter look use more water in your wash. For a darker look use more paint in your wash. If you find your wash is not dark enough after it has dried, repeat with another layer of wash.
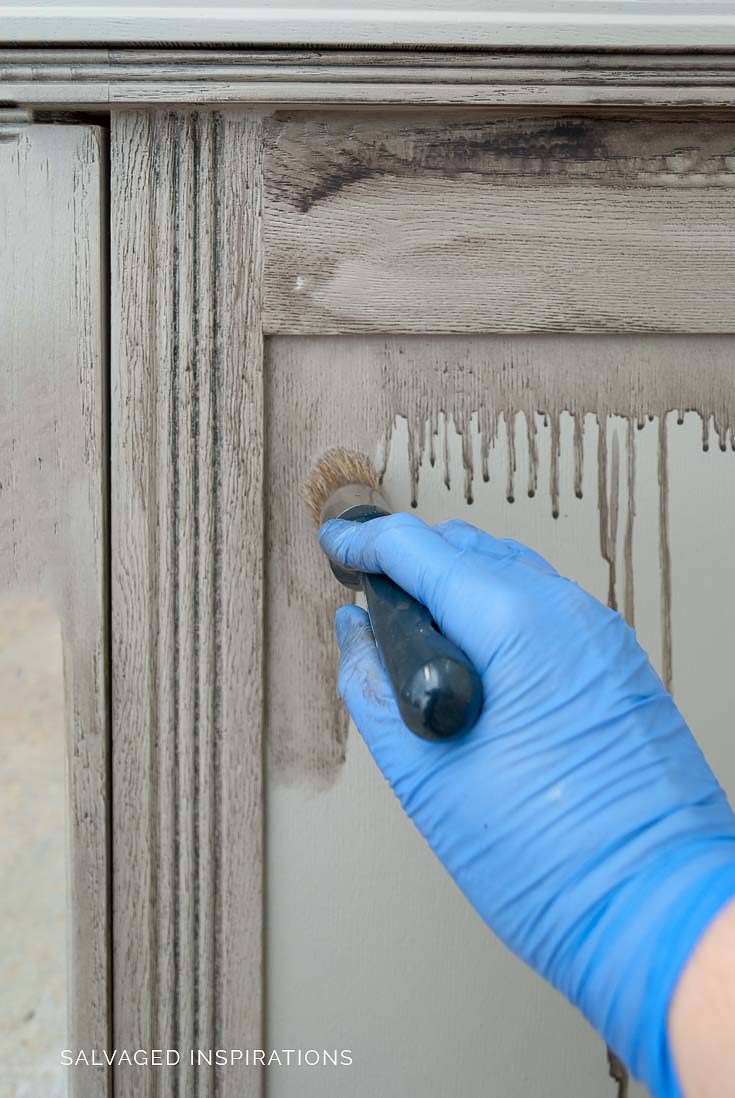
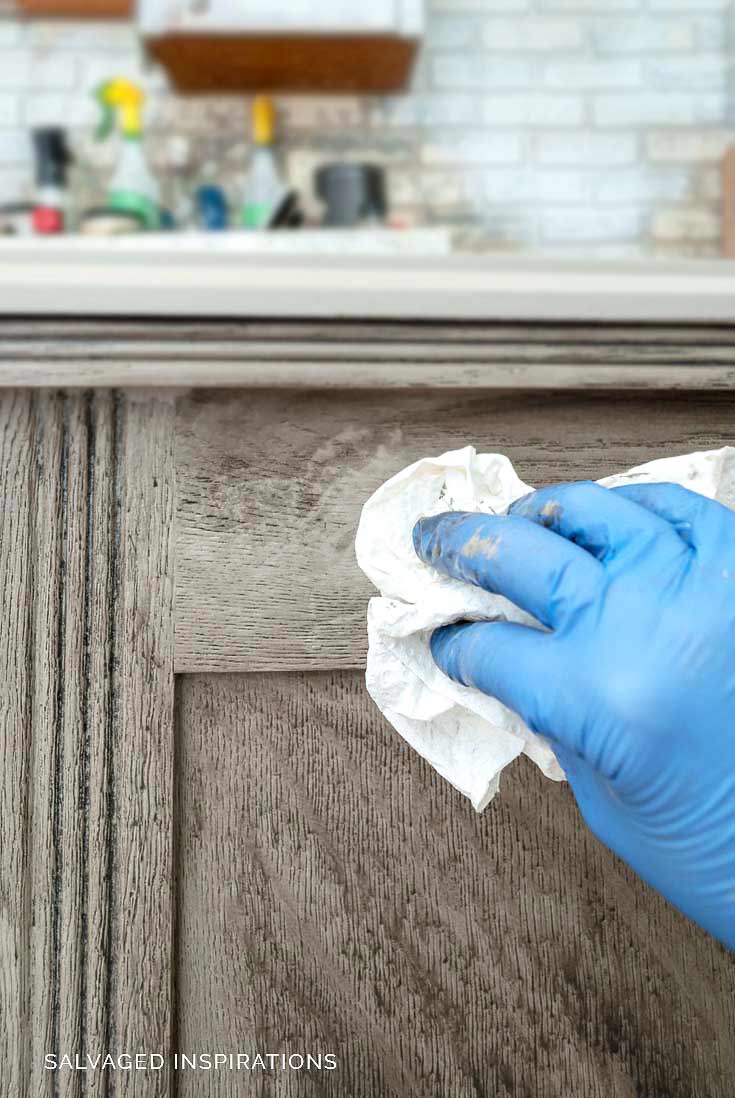
STEP 5 – REMOVE EXCESS WASH
To create more texture, I immediately started dabbing at the wash with a shop towel. If you don’t have a shop towel, any lint-free cloth or rag will work. I find it works best if I alternate the pattern and move my hand in a different direction. A little dabbing and smoothing to create the look you like. You can see this in action as I’ve included the Youtube video below.
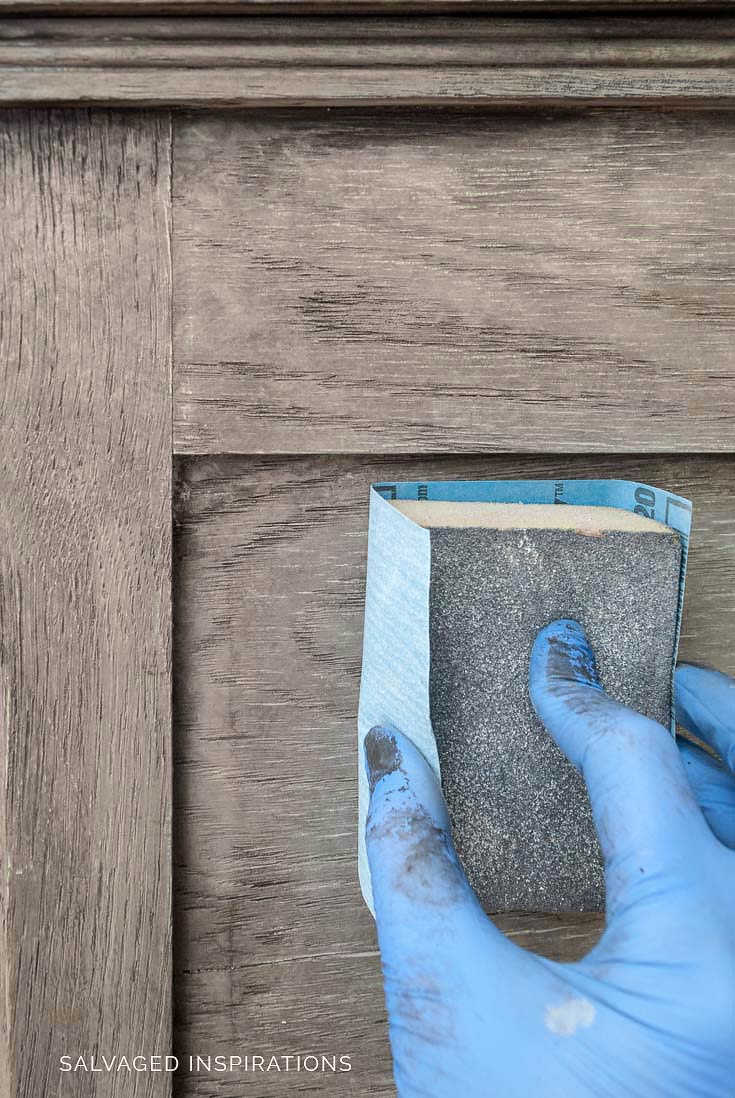
STEP 6 – SAND + TOPCOAT
Once 100% dry, I sanded with 320 grit and removed any dust before spraying two coats of this Satin Clear Coat for a perfect finish.
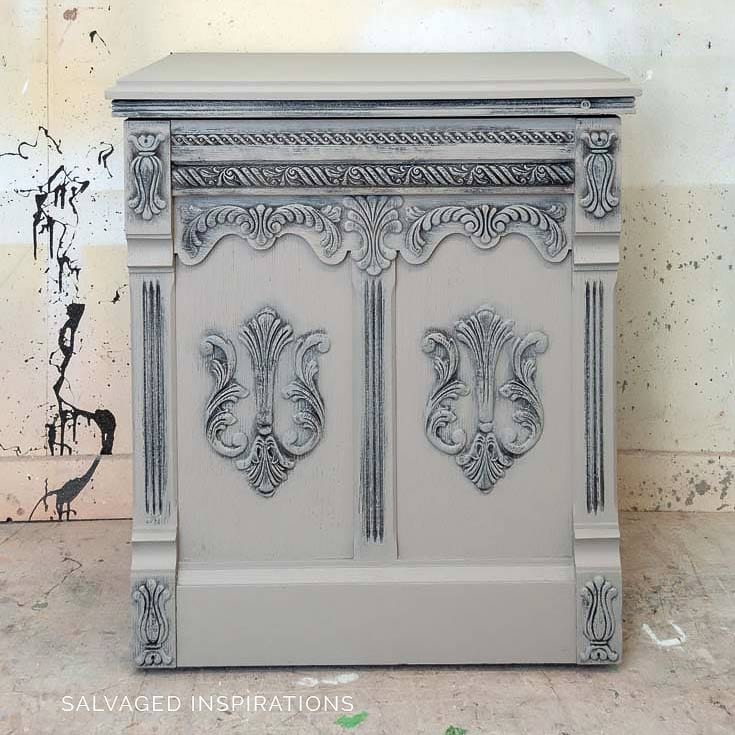
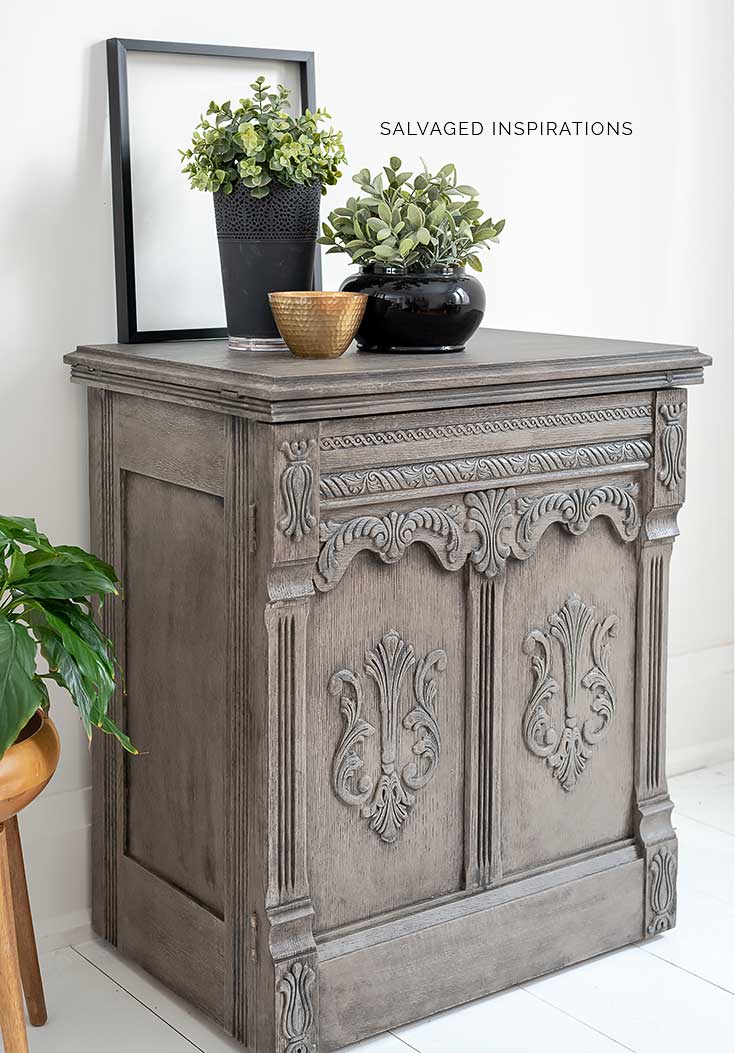
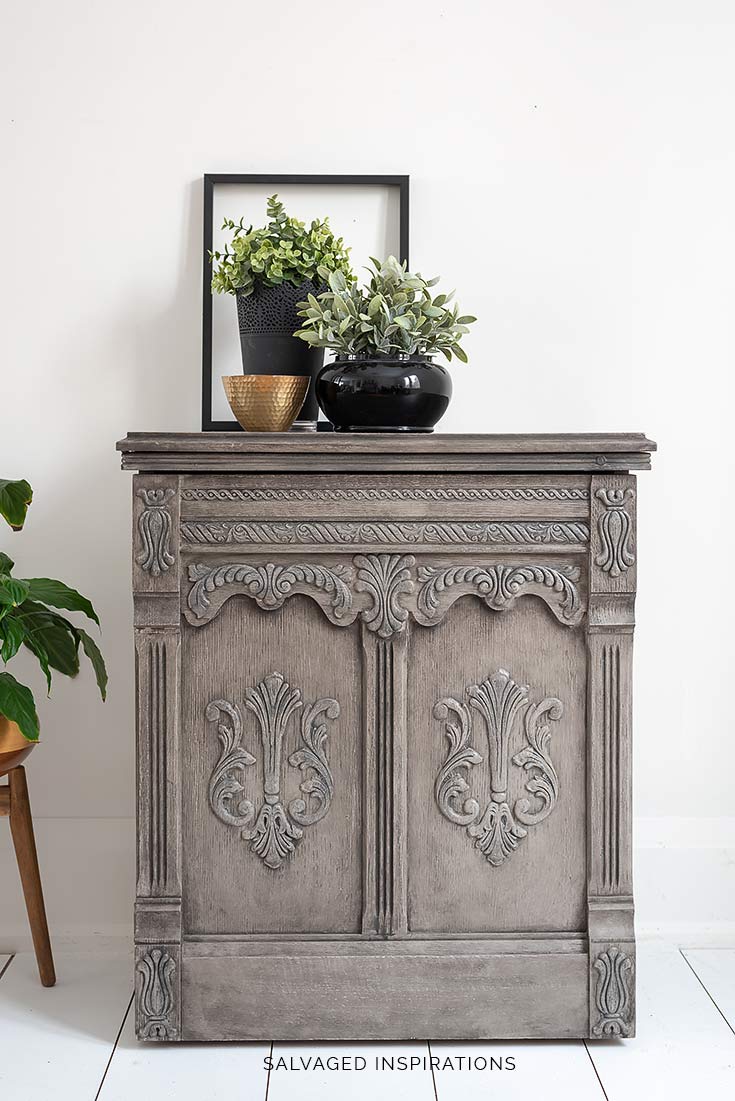
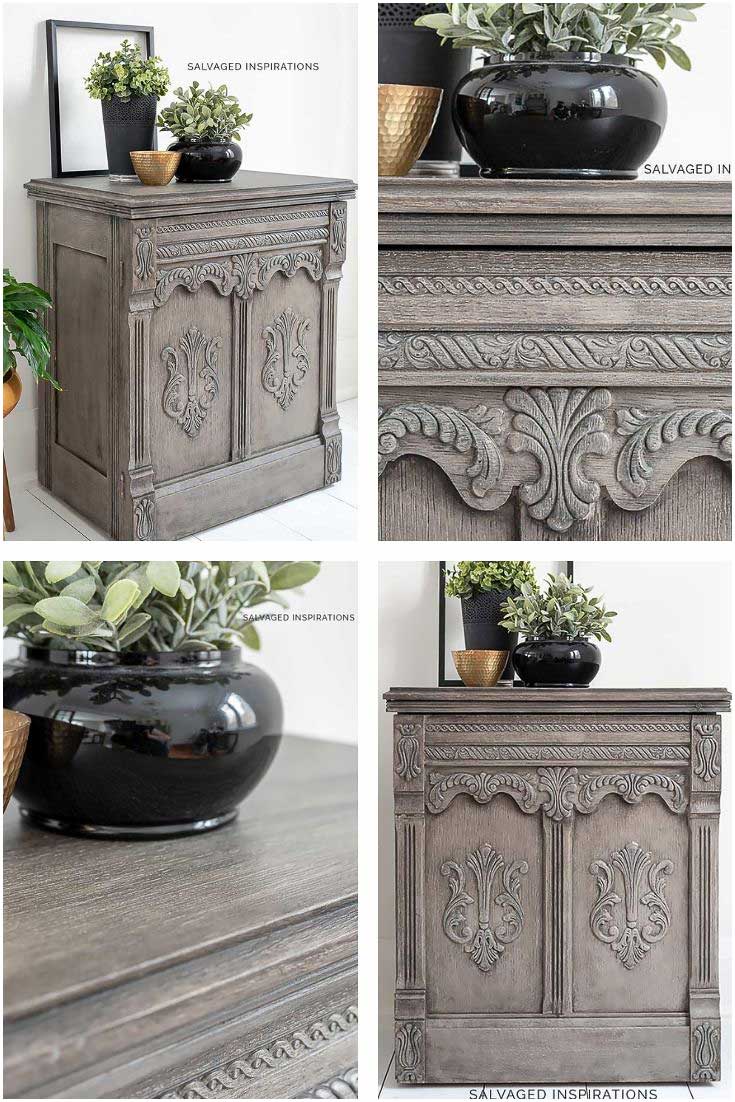
FINISHED LOOK
With only 2 paint colors, here’s the after! I’m loving this Restoration Hardware Greige Paint Finish. It has really updated the piece.
The satin topcoat is super durable and gives a really subtle sheen.

There’s a slight gap between the top and the body that gives the impression that it opens, but it’s secured.
I also painted the inside with Coffee Bean to finish the look.
I love these details and this Restoration Hardware Greige finish! I wish I had some wood beads to style this with. I think that would have looked so good!
This piece sold to a sweet young lady within the first week of listing it. She was so happy when she came to pick it up! It warmed my heart.
One more look at the before and after. I’m thrilled with the way it turned out and I can’t wait to hear what you think!
YOUTUBE TUTORIAL
Here’s a step-by-step tutorial on YouTube. Now that I’ve re-watched this, I think my video-taking skills have gotten a little better…hehe. 😉 If you have any problems viewing it below, feel free to watch it on my YouTube channel HERE. Our #siyoutubefamily is already a community of 41K so don’t forget to subscribe if you haven’t done so already! So exciting, thank YOU! 🙂
Don’t forget my Furniture Fixer Upper friends are sharing their favorite furniture makeovers! (This FFU post was originally published on Thursday, January 23, 2020.) Below are their BEFORE photos so feel free to visit the links underneath to see the amazing AFTERS and how they did it! I’ll meet you there. I’m heading over to take a peek myself! x

3. Confessions Of A Serial DIYer
6. Me.. so happy you’re here! 🙂
We all get treated to a double whammy this week! I’ll be back this Thursday with AN ALL NEW Furniture Fixer Upper makeover transforming this desk below. See you then! 🙂
LET ME KNOW WHAT YOU THINK OF THIS RESTORATION HARDWARE GREIGE … OR FEEL FREE TO ASK ANY QUESTIONS YOU MAY HAVE… I ALWAYS LOVE HEARING FROM YOU.
Thanks for reading. 🙂
Wishing you a beautiful day filled with inspiration and Happy Painting friends!
Denise XO
RELATED POSTS:
HOW TO ADD GRAPHICS – PINK CHAMPAGNE TEACART
QTT – HOW TO STOP BLEEDTHROUGH
SPRAYING DIY CHALK PAINT
LAYERING CHALK PAINT | EMPIRE MAKEOVER
HOW TO PAINT FURNITURE WITHOUT BRUSHMARKS!
PIN AND SHARE!

This cabinet is sooo similar to a cabinet I am planning to paint. It is not a sewing cabinet, but a bar cabinet. I wasn’t sure whether I was going to paint or stain, so my husband stripped and sanded it down to bare wood. I feel kind of bad painting it after he did all that work. I was thinking of painting it a dark blue, but I really like the greige you used, it really highlights the detail.
I love this geige paint finish and I would like to do this on a chest/coffee table I have. The wood of this piece has a deep grain and I would like to know how to prep it. It is 30 years old and was originally white-washed, now it is yellow white -wash. Any ideas?
Thank You!
Hi Gerrie! If you were to give it a light sanding to scuff up the existing white-wash, then prime with a stain-blocking primer… you’re all set to paint this finish. 🙂
Denise this is absolutely gorgeous. I’ve been looking for inspiration on updating my oak kitchen cabinets. Do you think this would work on that type of wood? I’m a newbie at this l
Hi Heidi! This works best on wood that has a bit of grain/texture to it. So if you have say Oak Cabinets, it would look amazing!
Hello,
I am applying this technique to a smoother finish piece. To achieve the same affect, do you have any suggestions or should I take the same approach?
Also, did you apply 3 coats of the lighter color or two?
Beautiful and definitely using this for inspiration! Prior to painting, did you sand the clear finish off the wood or just work over top of it? Thanks!
Thanks, Alexis! I probably did give it a light sanding bc I’m in the habit of doing so but if you have a matte finish, you can forgo this step. 🙂
This is gorgeous. I would love to do this to my oak china hutch and the antique oak dining room table that my dad refinished years ago….it was his parents’ table. (He would turn over in his grave that I’m painting oak! haha) I’m wondering how much I would need for that? Or how do I match the colors you have used if I use a different paint source? Thanks in advance for your response and your inspiration!
I have a similar size piece I would like to finish. Would you recommend the 8 oz or 16 oz when I order the paint? Thanks!
8 oz would probably do but I always recommend siding on more paint just in case because anything can happen. I remember I was having a hard time opening a lid and almost half spilled onto my floor… uggggh… believe me stuff happens and for the extra couple of dollars, well worth having the backup. 🙂
This is STUNNING!!! I wish you could see me with my jaw hanging open. It truly looks like a $1200+ piece from Restoration Hardware. You have the most gifted ability to see potential in a furniture piece.
And thank you so much for sharing your method in simple step by step directions. I can not hardly believe such a simple method resulted in such a dramatic and beautiful transformation.
Thank you!!
Thanks SO much, Maggie!!! 🙂
Wow I love this piece! I have a question regarding the Clear Satin Coat. Do you always need to spray it on? Or can it be applied by brush. Also I always have used wax as the finish. I know that Clear Satin Coat is more durable. But other than that do you have other reasons or benefits you use clear satin coat vs wax?
I am going to be trying this today on a piece, and just curious about the wax vs satin coat.
Thanks,
Pam
Hi Pam! This Satin Clear CoatSatin Clear Coat applies beautifully with a brush – so no – you don’t need to spray it on. And because I sell all my pieces, even when/if I use wax on the body, I’m in the habit of using poly on the top. It doesn’t need to be reapplied down the road and it is more durable and super easy to clean. Have fun with your project today Pam. 🙂
Wow – I love this finish! I am going to try this on raw pine barn doors. I’m a bit nervous as I’ve never used a painting technique beyond opening a can of basic paint. So, extreme newbie here. I actually need to do this project this weekend so don’t have time to order products. If you were going to attempt this with items from a big box store like Lowe’s or Home Depot, what would you use to replicate this finish? Thank you, in advance, for your guidance.
Hi Julie! If you’re shopping at Lowes or Home Depot, I believe they both sell Rustoleum’s Chalked Paint and I believe Behr has a Chalk brand now too. Either of these would work better than a regular latex for this type of finish. Have fun!
Gorgeous! Thanks for sharing! Two quick questions:
1) what paint sprayer do you use/recommend?
2) have you tried this technique with any other brands with a similar color? I have an easier time getting my hands on Behr or Rustoleum chalk paints.
Thanks in advance!
Hi Jamie. I’ve been using this Husky Paint Gunthis Husky Paint Gun for years now and it still works amazing. Anthracite and Aged Grey in Rustoleum Chalk PaintRustoleum Chalk Paint would be a similar match… or you could take those swatches and get them to custom tint it for you in Behr. Hope this helps. 🙂
I have found the Aged Grey in Rustoleum , but could not find the Anthracite color. What other color would you recommend? Thanks in advance
Hi Lisa! This Gravel RoadThis Gravel Road is a great sub for Anthracite.
I decided to go with Behr they matched the colors perfectly. I’m getting ready to do the coffee bean wash. You make it look so easy! Lol
I haven’t purchased the top coat yet because the only one I could find at Home Depot is Rust-Oleum Matte clear protective coat. Is that ok to use? Thank you
I’m glad they could match it perfectly for you! Yes, Rust-Oleum Clearcoat should work nicely.
I’m trying this look on my hardwood floor on our front porch. One thing I didn’t think of is creating a wash out of oil based paint. I had to get porch and floor paint and it’s oil-based. Can you still create a wash out of this? Fingers crossed because I’ve already started the project. Thank you!
Hi Jennifer! Great project but I’m unsure about creating a wash from oil-based paints because I’ve never done it. I know painters (on canvas or murals do it) but on a larger scale, I would contact your local paint store and ask what they suggest.
Gorgeous! Love the color , depth and the technique!.. Question: What type of satin spray top coat did you use on it? Was it a Polycrylic spray or Polyeurythane Spray or Varnish Spray or what???
Thanks so much Amy! I used my spray gun and used this clear coat here. If you don’t have a sprayer, DB clear coat is easy peasy to brush on to. It levels beautifully.
I love what you have done here. Would you recommend this for word floors?
I love this and am working on a similar cabinet. Will work using the same method but have one question. After you painted, you lightly sanded? Is that to distress the piece of to knock off the rough feel of the paint? Thank you so much for sharing your expertise!
Hi Peggy! yes to both. I’m in the habit of sanding between each coat for super smooth finish. Have fun with your cabinet. I’d love to hear how it turns out for you.
Is rhe Dixie Belle clear coat the same as the Rustoleum clear coat?
This is AMAZING! I am going to try this on my table and credenza! They are very glossy, would you suggest sanding down first?? I wish you could come do it for me! You have inspired my inner artist abilities 🙂
I’m so happy this piece has sparked some ideas and inspired you, Jill! And yes. If you’re working with a glossy/shiny piece, it’s good practice to give it a light sanding to scuff up the surface before painting.
I can’t wait to start this project. You did a beautiful job and make it look so easy. What grit sander would you use to sand the wood before chalk painting or do I not need to ? Thank you
Thank you, Lisa! I like sanding as scruffing up the surface using a 120 grit sandpaper. A light sanding before applying chalk paints does wonders and takes less than 5 minutes. Just run your sandpaper over the surface as if you were wiping down your kitchen counters. 🙂
Denise, thank you so much for the inspiration. I have a bed bench that will get this treatment. The video is very helpful. I have used a wash before but only wiped it off. The punching is much more forgiving. Fingers crossed that it will look as lovely as your sewing cabinet Blessings,Jeri
Thanks, Jeri! Have fun with your bed bench. I’d love to hear how it turns out for you. 🙂
This piece is BEAUTIFUL!!!! You are just so talented. I love your work as always!
Thanks, Teri! And once again CONGRATS! 🙂
You should be pleased with the results, Denise! That piece turned out to be GORGEOUS!! Just an amazing transformation…the details are just so beautiful!! I love, love, love it!!!
Aw, thank you, Karolyn, thanks so much! 🙂
This is one of my all time favorites and very inspiring!
Thanks so much, Shirley!!!
Wow!!! You do an amazing job! Love your work. Thank you for sharing your wonderful talent ❤️
Thank you, Connie! xo
This is the most beautiful make over ever!
Thank you.
Thanks so much, Denise!🤗
I’d be thrilled with the finished results too Denise! One of the most gorgeous pieces of furniture I have ever seen. From lovely to stunning.
Suzanne (PS Love your blog)
This means a lot, thanks so much, Suzanne!💕
I agree with Jacquey
The most beautiful work I’ve seen so far but I love all what you’ve done with the furniture you find.
Great job it’s a very nice piece.
Thank you, Elaine! 🙂
This has to be my all time favorite of a furniture make over. thank you for sharing your talents.
Thanks so much, Jacquey!!! 🙂
Oh Denise you never disappoint, beautiful piece as I’ve grown to expect from you. I have a question unrelated to this piece however. What is that “stool” you use to navigate your pieces? I’ve looked for something low enough that rolls and haven’t found one yet.. Thank you for all you do! Linda
Thank you Linda! And yes, I couldn’t live without it. It’s super comfy to sit on and easy to roll around on and even has space underneath for supplies. I couldn’t find the exact one I have but this one here is almost identical. 🙂
Lovely makeover! I feel a RH project coming soon. Thank you for another inspiring makeover. 🙂
Thanks, Do! Happy it’s inspired you, my friend! I hope Atlanta was great. XO
I can tell you it was wonderful. I had so much fun meeting Do and other bloggers. Wish you had been there,, Denise.
Dixie Belle always puts on amazing events and Do is fabulous! Hopefully, we’ll get to meet in the future too! XO
Denise this finish is gorgeous! Great step by step photos too! xo
Thanks so much, Jen! 🙂
Another knockout! It doesn’t even look like the same piece- seriously! Great vision, greater talent ❣️
Amy, can I shrink you down, put you in my pocket and carry everywhere! 🤣You always put a big smile on my face. Thank YOU! XOXO
Your work is sooooo amazing! Love it!
Thank you, Maryann! You’re soooo amazing! 🙂
Love it!!! At first I thought the sewing cabinet was a plastic. Either way you made a very gaudy piece very elegant. I love following you and your creativeness. Thank you!.
Me too! It looked like that fake plastic furniture they use to make. Maybe because of the sheen and the color. Well, no ugly looking plastic any more…lol. Thanks so much, Linda! 🙂
Terrific finish. Great job with the RH hack. Love it!!!
Thanks so much Susie!!! XOXO
OMG, Denise, I’m in love with this one. You just keep getting better & better & so grateful you continue to share your work with tips & instructions. Gorgeous bones to begin with, but man, you brought it to a whole other level.. Am I gushing too much?
I’ll take it wherever I can get it… no such thing as too much gushing! 😉 thanks my friend. XOXO
Fabulous, as always, Denise!! You are, and have been for years, my favorite furniture rehab designer, with the best ideas AND willing to share all your knowledge with us! I really enjoy your videos…it’s much easier for me to learn by watching rather than by reading. Thank you, sister!
Hi Kathy and thanks SO MUCH! I’ll try and sit down to do that video in the next few days. It’s super short but demonstrates the techniques. I hope you check back. 🙂
This sewing cabinet went from ugly to unbelievably gorgeous! You are so talented and gifted Denise! ~ Nicki
Aw, thanks so much Nicki! It was kind of ugly…lol. 😉
this came our BEAUTIFUL! what a night and day transformation. Love that Greige finish!
Thanks so much Kandice! XOXO
This is a great make over on this fascinating piece. Love what you have done with this and a great technique! I’m wondering how it would work with less neutral colours? Only one way to find out I guess!
Thanks, Angeline! And if you’re into color, I think it would look great! 🙂
fabulous! you are a wizard
Respect 🙂
Aw, thanks Zora! 🙂
This is gorgeous! Thanks for the tutorial.
Thanks Olivia! x
Denise, when I saw the before of this piece, I thought ewww, hideous. And for a split second, I thought nothing was going to help this cabinet. And then I scrolled down and saw what you did and thought”of course she made this beautiful!!”
I don’t know how you think up your ideas, but you are so good at what you do! Thanks for sharing everything with us! 🙂
When I first saw this sewing cabinet it the Restore I though ewwwwww too! The detail was amazing but the finish, ugggghhh… I actually thought it had some sort of plastic coat on it or something. Anyway, thanks SO MUCH and I’m happy to share! XOXO
Hi Denise. I’m loving the finish you used on this cabinet. I can barely believe that you only used 2 colors to create such depth and warmth. Amazing. Thank you for the inspiration and sharing your techniques:)
Thanks, Monique and ya these colors, beautiful on their own or together! 🙂
That turned out absolutely gorgeous!
Thanks so much, Marian!
This is stunning! Now I can’t decide to use the RH or Black wash finish on my very ornate cedar chest .
Thank you, Cherrie! Either or are gorgeous imo! 😉
I don’t know how you do it. It looks great! It seems like everytime I “makeover” something, I am happy with it for a day, then I think it is all wrong and I need to start again. (Lol) I will keep trying, and learn all I can from your blog.
Hi Jennifer! It sounds like you have the spirit of an artist. Many creatives are very critical of their own work – truth. I’ve redone numerous pieces over the years and it’s an amazing way to learn and grow! 🙂
This is really gorgeous, Denise! You made this cabinet look very high end and those lovely details pop in a beautifully subtle way.
Thanks, my friend! Way better than before for sure. Hope you’re staying nice and warm. 🙂
this is a beautiful look and I’m amazed it’s only two colors. I’m going to have to look for a piece to try this on!
Thank you, Kathy! YES!! 2 colors and you can create so much depth and texture… love it. 🙂
Denise,
This has got to be one of my favorite finishes you have created!,! Denise, I sure wish I could find such
decorative furniture as you have found, often times along the road side(?). Not so in sunny California.
The finished look on this project really caught my attention, beautiful just beautiful……
A personal comment, I so enjoy watching your videos too, your presentation is so natural. Watching the videos, it’s like I know you…you are a natural!!
The best,,
Carli E.
Carli, thaank youuuu! I’m so glad you like this piece and always love it when you drop by. XOXO I did shoot a super short video for this one also but I’ve been sick this past week and haven’t got around to posting it yet. I’ll do my best to get that up in the next few days so you can see this finish in action. 🙂
Love the end result! You’re video is much appreciated too! I cringed when you painted Coffee Bean on the moulding but was amazed at your transformation when you painted the French Linen over it. The grain of the wood really makes the texture come out. This is just a wonderful tutorial and inspiration. XOXO
Hi Cecilia! Ha, my sister said the exact same thing. When she saw that dark paint on the detailing she thought it was hideous…lol.
That is a fantastic finish Denise!
Thank you so much, Linda! XOXO
Such a gorgeous cabinet, and such an awesome paint finish. I’ll be using your tutorial soon- just need to find the right piece!
Thank you, Rebecca! And if you find the right piece and give it a try, I’d love to hear how it works for you. 🙂
This looks SOOOO good!! I always know I am going to love whatever you do and then I see it and I love it even more than expected!! XOXO
awwwww, this just made me smile, thanks Christy!!! I’m slow on the uptake this morning but I can’t wait to jump on over to your site to see your makeover.
Ahhhmazing! I’ve never seen a sewing cabinet like this. And what you did really showcases the details.
I’ve never seen one like this either. When I found it at the Restore, I actually thought it was plastic…lol. The color and finish were so bizarre. Anyway, I left the spool holder on the back of the door to preserve some of its character but I have to admit I’m loving this new version waaaaaay better. hehe
I REALLY like what you did with this cabinet! I love things that show attention to detail and this sure does. It’s one of those items that I’d look at and wonder, “how was that done??” so it has my interest piqued. Good job!!!
Thanks so much, Cate! I actually shot a tiny video on how I finished this piece but haven’t got around to editing and uploading. I’m hoping to get around to it so you can get a better look “at how this was done”! 🙂
Wow this looks amazing!!
Thanks so much, Sheila! x