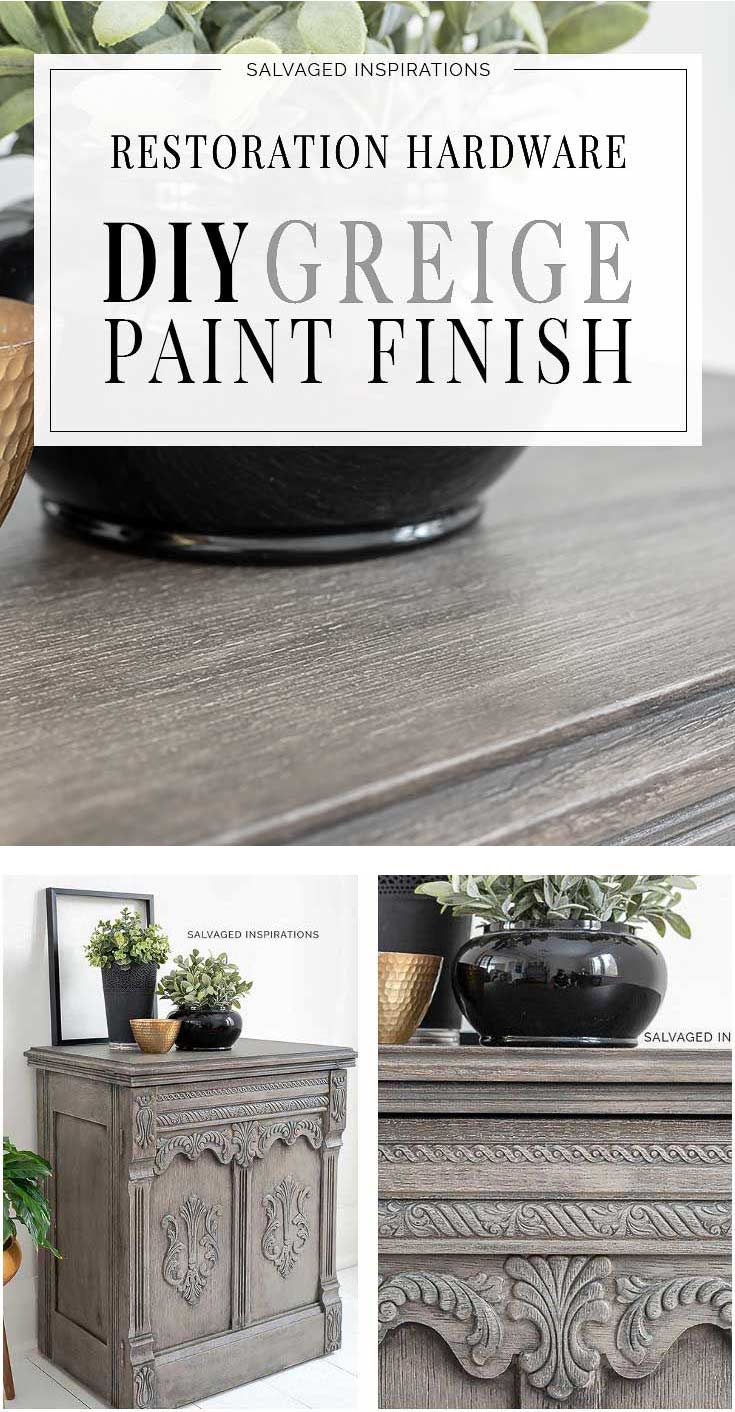
TODAY I’M SHARING HOW TO CREATE A DIY RESTORATION HARDWARE GREIGE PAINT FINISH WITH ONLY 2 COLORS! [WITH STEP-BY-STEP VIDEO]

Hi #sifamily, thanks for joining me! I’m so excited to share today’s makeover with you. This dated sewing cabinet has been reloved into a DIY Restoration Hardware Greige Finish using only TWO paint colors. And the best part — YOU control how light or dark you want your greige to be!
This post was originally published on Thursday, January 23, 2020, and has been updated on Tuesday, September 26, 2023.
But first, if you’re new to the #siblog, on the second last Thursday of every month I join my creative Furniture Fixer Upper Crew. This is a talented group of six DIY bloggers who share their expert tutorials and/or mishaps depending on the day. 😉 But I promise, we always deliver the best before and after! I’ll link to these fabulous ladies down below.
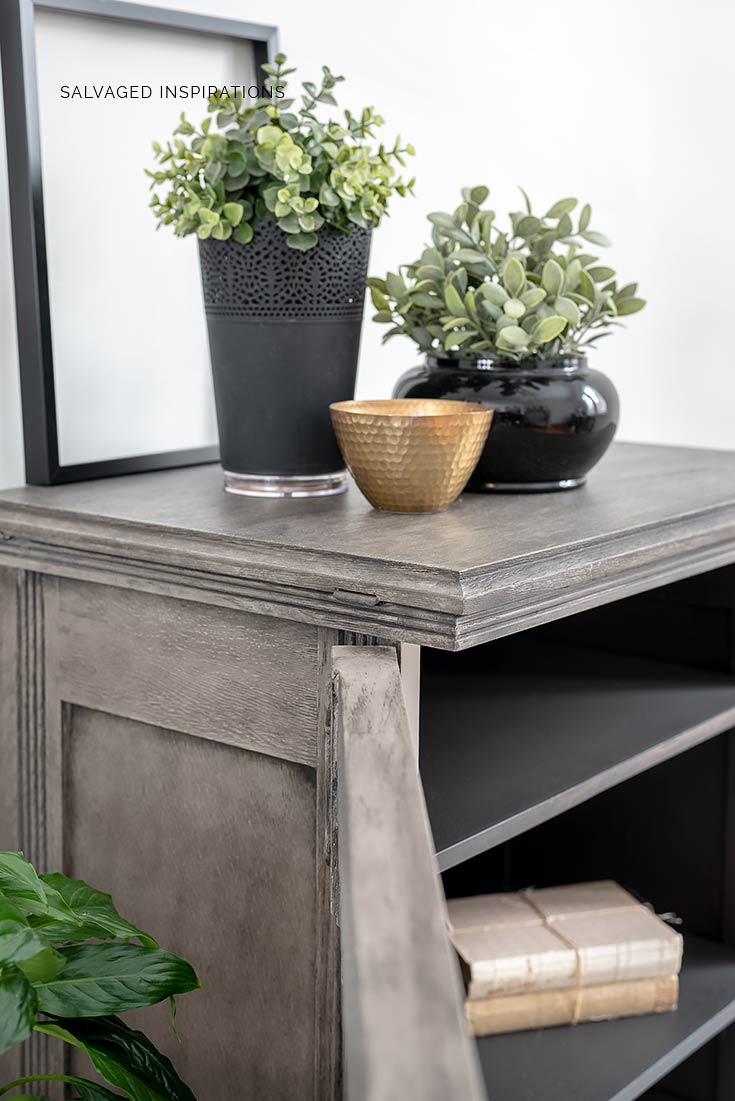
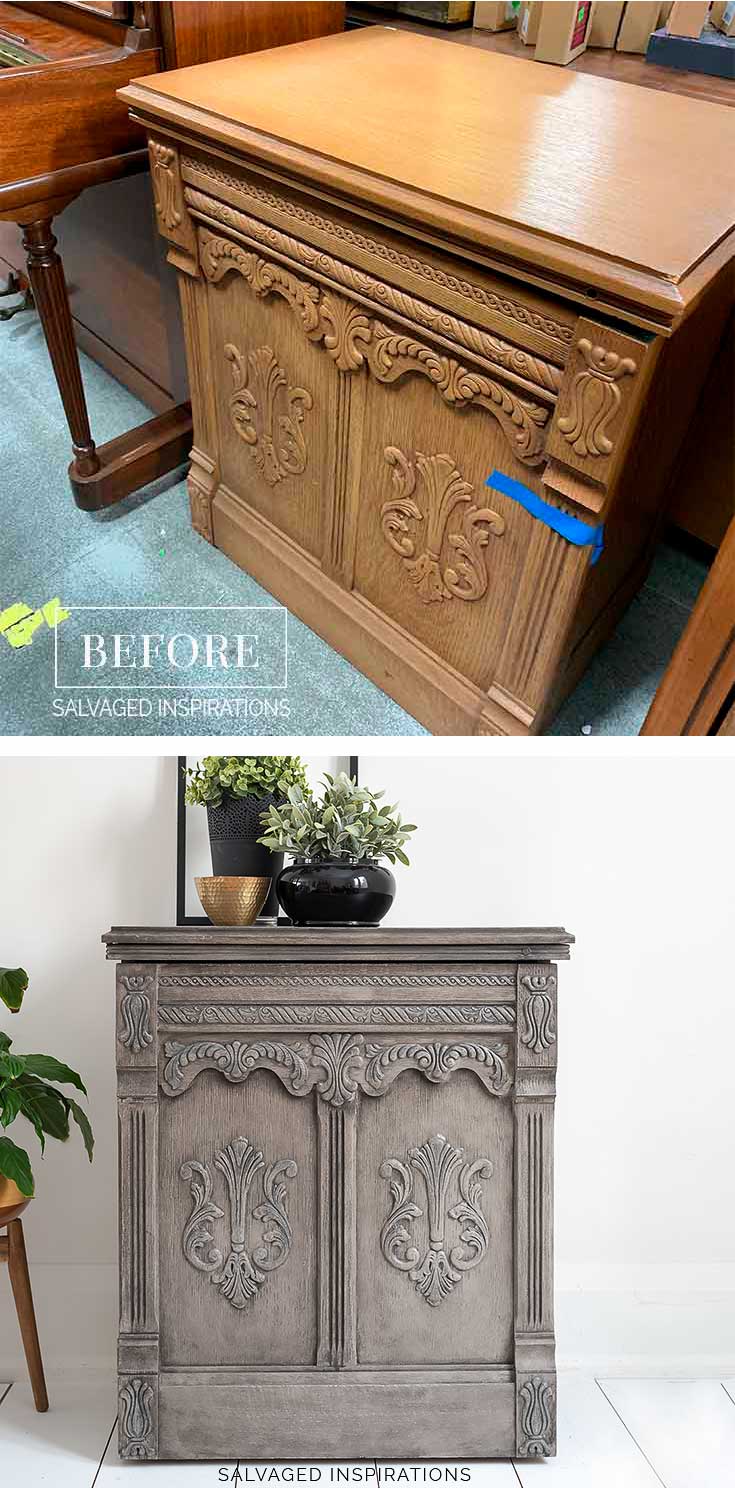
Check out this sewing cabinet I found at the ReStore. How old do you think this is? Judging from the finish I’m guessing maybe 70’s or 80’s? It’s a great piece of furniture.
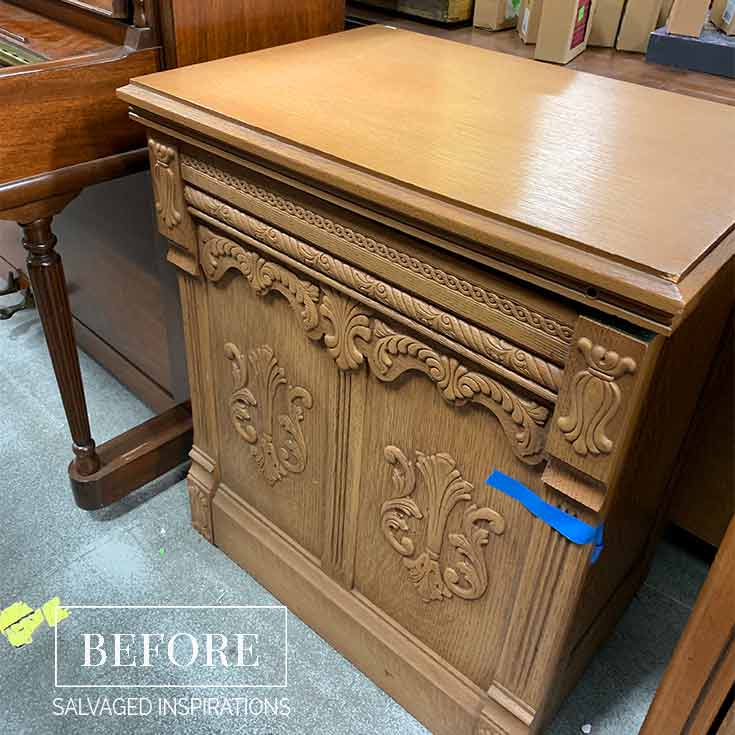
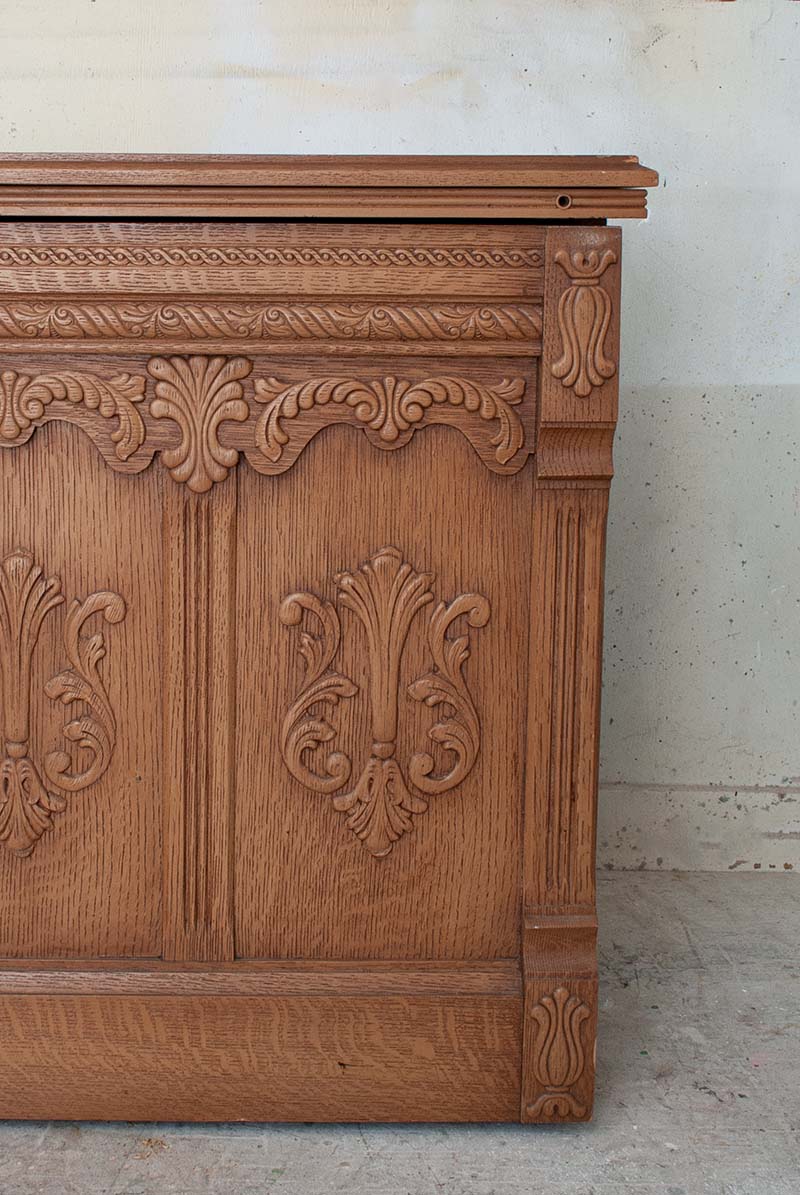
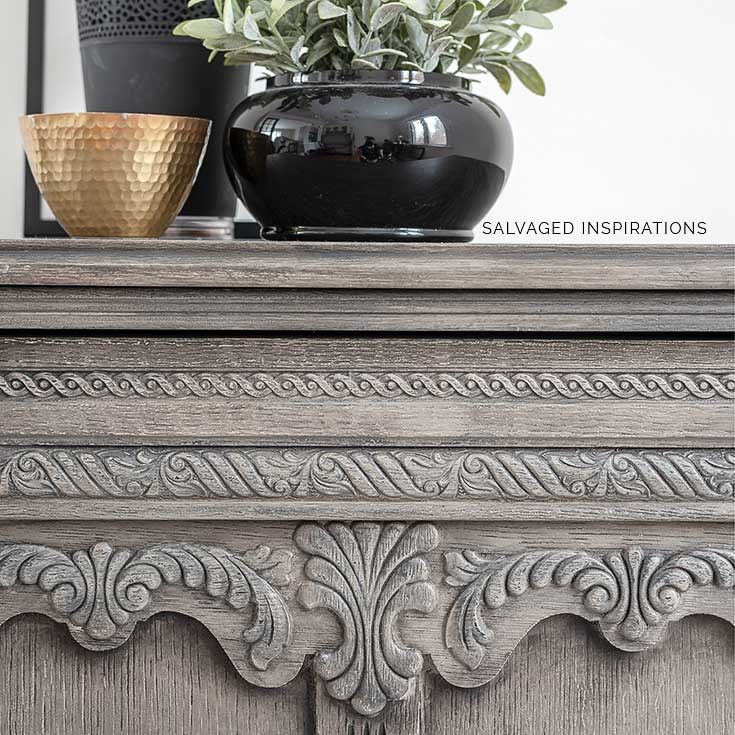
Here’s a closer look at all the textures and details. And even a hole for the sewing machine power cord, I’m guessing.
THIS POST IS SPONSORED/CONTAINS AFFILIATE LINKS TO PRODUCTS I USE. YOU CAN SEE MY FULL DISCLOSURE HERE.
SOURCE LIST
Sewing Cabinet – SALVAGED
Round Belle Paint Brush
Sandpaper | Shop Towels
Water Misting Spray Bottle
French Linen Chalk Mineral Paint
Coffee Bean Chalk Mineral Paint
Satin Clear Coat
CLEAN AND PREP
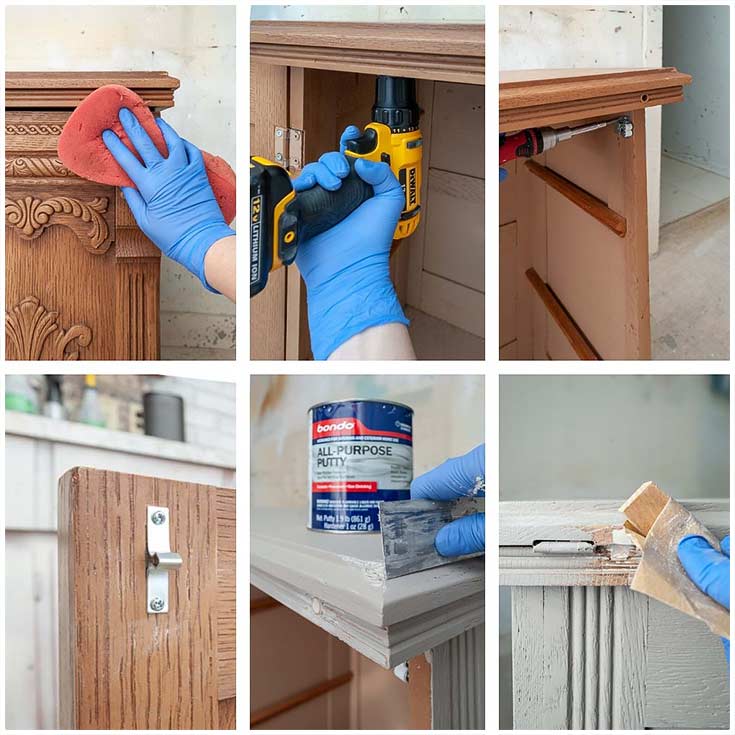
Before I started painting this RH faux finish, I prepped the cabinet with a good cleaning and a few repairs. Sewing cabinets have a flip-top to access the sewing machine but since I didn’t want this for sewing anymore, I screwed the top down from below. New clips were added for easy opening and closing.
After I painted the first coat I filled the holes for the power cords with Bondo and then sanded everything smooth. I have no idea why I painted first. That said, you can use Bondo over primer or paint.
HOW TO PAINT RESTORATION HARDWARE FINISH
This finish works best if your piece has some wood grain/texture. This oak sewing cabinet was perfect!
WHAT IS A WARM GREIGE?
A warm greige is a color that falls between gray and beige on the color spectrum with warmer undertones. The coolness of gray with the warmth of beige can create a super cozy atmosphere. I’ve created a warm greige paint finish by using only two paint colors, French Linen and Coffee Bean. As you’ll see this paint wash technique allows you to customize the lightness or darkness of the greige according to your preference.
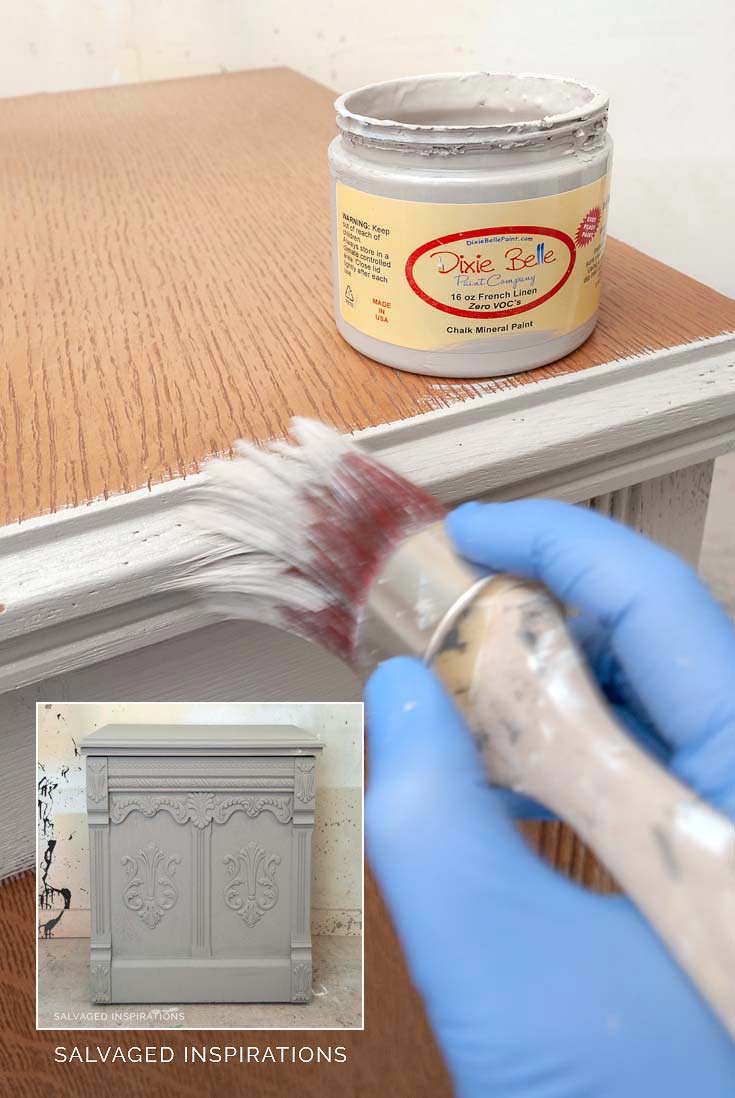
STEP 1 – PAINT BASE COAT
For my base coat, I painted two coats of this French Linen which is a mix of gray and brown or a very light taupe. You can also see this color on the headboard I painted back in 2019 with French Linen and Sawmill Gravy. This paint color is gorgeous!
STEP 2 – ADD SOME DEPTH
To add some depth and texture, I painted all the wood detailing in Coffee Bean. As you can see I wasn’t overly neat about it. Once another layer of French Linen was applied, it cleaned up any ‘overspill’.
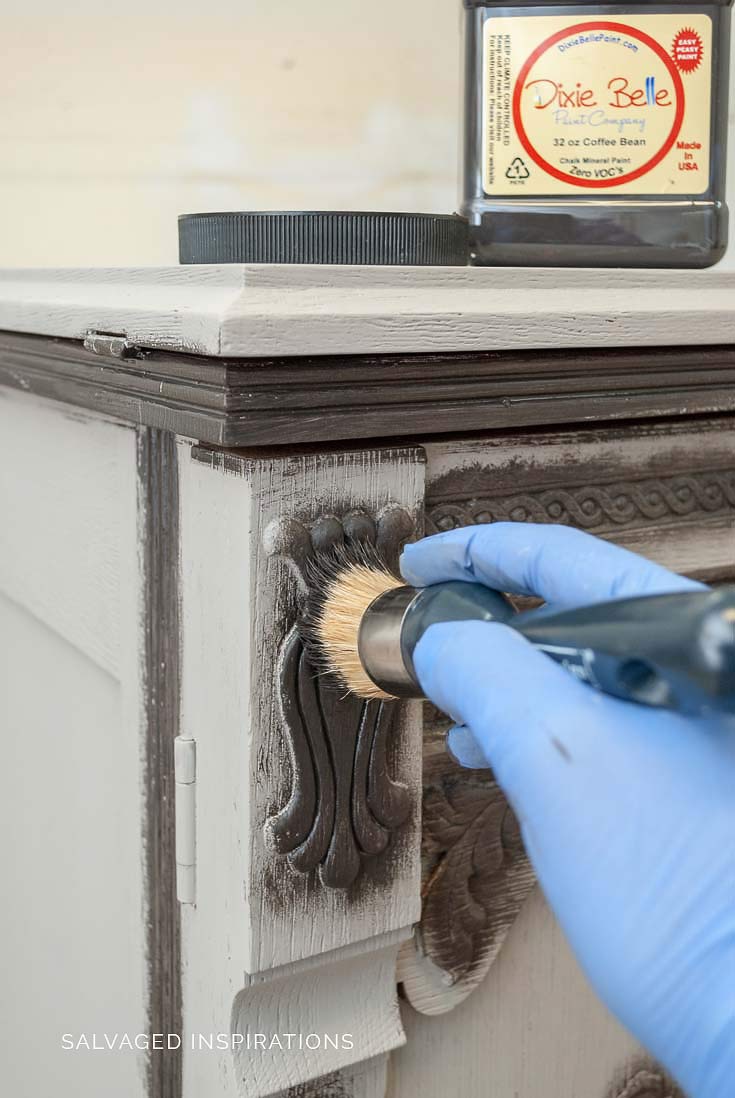
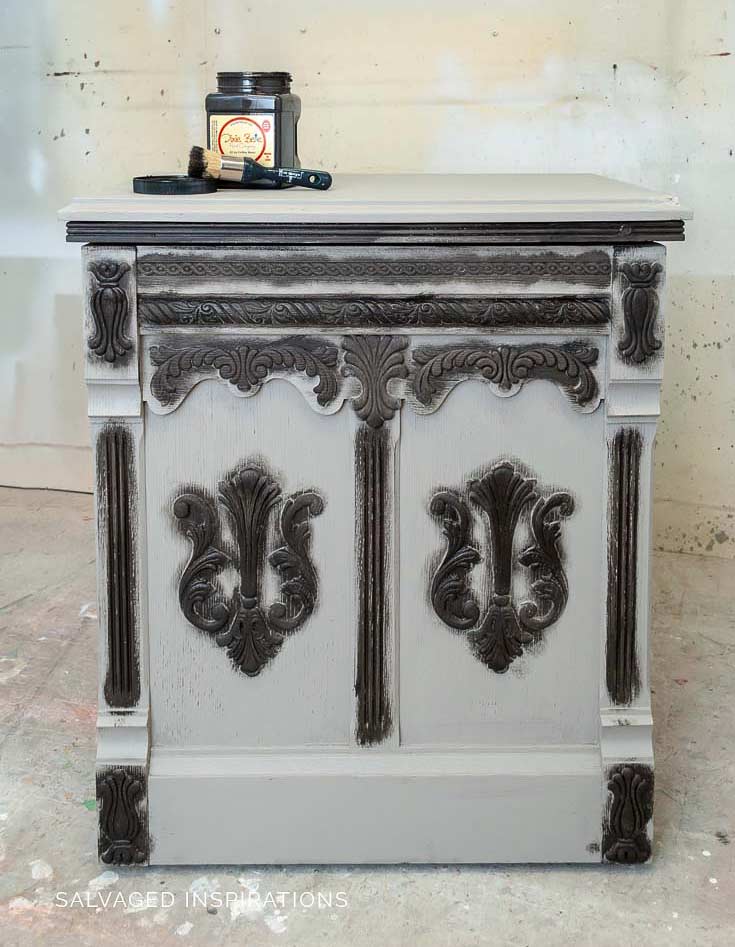
STEP 3 – DRY BRUSH FRENCH LINEN
To soften the details, I dry-brushed French Linen over the Coffee Bean and added another solid layer on the top and sides.
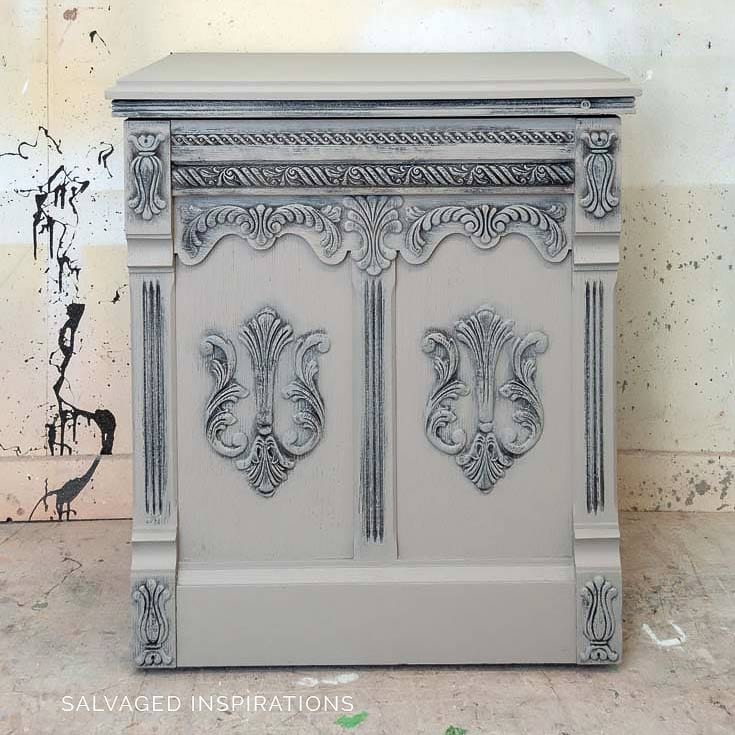
STEP 4 – APPLY A WASH
After step 3 dried, I applied a Coffee Bean paint wash. To do this, I dipped my brush in water and then dipped it into the paint. Working on one side at a time in small sections, I brushed on the watered-down paint. There’s no right or wrong way to do this. I left it heavier in some areas, lighter in others making sure the wash covered the entire side and got into all the crevices and details.
Tip~ This is where you control how light or dark you’d like your greige wood finish. For a lighter look use more water in your wash. For a darker look use more paint in your wash. If you find your wash is not dark enough after it has dried, repeat with another layer of wash.
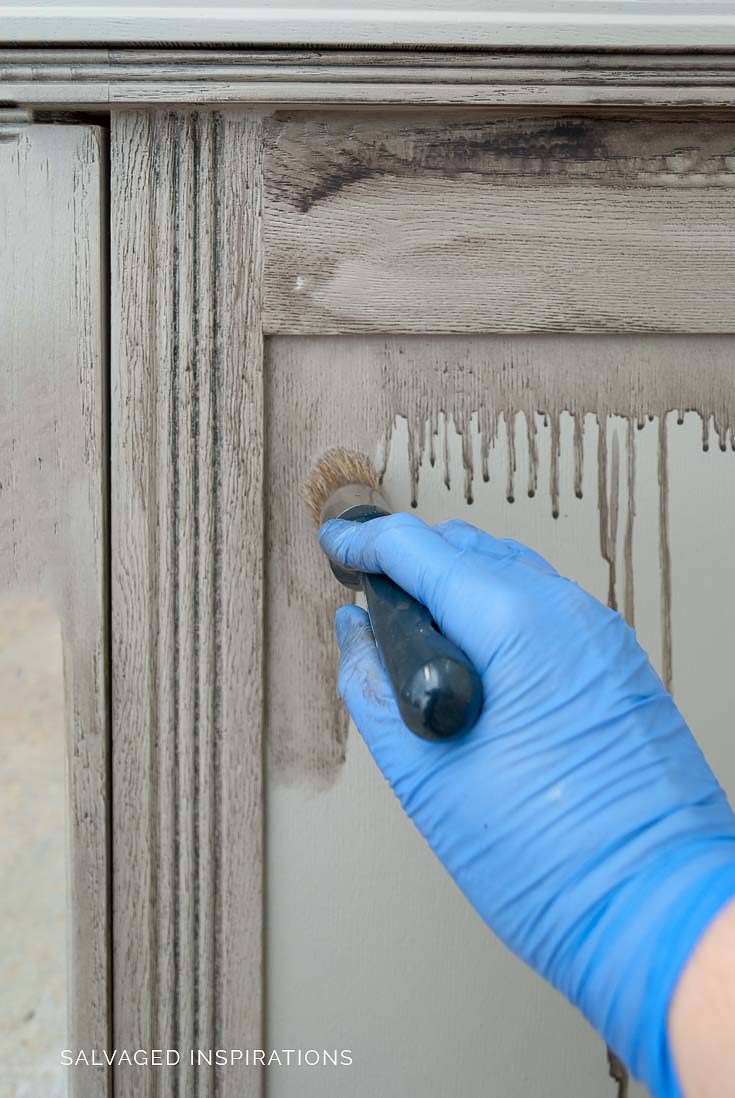
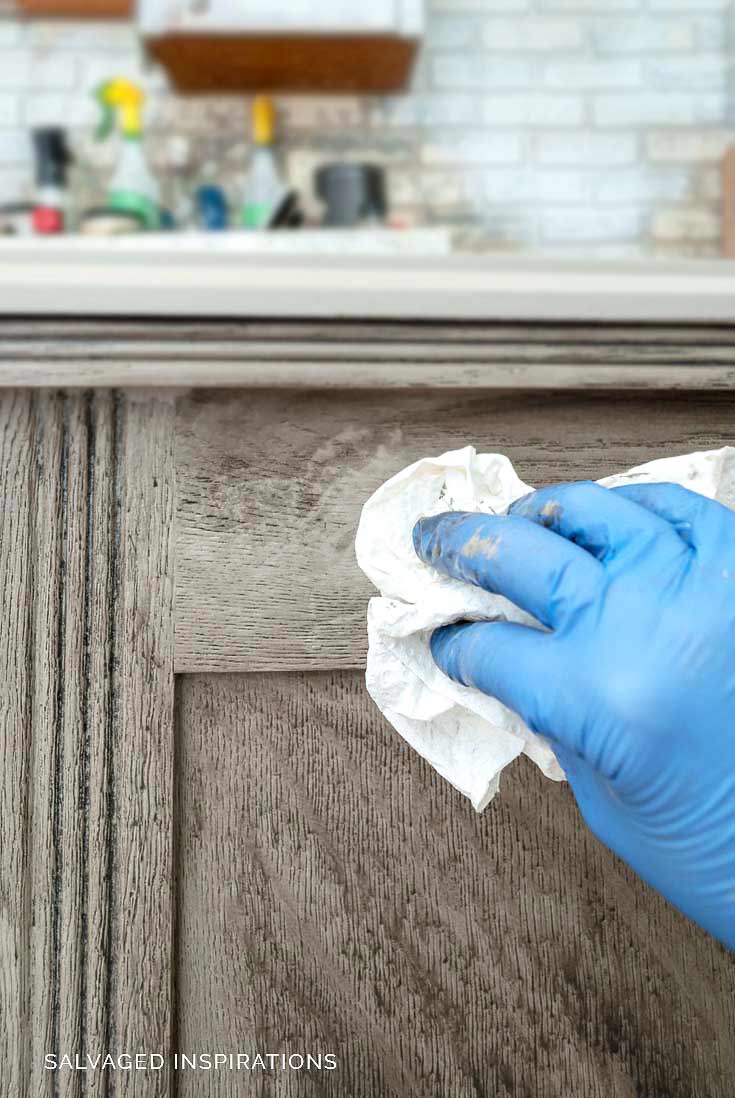
STEP 5 – REMOVE EXCESS WASH
To create more texture, I immediately started dabbing at the wash with a shop towel. If you don’t have a shop towel, any lint-free cloth or rag will work. I find it works best if I alternate the pattern and move my hand in a different direction. A little dabbing and smoothing to create the look you like. You can see this in action as I’ve included the Youtube video below.
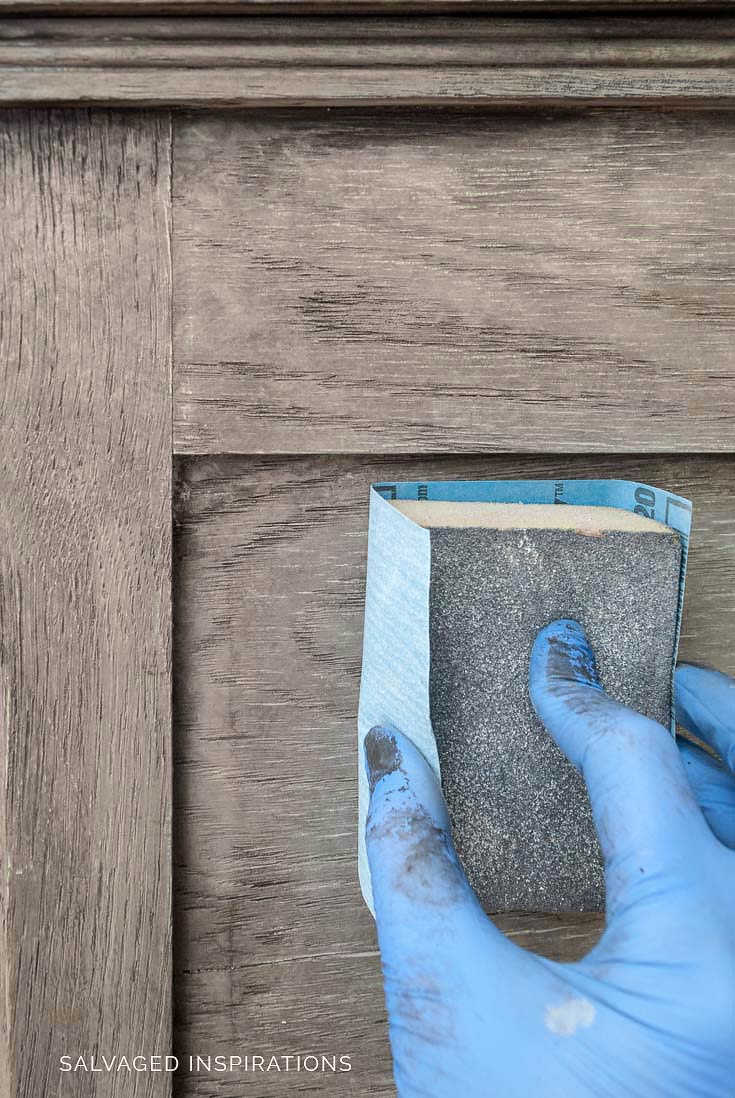
STEP 6 – SAND + TOPCOAT
Once 100% dry, I sanded with 320 grit and removed any dust before spraying two coats of this Satin Clear Coat for a perfect finish.
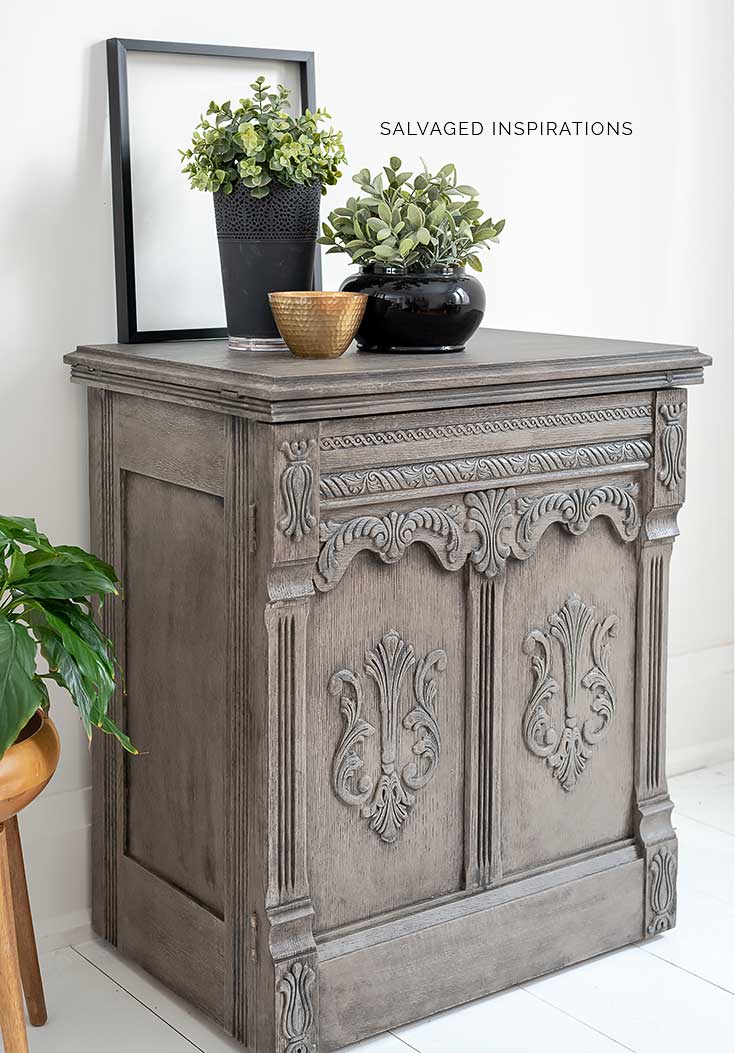
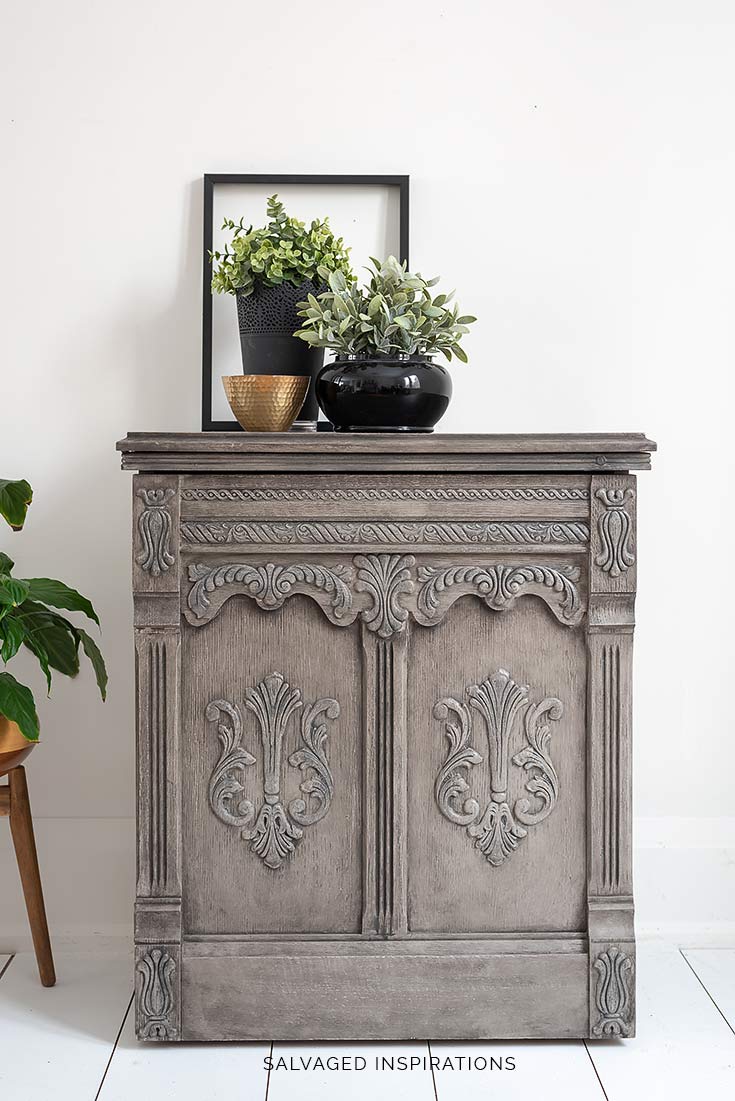
FINISHED LOOK
With only 2 paint colors, here’s the after! I’m loving this Restoration Hardware Greige Paint Finish. It has really updated the piece.
The satin topcoat is super durable and gives a really subtle sheen.

There’s a slight gap between the top and the body that gives the impression that it opens, but it’s secured.
I also painted the inside with Coffee Bean to finish the look.
I love these details and this Restoration Hardware Greige finish! I wish I had some wood beads to style this with. I think that would have looked so good!
This piece sold to a sweet young lady within the first week of listing it. She was so happy when she came to pick it up! It warmed my heart.
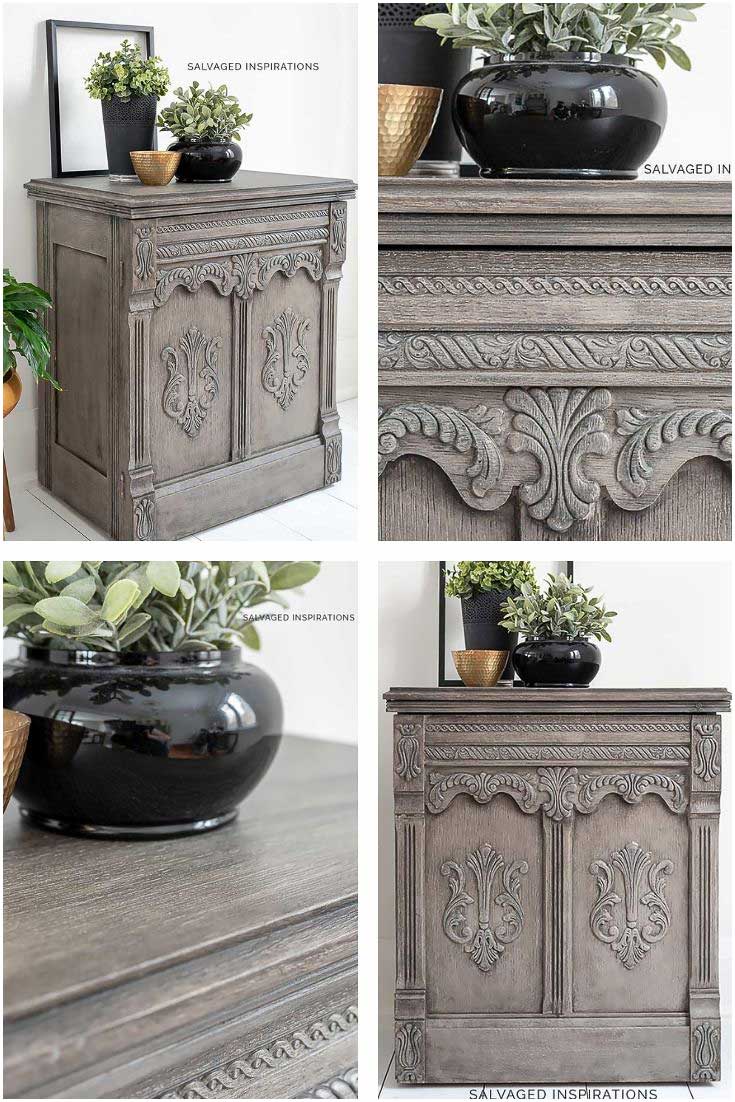
One more look at the before and after. I’m thrilled with the way it turned out and I can’t wait to hear what you think!
YOUTUBE TUTORIAL
Here’s a step-by-step tutorial on YouTube. Now that I’ve re-watched this, I think my video-taking skills have gotten a little better…hehe. 😉 If you have any problems viewing it below, feel free to watch it on my YouTube channel HERE. Our #siyoutubefamily is already a community of 41K so don’t forget to subscribe if you haven’t done so already! So exciting, thank YOU! 🙂
Don’t forget my Furniture Fixer Upper friends are sharing their favorite furniture makeovers! (This FFU post was originally published on Thursday, January 23, 2020.) Below are their BEFORE photos so feel free to visit the links underneath to see the amazing AFTERS and how they did it! I’ll meet you there. I’m heading over to take a peek myself! x

3. Confessions Of A Serial DIYer
6. Me.. so happy you’re here! 🙂
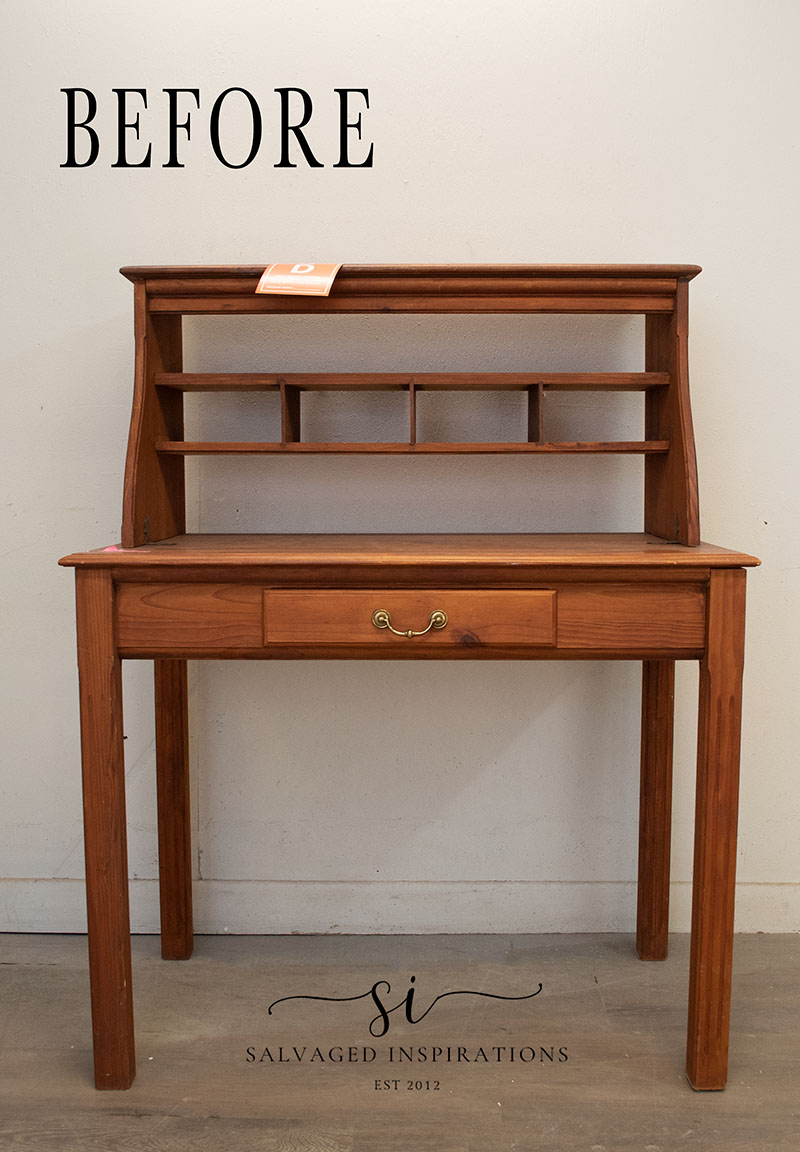
We all get treated to a double whammy this week! I’ll be back this Thursday with AN ALL NEW Furniture Fixer Upper makeover transforming this desk below. See you then! 🙂
LET ME KNOW WHAT YOU THINK OF THIS RESTORATION HARDWARE GREIGE … OR FEEL FREE TO ASK ANY QUESTIONS YOU MAY HAVE… I ALWAYS LOVE HEARING FROM YOU.
Thanks for reading. 🙂
Wishing you a beautiful day filled with inspiration and Happy Painting friends!
Denise XO
RELATED POSTS:
HOW TO ADD GRAPHICS – PINK CHAMPAGNE TEACART
QTT – HOW TO STOP BLEEDTHROUGH
SPRAYING DIY CHALK PAINT
LAYERING CHALK PAINT | EMPIRE MAKEOVER
HOW TO PAINT FURNITURE WITHOUT BRUSHMARKS!
PIN AND SHARE!

What brand paints did you use? I am sure it says somewhere in your post but I couldn’t find the info.
Thank you
Absolutely beautiful. I thought you were going to ruin it but it made it look like a million. JOB WELL DONE> I love it.
Thank you so much Carol! 🙂
Just lovely!!! 🥰 I can understand why it sold so quickky!!
Thank you Susan! And it always touches my heart when I know it went to the ‘right’ person… she so loved it! 🙂
Funny you should repost this now, as I recently searched your site to review this 2 color technique. Loved it in 2020, still love it now. Great technique and what an exquisite piece of furniture.
It’s one of my favorites too! Even though it’s been pinned/visited so many times, there are a lot of new followers that are seeing it for the first time. But this means so much Tracy…that you remembered this piece almost 4 years later! You’re the best. Hugs🤗
Hi Kelly! You can so do this! I would suggest testing the Mud Puddle to see if you like the contrast before going at it on your furniture. If it’s not quite dark enough for you, do you have a little bit of black paint you can add in? That just might do the trick!
Wow! I wasn’t sure where you were going with this piece, but the final step just made it beautiful. You have great vision!
Thanks so much Christine! 🙂
What a great find. If I ever come across one like this I will snap it up. Love the technique. A thought – there is a wealth of trim on this piece. Have you ever thought of making moulds of the details and use on other pieces?
Yes, snap it up Fran! It’s such an easy technique to do! And brilliant idea about replicating the trim for other pieces… love it!
Can this be done on pottery?
If the pottery has some texture – yes!
Hello! Just wondering how you spray the satin topcoat onto the piece? Is it withe misting bottle!? Do you add water to the topcoat?
Thank you!
Hi Donna! I have a paint sprayer that I spray most of my topcoats with.
Can you wipe ( side to side ) versus dapping?
I love this look! And you did a fantastic job! Would you suggest a technique like this for a whole kitchen? Or do you think it would be too labor intensive for one person?
Painting a kitchen is labor intensive and this finish would take extra. If you love the look, it may be well worth the effort though! 😊
TY,TY,TY,TY for giving us a no thinking list and a great tutorial. I shy away from Pinterest lately because the blogger go on and on and never tell you exactly what to do. Keep up the good work for our scared beginners
Thanks, Barbara! I’m SO HAPPY you found this helpful! 🙂
Beautiful piece. I am curious how long did you wait between the different coat of paint and the wash?
Thank you Mildred! You can apply the wash after the paint has dried. In my case, it took about an hour.
Love it! Inspiring indeed!
Thank you Mahwish!
I’ve been repainting my bathroom cabinets and wanted to do something to the framed mirror above the vanity. This technique might just be the answer but I can’t envision what the end result would be which is making it difficult to get started. Could I send a picture of the mirror to you for suggestions?