HERE’S HOW I UPDATED THIS SALVAGED NIGHTSTAND SET USING A ONE-COLOR STENCIL DESIGN | YOUTUBE VIDEO

Hi creative #sifamily! Today I’m sharing a fun way to update your furniture. I created a one-color stencil design to give it a fresh modern look and I can’t wait to hear what you think!
It’s also Furniture Fixer Uppers Day and I’m joining my FFU crew and sharing links to their projects below. I hope you join me in visiting their before and afters too.
*As an Amazon Associate, I earn from qualifying purchases. There may also be affiliate links in this post to other companies/products I use and love as well. You will never be charged extra when you purchase through these affiliate links. To see my full disclaimer, click here!
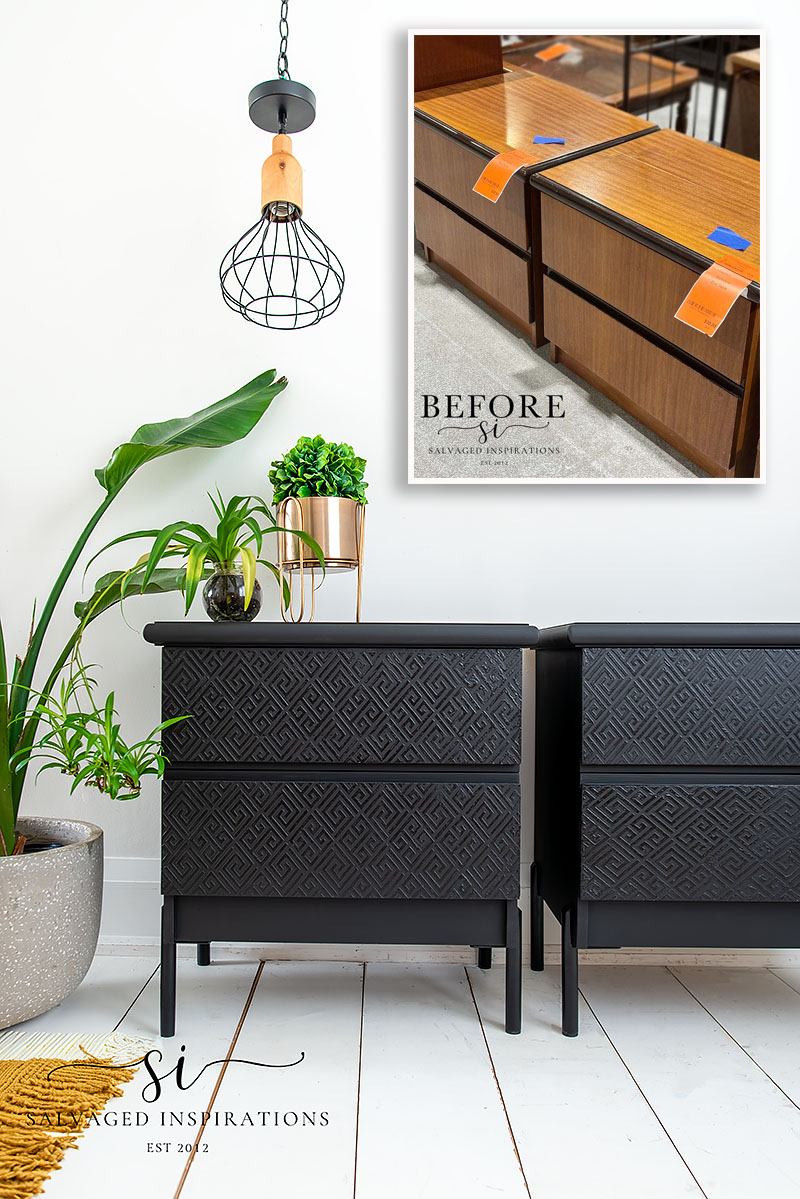
Here’s the Restore nightstand set I started with. I paid $30 each which isn’t the best price but I saw potential. They looked like a blank canvas to me!
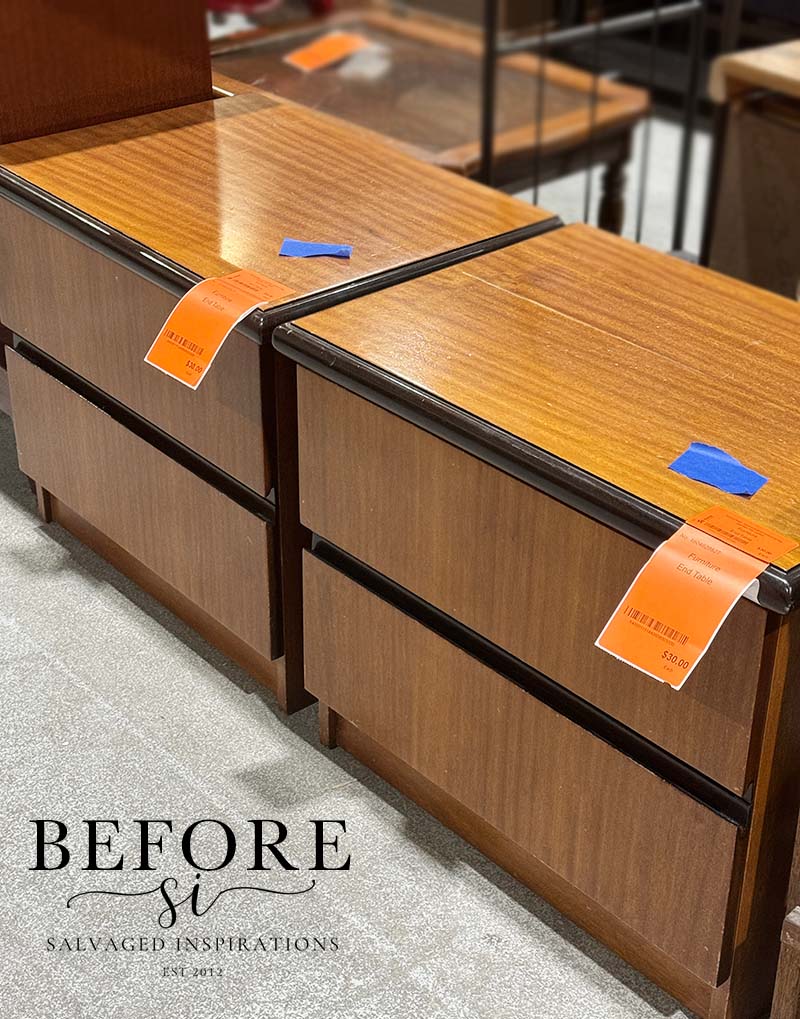
The set was in good shape but the laminate top did have a few dings and scratches.

The drawers are old-school wood sliders but all the drawers slide in and out smoothly.
THIS POST IS SPONSORED/CONTAINS AFFILIATE LINKS TO PRODUCTS I USE. YOU CAN SEE MY FULL DISCLOSURE HERE.
WHAT YOU’LL NEED
Bedside Tables – SALVAGED
Heat Gun
Bosch Sander (25% OFF as of writing!)
White Lightning Cleaner
Wood Filler
Bosch Sander
Bonding Boss Primer
Paint Brushes
Anchor Silk All-In-One Mineral Paint
Greek Key Stencil
Clear Coat Gloss
6″ Black Metal Furniture Legs
MONOCHROME STENCIL DESIGNS
Here’s how it all came together…
CLEAN/PREP/REPAIR
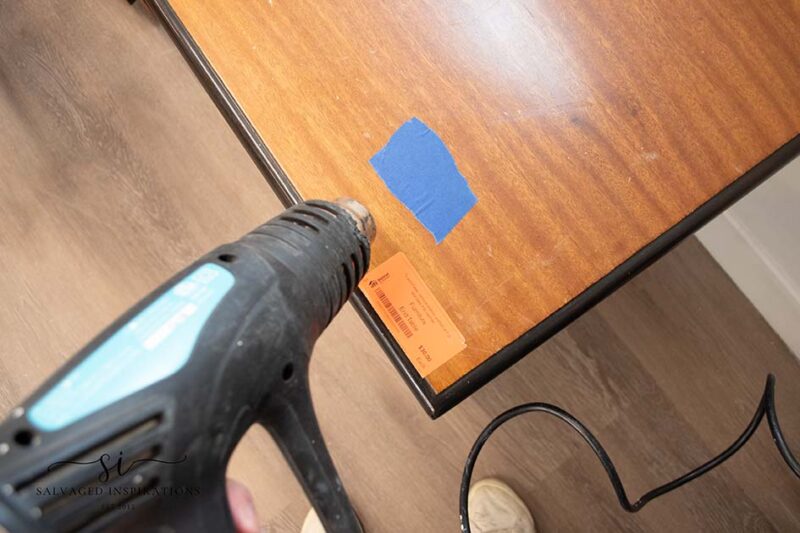
I used a heat gun to remove the price tags and tape which works effortlessly for stuck-on stickers.
DRAWER REPAIR
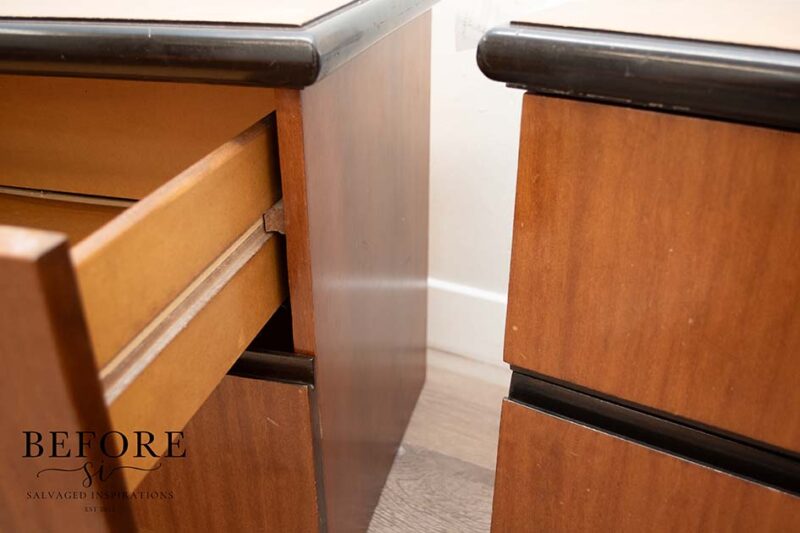
When I removed the drawers, I noticed they were numbered on the back – bonus. There have been times when I missed this step and then had a challenge figuring out which drawer went where. This is not a big issue with a two-drawer nightstand set, but it can be frustrating if I’m working with a long 9-drawer dresser and I can’t figure out how they fit back in properly. Older pieces can be fidgety.
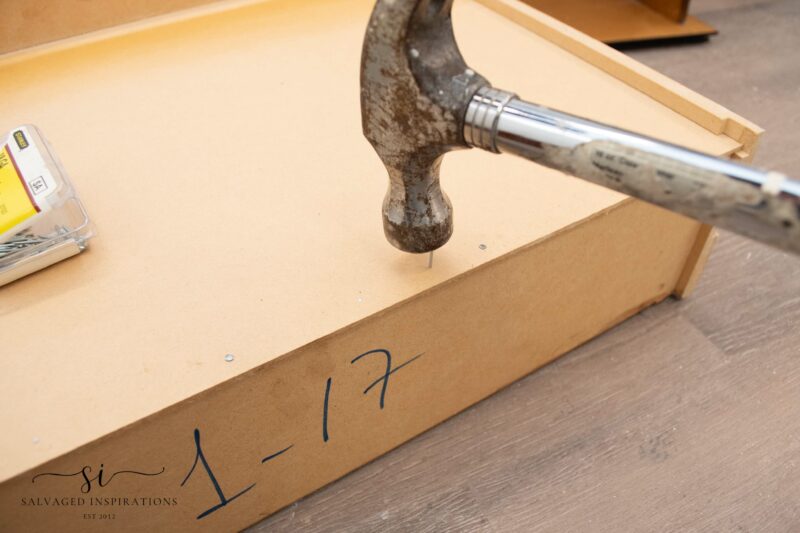
The bottoms of the drawers needed a few extra trim nails to reinforce the bottoms.
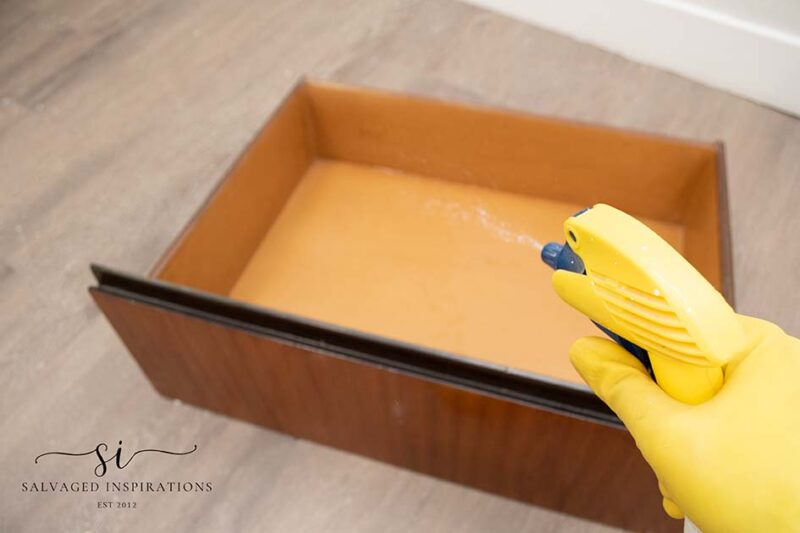
These nightstands got a good cleaning with White Lightning inside and out making sure to rinse my sponge and wipe with clean water to remove any residue.
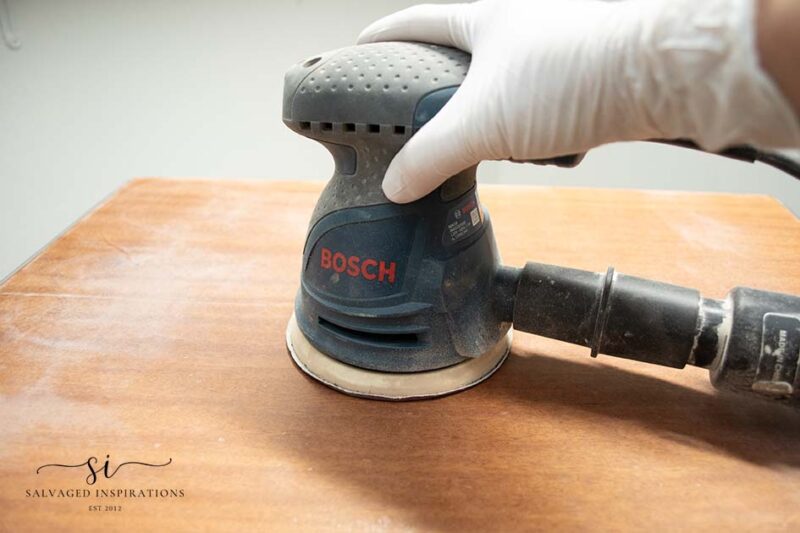
I also scuff sanded the entire piece with my Bosch Sander and a 120 grit sandpaper making sure to sand out the little scratches on the top.
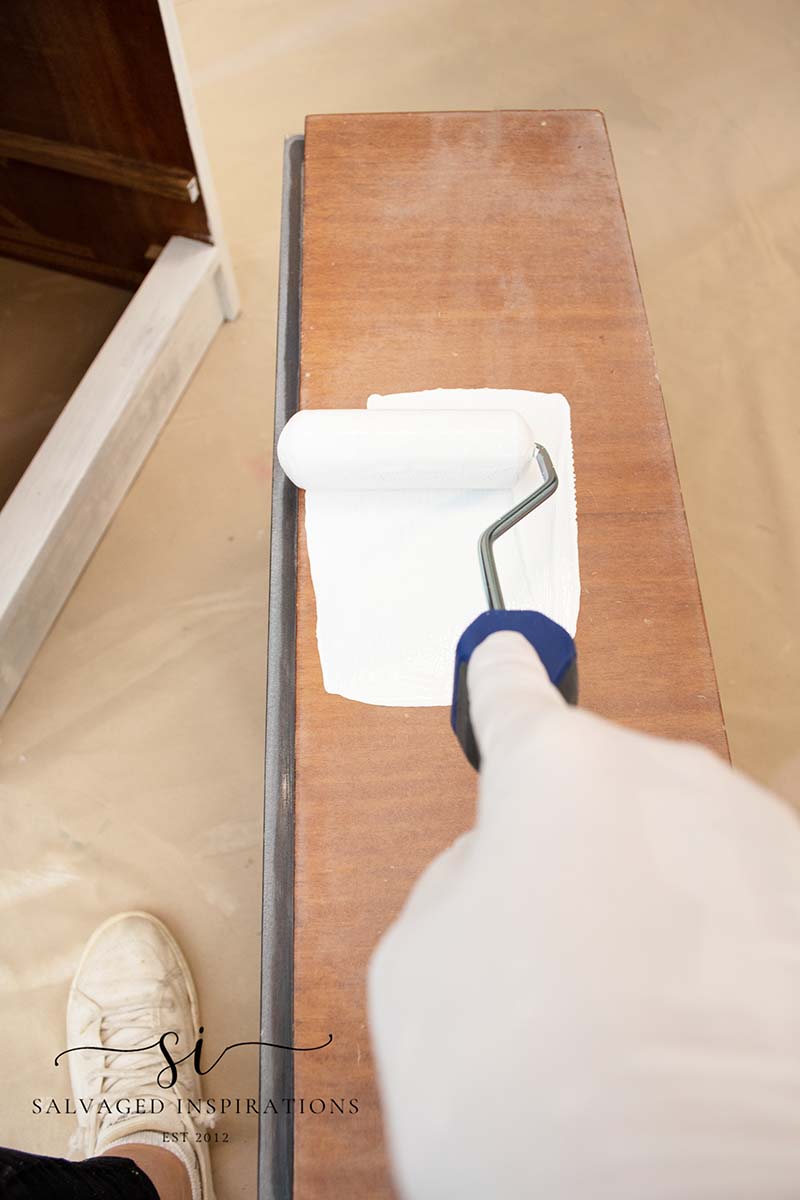
To prime this piece I used this Bonding Boss gripping primer. It rolls on beautifully and is quickly becoming my favorite. I didn’t think I’d ever find anything I liked better than BIN Shellac Based Primer but this primer may just be it!
BASE FOR FURNITURE LEGS
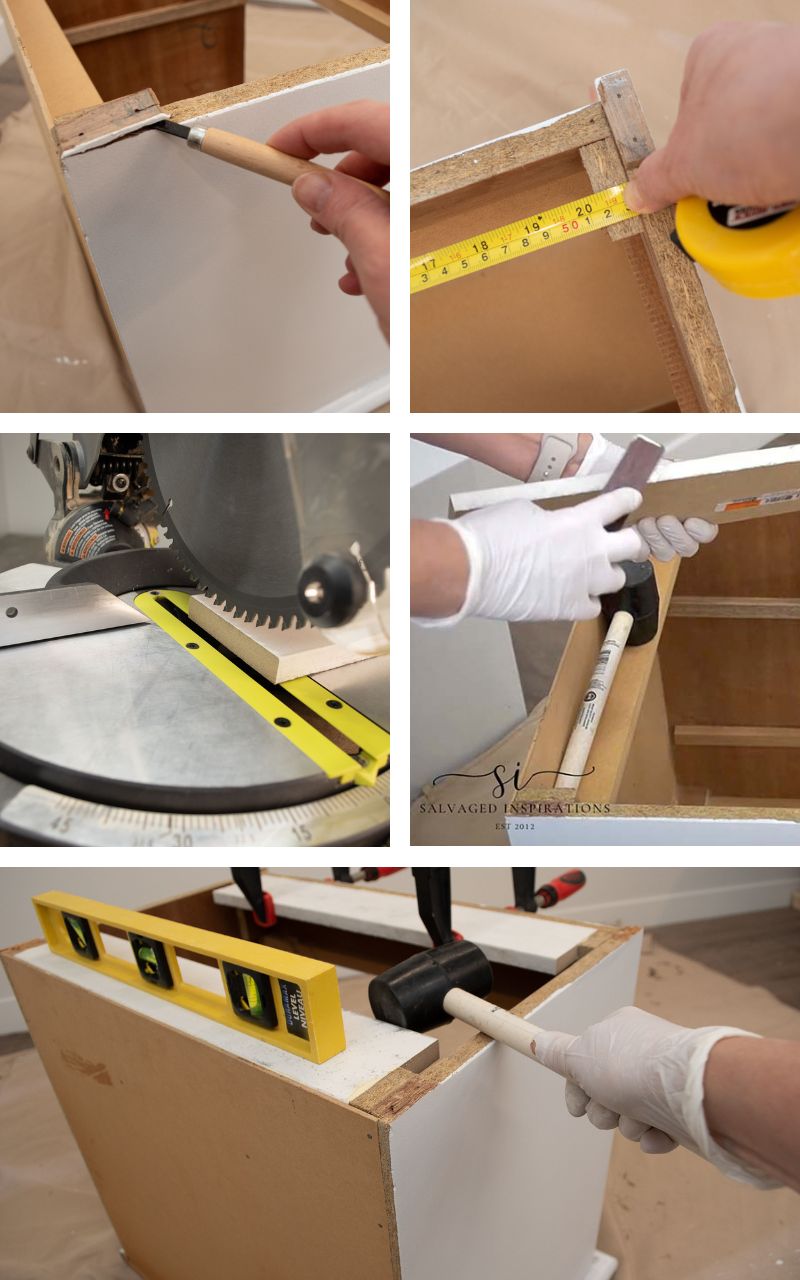
The average modern height for nightstands is between 24 and 28 inches. These were shorties standing 20 inches. To add some height to these nightstands, I reinforced the base so I could attach some legs.
Here are the steps –
- I removed the added wood to level out the bottom.
- Then I measured for the size of the board to be fitted onto the bottom.
- Using my miter saw, I cut four pieces of wood to size.
- I glued them into place
- And using a mallet and level, I made them perfectly flush and level.
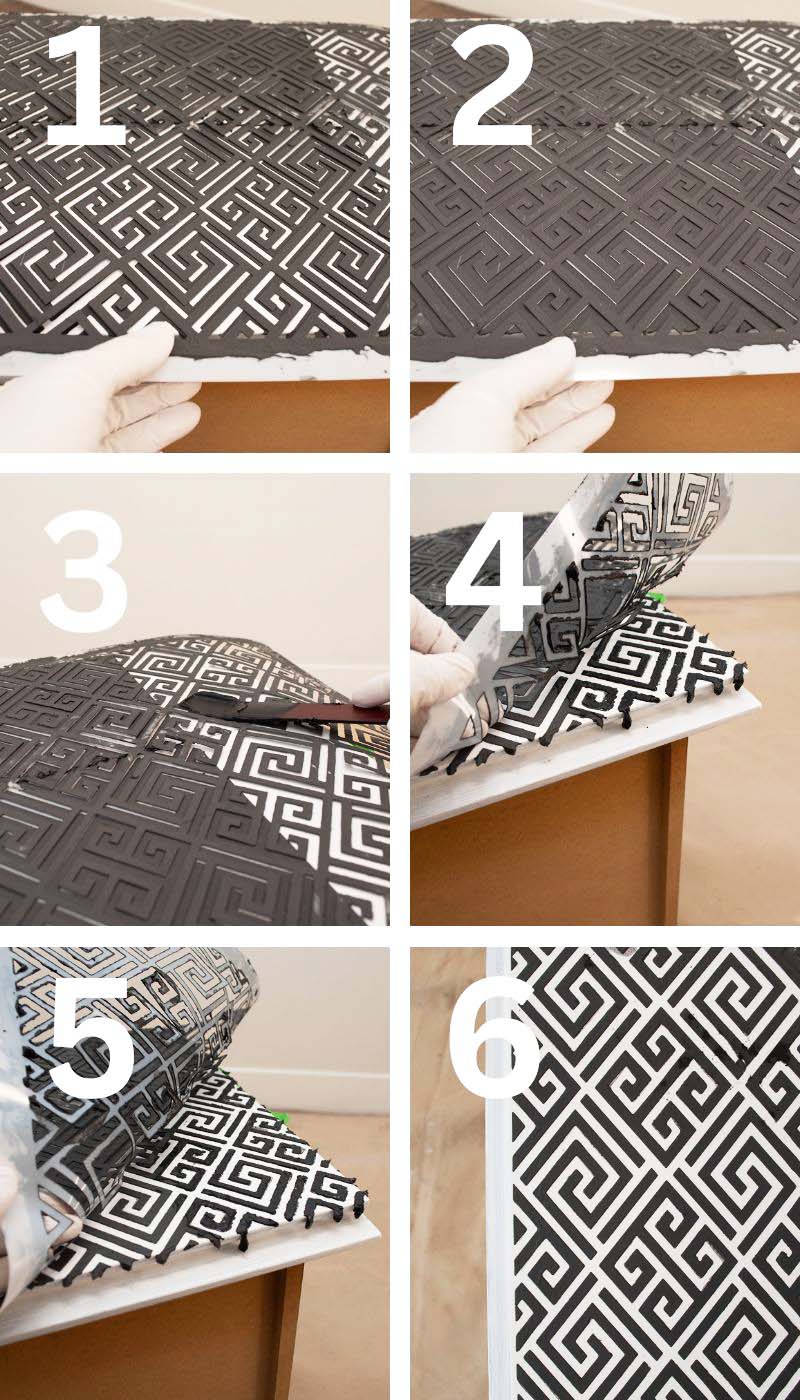
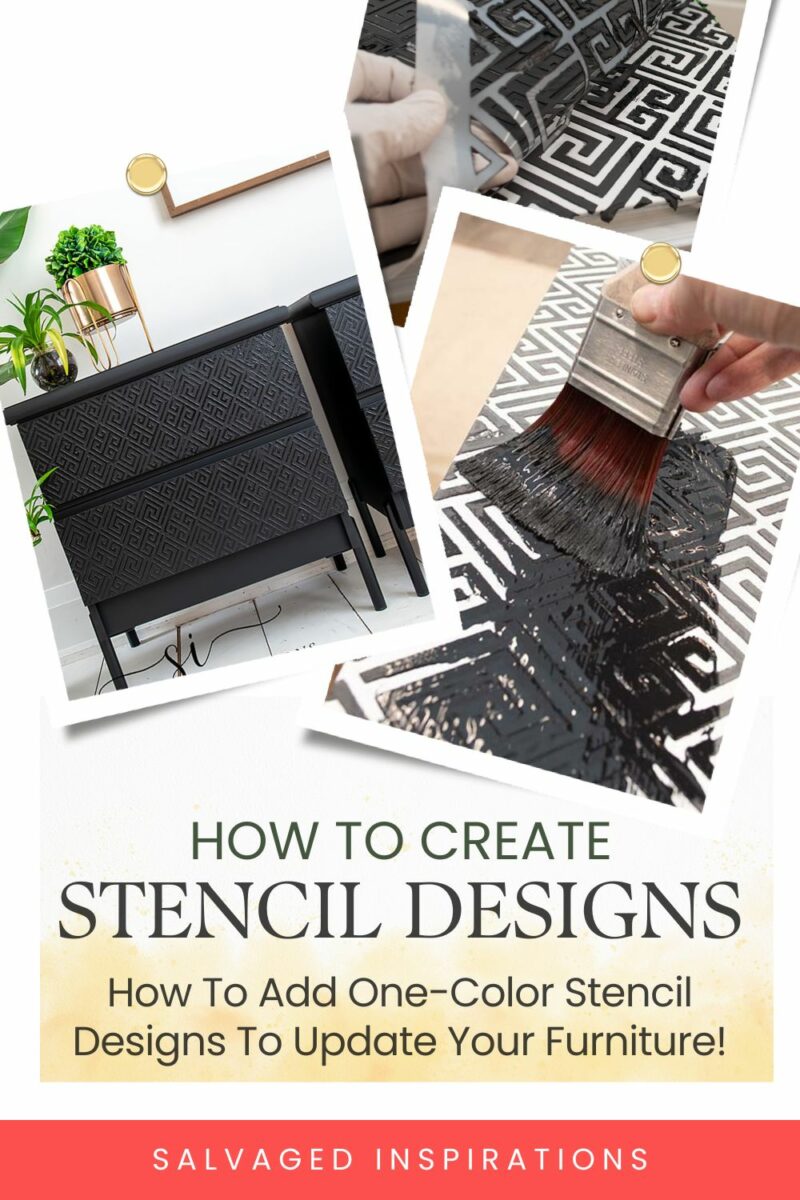
HOW TO ADD A RAISED STENCIL DESIGN
Now for the fun part! Using this Greek Key Stencil and Black Mudd, I added design and texture to these drawers. I found lining up two drawers at a time worked much easier with this large stencil pattern. I positioned it and then using a spreader, I “iced” the mudd onto the stencil. Creating a raised stencil is very similar to icing a cake!
I knew I was painting over this raised stencil so it didn’t have to be 100% perfect. You can watch the full demo in action on Youtube tutorial below. It’s so much fun!

HOW TO MATCH UP A RAISED STENCIL DESIGN
Wouldn’t it be great if every stencil fit our project perfectly? They rarely do so matching the design is often required. After I stenciled the drawers with the full length of the stencil, I let it dry overnight. The next day I came back and matched the pattern perfectly.
Matching a stencil pattern is so much easier when it’s dry!
You can lay the stencil overtop and maneuver it without worrying about messing up what you’ve already stenciled. Once I found the perfect match, I added the Mudd to the rest of the drawer top. I used black mudd so you can see the process (and I knew I was painting it black) but any color of mudd will work.
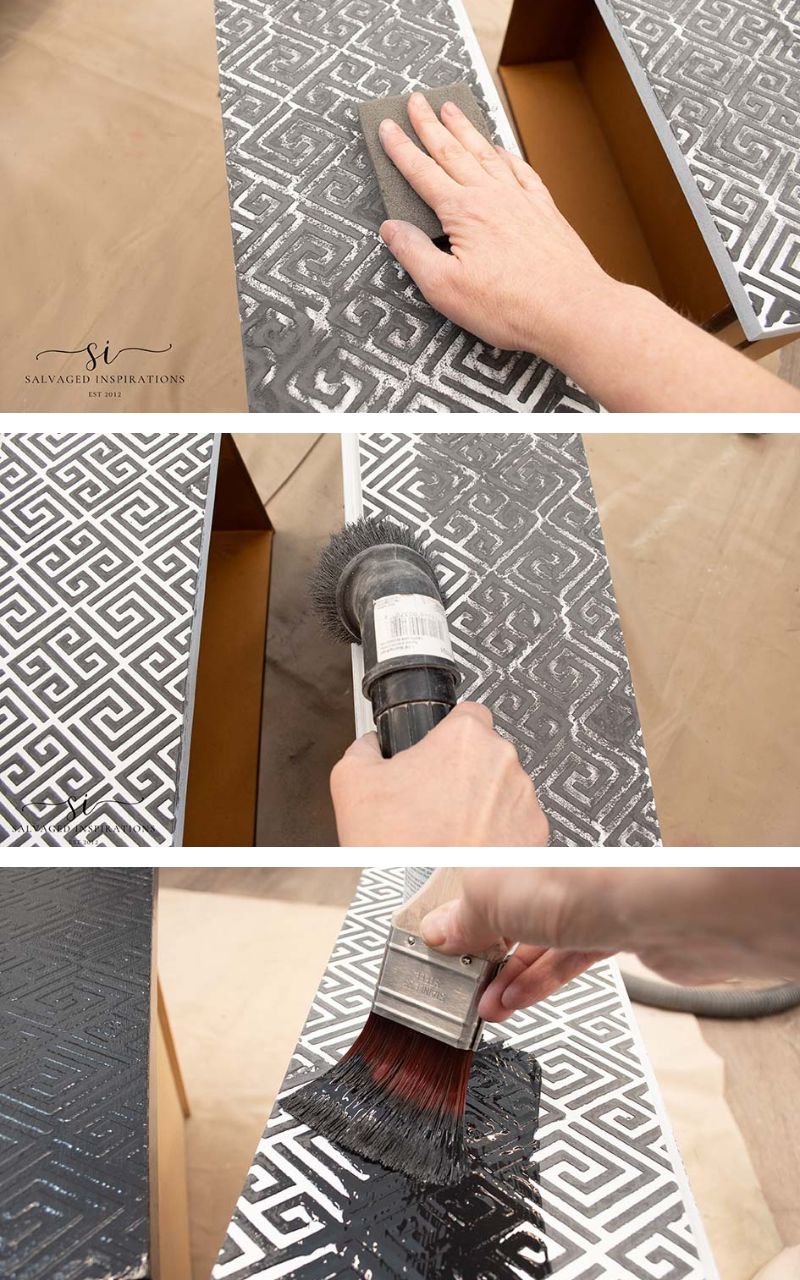
PAINTING A RAISED STENCIL IN ONE COLOR
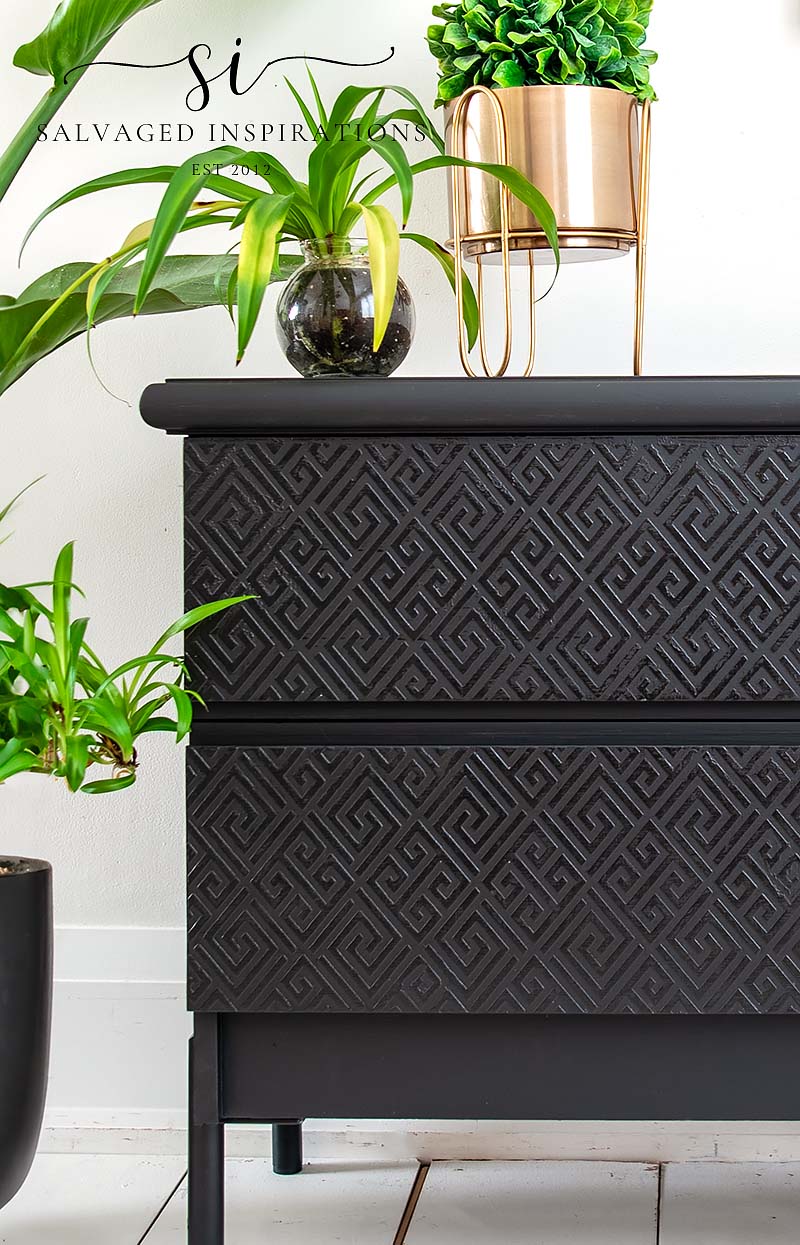
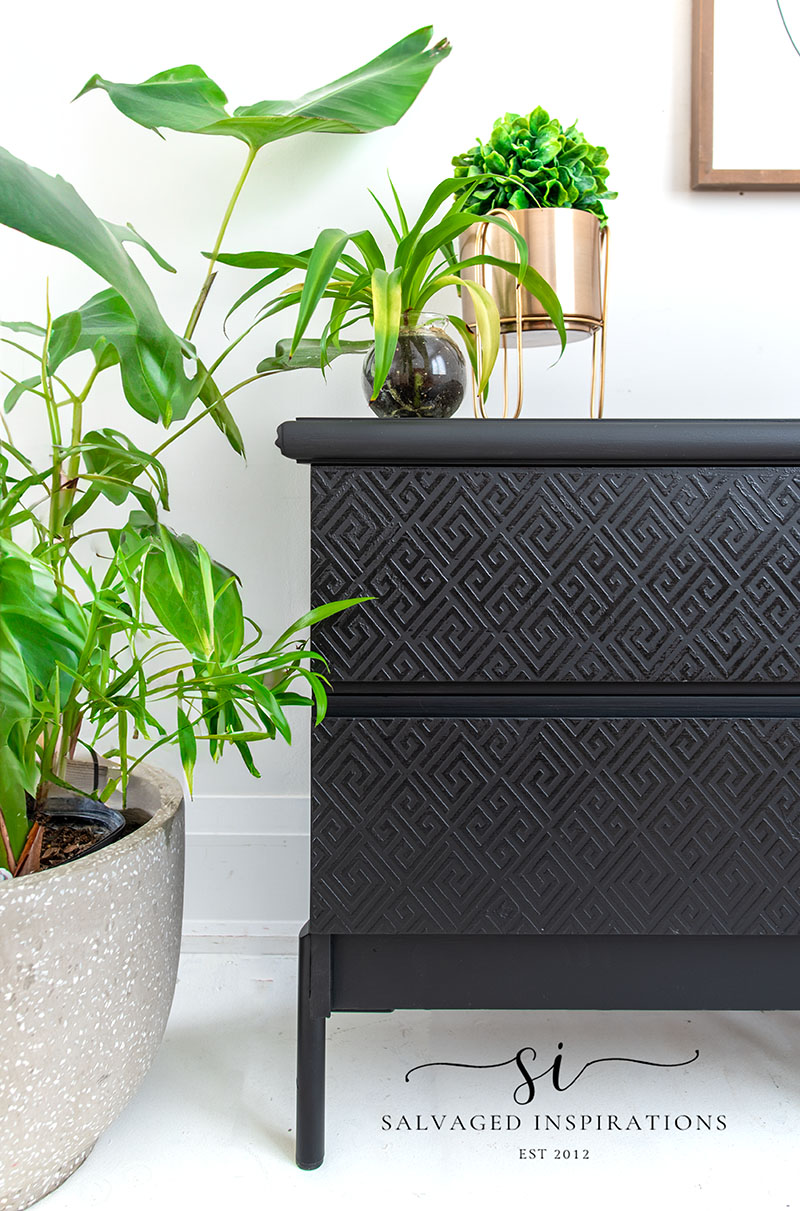
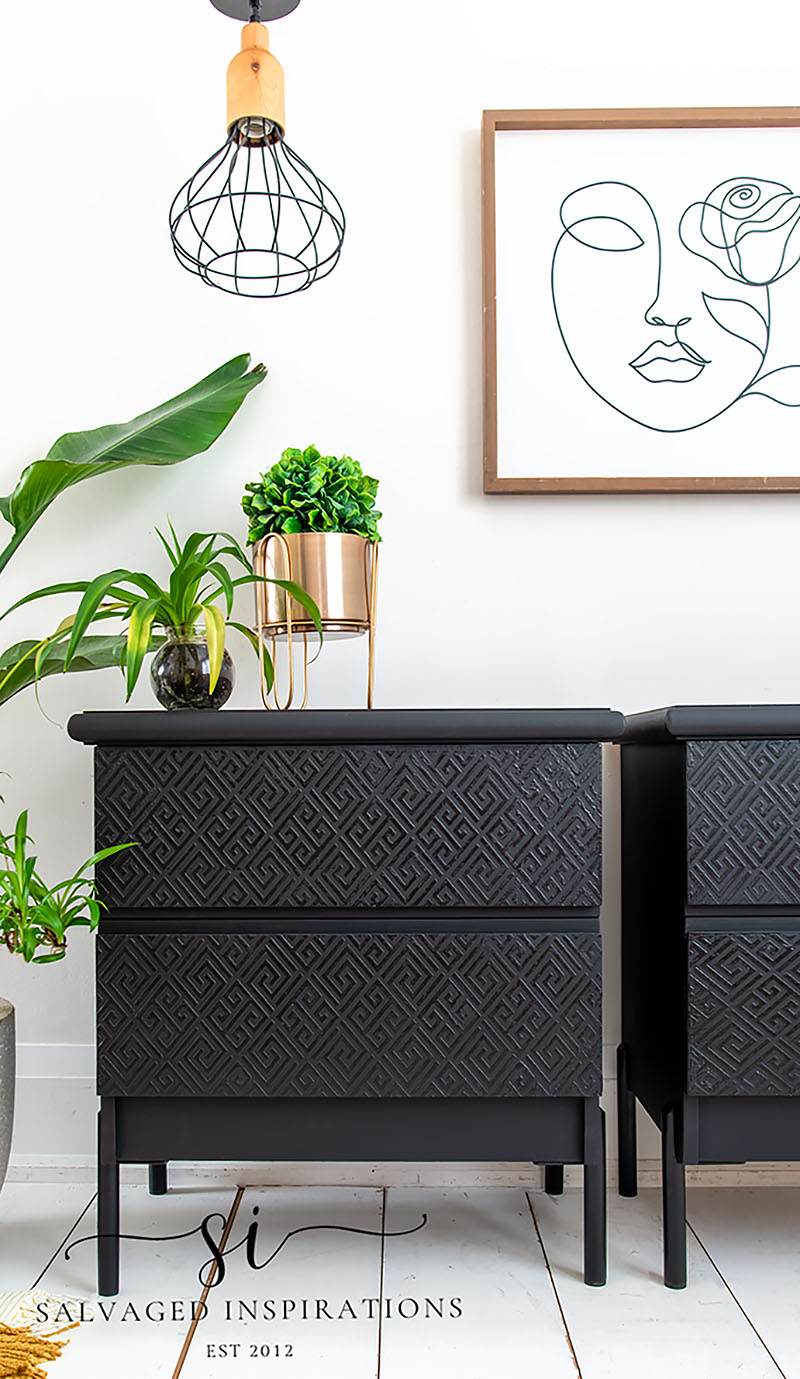
To create an updated look, I picked a black paint color for these nightstands called Anchor. Two coats covered the body of these nightstands beautifully.

Before painting the raised stencil on the drawers, I took these 3 steps:
- Very lightly sanded the stencil design
- Cleaned all the sanding dust with my shop vac
- Painted two coats making sure to pounce the brush (and then smooth out) to get full coverage
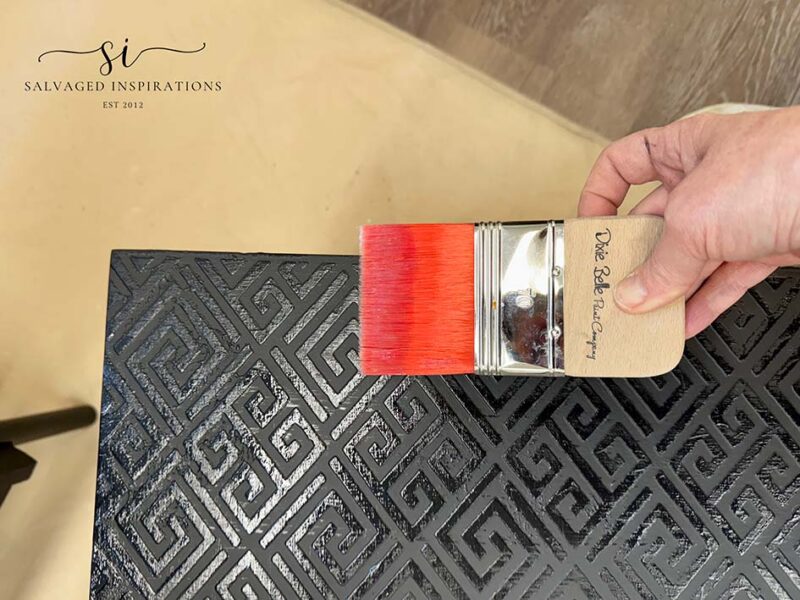
FINISHING TOUCHES
Anchor Silk All In One Mineral Paint has a primer and topcoat built in, so it saves me from having to topcoat the entire piece. But I did add a little extra something to highlight this Greek Key design.
I took a small amount of high gloss topcoat and lightly brushed it on the raised stencil. This way when the light is just right the design is highlighted.
FINISHED STENCIL DESIGN
Here’s the finished look…
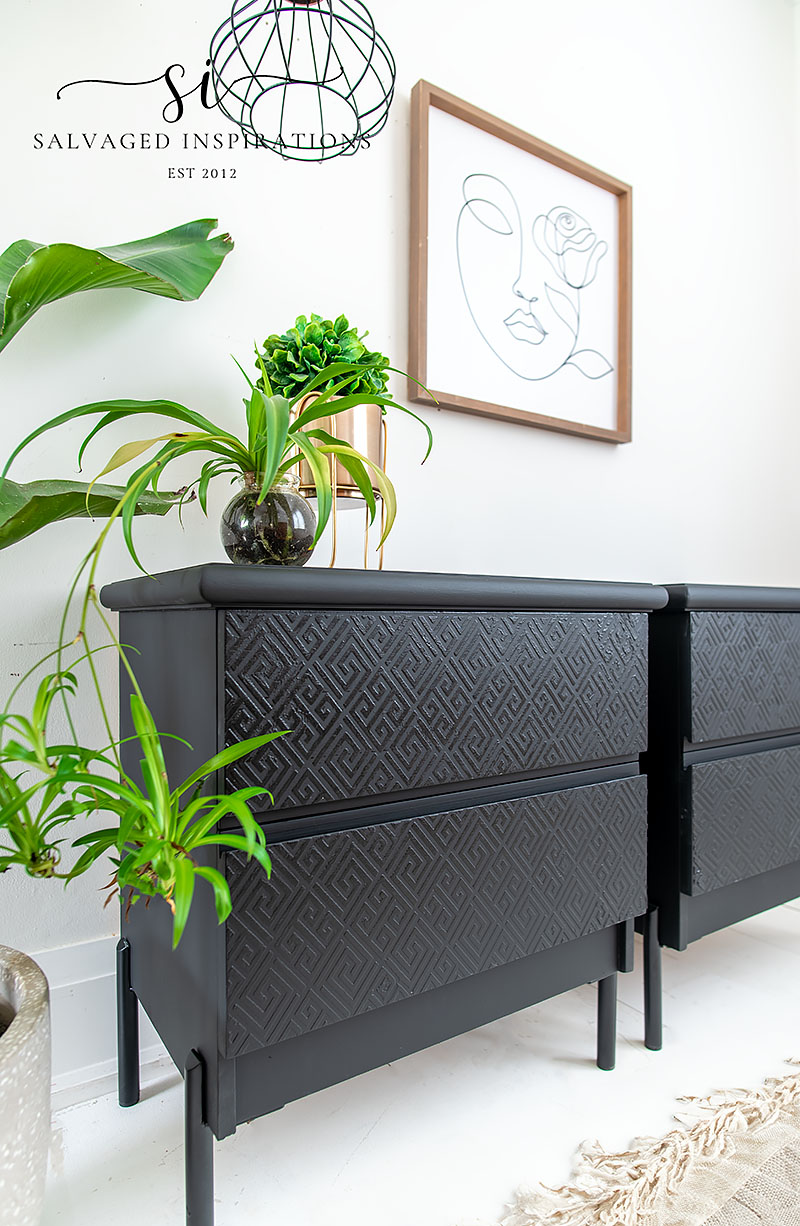
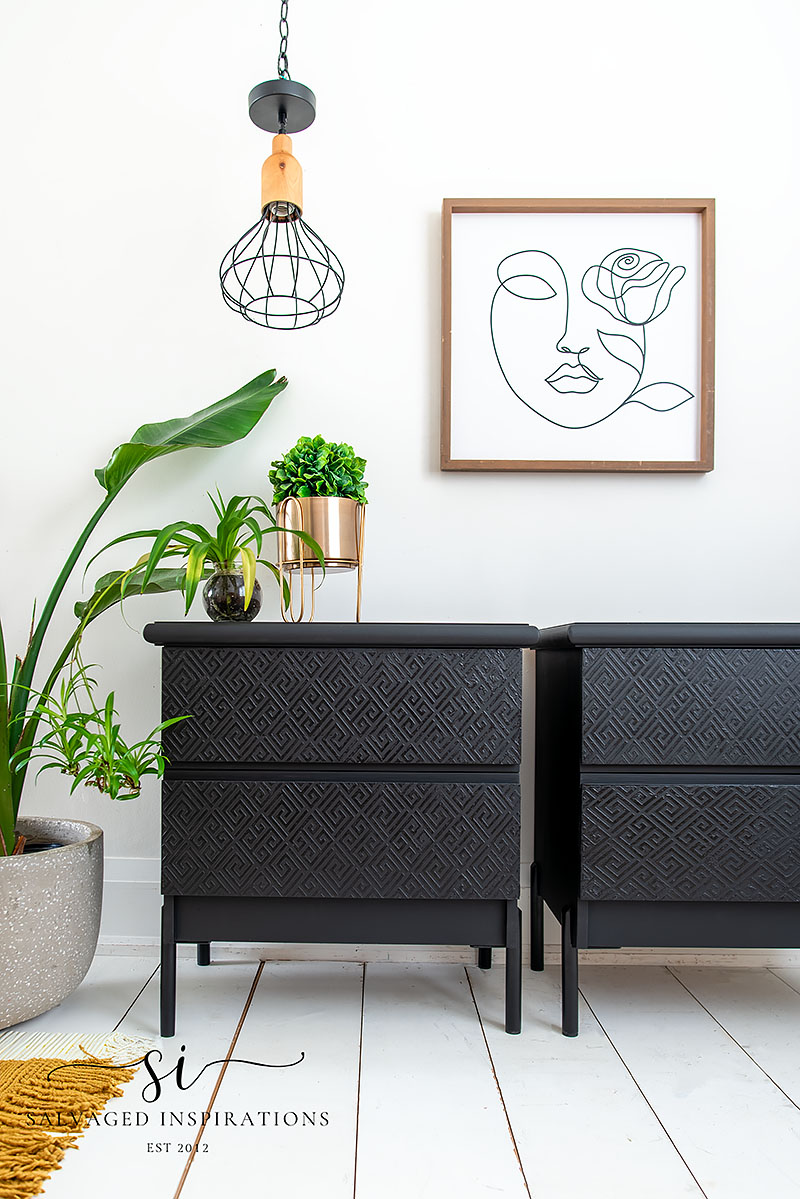
Check out the stencil design on these drawer fronts! I LOVE it!
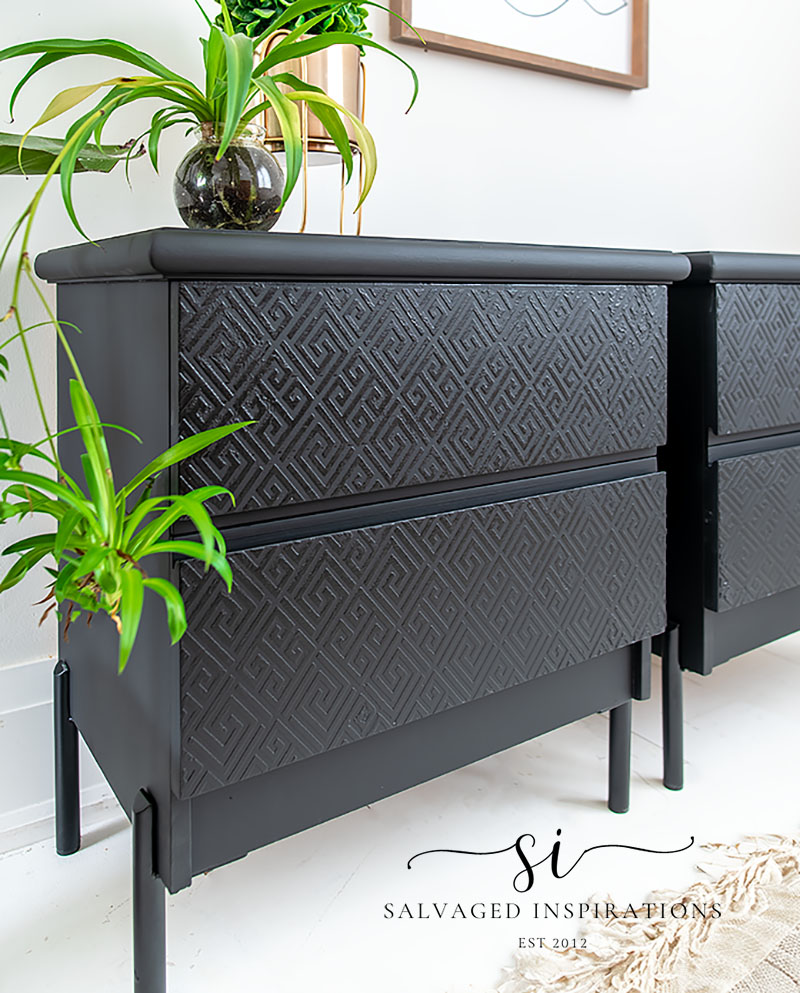
I’m tickled pink at the little extra pop the gloss clear coat adds over the design!
And the legs totally change the entire look of this set, right?! And just as a side note, check out how AI cleaned my floor (this staging floor desperately needs a fresh coat of paint!!) and grew my plants! 🤣 Are any of you playing around with AI?
PIN FOR LATER 🥰
YOUTUBE TUTORIAL
Here’s the full step-by-step video below. Our #siyoutubefamily is already a community of 44.8K so don’t forget to subscribe if you haven’t done so already! So exciting, thank YOU!
And now for some FURNITURE FIXER UPPER FUN!
You’re going to LOVE what my creative FFU ladies do! Below are the BEFORE photos. Visit the links to see the amazing AFTERS and learn how they did it! I’m heading over to take a peek as well!
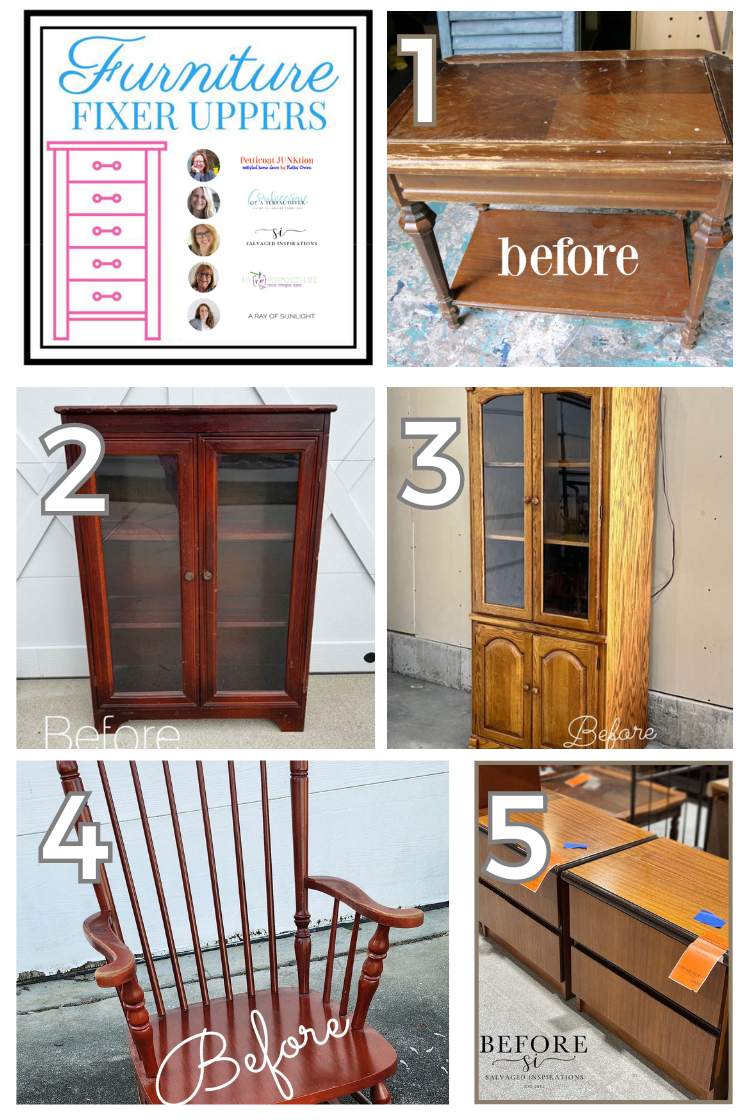
1. PETTICOAT JUNKTION
2. CONFESSIONS OF A SERIAL DIYER
3. A RAY OF SUNLIGHT
4. MY REPURPOSED LIFE
5. SALVAGED INSPIRATIONS (HAPPY YOU’RE HERE!)
Here’s another look at these salvaged nightstands. I hope it inspired you and gave you some ideas for your upcoming furniture painting and stenciling projects.
I’m wishing you a day!
Let me know what you think of this bedside table makeover or feel free to ask any questions you may have. I always love hearing from you, it makes my day! 🙂
Happy painting my friends!
Denise x
RELATED POSTS::
HOW TO MAKE PAINT LOOK LIKE WOOD
DIY BOHO NIGHTSTANDS
22 SALVAGED FURNITURE FLIPPING IDEAS
DECOUPAGE ART ON NIGHTSTANDS
HOW TO CREATE A RAISED STENCIL DESIGN
HOW TO APPLY STENCIL TEXTURE TO FURNITURE
PIN AND SHARE! 💙

PERFECT, DENISE!! I’m recovering from a major surgery, so am just laying around, I figured I’d take time to pop in and see what youve been up to. You NEVER cease to ahhhMAZE me with your talents and creative flair!! Thank you for sharing your gifts with us!! 🥰🥰
Thanks so much! And I’m wishing you a super speedy recovery Susan. Take good care!😘
THANK YOU SOOO MUCH!! 🥰🙏
Wow! Very pretty! I want to try this now. 🙂
Hey Cyndi, I’m so glad you like it and it’s inspired you to give it a try. I hope you do!! It’s a TON of FUN! xo
Denise,
I’ve done a raised stencil before, but you definitely take it to the next level. Awesome job on this furniture update, but honestly, my favorite part? The LEGS! What a difference they make.
pinned!
gail
These legs are great, right?! They really make this set look more ‘grown-up’, lol! Thanks Gail! XOXO
Very cool! Love this idea.
Thanks so much Kim! I’m glad you like it! 🙂
STUNNING!
Thank you Gwen!! I had a lot of fun with this set! Have a great night! xo
Stunning. Bookmarked to come back and study later. I have to try this. I have Dixie Belle Mud!!
Thanks my friend. You’d have a ton of fun and create something spectacular… it’s like icing…lol. 😉
You have such a good eye. These plain cabinets are now stunning pieces. Being black, they can easily fit in anywhere. I love the raised stencil. I’m dying to try this. The gloss on the raised stencil design is perfection !
The added hieight of the legs give them a stately elegance.
Wow – another win for sure !
Thanks so much P! They looked really good without the gloss topcoat across the raised Greek Key design as well but I’m really glad I tried adding the gloss clear coat. I’ve never tried it and it works great! I’m still learning. 😉
WOW- truly one of your best make-overs to date. They look soooo high end! I think each choice was very well chosen. Well done, Denise.
What a huge compliment Michele, thank youuuuu!💙🤗 I love working on these blank canvas pieces, so much fun!
Black Mudd? Is this something you buy or make?
I buy it Cathy. It’s a wood filler OR you can use it to create raised stencils, texture ect. It comes in White, Brown and Black. 🙂
Oh, Denise! These are stunning. 🤩
I’m a fan of the raised stencils with one color too. The texture added to these plain night stands adds just right amount of interest and I love your color choice too. It’s always inspiring to see how you make these pieces your own. xo, Do 😘
Thanks my friend! These were a blank canvas and could have gone so many directions but I’m happy with the classic black with stencil design as well. XOXO
Amazing transformation! Wow!
Thanks so much Lizzy! XOXO
WOW, another fabulous makeover, my friend!! You sure can work magic on these plain pieces!! XOXO
Thank YOU Christy! It was a lot of fun to update this set! XOXO
That greek raised stencil is the perfect look for these tables!! Pinned!
Yay, thanks so much Natalie! And thanks for the PIN! XOXO
Hi Denise – that’s a great look – very cool!
Sheila
Thank you Sheila!💙🤗
You were a genius with these two pieces. I wouldn’t have given them a second look! Now I’m going to look for a set. Great job!
Thanks Jeanne! I think these blank canvas pieces are so much fun because they can take on just about any technique/finish.