THIS $19.99 THRIFT STORE DRESSER GETS AN AIRY FLORAL MAKEOVER USING MAGNOLIA GARDEN FURNITURE TRANSFER | YOUTUBE VIDEO TUTORIAL 
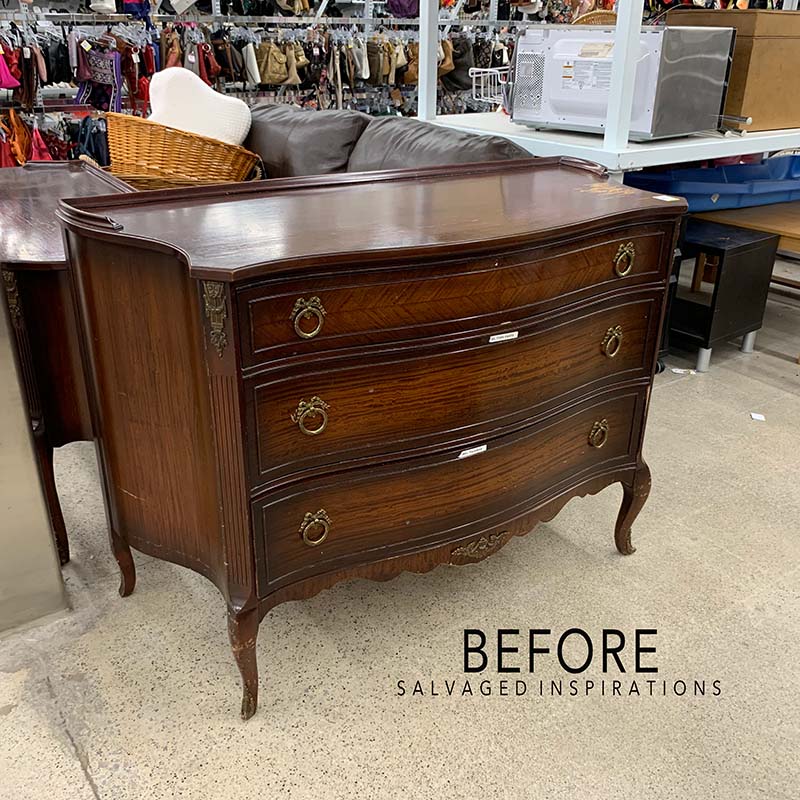
Hi, creative friends welcome back! Have you ever looked at a price tag and had to take a double take? I found this GORGEOUS dresser selling at the Thrift Store for $19.99 and couldn’t believe my luck! I don’t often find used furniture at this price point anymore! Today I’m sharing how I took this vintage dresser and turned it into a floral beauty using a Magnolia Garden Furniture Transfer!
I’m also sharing…
- How To Get Rid of Sticky Residue using what you have in your kitchen
- My Favorite Tool For Sanding Tight Areas
- How to Use Wood Filler AFTER Priming
- How To Burnish Furniture Transfers
- And more!
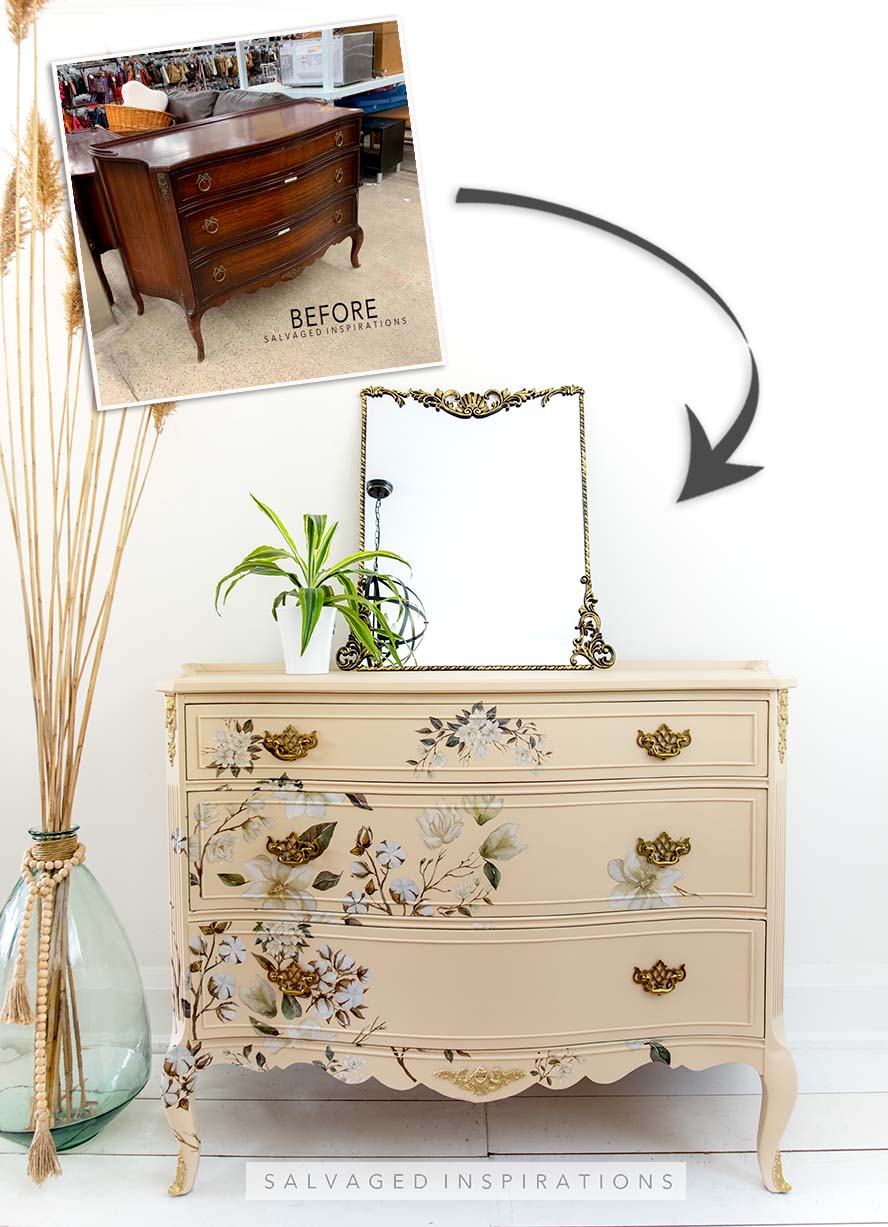
Here’s the thrift dresser I started with. What a gorgeous piece of furniture! It also had a matching desk tucked in behind on the left side. If you missed that makeover, I’ll be sharing it in the Related Posts at the end of this post below.
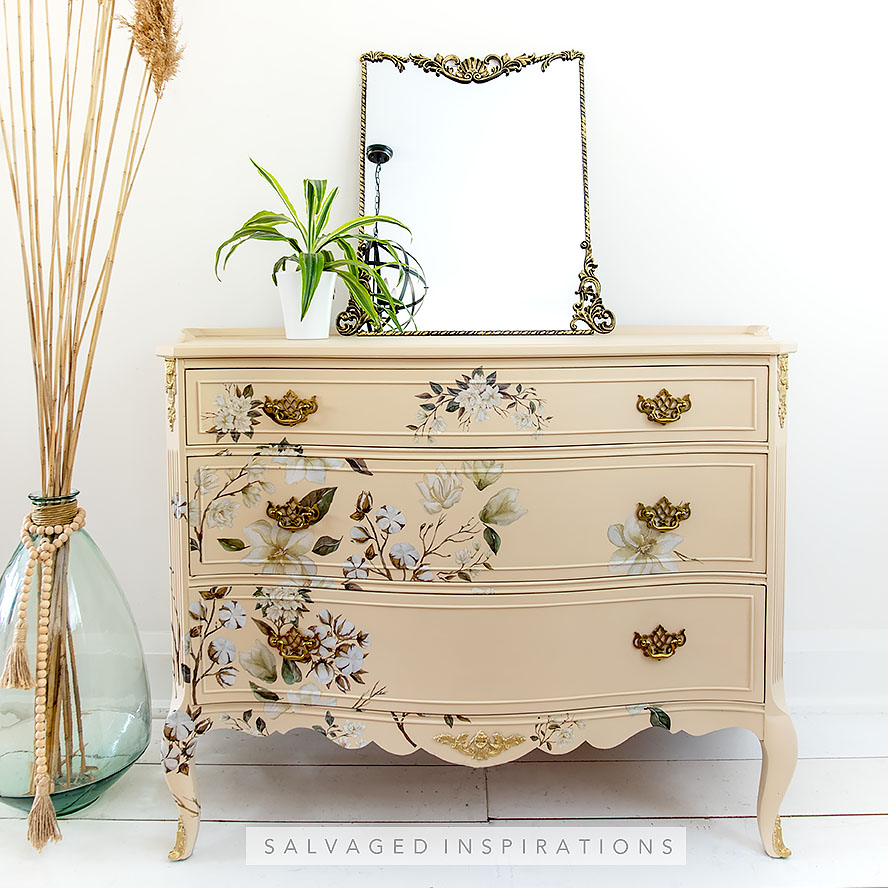
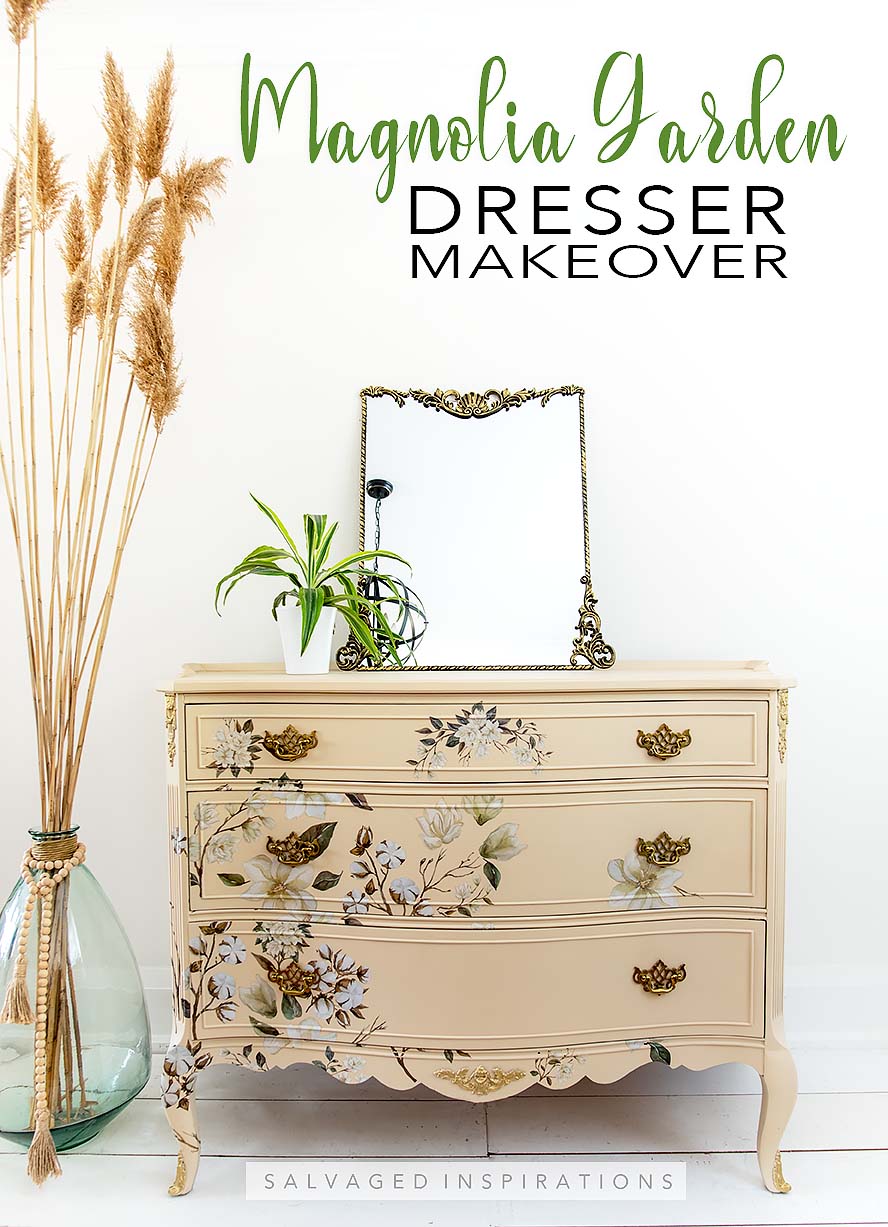
Before I get into the how-to details here’s a sneak peek at the NEW look! What do you think? This floral with its neutral colors pallet is absolutely beautiful.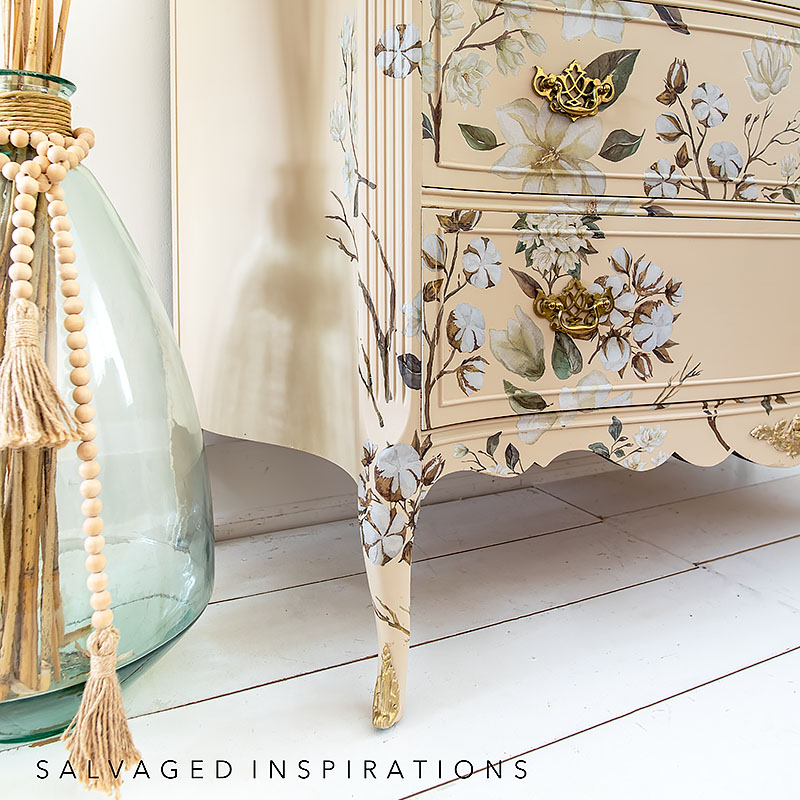
THIS POST IS SPONSORED/CONTAINS AFFILIATE LINKS TO PRODUCTS I USE. YOU CAN SEE MY FULL DISCLOSURE HERE.
SOURCE LIST
$19.99 Thrift Dresser – SALVAGED
White Lightning
Bondo
Wood Filler
BIN Shellac Base Primer
Paint Brush
Sand Castle Silk Paint
Magnolia Garden Transfer
Gold Gilding Wax
Satin Clear Coat
TOOL LIST
Painters Tool (similar)
Orbital Sander
Oscillating Tool (the one I WISH I had)
$19.99 MAGNOLIA GARDEN DRESSER MAKEOVER
Here’s how it all came together…
PREP | CLEAN
I removed the hardware and then cleaned this piece with this TSP substitute.
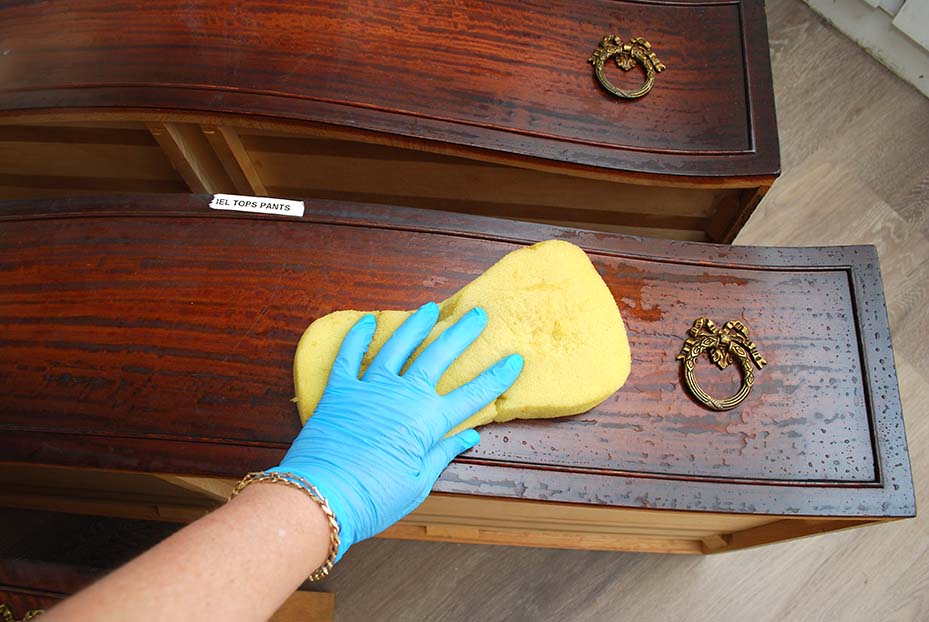
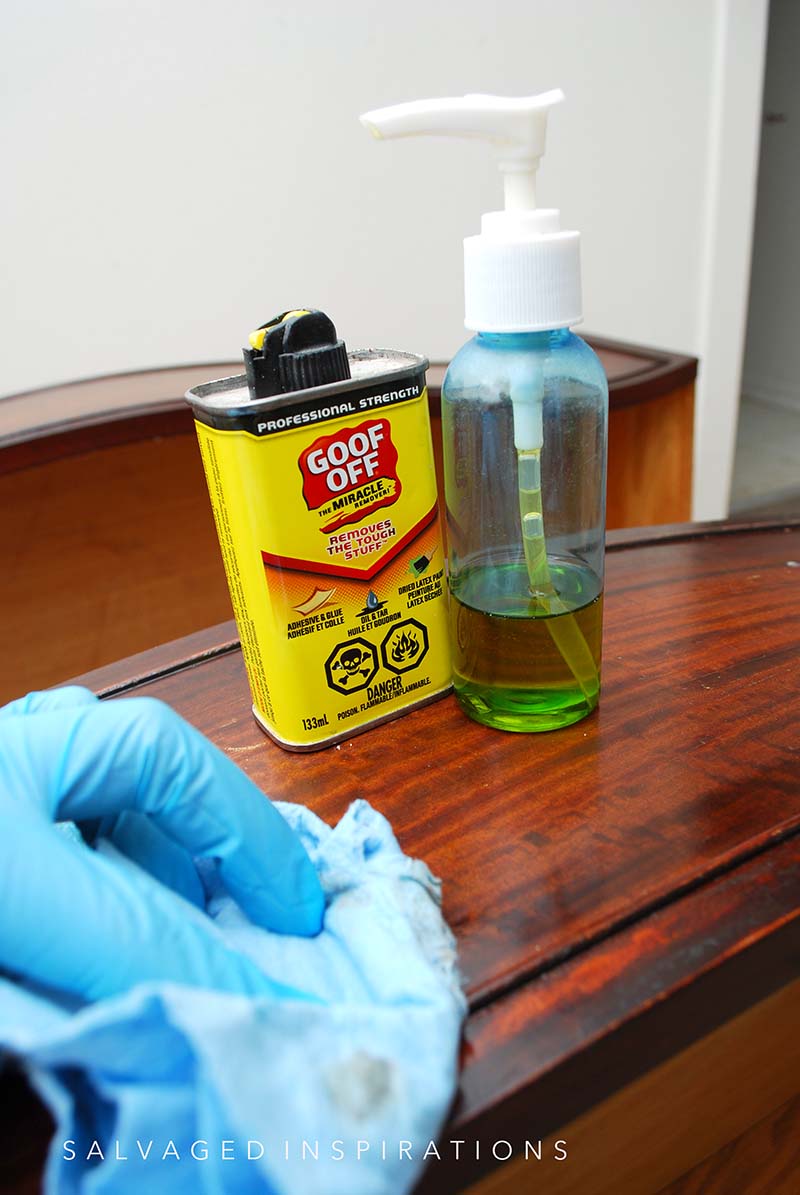
As you can see in the ‘before’ pic and the image above, this dresser had sticker labels on the drawer. TSP or cleaner won’t remove stickers or sticker residue. But you have something in your kitchen that will. OIL! I keep a bottle of this Goof OFF when I want/need to go the chemical route but I also keep a pump bottle of olive oil in my workspace. Any cooking oil or baby oil will remove sticky residue from your furniture! Just add a few pumps of oil onto the sticky residue and wipe with a cloth. It comes off like magic!
FIX VENEER
To fix the veneer, I used this painter’s utility tool. These putty knives are made for painters as they scrape paint off rollers, remove nails, gouge, cut sandpaper, open cans, remove veneer, and more. They are super cheap too. I get mine from the dollar store!

SAND – FILL – PRIME
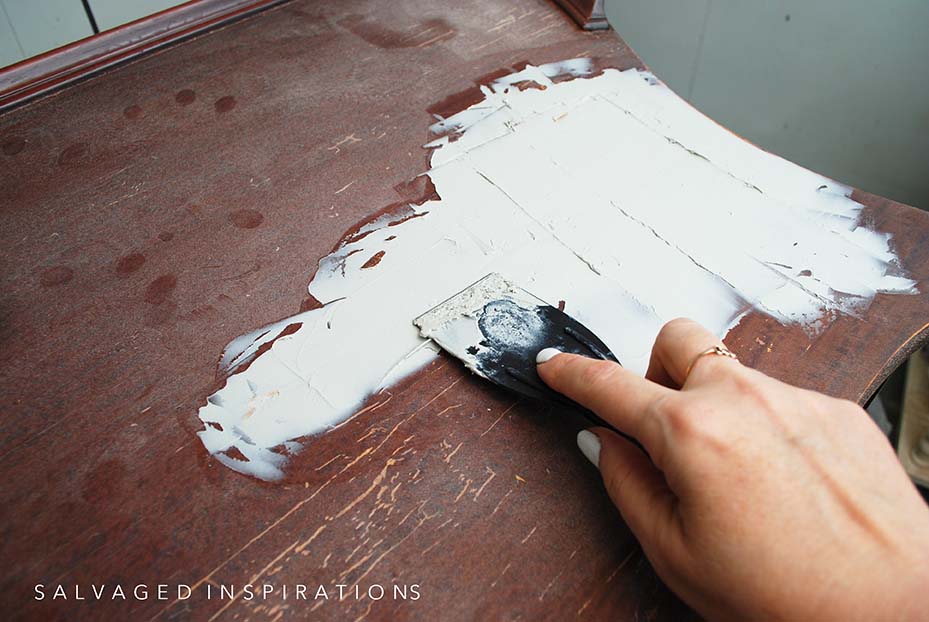
After I had all the loose and bubbled veneer off, I filled and repaired the damaged areas with Bondo. I used this All Purpose Bondo as I don’t notice ANY difference in the Wood Fill Bondo VS the All Purpose — other than the price difference. I have a full tutorial on How To Repair Furniture with Bondo here.
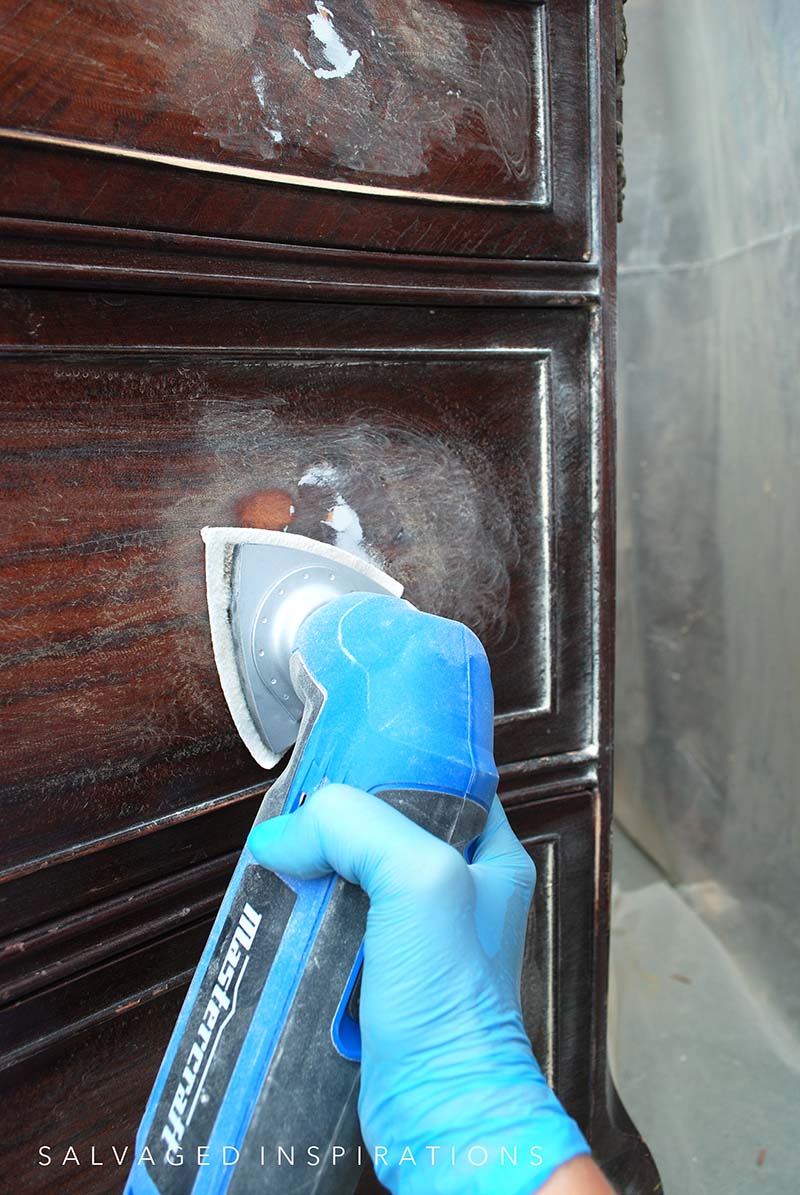
Then using my orbital sander and an 80 grit, I scuff-sanded the entire dresser and smoothed out the Bondo. To sand the smaller corners and areas of the dresser I used my Oscillating Tool. These tools come with a variety of blades to cut metal, plastic wood, AND a sandpaper attachment for tight areas. I have a Mastercraft brand from Canadian Tire but I WISH I had this Bosch one!
After I filled and sanded, I primed with this BIN Shellac-Based Primer. I have a full tutorial on how to use B-I-N Shellac Base Primer here.
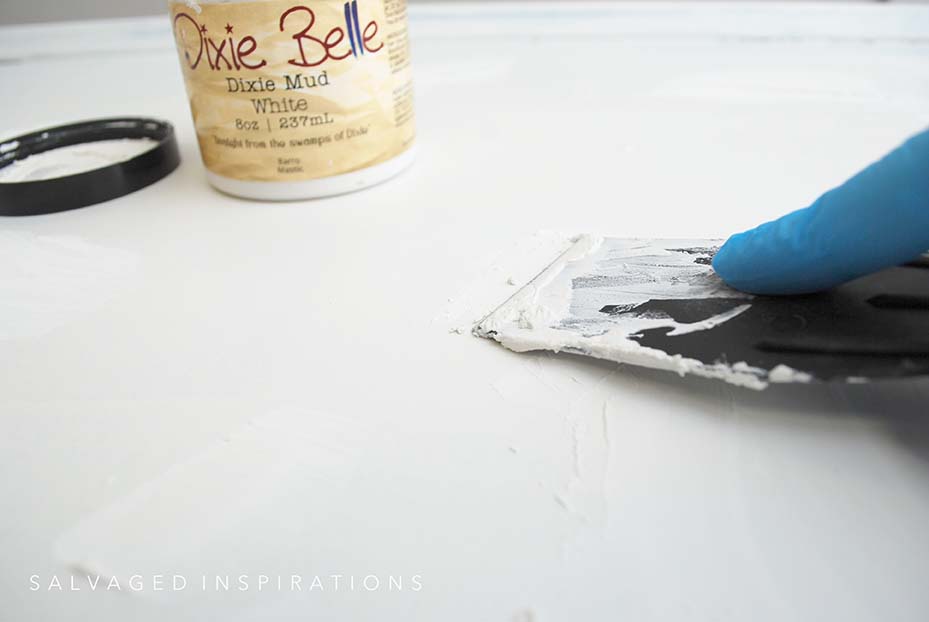
TIP ~ If you’ve filled, sanded, and primed, and then notice you’ve missed a few little areas (which often are clearly visible only AFTER you’ve primed!) did you know you can use wood filler OVER your primer?! I do it all the time and it works great. Once I fill in the places I missed, I sand and reprime.
PAINT
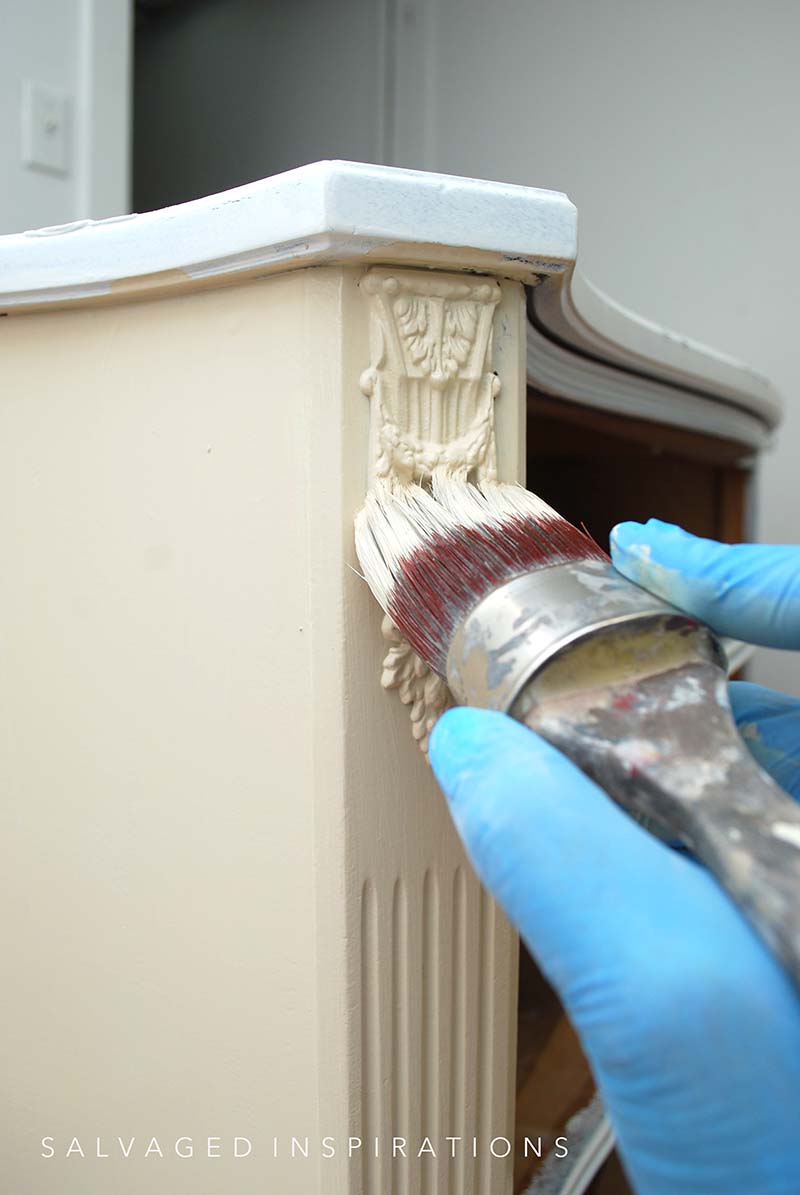
For the paint color, I choose a warm neutral — this Sand Castle Silk All-In-One Mineral Paint. This Silk paint has a primer and topcoat included which is a time saver. I love spraying this paint but it’s self-leveling and brushes on beautifully as well.
RUBBING ON TRANSFER DESIGN
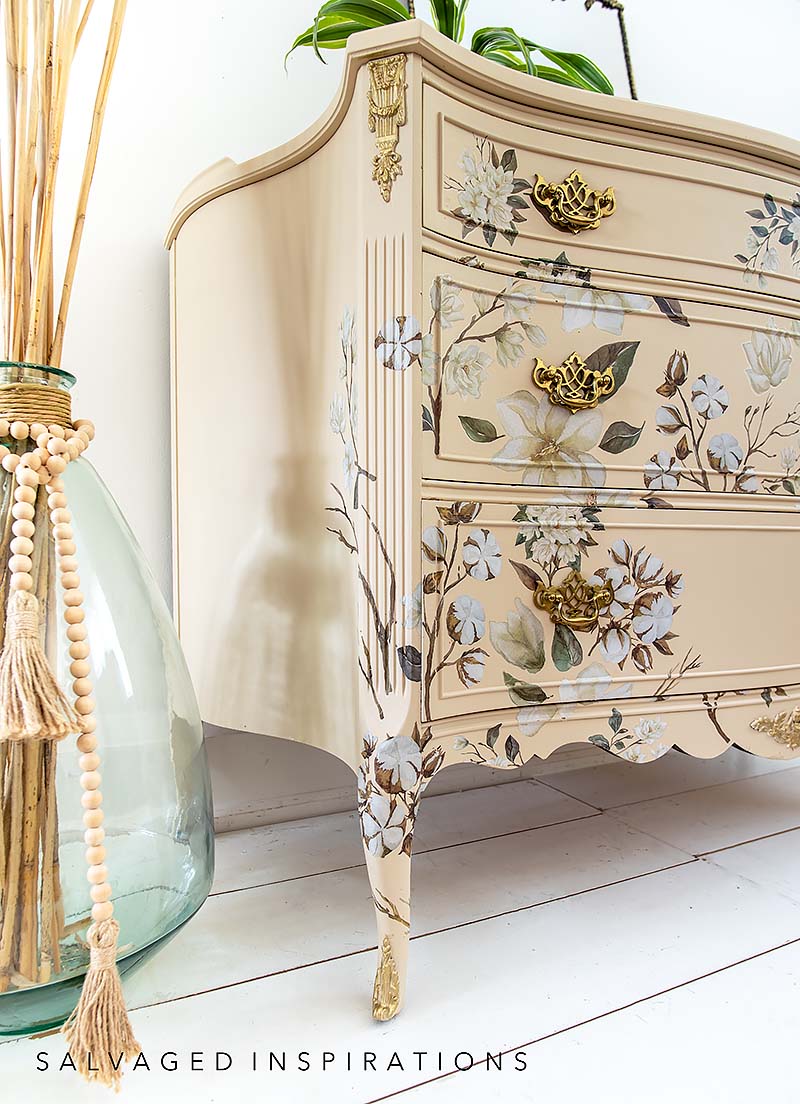
I used this gorgeous Magnolia Garden Furniture Transfer Design to create this airy floral dresser. I like that this transfer comes with a sheet that is already designed plus floral sheets you can mix and match to create your own design. For this piece, I wrapped the florals onto the side and leg. I have a full tutorial on How To Rub On Furniture Transfers here.
![]()
TIP ~ To remove the ‘halo’ around your furniture transfer, burnishing it with a cloth or your finger works really well. To burnish the design, all you have to do is run your finger or soft cloth along all the edges and the halo will disappear. You can see it in action in the Youtube Video tutorial below! 🙂
![]()
NEW HARDWARE & GILDING WAX
I replaced the old hardware with these Chippendale Brass “lacey” drawer pulls. I’m so happy I’ve kept sets like this from my other furniture makeovers because they are selling at premium prices now!
To tie in the gold hardware, I used this gold gilding wax on the details of the dresser.
TOPCOAT | PROTECTION
No top coat is needed for the paint portion of this dresser but I will be spraying with this topcoat/sealer to protect the transfer design.
Here’s the finished look!
Check out these drawers! What do you think of the off-center design and negative space?
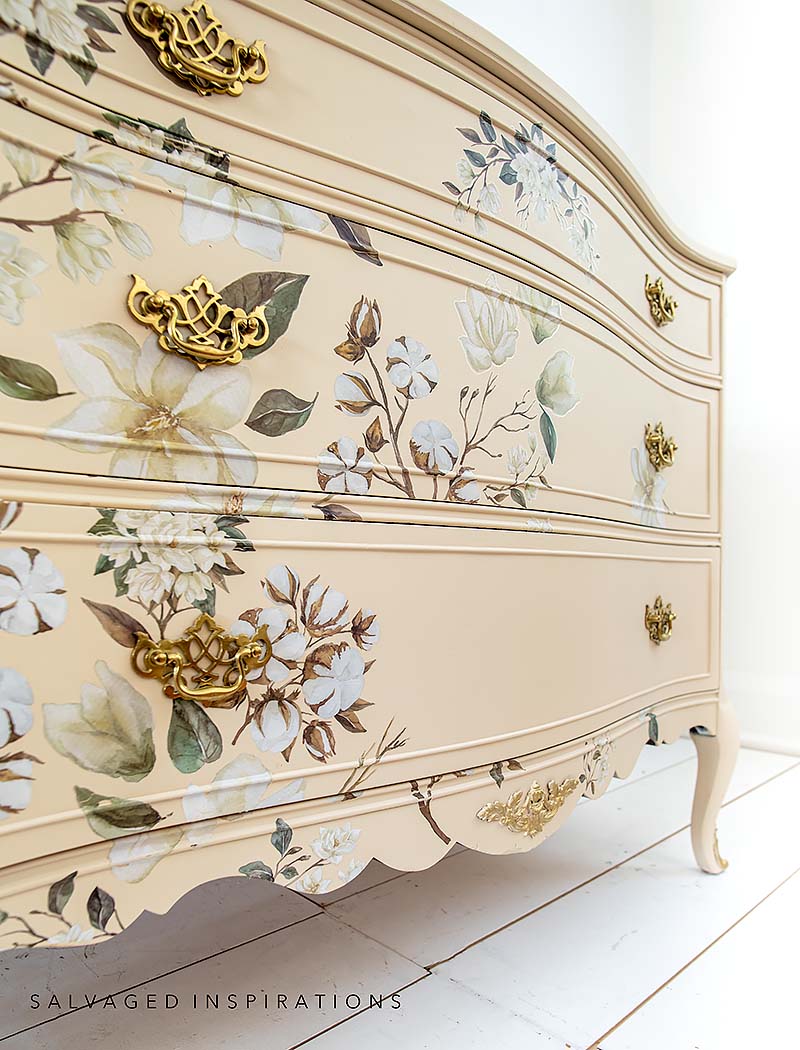
And I love the way this design wraps around this dresser’s gorgeous curves!
YOUTUBE TUTORIAL
Here’s a step-by-step tutorial on Youtube. If you have any problems viewing below, feel free to watch it on my Youtube Channel HERE. Our #siyoutubefamily is about 4 people away from 15K so don’t forget to subscribe if you haven’t done so already! So exciting, thank YOU! 🙂
Here’s another look at this dresser’s before and after. I hope it’s inspired you and given you some new ideas for your projects! And oh, I’ve also included the DIY Mirror Tutorial here. 🙂
Thanks so much for joining me today! I’ll see you here next Tuesday for another furniture makeover!
LET ME KNOW WHAT YOU THINK OF THIS $19.99 DRESSER MAKEOVER. FEEL FREE TO ASK ANY QUESTIONS YOU MAY HAVE… I ALWAYS LOVE HEARING FROM YOU. IT MAKES MY DAY! 🙂
Happy furniture painting friends!
Denise x
RELATED POSTS::
DIY ANTIQUE GOLD MIRROR
ROYAL DAMASK PAINTED DESK
HOW TO LAYER FURNITURE TRANSFERS
FURNITURE TRANSFER | 10 FAQ’S
DIY FLORAL TRANSFER MAKEOVER
PIN AND SHARE!


I can’t believe you got this beautiful piece for 19.99. What a steal. The color you chose is lovely and the transfer fits on it beautifully. You always know what looks best together. Have a great week.
Aw, thank you Kathy! Glad you like it. Wishing you a wonderful week as well! XOXO
I love this airy makeover Denise, and at $19.99, that’s a huge win. I hate to admit but I’ve done this before too. 😜 Along with many many other oppsies. Oh well, it all works out in the end. You always inspire me with your designs. PINNED again. 📌 Thanks for sharing. Have a great week. 🤗 😘
I’m right there with you… I’ve had my fair share of ooopsies and those are the ones I learn the very most from!🙂 Thanks for the PIN and wishing you a fabulous week as well! XOXO
Good evening, Denise! BRAVO on your work of the dresser ( great price -lucky you)! Personally, I have been painting old furniture for several years now. Maybe I missed a comment which was wondering – do you paint the inside of the drawers? Other then that – a Beautiful piece. Actually, have a dresser in my garage that haven’t started yet! Maybe I procrastinating too long on what, how and eye catching design. Thank you for your video and sharing. Patricia
Hi Patricia!🤗 Thank you and yessss, such a great price! If the drawers are in good condition, I don’t paint them or line them. I give them a detailed cleaning and then freshen them up with a salve (if need be) but otherwise I prefer to leave them alone. I’ve learned(over the years) that ppl who come purchase my pieces prefer this. Have fun with your dresser project!😊
Amazing transformation !!
Thanks so much! So glad you like it Patti!
MERCI beaucoup pour le beau travail que tu nous fait découvrir.Je ne me tanné pas de regarder ton oeuvre TELLEMENT magnifique continue de nous épater merci
Oh, merci beaucoup Sylvie! Je suis si heureux que vous l’aimiez et que vous appréciiez les mots gentils!
Hi Denise!! This is beautiful!! So classy and so many great tips. Thank you for all of your tutorials and inspiration.
Hi Cheryl and thank YOUUU! XOXO
Love love, as usual, Denise 🙂 Wrapping the transfer around the leg of the dresser was a great idea ~ but getting into all those little grooves must’ve been enough to make you wild! Yet you never mentioned it being a challenge. Still, do tell: how did you work the transfer into the grooves on the leg?
Thanks so much and easy peasy Suzy!😉 I start with the placement I want and then adhere the transfer design to the largest surface. THEN work my way around the details. If you’re interested in seeing it go on, I’ll be sharing in this Saturday’s Youtube tutorial… which I’ll also embed in this post once it’s published as well. XOXO
Wow, talk about a fabulous score, you never find quality pieces at that price here in Alberta. The dresser makeover is absolutely stunning, Denise, and you do such a beautiful job with the placement of transfers.
Thrift prices around here have skyrocketed as well so this was a WONDERFUL find! And thanks for the kindness on the transfer placement. I spent so much time placing it ‘perfectly’ and then I put the drawers in the wrong order…lol. Still look pretty good tho! 😂
So ironic Denise! I did that exact same thing with a little sewing box and the same transfer. I ended up photographing it not put together with screws so it looked how I envisioned it for the post. But in reality I pretty much messed it up lol.
haha, it happens, right?!😉 Love this transfer for big and small projects. It’s so versatile!
How beautiful, I love a ‘good’ make-over and you never fail to impress. This piece looks stunning.x
Thank you Janette!💜
Oh that is absolutely stunning! Def. one of your very best yet. WOW. Well done!!!!
Awww, thanks so much, Michele! So happy you love it! XOXO
Beautiful!
Thank you Lizzy! Have a fabulous week!🤗
Oh, Denise,
You have done it again. This is exquisite!!!!!! The vision, the color, the pattern, everything is perfect!
Aw, thanks Marian! So glad you like it! XOXO
I would never have noticed that the drawers were switched! It looks perfect even with that imperfection! Fairly new to your postings, and you are very inspiring :-). Thanks for sharing your diy wisdom!
That’s sweet of you to say, Martha, thank you! 💜 In 10 years of painting furniture, I believe this is the first time I’ve put the drawers in the wrong way! 😂
Absolutely gorgeous!!!! I am always amazed-and envious- of what you do. This beautiful piece makes me want to run to the garage and do SOMETHING. IF i ever get caught up on some other things am definitely going to try this.
Hope my item comes out even half as beautiful!!!
Thank you Kathaleen! If it makes you want to run to the garage and DIY something, that’s HUGE! Thanks again!💕
WOW!
I love me a WOW… thanks Ruth!🤗
Just love this piece. I used to the magnolia transfer on a cedar chest I refinished — it belonged to my parents. I’m still an amateur but I think it turned out pretty good. Not Quite as beautiful as yours, but it was a lot of fun re-creating it into something for myself.
This transfer (and furniture transfers in general) are a lot of fun, aren’t they?! Your cedar chest sounds wonderful!!!
This is so pretty!
Thank you Constance!🤗
Hi ! The paint color and transfer color mate so well. Very soft.
I always love your process details. Sooo informative / helpful.
I was surprised a bit…. that you changed the hardware. The original has pretty floral ish details.
I Do however really like the new hardware you chose. Decisions decisions !!!
I also have a different brand oscillating multi tool. I have a hard time with the sand paper slipping around. 🙁
Tools are so expensive – hard to justify replacing it.
Thanks for sharing – I love it !
Thanks, P! I was thinking of keeping the original hardware but I would have had to refinish it gold… it didn’t look good in its original condition. And if you don’t mind sharing, what brand of oscillating tool is yours? I’m the same. Hard to justify replacing mine as well when it works just fine.
Absolutely gorgeous. I especially like the use of the Sand Castle color. I do like the orginal hardware and if you want to part with them I would be glad to take them off your hands.
Thank you Fran!🤗 As for the original hardware, I love it too and will be using it for a future makeover. I just didn’t have the time to refinish it for this one. XOXO
It looks to me like the middle drawer should be on the bottom. Below the bottom drawer there is a stem, what is suppose to be attached to it?
Hi Brenda! 🤗 yes. You are 100% correct. I spent a lot of time coming up with the placement of this floral design and then when I brought the dresser upstairs to style and photoshoot, I put the drawers in wrong. I must have been more tired than I thought. I can’t believe I didn’t notice until you all started pointing this out! Omygoodness!
This is absolutely stunning, Denise! That transfer pairs so beautifully with that color of paint! And 19.99?? We definitely don’t see those prices much these days either! Just lovely! XOXO
Thanks my friend! And I know, right? I wish I could find more deals like this!🤗
I love this one, Denise! But I say that about all your makeovers. I like the light and airy feel this one has. The transfer is perfect. Thanks for sharing another gem. 😘 xo pinned
Thanks so much and thanks for PINNING! Have a super week Do! XOXO
This is gorgeous! I suspect you have swapped the middle and bottom drawers in this photo. ? Maybe?
Thank you and OMGOSH Leslie… you’re brilliant! I DIDN’T EVEN NOTICE I DID THAT🤦♀️ but you are so right! Uggggh.
I thought it looked funny too but couldn’t figure it out.
Hilarious — I put so much thought into the design, and then I don’t even put it together properly.🤦♀️
It’s still gorgeous! 🙂
I still look forward to your weekly emails and long for the time to emulate your beautiful designs.
Hi Leslie, thank you! I always appreciate you dropping by! hugs
This is so beautiful and feminine. And thanks for sharing the tips, I didn’t know about olive oil!
Aw, thank you Nicki and ya, oil works amazing! 🙂
I love this, but shouldn’t the second and third drawers change places?
YESSSS, thank you Gail! I can’t believe I didn’t notice this as I was doing my photoshoot! I must have been more tired than I thought because I usually don’t miss these details!🤣
Absolutely beautiful!! You have such a talent for painting and I love everything you do!!
Thanks so much Janice!
GORGEOUS!!
Thank you Jennifer!
I may be going out on a limb here, but I do believe this is my most favorite makeover of yours of all time! This is absolutely beautiful – the pale blue in the decal with the warm cream paint – swoon. It’s just gorgeous, Denise! And you should buy yourself the Bosch! I have a low-end tool like this from a discount store and it just makes me sad. Life is too short for that. :o) Meanwhile, I’m intent on recreating this look for myself!
Aw, thanks Marcia, sooo happy you like it!!! and yes, I agree life is too short. But then my thrifty side kicks in and I think – wellll, this Mastercraft works so it’s wasteful to buy another one. Sometimes being thrifty sucks. 🤣😂🤣
Beautiful transformation! The paint you used has a slightly different feel. Kind of an ‘egg-y white’. And the off center magnolia design is lovely. I always start to hunt my house for projects after I see your posts! Many thanks.
Glad the #siblog inspired Laura… that’s such a huge compliment. Happy hunting and diy’ing! XOXO
Hi Denise. Holy cow….$19.99!!?? That’s a steal. This dresser was pretty to begin with but now it’s absolutely gorgeous. I’m in love with the color, the transfers you used and the gold accents. Beautiful transformation.
I know right?! I wish I found deals like this all the time but unfortunately, thrift store prices have REALLY increased in the Toronto area. So happy you love the color and makeover. Have a great week my friend. XOXO
OMG! GORGEOUS
Thanks Rebeccca! XOXO