Before I get into the pros and cons of painting salvaged furniture, I want to thank all of you who took the time to comment on my Heart to Heart.
You all left beautiful heart warming comments and your words will surely comfort other readers dealing doubt and insecurities. As Nancy so eloquently said, it’s so nice we can all “share our wisdom and support and learn from each other”!
So, I’m excited to share my very first salvaged restyle of the year!
M-M-M sent me these text pics asking if I was interested in these two pieces.
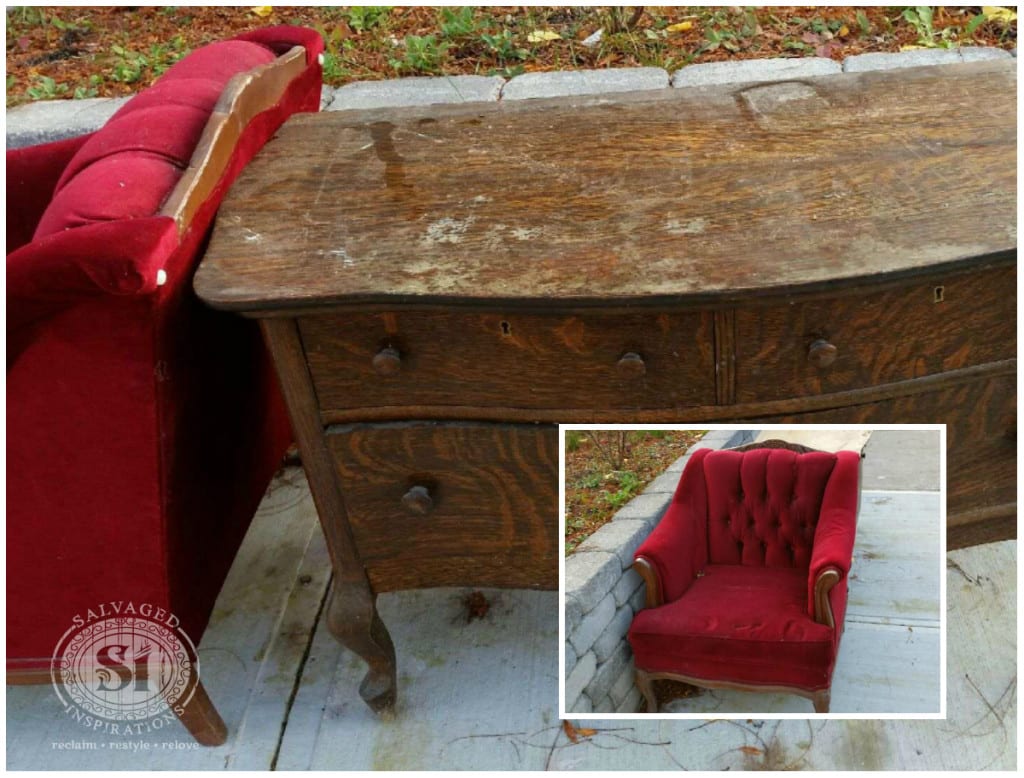
It was a definite YES for the vintage low boy, but for whatever reason, I couldn’t make up my mind about the chair.
Yes – No – Yes – No… well maybe?
I finally decided on a firm NO but now I wish I had it! This chair would have made a really good piece to experiment with painting on fabric and then I could have shared the results with you.
On the positive side, it helped make a creative decision super easy. I knew this vintage dresser HAD to be RED in honor of the would-have-been-striking-chair that was left behind!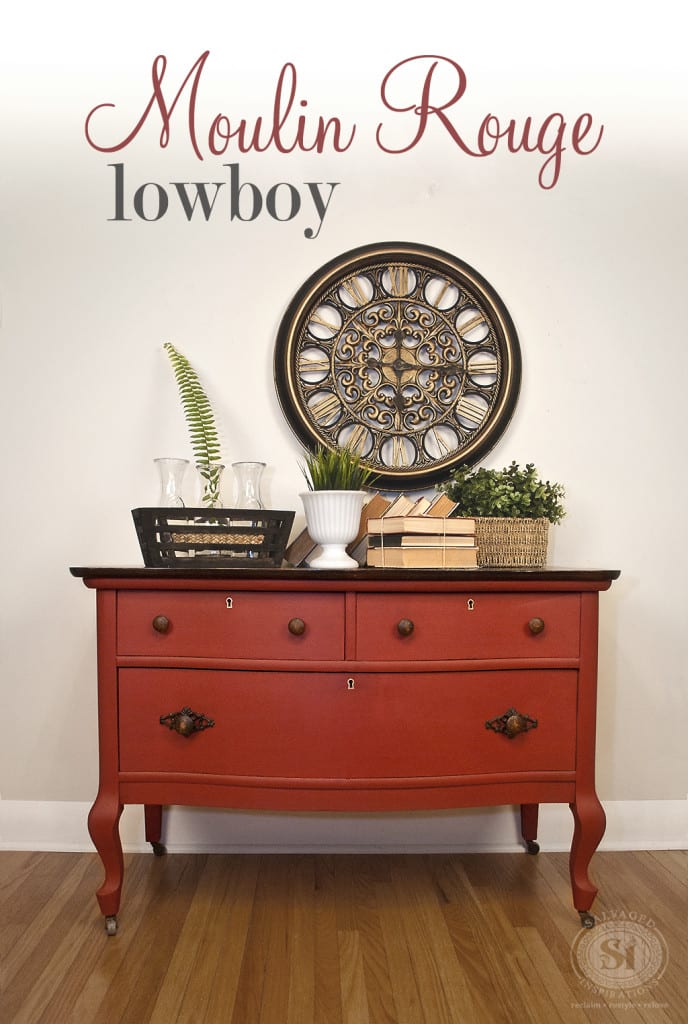
Some of you may be wondering why I still get “full of happy” when I rescue a piece of furniture. Salvaging is how I started my business. Salvaged Inspirations was built on my desire to restyle and repurpose furniture while rescuing and reclaiming. I literally started this furniture painting business learning all my painting techniques on “junk”. All the free pieces were curb-shopped or ‘gifted’ to me by generous neighbors and friends! I learned a ton while keeping business and inventory costs to a minimum.
Pros of Painting Salvaged Furniture
- Guilt Free Practice – if you screw up it’s no big deal!
- Zero Investment – you buy paint and supplies but the main inventory is free!
- DIY Satisfaction – you restyled this trash bound piece!
- Conversation Piece – tell your amazing trash to treasure rescue story!
- Experiment with Different Techniques – if it doesn’t turn out, only product cost is lost!
- Environmentally Friendly – You saved and rescued a piece that would have otherwise ended up in a landfill!
- Greater Profit – when starting out, you can offer your painted furniture at a discounted price while still making a profit!
Cons of Painting Salvaged Furniture
- Dirty – the furniture may need time to air out and/or requires a good cleaning.
- Repair – the furniture may require repair(s).
- Curb Shopping – depending on your personality type, this may be a pro or con. I have a blast. But you may feel self-conscious picking up someone’s throwaways. That’s okay. If you don’t mind hunting online, Craigslist, Kijiji and other listing sites will often have free furniture if you’re willing to go pick it up.
If you’re just starting a business or are on a limited budget decorating your home, the pros of painting salvaged furniture far outweigh the cons. Although I purchase a lot of my furniture from Thrift Stores, ReStores, Kijiji and Craigslist now, I still can’t help getting excited when I come across a salvaged piece like this!
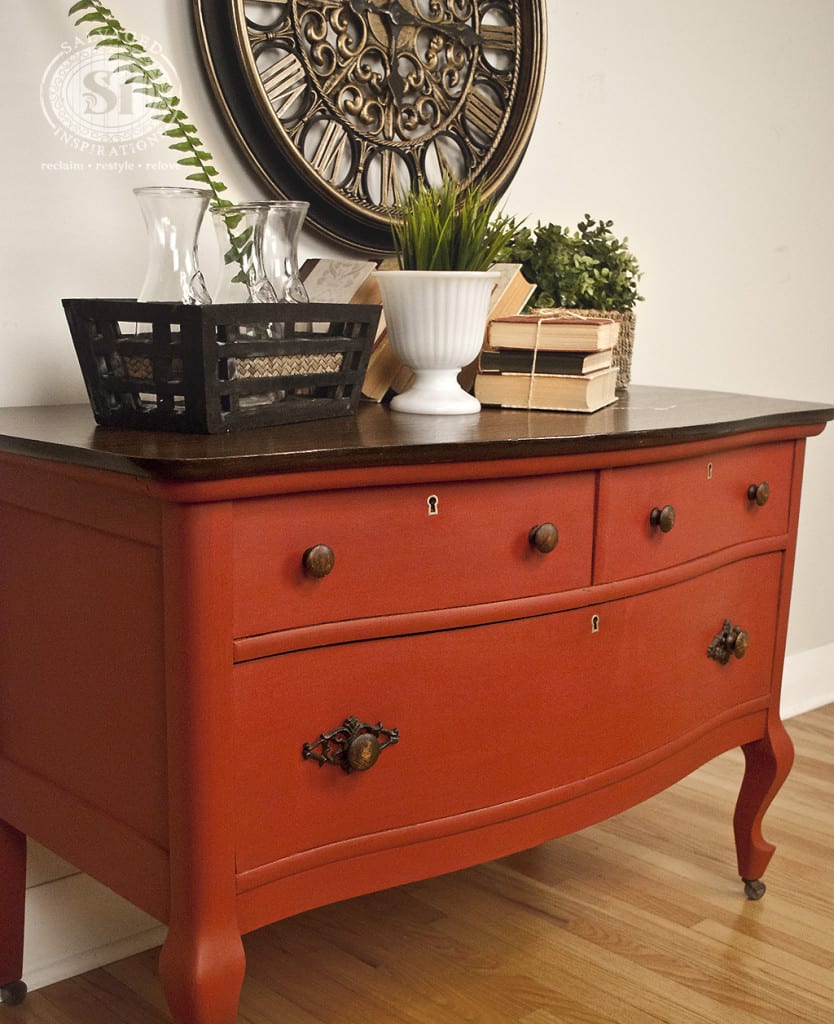
How I achieved this look ~
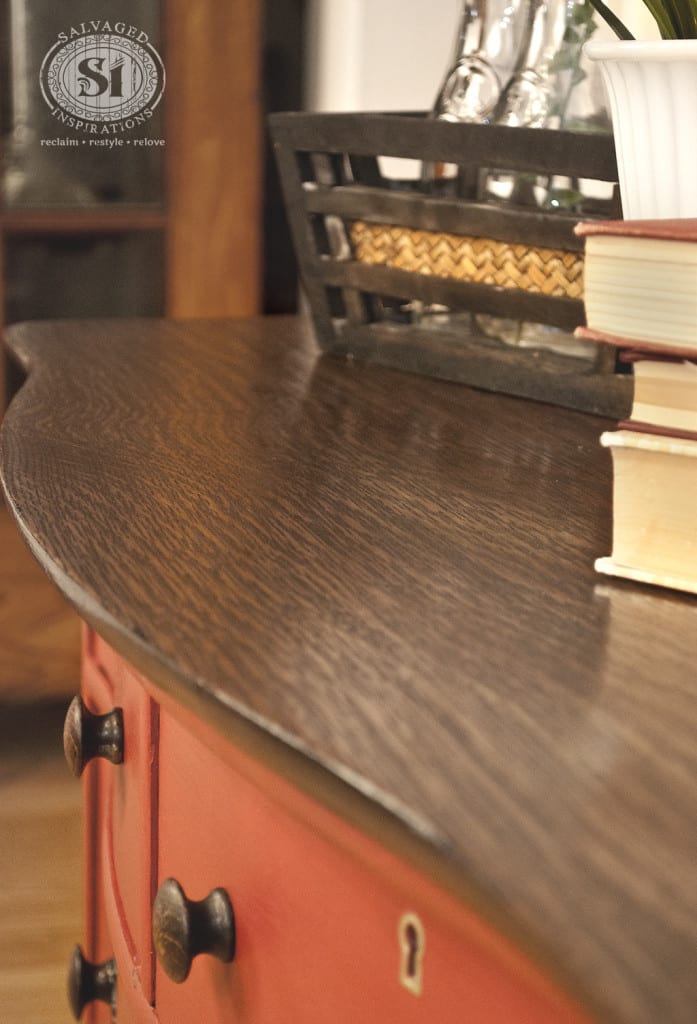
This adorable vintage lowboy has been painted with Bluestone House Chalk Style Paint in Moulin Rouge and waxed to a beautiful luster with 100% All Natural Bee’s Wax. It was my first time waxing an entire piece with Bee’s Wax. It has a denser consistency and and provides a wonderful softly-buffed look!
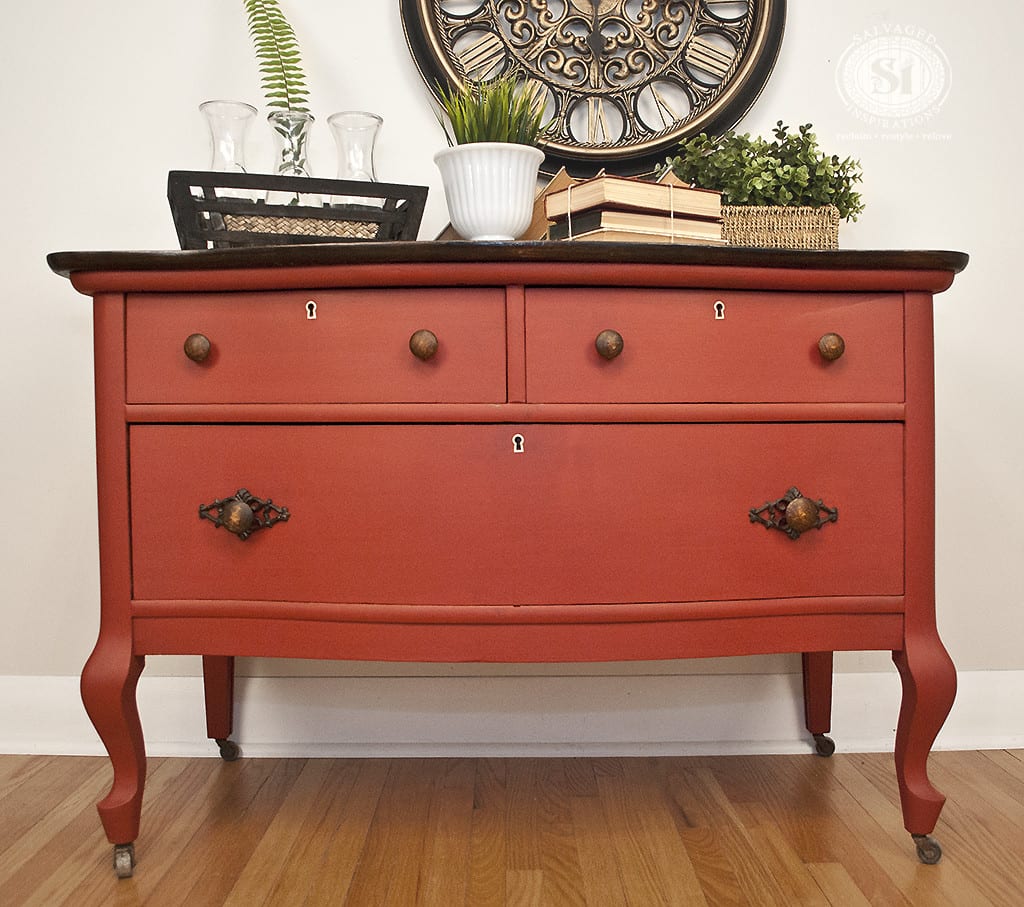
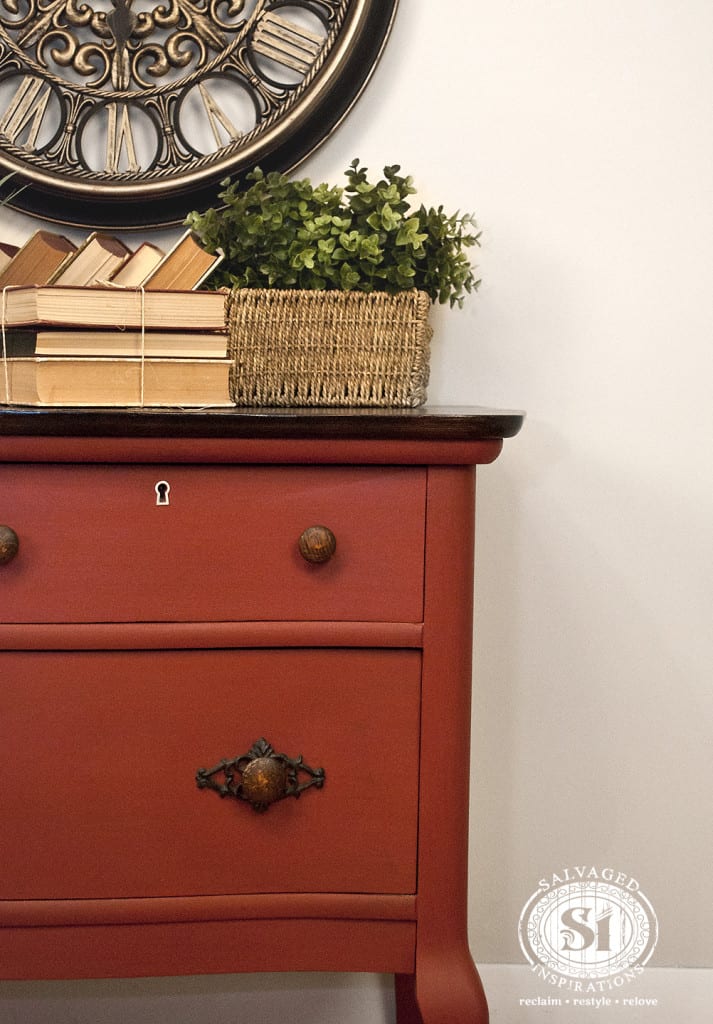
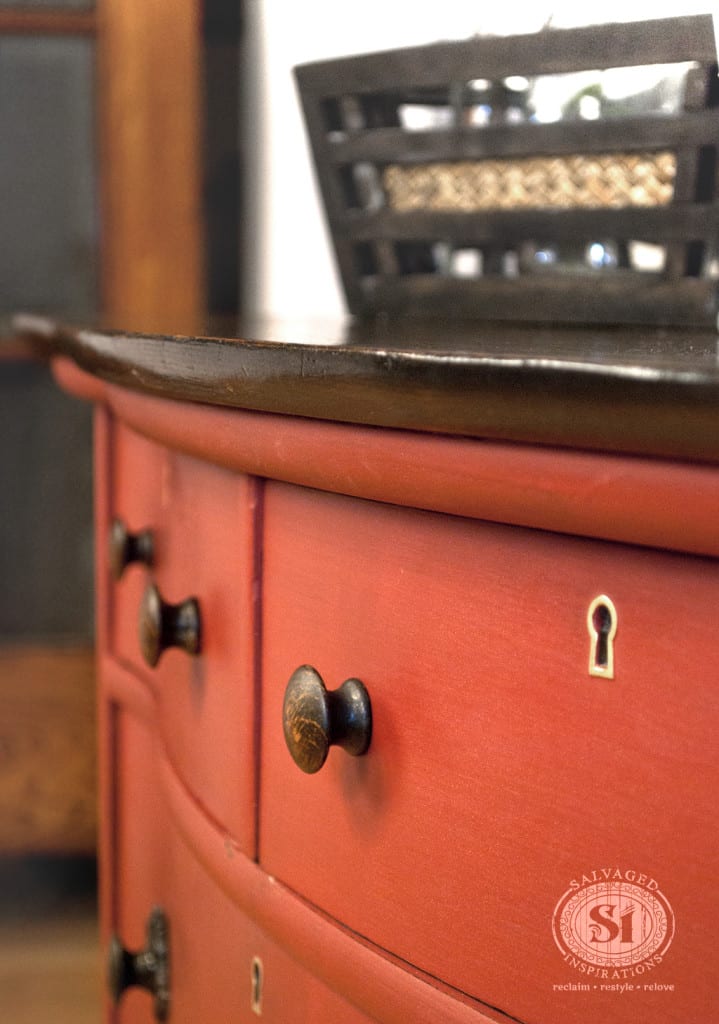
For hardware, I used the original wood knobs to tie in the stained top. To give the wood knobs more character, they were cleaned, sanded, distressed, and then polished with the Bee’s Wax. Metal back plates were added to give the bottom drawer a little french flair! I love the contrast and interest the wood knobs and metal back plates add! What do you think?
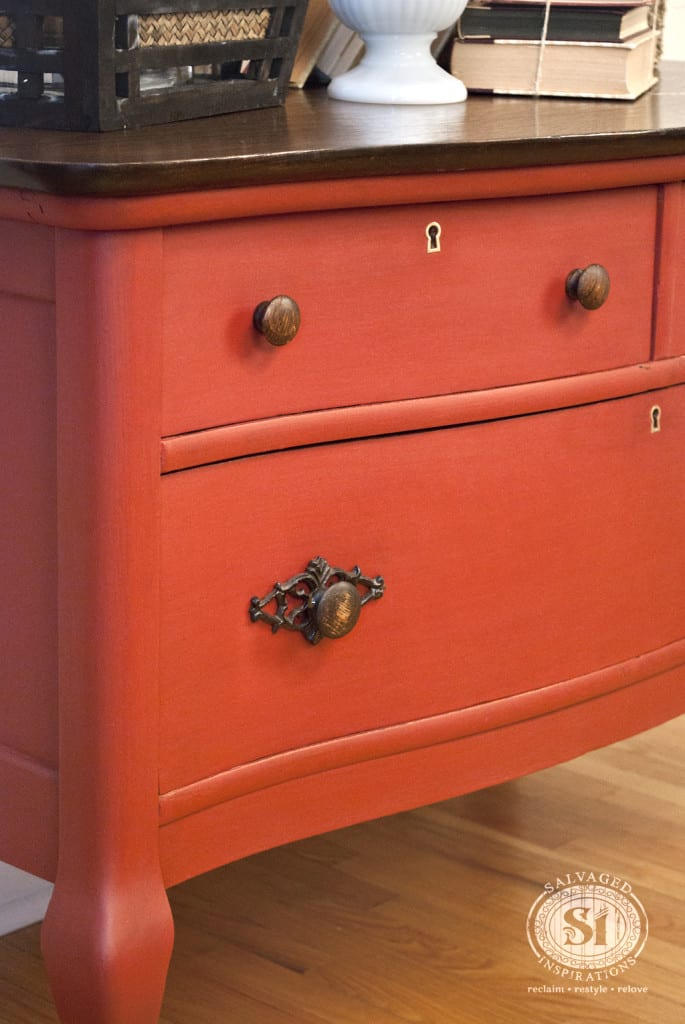
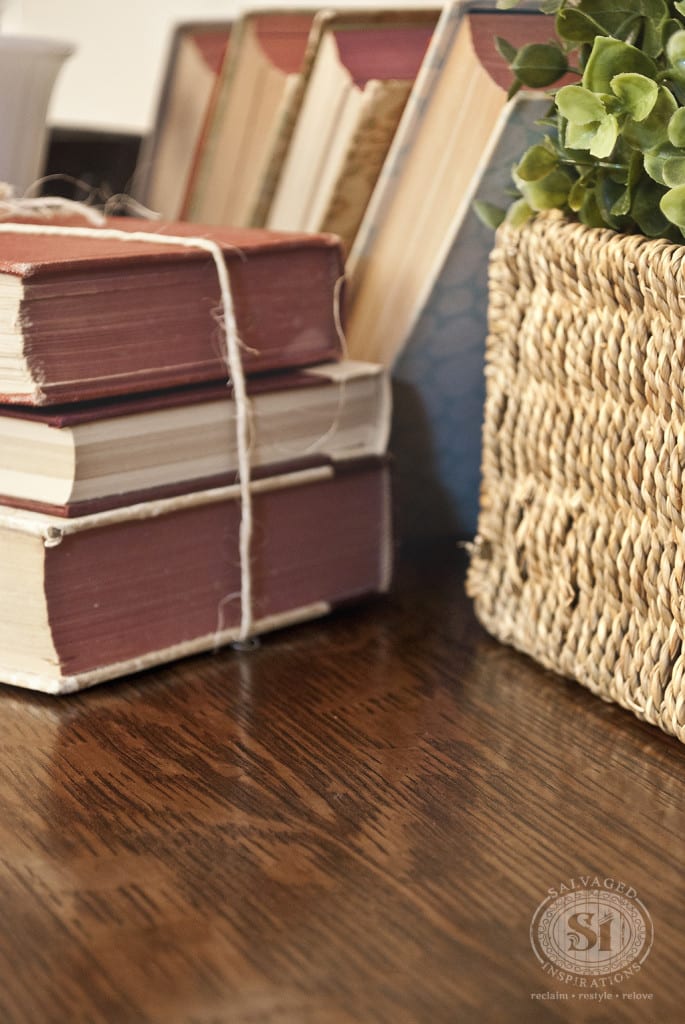
I swooned over the grain of this wood! I have an antique dresser in my bedroom with the same grain and I believe it’s fumed oak or tiger oak… if anyone knows feel free to chime in. To keep some of this gorgeous wood showing, the top was sanded and then prepped with Minwax Pre-Stain Wood Conditioner![]() . Sometimes I forgo this step because many of my pieces are a little more rustic and distressed, but if you want to keep your stain perfectly even and consistent, a wood conditioner prior to staining is key.
. Sometimes I forgo this step because many of my pieces are a little more rustic and distressed, but if you want to keep your stain perfectly even and consistent, a wood conditioner prior to staining is key.
The stain color is Varathane’s Kona Gel Stain and it’s protected with Varathane’s Non-Yellowing Satin Poly.
Do you have any pros or cons to add? Feel free to chime in below!
Denise
_____________________________

I’ve only just found your blog, and I’m instantly completely obsessed with it! I’ve painted cabinetry many times through my business and have refinished a few pieces of my own furniture in the past, but never anything like what you’ve created. All I want to say is that YOU have lit a bonfire of inspiration within me. I’m now actively searching for pieces to rescue and paint. Who knows? Maybe I can sell a few too. I’m very excited to see what you do next!
Hi Kathleen! A BIG WARM WELCOME to the #siblog… so happy to have you here and glad you’re finding the tutorials and makeovers inspiring! Have fun with your makeovers!
Hi Jenn
I am still a newby to chalk painting and I love it! You say to use a conditioner before staining. What does this do? I have been asked to stain and refinish a table and I want to do it right. Obviously this gives a better finish. I am in Australia and often we can’t get the same products here. If I go to our largest hardware chain will they be able to point me in the right direction do you think?
I love your articles they are very easy to follow. The fabric painti g one was a revelation. I picked up some old chairs that defy reupholstering. This will be a great solution!
Thank you
Sorry Denise I put the wrong name there!
Hi Rhonda! A pre wood conditioner evens out the absorption of stain so you don’t end up with a blotchy looking stain job. I can’t speak for Australia (which I would so LOVE to visit btw!) but in North America, any and every large hardware chain sells it. So glad you’re finding the tutorials helpful! 🙂
This piece is beautiful! Love it! Sometimes if I see an old piece, the inside seems too yucky to put anything in. Do you ever paint the inside of the drawers or cupboards?
I do and I don’t Patti. If the wood drawers look great, I leave them. If they can be cleaned up with a sanding – great. If they are non to pleasant, I line them or paint. I guess I’m all over board…lol.
Hi Denise,
I came across your website (which I love, btw) while searching for chalk paint recipes. I know that “Annie Sloan” is the most popular ready-made chalk paint brand. How does “Bluestone House” compare to it? Would I be better off buying ready-made or making my own? Thanks a bunch!
Annie Sloan Chalk Paint has a much thicker consistency than Bluestone House Paint. I would say applying this Bluestone paint feels more like applying a mineral paint (eg Fusion) but provides EXCELLENT coverage and a nice chalky finish. Both are excellent products. I always encourage people to try them all and see what they like best… and this includes DIY Chalk Paints too!!!
Dear Denise
I love everything you do. Your hands are gifted. Would you please tell me the name of the beautiful red you paint the lowboy ??. I really fall in love with.
Thank you so much
Sonia
Thanks Sonia 🙂 The brand of paint I used for this lowboy is Bluestone House Chalky Patina in Moulin Rouge.
Love all of your advise. This piece is so pretty, quite the inspiration. I also love the color combo and the backplates!
Thank you Donna! <3
I totally smiled through this post. I feel the same exact way…rescuing perfectly great old pieces from the would be dump. Even named my little business Some See A Weed…you can see my stuff on fb. This red is amazing! And the back plate idea is perfect. My favorite part is the top. I’m def using your tips and doing a dresser like this. Thanks for sharing.
Thanks Mimi! I just saw your most recent find via my email. It will make the most charming bedside table!!!
Your use of the metal back plates was genius! It took the piece to a formal level that you wouldn’t have achieved with solely the wooden knobs. I have mixed the wood/paint look when the wood is in great shape and has nice grain like your tiger sawn top. Stellar job!
Thank so much Ellen! Funny thing is, I wasn’t even going to try the metal back plates with the wood knobs. So glad I did because the two materials really add interest!
Yes, Denise you are correct. That is Tiger or quarter-sawn oak. I LOVE the grain !! The red is GORGEOUS ?
The grain is so interesting isn’t it?!….Thank you Maria!
Hi,
I love what you’ve done with this piece. I’ve been indecisive for years as to what to do with an inherited piece made of tiger oak. I just don’t care for the piece like it is and the doors were replaced many years ago with something that doesn’t match the oak.
However, every time I’ve considered painting it, I’ve felt guilty about covering up all of the oak. Your top is the perfect answer!
Thanks for sharing.
I know how you feel Pamela. The antique dresser I have in my bedroom with the same looking grain – I’ve been debating on whether to paint or not too. I find it so easy to experiment on salvaged pieces but not as easy when it’s a piece I own or have purchased..lol.
You are so right! The best part of salvaging furniture in my mind is the chance to experiment without fear. I scored a vintage pine harvest table from an old farm and though it needed a ton of work–dogs had chewed it, was built for short people, etc–I felt free to try my hand at a pickling stain, experimented with repairing wood and went wild with paint. I would never have been so bold with a piece I bought.
Your experimental vintage harvest table sounds amazing Jenn! And isn’t it funny how when we’re ‘relaxed’ and not worrying about the outcome, creativity just flows and the results are often remarkable! 🙂