LEVEL UP YOUR FURNITURE AND GIVE IT AN ELEGANT LOOK WITH WOODUBEND! | CURB-SHOPPED DRESSER MAKEOVER [VIDEO]
 Hi friends, I hope you’re well and having a great start to your week! My sweet neighbor put this dresser at the end of his driveway for bulk pick-up. He’s 82 years old and has decided to move to a condo. I’m sad to see him go. But it made him (and me!) happy this dresser is getting a makeover rather than going to the dump. I can’t wait to show my neighbor (and YOU) how a little WoodUbend, paint, and glaze transformed this piece!
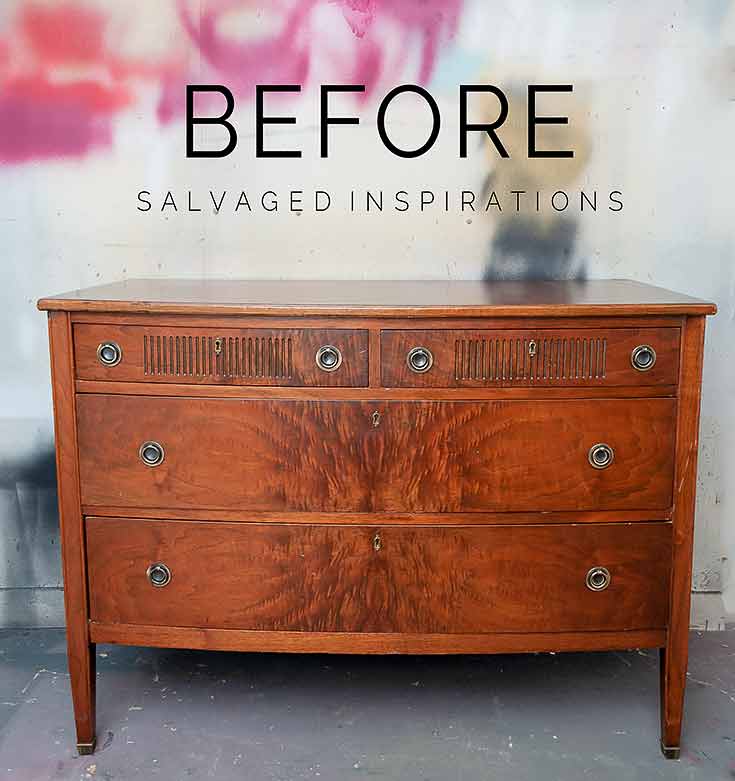
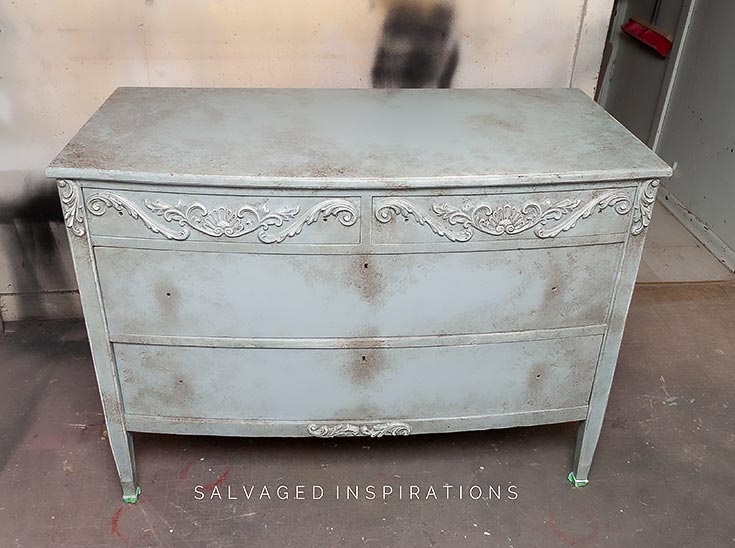
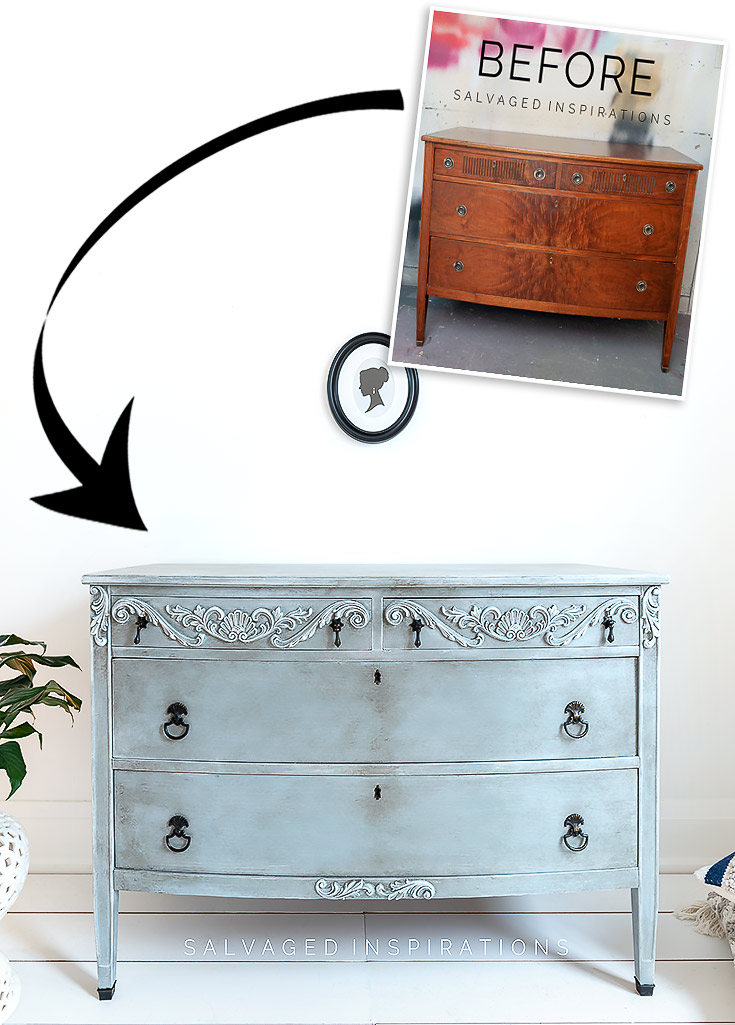
Here’s the before. It’s a gorgeous well-loved dresser.
THIS POST IS SPONSORED/CONTAINS AFFILIATE LINKS TO PRODUCTS I USE. YOU CAN SEE MY FULL DISCLOSURE HERE.
SOURCE LIST
-
- Curb-Shopped Dresser – SALVAGED
- Paint Brushes
- Sandpaper | Shop Towels
- Water Misting Spray Bottle
- BIN Shellac Primer
- WoodUbend Appliques
- Stormy Seas {20%)
- Manatee Gray {80%}
- Buttercream (for dry brushing)
- Grunge Glaze
- Posh Chalk Pigments Blck (for hardware)
- Satin Clear Coat
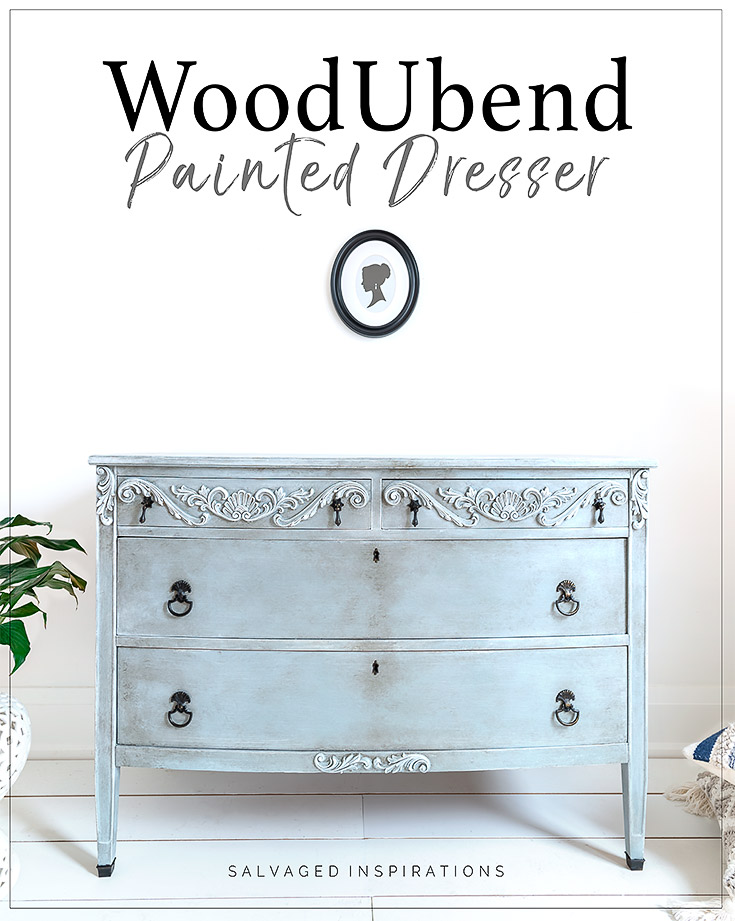
WoodUbend Curb-Shopped Dresser
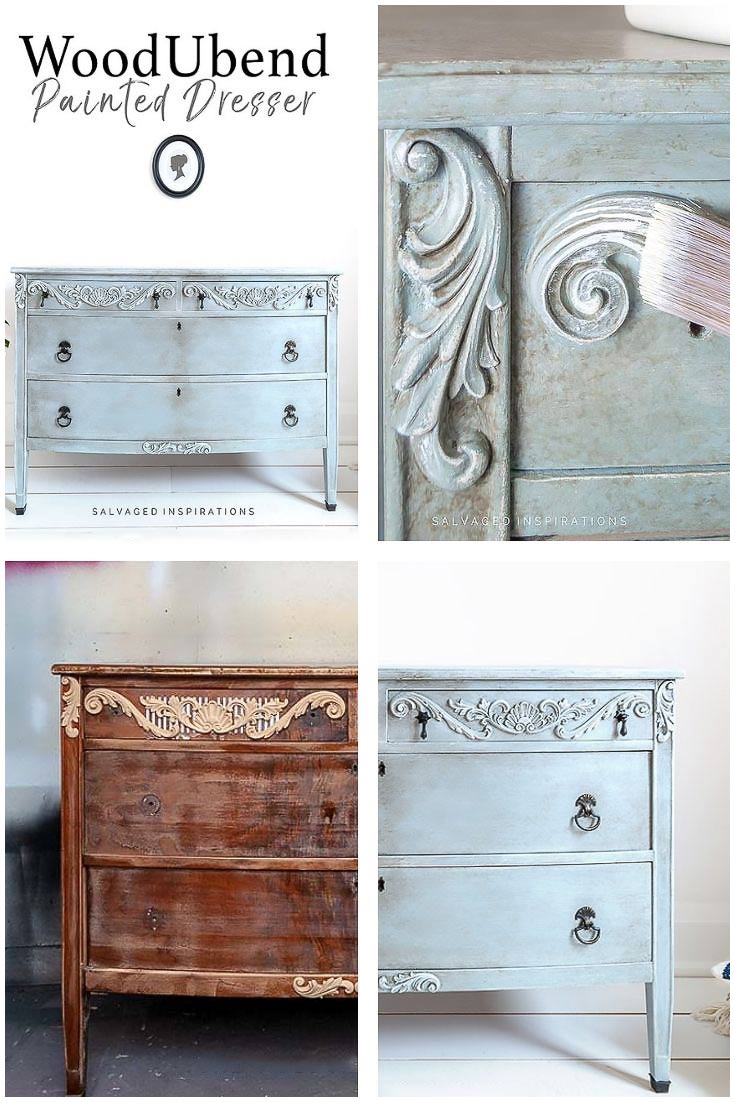
I like incorporating the details of a piece into my makeovers. This dresser is solid and well built, a really gorgeous piece — but the grooves on the top drawers weren’t doing it for me. I must have sat staring at them for over an hour wondering what to do and still didn’t come up with anything I liked. WoodUbend to the rescue!
STEP #1 – CLEAN AND SAND
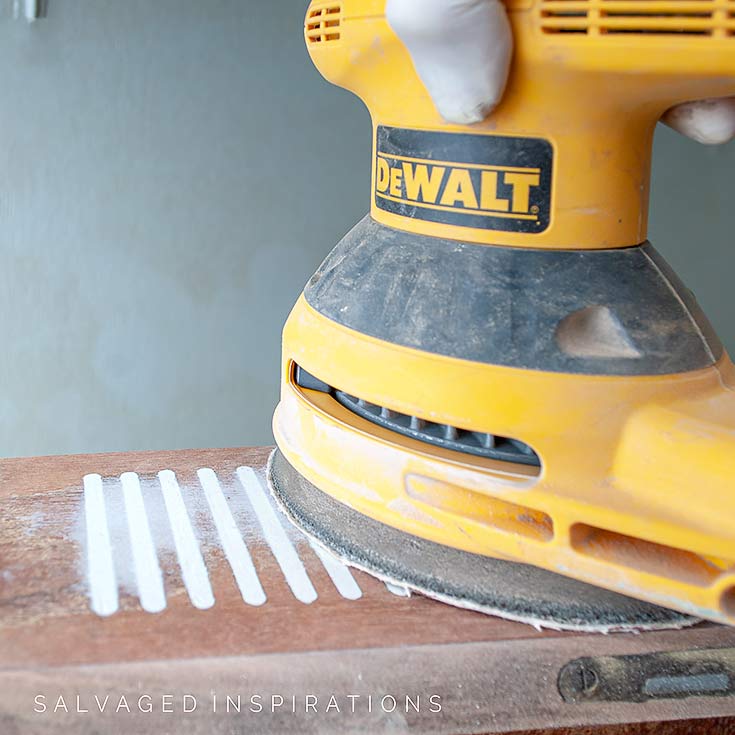
I started by giving this piece a super good cleaning with this White Lightning. Then I sanded it from top to bottom to even out the surface and help smooth the scratches.
STEP #2 – FILL WITH BONDO
As I mentioned, I like to work with a piece’s original details but I just couldn’t come up with any sort of design I was liking for the top drawers. I filled the drawer details (and old mirror holes) with Bondo. You can see Bondo For Furniture Repairs here if you missed my video tutorial.
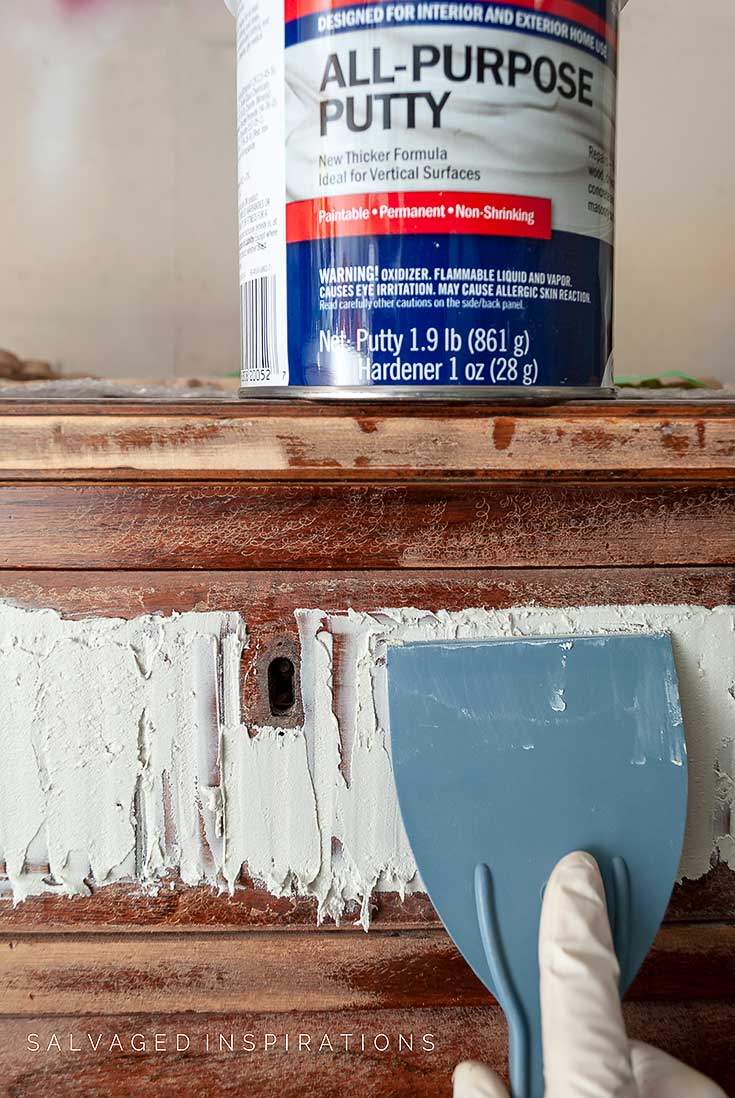
Bondo dries within 10-15 minutes and then it’s ready for sanding and priming.
STEP #3 – APPLYING WOODUBEND
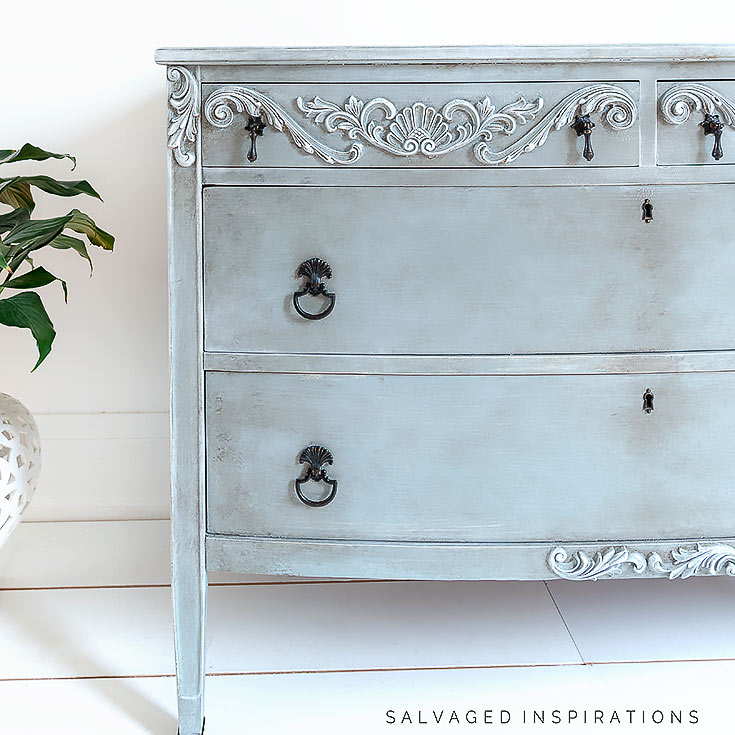
Here’s the fun part that changed this dresser’s entire look and feel! I added a few WoodUbend Moldings to the top drawer, corners, and bottom lip. What a transformation! It looks like an entirely different piece of furniture. I love how versatile these furniture moldings and trim are. Unlike the ones I buy at HomeDepot or LeeValley, once these are heated they can bend, be cut, drilled, and pieced together to create an original design. They are super easy to work with and a lot of fun! If you have a plain piece of furniture, this is an amazing way to level it up and create a ton of character!
Here’s a step-by-step video on How To Appy WoodUbend.

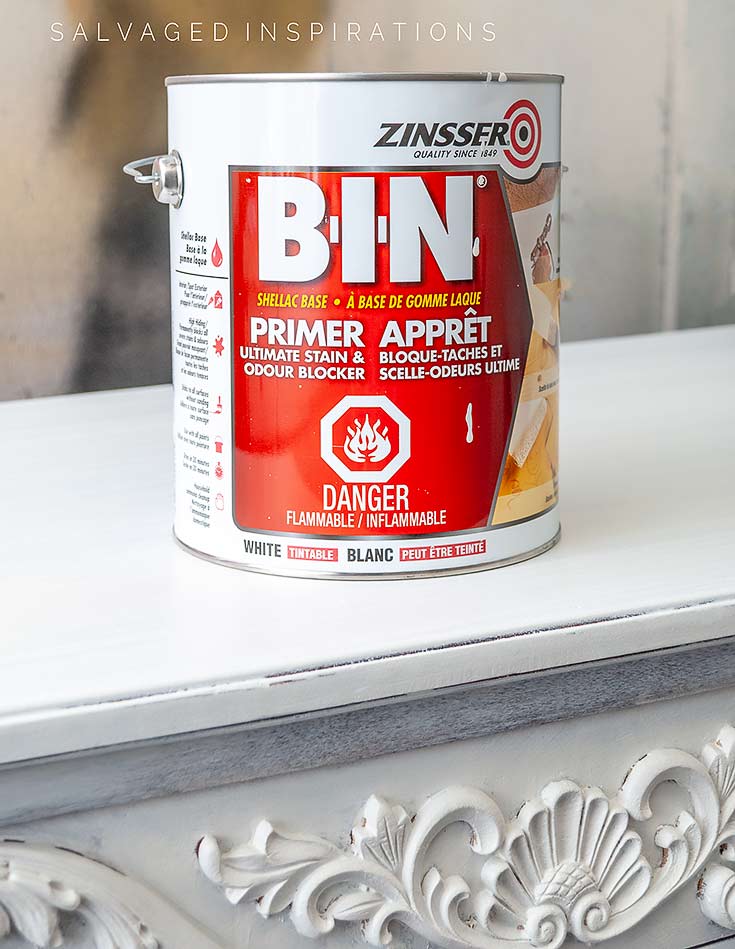
STEP #4 – PRIME
Once all my WoodUbend was adhered and dry, I gave this piece two coats of BIN Shellac Primer to ensure no bleedthrough would show through. Here’s a step-by-step video tutorial on How to Apply BIN Shellac Primer and STOP bleedthrough, stains, and odors. For ‘fast’ makeovers, this primer is fabulous because it dries within 30 minutes!
STEP #5 – PAINT
I’ve been trying to use up bits of paint I have left in some of my containers so I mixed a custom color using Stormy Seas {20%} plus Manatee Gray {80%). One coat was all it needed to give me a basecoat for my glaze. If you haven’t tried Dixie Belle Paints, they are highly pigmented. Depending on your paint finish, oftentimes one coat is all you’ll need.

STEP #6 – GLAZE
I used this Grunge Glaze to age the finish. Instead of painting it on, I used a brush to dab and drag so the paint finish looks “grungy” and antiqued.
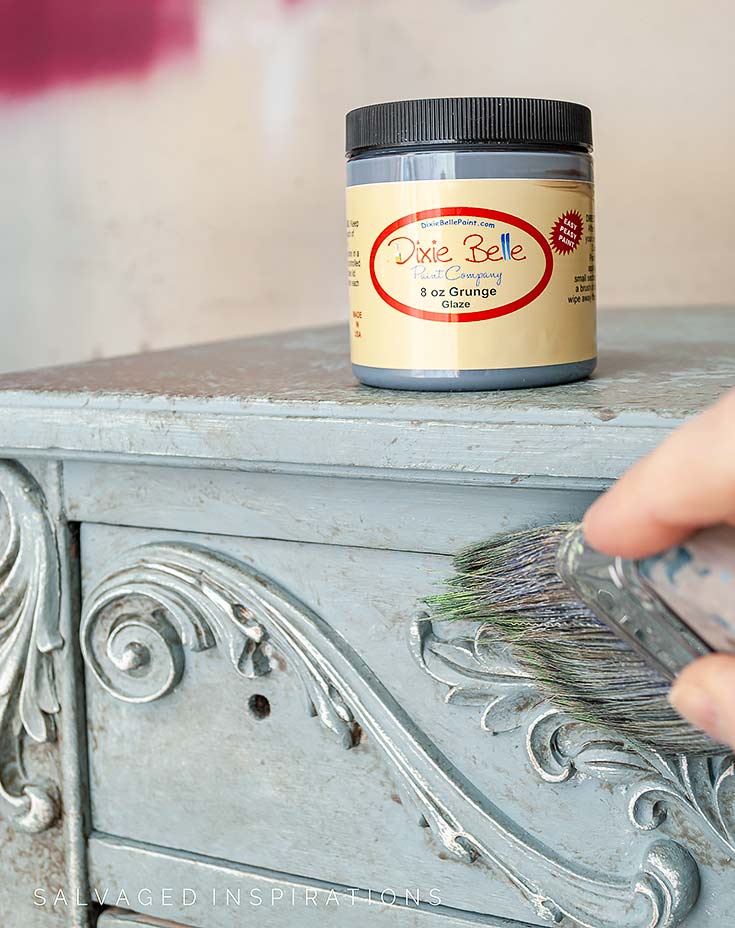
Here is what it looked like after the first coat. I layered and repeated the process until I had a look I was happy with.
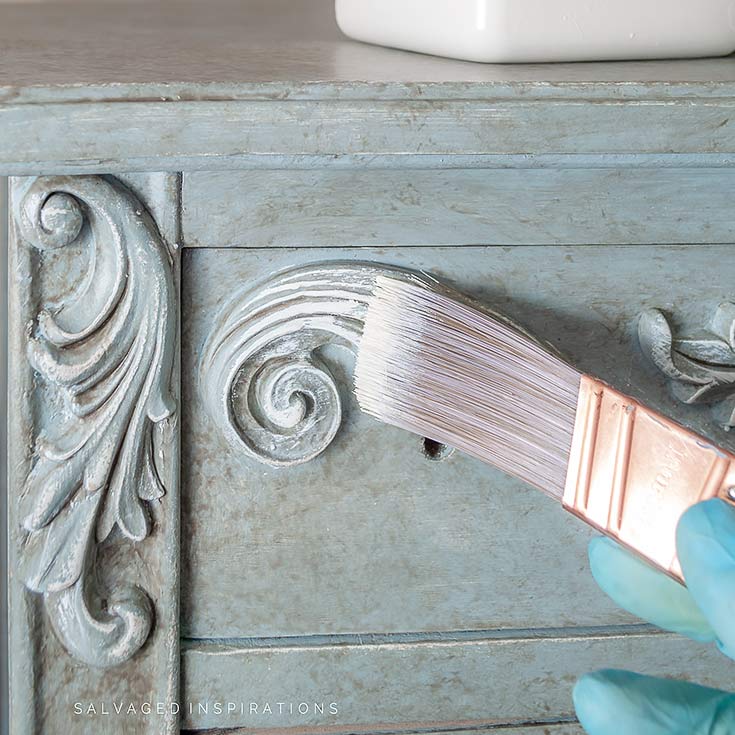
STEP #7 – FINISHING TOUCHES
For the finishing touches, I dry brushed the dresser including all the WoodUbend moldings with Buttercream. This highlighted the appliques and toned down and blended the glaze.
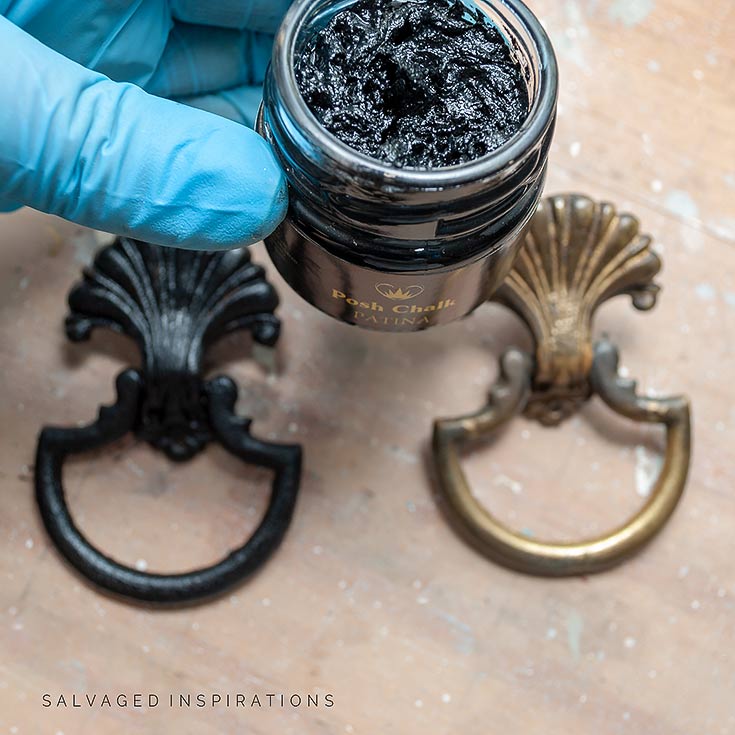
The vintage hardware, Hobby Lobby teardrop hardware, and metal caps on the feet were given a black-on-black finish using POSH Chalk Pigments in this Black. AMAZING! If you have a stash of old hardware that you’d like to update, it’s as easy as brushing this patina on with an artist’s brush or your finger. It comes in a variety of finishes like Copper, Gold, Silver, and Metallics!
To seal and protect, I used this Satin Clearcoat and sprayed three coats.
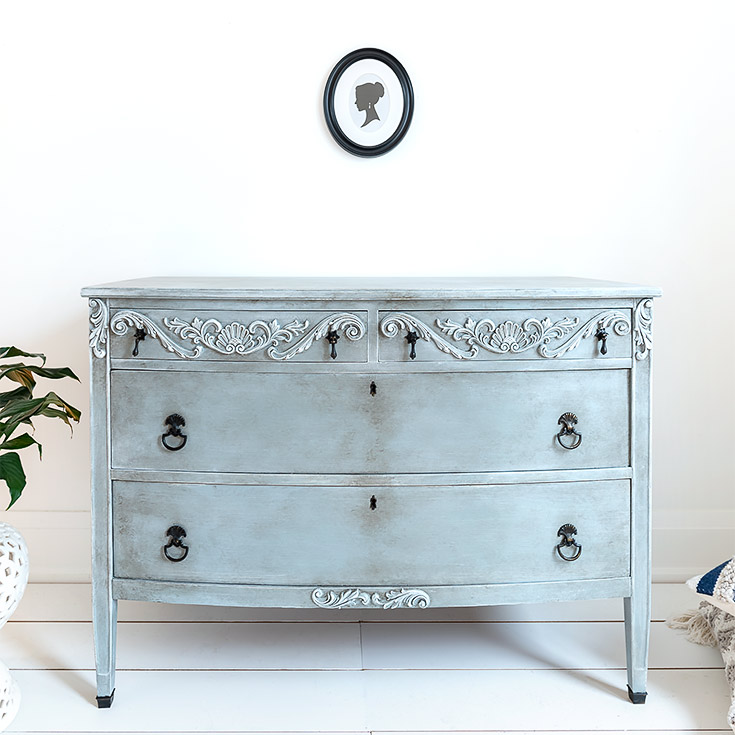
THE FINISHED LOOK!
Here’s the finished look. The Woodubend leveled this dresser up!
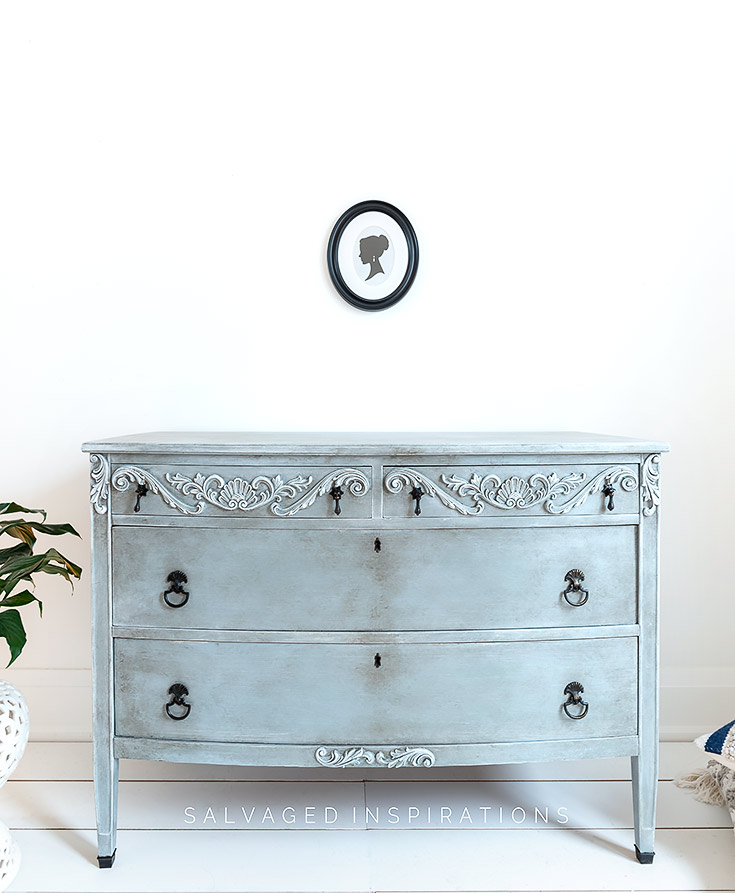
I like the aged look the glaze gave as well.

I can’t wait to hear what you think of this makeover!

YOUTUBE TUTORIAL
Here’s the full step-by-step YouTube tutorial. Our #siyoutubefamily is already a community of 49K so don’t forget to subscribe if you haven’t done so already! So exciting, thank YOU! 🙂
Here’s the step-by-step video tutorial on how to get this look including tips on…
- How To Remove Key Hole Plates
- How To Fill Mirror Holes on Dresser Tops
- My FAV Primer to STOP Bleedthrough
- My FAV Paint Brushes for a Smooth Finish
- How To Hide UNWANTED Furniture Details
- How To TOTALLY Change the Look with WoodUbend
- If you find them helpful feel free to subscribe to my channel. 🙂
Here’s another look at the before and after! I hope it’s inspired you to try Woodubend on one of your projects!
LET ME KNOW WHAT YOU THINK OF THIS WOODUBEND-PAINTED DRESSER… OR FEEL FREE TO ASK ANY QUESTIONS YOU MAY HAVE… I ALWAYS LOVE HEARING FROM YOU. IT MAKES MY DAY! 🙂
I’ll be back this Thursday with my FFU friends and this salvaged cedar chest makeover. Hope to see you then!

Happy furniture painting my friends!
Denise x
RELATED POSTS::
HOW TO USE WOODUBEND ON PAINTED FURNITURE
RUSTIC RED DRESSER W WOODUBEND
SINGER SEWING MACHINE W WOODUBEND
STOP BLEED THROUGH WHEN PAINTING
GEL-STAINED CHEST W WOODUBEND
PIN AND SHARE!

I like watching how you transform furniture and glad to hear you had to ponder a while on the final design. It humanizes you! LOL. You give me confidence to try something myself.
lol…I ponder a lot Kim.🤣 Thanks so much and I hope you give something a try. I’m cheering you on from this end and you can always reach out if you have questions.💕
I love love it. That is really a great piece. The color blue is my favorite. What a great find. Love your work.
I appreciate this Donnita, thank you!
That is lovely!
Poor sweet man. Now you have a memory of him constantly.
Exactly, and thank you Tracey!😊
This is a beautiful piece! I have an old wooden farmhouse type table that I would like to do using this technique. What other steps would I need to add at the end to make sure my table is more durable as a dining room table?
Thanks for your help!
I am so far behind in reading what you’ve been up to. Lucky for you this went “to the curb”. It’s a beauty and now has a new look; thanks to your creative talent. The “bendables” really sets this piece off and gives it a softer look. The color fits it perfectly too. I’m off to the next one! LOL. I’ve got to get caught up on what’s happening in your painting world.
Thanks, Kathy! It’s a web crawl instead of a pub crawl! 😂 I’m off to the next as well. 😉
What a beauty!! Love it❤️ Could you tell me if you think of the Posh chalk pigment would work on a door knob set? I have an ugly old gold tone set and I would like it a darker color. But I’m not sure of it would work…..Thank You Denise
Thanks, Lisa! And I wouldn’t want to say because this is the very first time I’ve tried this product on my hardware. It’s taking a while to dry/cure and time will tell how durable it is. 🙂
Your pieces inspire me! Thanks for sharing your ideas and creations.
Thanks so much Heidi! xo
Thanks for your info Denise, I appreciate it. Have a lovely day!
Thanks so much, Barbara and you too! 🙂
Amazing transformation….its Beautiful. I can’t believe they got rid of it Wow
Thanks Lynn! 🙂
Hooray for rescuing this piece from ending up in the landfill. Would have been such a shame. I bet he’s going to be amazed at the transformation. Hopefully, if he has any more furniture to purge in his downsizing he’ll come knockin’ after seeing this stunner.
Thanks, Marie! His son is helping him clear out so I told him I’d keep my eyes peeled for anything else that might end up roadside. He’s such a sweet man.
Your finished piece is just super lovely! Truth told, I was a little leery when I saw the grunge applied, and sooo hoped it would be changed into loveliness—and YOU DID IT! WoW!! Good job, as always!!
Thanks Caye! 🙂 And yes, I was a little concerned when I saw the first coat of Grunge Glaze applied…lol. 😉
Love love it!!! Turned out amazing, soft beautiful colour. Your neighbour will be very impressed with the finished product. 😊
Thanks Rosie!XOXO
Absolutely stunning, my friend! What a shame it would have been to see this gorgeous piece go to the trash…glad you were able to rescue it! XOXO
Meee toooo! Thanks so much! XOXO
Hi Denise! Very pretty. I wouldn’t know which Woodubend Appliques to use. Its amazing how you put them together and it looks gorgeous. Great job and i love that color mix.
Thanks! There are SO MANY styles to choose from, right?! Something for everyone’s tastes for sure.
This turned out absolutely beautiful. Can the Zinzer BIN shillac be used on a piece that is not made of wood but is real dark?
Do you mean like a laminate or something?
Yes laminate, mdf, and paper covered mdf.
Yes! BIN Shellac Primer is a great choice for mdf or laminate. It’s a bonding primer.
This piece looks great! I really liked the original finish as I like antique furniture, so I wasn’t sure if I had it if I would have wanted to change it at all. But it looks lovely! Was the original finish a painted burl wood finish?
Thanks, Liz! The original finish was a burl veneer that had been ‘modified’.
Hi Denise! I love the dresser make-over! Very nice job. I was wondering where you purchased the White Lightening cleaner. Is it good for cleaning all finished wood? Thank you. Keep up the beautiful work!
Thanks, Susan! And yes it is… it’s like a TSP substitute and I get it here. It lasts me a long time as well as I put a few tablespoons into a big spray bottle. Hope this helps. 🙂
Hi Denise! Once again you have inspired me with new products to use and a finished look that is timeless. (By the way, It was an honor meeting you at the 2019 Dixie Belle/Prima workshop!) I really enjoy each of your posts because you take it step by step & it doesn’t seem so overwhelming. I really like the POSH black for the hardware. I’ll have to add that to my idea list!
Hi Crystal! 🙂 Can you believe it’s been over a year since we were at the workshop?!… omgosh, time flies. If you try the POSH I’d love to hear what you think. I don’t know if you’ve ever used Rub’N’Buff but I find it works just as well but it doesn’t smell or dry up! 🙂
OMG! That piece is absolutely STUNNING!
Thanks, Donna! xo
bonjour
ton travail et toujours aussi beau,
mais nous n’avons pas tout à fait les même produits.
Donc je regarde et je rêve
Merci Dominique! Et oui, selon l’endroit où vous vous trouvez, il est parfois difficile de trouver certains produits. Je sais que Dixie Belle est dans de nombreux pays, mais je ne suis pas sûr de WoodUbend. 🙂
What a great find! Gosh, I love it when good things happen in hard times. Beautiful makeover as always. Stay safe my friend. xo 😘
There’s always a silver lining…right!? 😉 Thanks so much Do!!! Hugs
It’s beautiful. It looks like an old Swedish piece now. I love everything about it!
An old Swedish piece… love it! Thanks Lizzy! 🙂
Outstanding work, what a difference. Your neighbor may just may wish to trash some other piece to get this one back!
LOl…he offered me a bookcase with a glass front as well but I have to be careful what I bring in because of space. I’m trying reeeeaaallly hard to keep my inventory and workspace somewhat clean…LOL. Have a super day. XOXO
The color is gorgeous! Love the transformation!
Thank you, Stephanie!!
Fabulous!
Thanks Char! 🙂
You have inspired me beyond words! I’m moving to a coastal home in 2 months and I’m painting pieces right and left! Thank you for all the amazing and so inspiring blog posts!!
Oh, I’m so glad Pamela, and congrats on your coastal home! How exciting! x
This is gorgeous and I LOVE the Woodubend trim! Thanks for sharing. ~ Nicki
Aw, thanks my friend! XOXO
Love this! what a new look!
Thanks, Elizabeth! Have a super day. 🙂
I love this piece! The appliques “make it”.
Thanks Carla… and I agree! They really do transform a piece. 🙂
I’ve not worked with Bondo before but feel that it would be a great product. How hard is it to mix and get the right ratios? Love the dresser! They should market that color 😁
Right!?!… It’s such a gorgeous grey/blue! 🙂 Bondo is AMAZING and SUPER durable and dries SUPER fast… which is why I use it for so many of my makeovers. The negatives are you need good ventilation because of smell and it did take me a few tries to get the ratios right. Too much and it hardens so fast you don’t have time to fill everything. Too little and it takes forever to dry. I’ve figured out my perfect ratio is approx a golf size portion of Bondo and I squeeze an inch of hardener. PERFECT. 🙂 Couldn’t go without the stuff. 😉
Hi Denise. What a wonderful find. It would have been such a waste for such an old, well-made dresser to go to the dump! Gorgeous makeover. I love your soft custom blue and the Woodubend accents. Absolutely beautifully designed and painted.
Thanks my friend! I love the custom color as well! I’ll have to remember it for future projects. 🙂