CAN YOU PAINT LAMINATE? – YES YOU CAN AND IT’S EASIER THAN YOU MIGHT THINK! HERE ARE 7 GORGEOUS EXAMPLES AND HOW-TO’S!
Hi creative friends and thanks for joining me today! Laminate furniture pieces often get a bad rap, but don’t let that shiny, dated surface fool you—there’s so much potential hiding underneath. There are tons of 1960s and 1970s laminate dressers, nightstands and tables out there, just waiting for a little love. If the frame is solid, the drawers slide well, and it’s sturdy, you’ve already got the makings of a beautiful makeover piece!
In today’s post, I’m sharing 7 amazing laminate furniture transformations that prove just how stunning these “throwaway” pieces can become. From bold color makeovers to sleek modern finishes, each of these makeovers proves that with the right preparation, laminate furniture can look every bit as gorgeous as solid wood.
✨ Stick around till the end for my best tips and go-to products for painting laminate like a pro— I hope it inspires you to try updating one for your home or business!
*As an Amazon Associate, I earn from qualifying purchases. There are affiliate links in this post to other companies/products I use and love as well. You will never be charged extra when you purchase through these affiliate links. If you purchase from my links – A BIG thank you for supporting me and the #siblog! To see my full disclaimer, click here.
Below are 7 Gorgeous Laminate Furniture Makeover Ideas in no particular order. If you’d like to read the full tutorial, including colors and all the supplies used, I’ve included a link to the original post in the title above each image.
THIS POST IS SPONSORED/CONTAINS AFFILIATE LINKS TO PRODUCTS I USE. YOU CAN SEE MY FULL DISCLOSURE HERE.
THE DIFFERENCE BETWEEN LAMINATE & VENEER
Before I get into the makeovers, here’s the difference between laminate and veneer – which I myself never knew the difference when I first started painting furniture. Think of laminate like a sticker glued on top of the furniture—it’s plastic and printed to look like wood like shown in the pic below. When I tried painting over it (without proper preparation) the paint easily scratches off the slick surface.

Veneer is a super-thin slice of real wood glued onto the furniture, so it’s REAL wood on the outside. Laminate is easier to scratch, but veneer feels more like the real thing. In the pic below, you can see there is a piece of the veneer missing off the front of this drawer. Veneer can be sanded, stained and refinished just like real wood. Laminte can not.

HOW TO PAINT LAMINATE PARTICLE BOARD
This 2003 particle board bookcase was looking tired with its cherry laminate finish, but with a little prep, it got a whole new look and now sits pretty in my office! I gave it a good cleaning, lightly sanded the surface to help the paint stick, and applied a bonding primer. Then, I painted it with a soft, neutral color and added a glaze for depth. The result is a fresh, modern look that proves even inexpensive mass-produced furniture can be updated!


HOW TO FIX BUBBLED LAMINATE FURNITURE
This curbside find had a bubbled laminate top from sitting out in the rain. I started by sanding down the swollen/bubbled laminate areas using a 60-grit sander until the surface was smooth and the particle board was exposed. Then, I sealed it with a bonding primer to lock in moisture and prevent further issues. After priming, I filled any remaining imperfections with wood filler, sanded them smooth, and finished with a fresh coat of paint and a protective topcoat. The result? I love this makeover with its modern look, and it proves even water-damaged laminate can be saved with the right prep and products!

PAINTING OVER LAMINATE THE EASY WAY
Painting over laminate doesn’t have to be intimidating—especially with the right prep and products. I started by cleaning the dresser thoroughly, then applied two coats of Slick Stick primer (now known as Bonding Boss!), letting each coat dry for a few hours. Once the primer passed the scratch test, I sprayed on two coats of Cotton Chalk Mineral Paint, thinned with a bit of water. To add a touch of elegance, I applied a Fern Woods furniture transfer and sealed the piece with a clear flat topcoat. Here’s the new botanical-looking dresser, totally transformed!

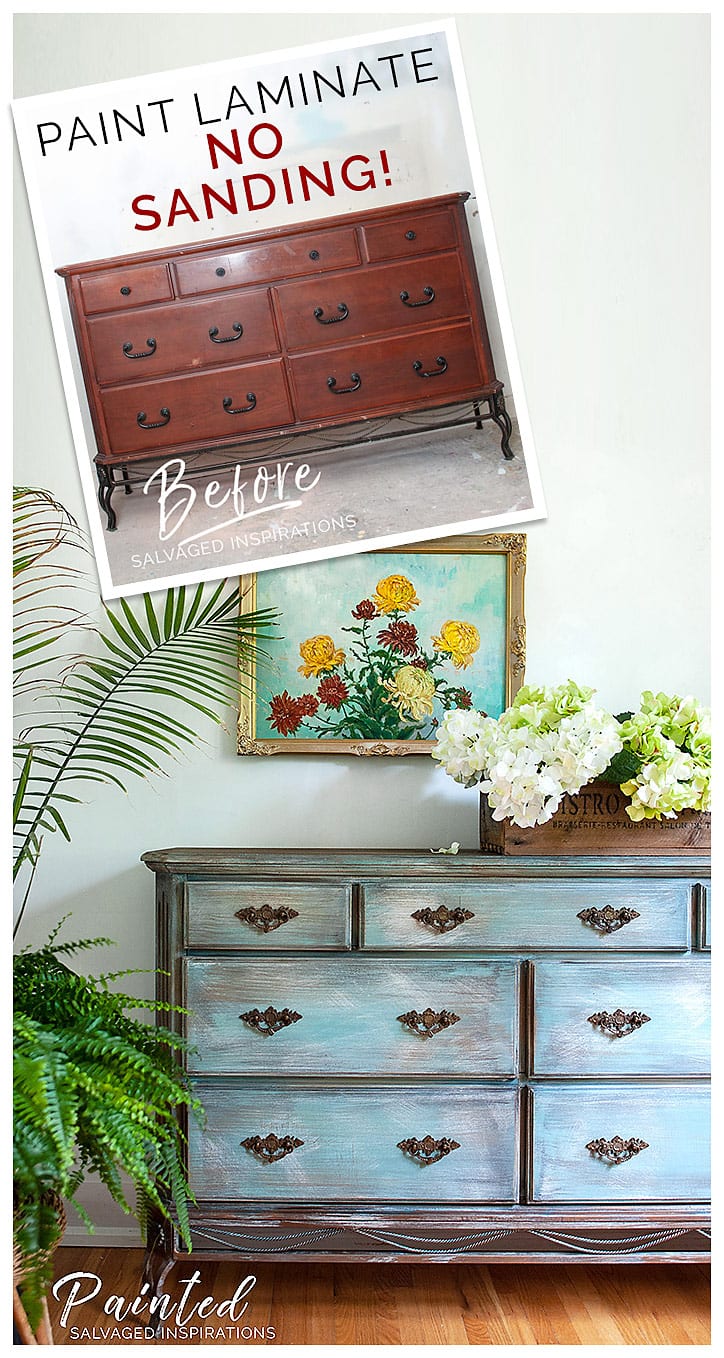
HOW TO PAINT LAMINATE WITHOUT SANDING
I found this 90s laminate dresser on Craigslist for just $20—what a steal of a deal! But when I tried painting over the laminate with no prep and chalk paint, the chalk-mineral paint wouldn’t stick; it was still scratching off after 24 hours. I went back and used Dixie Belle’s Slick Stick bonding primer which has more recently been upgraded to this Bonding BOSS Primer. This game-changer sticks to laminate without sanding, is easy to apply and clean up, and doesn’t stink up my workspace like shellac-based primers. After applying the bonding primer, I used layering and dry-brush techniques to achieve a boho mottled look. The finish looks textured but feels super smooth to the touch. For the wrought iron skirt and legs, I created a patina effect using bronze patina paint and turquoise gilding wax. This one sold super fast and she commissioned me to paint nightstands in the exact same finish!
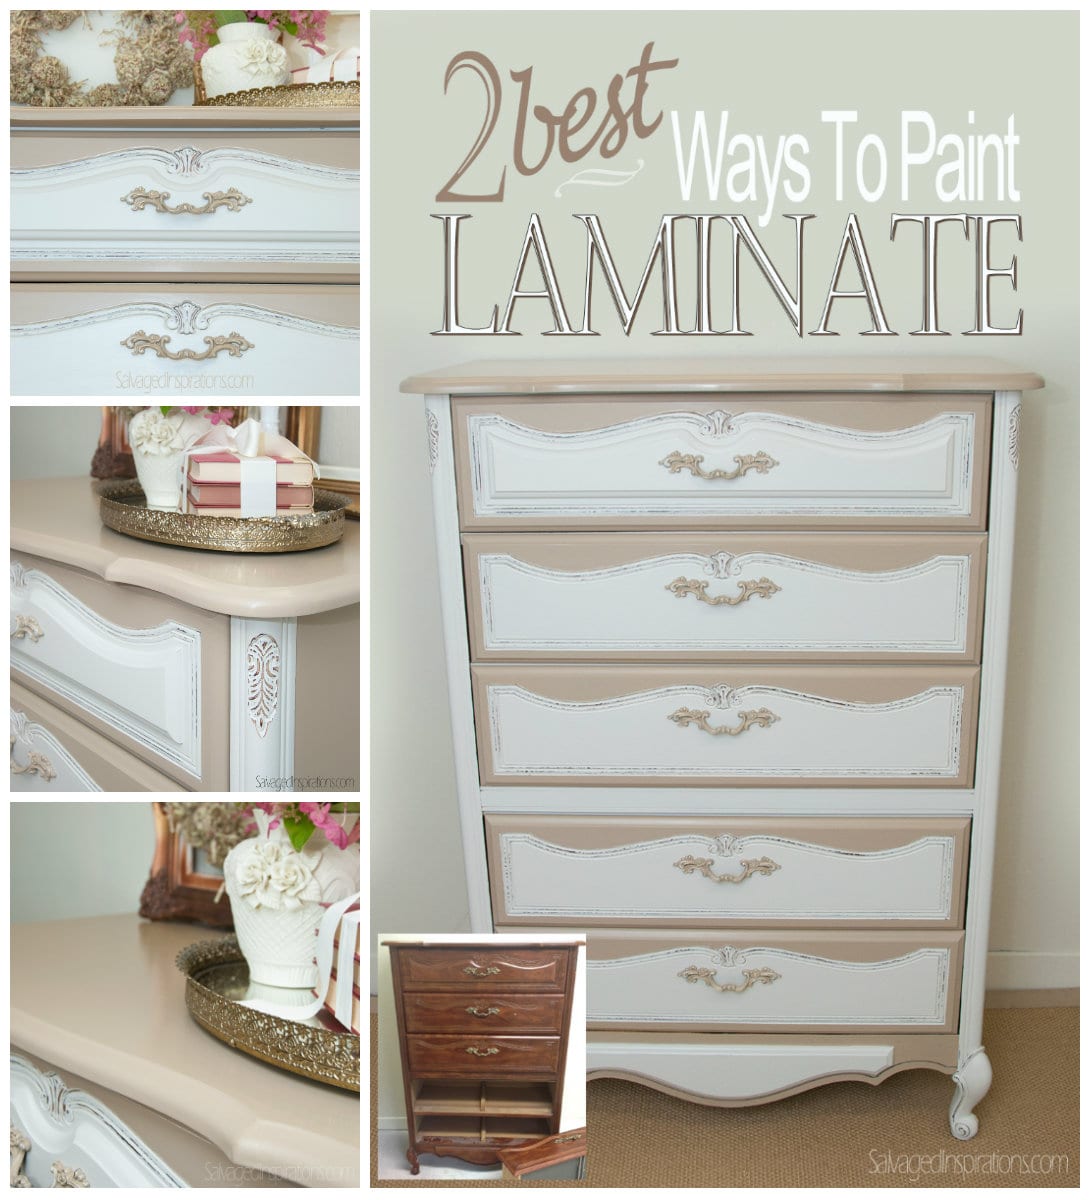
COMMON CONCERNS WHEN PAINTING LAMINATE WITH LATEX PAINT
This French Provincial dresser was one of my very first laminate makeovers, and it taught me so much about the importance of proper prep. I started by cleaning the surface with a damp cloth, then lightly sanded it using 150–220 grit sandpaper to scuff up that slick laminate finish. After sanding, I applied a coat of B.I.N. shellac-based primer to ensure the paint would adhere properly. Once the primer was dry, I painted the dresser with Café au Lait latex paint, sanding between coats for a smooth finish. To protect the piece, I sealed it with Minwax Wipe-On Poly for the handles and Annie Sloan Clear Wax for the rest of the dresser. This makeover was a game-changer for me and encouraged me to start transforming more laminate furniture!
BRUSH AND ROLL LAMINATE FOR A SMOOTH FINISH
If you’re aiming for a flawless finish on your laminate furniture – without the fuss of sanding, the brush-and-roll technique is your new best friend. I used this method on a mid-century modern dresser with a laminate top and was thrilled with the results. And since this piece, I’ve used it on numerous other makeovers. After cleaning and priming with a bonding primer, I applied a coat of paint with a synthetic brush and immediately followed up by lightly rolling over it with a foam roller. This combo smooths out brush strokes and minimizes texture, giving you a finish that rivals a spray finish. A little sanding between coats and a protective topcoat, and this dresser was transformed from drab to fab!


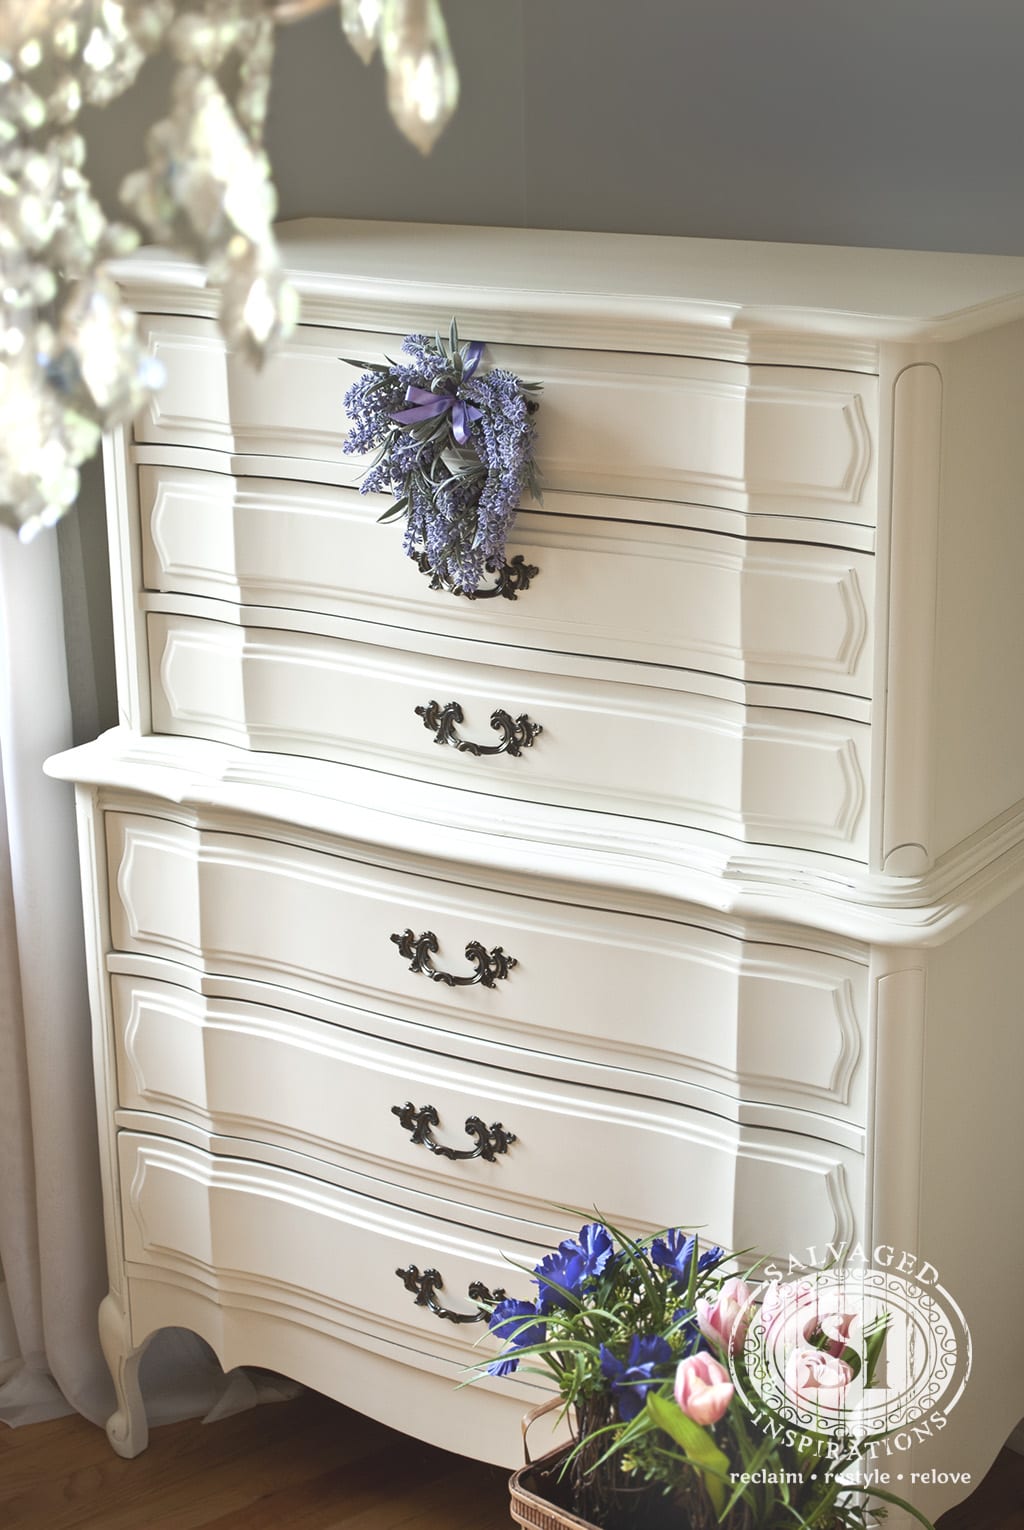
ROADSIDE LAMINATE FRENCH PROVINCIAL
I found this French Provincial dresser roadside, and with just a little TLC, it became a timeless beauty. After replacing a few drawer guides and filling some deep scratches, I scuff-sanded, primed with bonding primer and sprayed it with General Finishes Antique White Milk Paint. The result was a flawless, satin-smooth finish that transformed this roadside find into a classic piece. I kept the original hardware and lined the drawers for a clean, detailed look. This makeover proves that with the right prep and products, even a curbside find can become a cherished piece of furniture.
HOW TO PAINT OVER HIGH GLOSS LAMINATE
This dresser was so simple but I absolutely LOVE this makeover! The key to painting over this laminate finish was scuff-sanding that high-gloss finish and then using a high-quality bonding primer. Once prepped, you can use ANY PAINT YOU LIKE—chalk, mineral, latex, acrylic, or enamel. For this particular dresser, I cleaned it with White Lightning, repaired any loose drawer fronts with wood glue, and then applied a shellac-based primer to prevent bleed-through. After priming, I painted it with a beautiful Conch Silk color and added gold gilding wax for a touch of elegance. The result? A stunning transformation that proves even high-gloss laminate can be beautifully refinished with the right prep and products!

I hope you enjoyed today’s laminate furniture roundup and it’s inspired you to take a second look at those mass-produced laminate pieces. As you can probably tell from all the makeovers I shared, My best tips and go-to products for painting laminate like a pro— is a good scuff sanding to scuff up the shiny laminate finish AND a really good bonding primer! Once you prep, you’re ready to start painting and creating with whatever type of paint and products you enjoy using!
Happy painting!
Denise xo
RELATED POSTS::
FURNITURE PAINTING MUST-HAVES!
HOW TO ‘MODERNIZE’ OLD FURNITURE
5 IDEAS TO UPDATE YOUR OLD DESK
27 GORGEOUS DESK MAKEOVERS
25 FLORAL FURNITURE MAKEOVERS
WHERE TO FIND FREE FURNITURE
PIN AND SHARE!


Love your furniture transformations. Thank you for sharing your years of experience. From reading your great advice and instructions I feel I could give it a try. I have a dresser i’ve had for years that needs a good makeover. You’ve given me the tools to go for it. Thank you again for sharing your knowledge.
Hi Pam! I’m so happy this has inspired you to give it a try. I’d love to hear how it turns out for you!
Thanks for the tips and for resharing these beautiful pieces! I’ve been following you for years, but I had forgotten about a few of these!
I’m so glad you enjoyed them Nicki! Have a great weekend. XOXO
Hi Denise. Beautiful showcase of some of your past furniture makeovers. You have such a talent for turning outdated to outstanding! Great tips too. Thank you.
Thank you Monique! Wishing you a great weekend. XOXO
Really great looking pieces! Some of that hardware is really gorgeous. Well Done!
Thanks so much Mary! The hardware on the Conch dresser is my favorite. It was repurposed from an old MCM piece. Have a great week! 🙂
These are all so beautiful! Great work.
Thanks my friend! XOXO