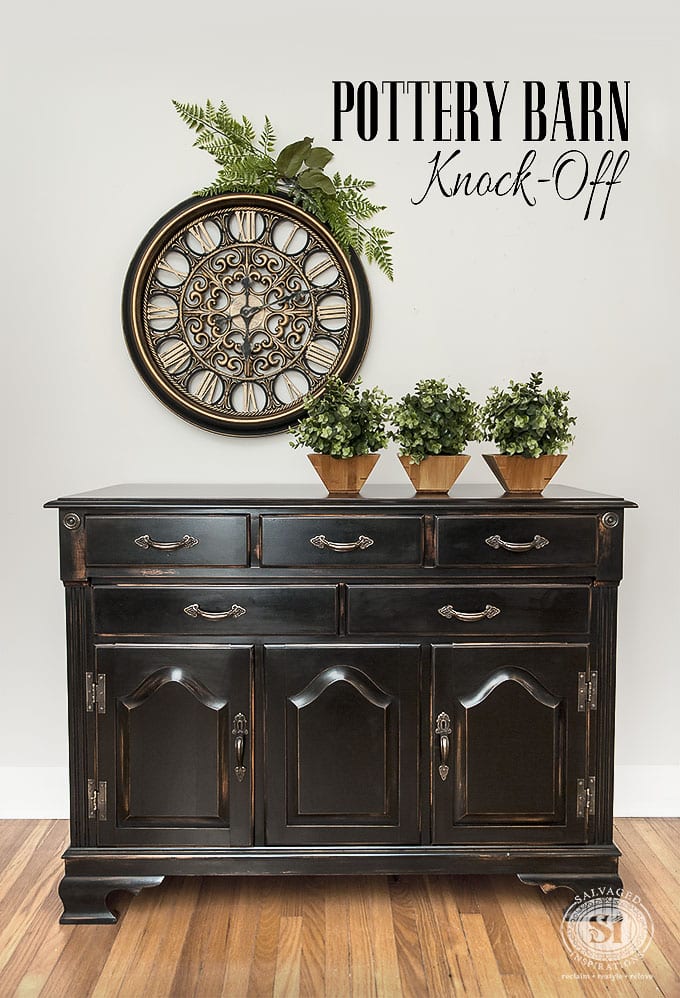
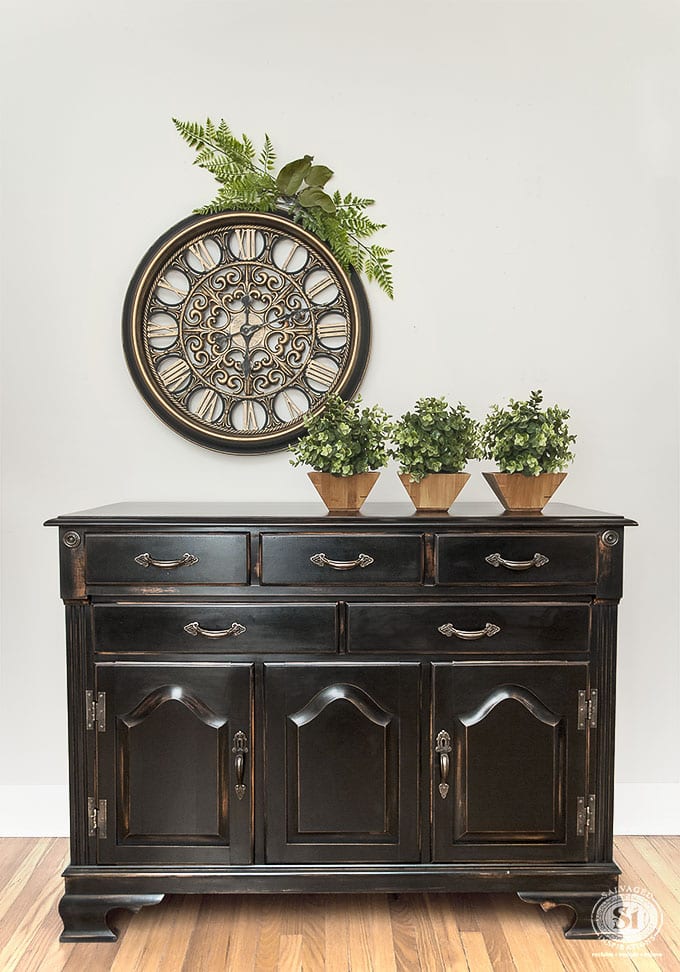
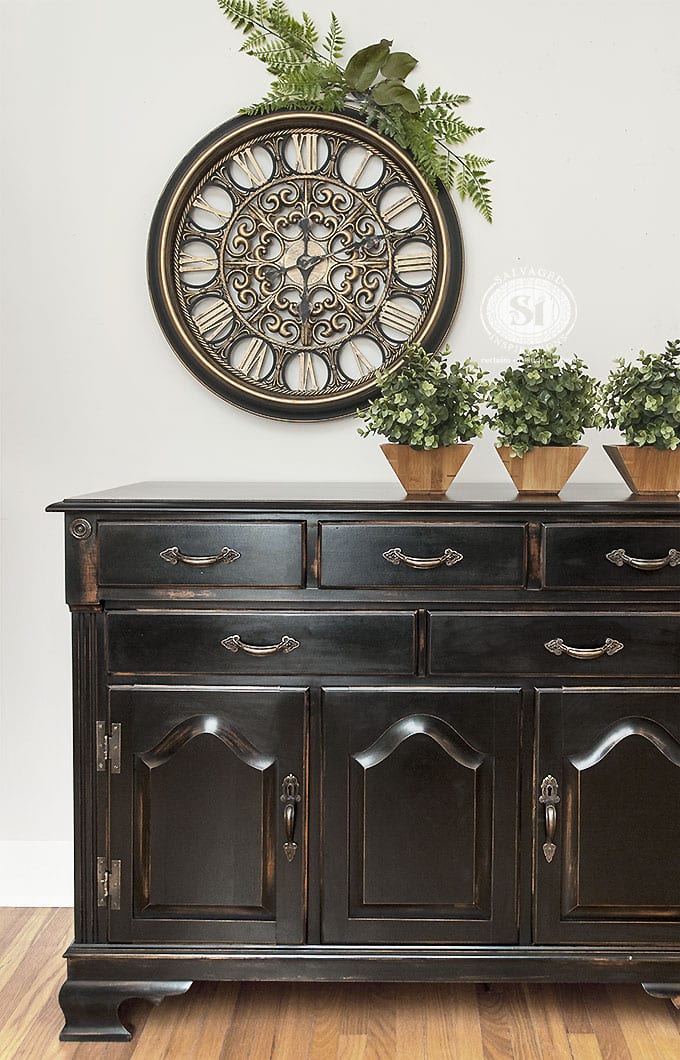
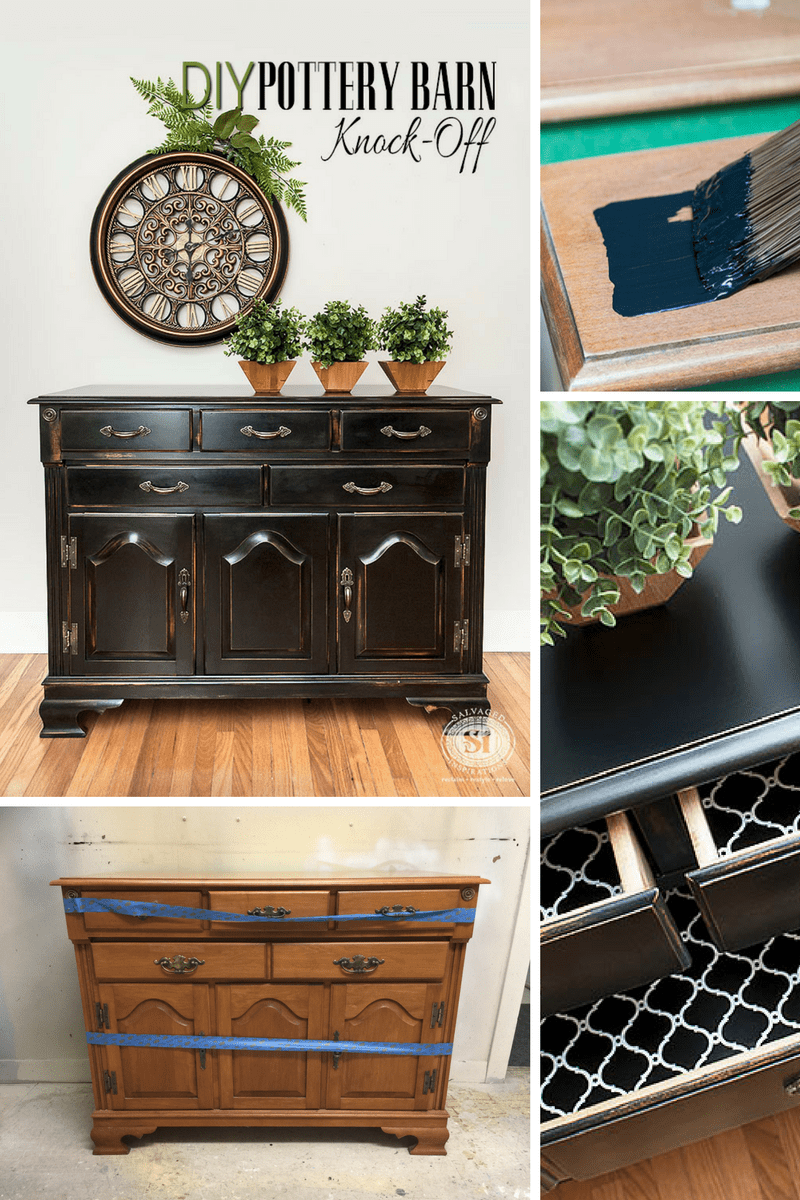
 Hello friends! Can you believe it’s already November? The weather is starting to cool down here, so I’m taking every opportunity to stay warm in my paint studio. I picked up this 80’s buffet from the ReStore and my first thought – was Pottery Barn Black Finish. The shape, style and existing stain are all perfect for a Pottery Barn knock-off! If you’re a fan of this popular black distressed look, be sure to read on because today I’m sharing 5 DIY tips that make recreating this dramatic finish a whole lot easier!


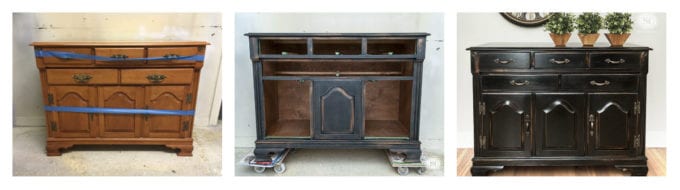
Here’s a peek at the before, during, and after. This buffet also came with a top hutch but I decided not to use it for this restyle. It will come in handy for something else down the road.
(This post contains affiliate links. See my full disclosure here.)

SUPPLIES~
80’s Buffet – Salvaged
General Finishes Lamp Black
Paint Brush | Roller
Sanding Sponge
Stain (I used Minwax Gunstock)
Q-Tips & Shop Towels
I used Black Wax for the body this Poly for the top)
5 TIPS FOR A KNOCK-OFF POTTERY BARN BLACK FINISH~
1. PICK THE RIGHT PIECE
The shape and style of the piece of furniture you pick will make a big difference. Solid wood pieces that have an existing warm stain (even the outdated orange stain on this 80s piece) work really well. It saves a lot of time when you already have a base coat of stain.
2. DO NOT USE PRIMER
Primer aids in adhesion and stops bleed-through and stains. The latter is helpful when painting with light paint colors. But when painting a black distressed finish, the last thing you want to see when you start sanding is a white primer underneath! This can ruin the entire look so here are a few options…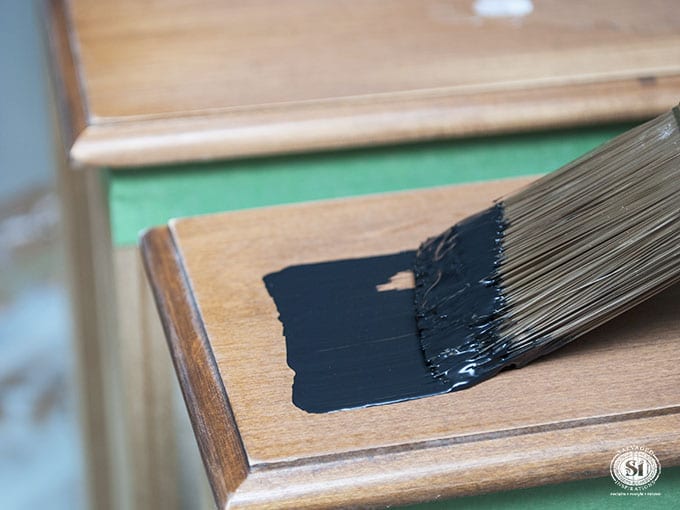
As long as your piece is properly cleaned, prepped with a light sanding (220 grit), and quality paint is used, primer is not needed. I didn’t use any on this piece and it turned out perfect. If you decide to use a primer, a tinted primer could be purchased so no white shows through after sanding. The last option is to avoid using a primer and use chalk or mineral paint where no priming is necessary.
3. SAND BETWEEN COATS
To get this distressed Pottery Barn Knock-Off Finish, sanding in between each coat is key.
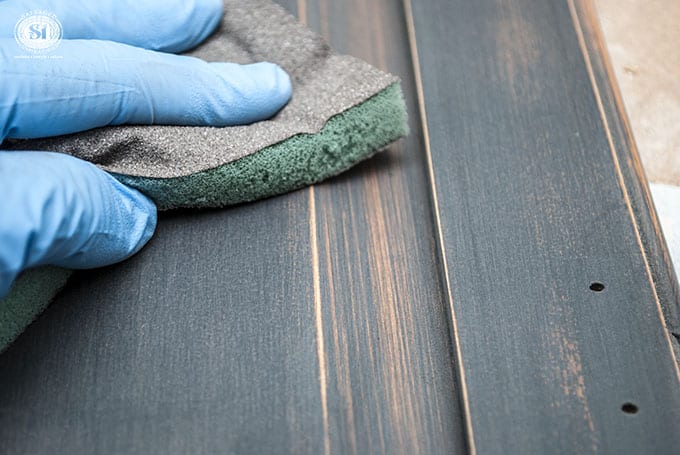
While I was painting, I painted some areas with a lighter hand and then sanded these areas back a little more aggressively. The goal is to reveal some of the original stain while the majority of the piece remains a rich opaque black.
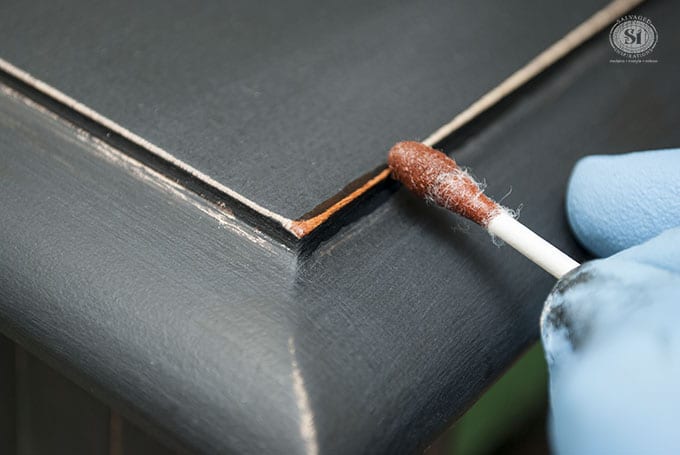
4. SPOT TREAT BARE WOOD WITH STAIN
Unless you sand back with a super light hand, you may find that some areas have been sanded back to bare wood, especially on the corners and edges.
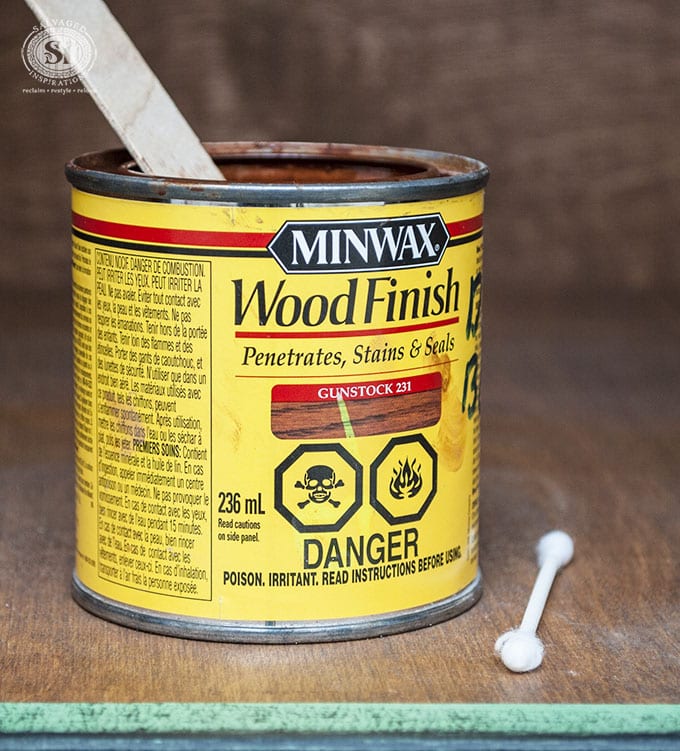
A really simple fix is to take a similar color stain and apply it with a Q-Tip. I dipped the Q-Tip into the stain and only applied it to the raw wood areas. I let it sit for a minute and then wiped it off with a shop towel and let it dry. This step is done after you’ve applied and sanded your last coat of paint but before you topcoat.
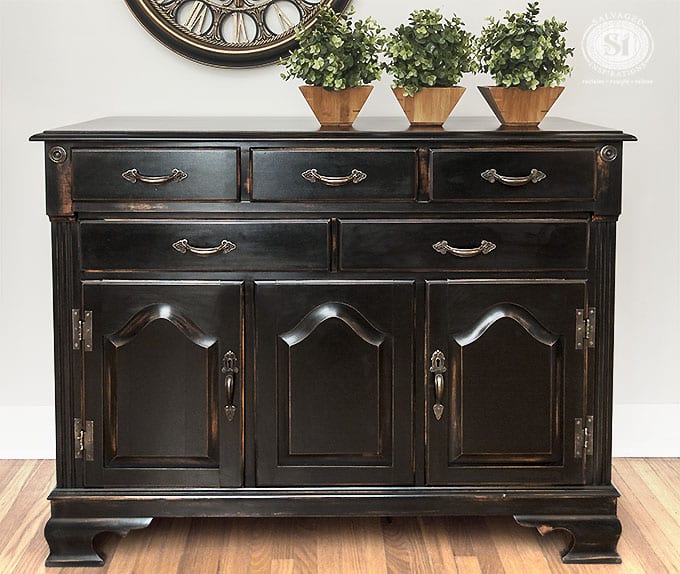
5. BLACK WAX FINISH & TOPCOAT
To get a rich black-on-black Pottery Barn Finish, black wax works amazingly. In the image below, the one on the left has been waxed and the one on the right has not. Big difference, right?!

For extra durability on the top of this buffet, I used General Finish High-Performance Poly. For the entire body, I used Black Wax.
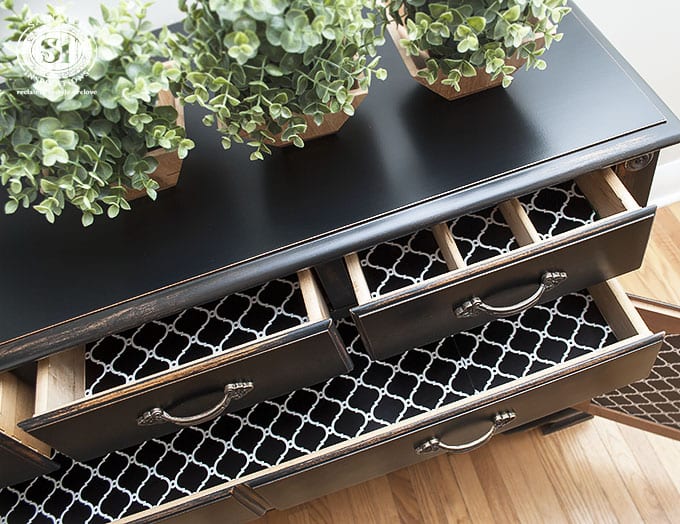
And check out these drawer liners! I found this paper at HomeGoods and it ties in so beautifully with this piece!

Feel free to pin this project and if you have any questions, ask away. 🙂
LET ME KNOW WHAT YOU THINK OF THIS TWO-TONE DRESSER MAKEOVER. FEEL FREE TO ASK ANY QUESTIONS YOU MAY HAVE… I ALWAYS LOVE HEARING FROM YOU. IT MAKES MY DAY! 🙂
Happy furniture painting friends!
Denise x
RELATED POSTS::
DIY ANTHROPOLOGIE DRESSER
HAMPTON OLIVE ENTRY TABLE
SALVAGED SETTEE BENCH
DIY BOHO NIGHTSTANDS
12 PAINTED NIGHTSTAND IDEAS
PIN AND SHARE!


Hi,
This is amazing, how many times do you have to apply a top coat on a dinning room table? And how to avoid streaks marks from the topcoat?
Thank you
2-3 coats of poly on a high traffic piece like a dining room table works well. Using a spray gun will eliminate streaks. Using a good quality synthetic bristle brush. And do not overwork the product. Lay it on, Even it out. And let it be. Hope this helps. 🙂
I love the look of this piece!! I did this on a chair a couple of weeks ago and love the look! But I just noticed yesterday that the paint started to bubble. Do you have any idea why that would happen? I did mix a little water in the paint and sprayed it lightly with water when it was wet to help with brush strokes so I don’t know if that is the problem. Any thoughts would be appreciated:)
Hi Libby! Sorry to hear this. Paint blistering or bubbling is often caused by heat or humidity. I wouldn’t think you adding a little water or spraying lightly with water would be the cause.
Hi Denise!
Love this piece you did so much! I would like to do my table and chairs. Ive been looking at painting them
black, but this is so much richer. My problem is the legs on the table and chairs are a cream color..The table
top and seats on the chairs are stained. How would I get that distressed look on the cream sections of my project? Also, I had already purchased” Beyond Paint” in licorice do you think it would work as well as General finishes? I could return it is I had to, and I would gladly do it if my project turned out as amazing as your!! Thank-you so much!
Hi Chris and thanks so much! I don’t have any personal experience using Beyond Paint but I’ve heard good things so I think it would work well. For the cream chairs and table legs, a stain match would work so everything is cohesive… which could take considerable work on chairs and table legs tho.😐
I’m going to makeover table and chairs also;) Hood luck to you! Show the results;)
Hi, Denise,
Absolutely love what you did with this black finish! FYI, Wise Owl Paint company has a clear primer. I use it for everything.; makes it easy when you want to distress a piece..
Thank you for sharing all your projects!
Mona Z.
Hi Mona! I’ve heard really good things about Wise Owl products but I’ve never tried them. Thanks for this!
Just came across this buffet re-do and would love the same look for a small bathroom. Would this paint/sealer be recommended for a bathroom?
Hi Mimi! Are you asking for a bathroom vanity?… or walls?
Hi Denise – so excited to find these DIY’s you’ve put together! I have lots of antique furniture handed down from family. Some of it was very nicely restored about 20 years ago with stain that has a good bit of orangeyness. Would you recommend doing something like this Pottery Barn black option to tone that down? I hate the thought of trying to sand/strip everything down off this furniture because some it has a fair bit of detailed trim. This technique you’ve done seems like it would adjust the color without losing the charm of the details and minimal removing of the current finish?? Could you do the same technique with a paint that was a dark brown too?
Hi Susan and a BIG WARM WELCOME! I’m so excited you’ve found the #siblog. Yes. This Pottery Barn black finish works amazingly to cover-up orangeness or other undesirable stains. And yes to the dark brown too. You just want to make sure you like the look of the paint color with the original finish peeking through. 🙂
Hello,
How did you get the top corner medallion to match the hardware? I have something similar on a piece I want to do, but it is brassy . I want to have it match the pewter line hardware
Using a pewter Rubb’n Buff or a gilding wax might greatly help Cassondra.
Love the look and finish of this piece! It’s exactly what I’m imagining for a set of Windsor chairs I’m about to paint. I’m struggling with what type of paint to use. If I use milk paint, is a primer required? I’m also using a spray gun, any recommendations?
I love all you do Denise!
Thanks so much, Taina!
Can I sub the wood colored stain for a metallic silver wax?
Hi Jodi! If you’re looking to substitute the stained underwood with silver – a silver paint would be a better choice than a wax… then topcoat with black paint and leave a little silver peeking through. Reason being, ideally wax is always the last thing to be applied. For instance, I’ve used silver metallic wax to highlight over my finished painted piece, but I wouldn’t use it under the paint. Hope this makes sense and is helpful. 🙂
I love this. If I find the right dresser, I may do this for an upcoming Pinterest blog challenge for one of my posts on http://www.thediynuts.com. I’ll let you know. Thanks for the inspiration.
OMG – what a find!! I can’t tell you how excited I was when I found your blog! I have a cherry buffet I painted years ago with Latex paint and put on a poly satin topcoat. After years of light use, the paint has chipped off and I really don’t like the shine it has.
Your Pottery Barn Knock Off is exactly what I am looking for. I can get the General Finish Lamp Black paint and General Finish High Performance Poly shipped to my local Home Depot. Minwax – no problem. I found a store that sells Annie Sloan products about 1 ½ hrs away or could order the Annie Sloans’ wax. Nothing is close to me. Why did you use Annie Sloans’ wax for the body and poly for the top?
Thank you for the detailed list of supplies and step by step instructions with photos! You Rock!! I would love suggestions on prepping my piece, because I don’t want to see the cheery finish when I start sanding. What are your thoughts on painting the top of the drawers? I have seen comments not to because it won’t close properly if you do – any thoughts on this? My goal is to achieve the look you created.
Can wait for a reply!
Hi Beth! Welcome, so excited you found the #siblog too! 🙂 Okay, I often wax the body and poly the high-traffic top because it makes the top way more durable and easy to clean. I also always paint the tops of my drawers to create a unified finished look. The key is to sand them smooth so there’s no paint buildup. To achieve this Pottery Barn look, a little stain was exposed so from what you’re telling me, I believe your pieces would require I light sanding to knock down the old paint/finish and then sand down a few areas down to raw wood so you can stain/paint. hope this helps. 🙂
Thank you! I’m inspired now!
I love how this turned out, it looks like a much more expensive piece of furniture now than before. The finish made the piece. Great job!!
Thank you Sandra!
Gorgeous work!!! I have a small hutch that was painted with Old Village paint over stain. Do you think I could sand it and get this same look? The paint is definitely more of a matte finish. Would I need to seal it? Also, I have a number of pieces of other furniture that have been painted with Old Village and I would really like to antique them. Do you think it’s possible with this brand? And if so, would you suggest a glaze or a stain?
Hi Denise! Love your work. I love what you did with buffet. Great tips:). I see that you put a lovely contact paper down inside…unless it’s fabric…..do you have any good tips for getting a great looking paper in drawers? I find this a struggle for me. Thanks for the work you do and for share your gift. Blessings!
Hi Nina! Thank you so much and glad you’re finding the tips helpful. 🙂 If my memory is serving my right, I believe I picked up this thick wrapping paper from TJ Max. I don’t use contact paper because if the person buying the piece wants to switch it out, it’s easy to do. Here’s an easy way to install drawers liners.
Hi! Just ran across this Pottery Barn knock off while looking for techniques on how to do something similar in our front bathroom. I LOVE this piece and I have a similar piece that I was going to get rid of but not now!!! What did you end up doing with the top part? Glad I found your site!
Hi, I just stumbled upon this post while looking for ideas for my aquarium stand and entertainment stand as well. The aquarium stand is pine so I’m thinking I should sand and stain completely prior to the steps above. As for the entertainment stand, it currently has a dark stain, but there is a bad scratch on a front leg. How would suggest correcting that? Thanks!
BTW this piece is stunning!
Hi Jessica! A bad scratch can easily be filled with Bondo or Wood Fill. When you go to paint, just make sure the filled scratch is covered with paint so you don’t see the repair. Any distressing can be done around that area. Hope this helps. 🙂
Hi! I love this!! Thiis is exactly the color I am looking for
I just purchased a used white French provincial sideboard buffet. I love the shape, but the color is like a cream with gold accents. My question is would I need to strip the whole piece using sand paper, stain it then paint it black? Any tips on the process? Would the stain andpaint you used work for me? i would really love to have the wood stain come up instead of white when distressing it.
Thanks!
Hi Monna! If you like the looks of stain showing through, you do need to start with a stain base – otherwise, you will see the cream/gold accents if you were to distress. So yes, stripping and staining would be the best place to start and the products listed above will work nicely. Hope this helps and have fun. 🙂
Love this piece!! Do you know what Behr color would best match your paint color?? Thanks!! Gail
Hi Gail! I like Behrs “Black Smoke” or “Black Suede”… both are beautiful. Also, applying black wax over any black paint really help deepens the look. I also wrote this article on The Best Black Furniture Paint if you’d like to take a peek. Hope this helps. 🙂
Do you use the black wax over the entire piece? Or just the painted black areas, skipping the exposed stain?
Hi Alisha! I used black wax for the entire body (painted and stained areas) and poly for the top.
Hi Denise,
I just stumbled on this post of yours from a couple of years ago. I am curious about the top half, what did you end up doing with it? I have a similar piece and am considering just using the bottom half as a buffet.
The top is sitting in storage waiting for its makeover. I’m guessing I will add some feet and turn it into a bookcase/display cabinet. 🙂
HI Denise,
How much paint is required for a buffet the same size as yours, and also for one typical kitchen chair?
this lovely! for my first ever project I’m going to do this to a few end tables and I’m so pleased to have found your instructions and paint recommendations.. I have two questions for you…if you possibly have time: (1) it’s okay to use the poly all over and skip the wax entirely, correct?, and (2) have you used Rub ‘N Buff or a similar product you’d recommend for the detailing? I’m looking for a subtle gold metallic look where you have the stained/distressed detailing. THANK YOU! ~allison
Hi Allison! Yes and yes. 🙂 The only thing you may test before you proceed with the entire distressing/detailing is the Rub’n Buff. I would make sure it isn’t too metallic looking… a gold metallic gilding wax may give you the more subtle look you’re after…. just my 2¢ 🙂
Hi Denise. Trying my first project. I am searching for the materials and want to make sure I am using the correct products. Was this milk paint? Did you use chalk wax and was the top coat water based? I have found these all on Amazon and I’v got the brand but not sure on the types. Thanks so much.
Hi Renee! I’ve included links to the products I’ve used under ‘supplies’ that you can click through and take a peek. General Finishes Lamp Black was used as the paint. It’s a durable acrylic but labeled as a milk paint. Annie Sloans Black wax was used for the body and a water based poly on the top for extra durability. Hope this helps and have fun with your project. 🙂
Great, Thank you!
Hello,
I was curious what you do with the hinges? Do you use the existing ones or change them?
Hi Natalie! I used the existing/original hinges. 🙂
Beautiful piece! My wife would like a finish like this on a buffet table I built, however she wants it white not black. How would you suggest getting this finish with a new wood piece that has no stain and in white? Any help would be appreciated! Thanks!
Hi Kevin! For a raw wood piece, I would start by staining it the stain color of choice – the stain you want to show through the white. Then seal with Shellac or some type of CLEAR stain Block. Then paint using the same technique described above for the Potter Barn Buffet. I hope this helps. 🙂
I was wondering exactly how you applied the black wax. Did you just brush a layer on and leave it? Or did you wipe off the excess as you went along? I’m seeing a lot of brush strokes on mine so I wasn’t sure which way I’m suppose to use this.
Hi Renae! Yes, I worked in small areas applying the wax, and then rubbed off all the excess. Finish is smooth as glass and no brush marks.
WOW, what a beautiful piece of furniture you’ve created!!
I found this blog post through “Knock Off Decor” and thought your refinished buffet was the Pottery Barn piece you loved until I read on…… this is truly a PB quality piece of furniture now. Thank you for the great tutorial, just the incentive I needed to try this on a small buffet I inherited from my Mother.
I’ll definitely itely be looking back ….
Thanks! And good luck with the buffet you inherited from your Mother. x
Hi Denise. I love this piece. I’m scared but am going to try this on my outdated entertainment center. You mentioned you sand between coats. How many coats did you do? Did you sand before the first coat? Thanks so much!
Hi Beth! Yes, you can give you’re piece a light sanding to create some tooth (like wiping down your kitchen counter) for the paint to adhere to – and then a very light sanding inbetween coats for a professional finish. I beleive I used 2 coats on this piece. Good luck and have fun. 🙂
Hello Denise – I am trying this finish with a corner TV cabinet. What grit sandpaper do you use between coats of paint? Also, do you put clear wax on everything except the top before you put on the black wax? Will this work if the top of the piece has a veneer finish? Thanks
Hi Robert! I always sand between coats with a high grit – 220 or higher. I did not use clear wax before applying the black wax because there’s no need. Often clear wax is applied before a dark wax to help ‘control’ the effect. ie – if you want to remove some of the black wax, the clear wax below makes this possible. However, black wax on black paint – not needed because you want a nice rich black sheen. And yes, I’ve painted and waxed over a veneer surface many times and it works nicely.
Hi Denise. I am so glad that I found your information. This is the look that I want for my bedroom suite, which is pine. I know that you used milk paint, but I was thinking about using an expresso color and making my own with calcium carbonate. Any tips? Since this is an existing suite that has been polished many times, what should I use to clean and prep? This is my first time, so I am so concerned about ruining my bedroom suite.
Hi Sheryll! If you’re going with expresso w CC, a good cleaning and a light sanding will be beneficial as the furniture has been polished many times. TSP cleans/degreases (spray versions can be found at HomeDepot..even Walmart) and then a light sanding with say 150-220 grit sandpaper to ensure proper adhesion.
I am so excited to tey remaking this pieces! I am dying to know where you found those drawer pulls…I’m so in love with them
Thanks Liz! All the hardware came from Hobby Lobby!
Hi Denise, I am new to the furniture repurposing world but it is quickly becoming an obsession with me. You mentioned that you apply a black wax to achieve the black on black effect. Do you also put it on the top as well and THEN put the General Finish High Performance Poly on top? If not, how do you achieve the black on black effect for the top?
Hi Nena… welcome to the world of painting obsession! 🙂 No wax (black or otherwise) was used on this top – just GF High Performance Poly. Black wax adds depth and sheen to black paint, but doesn’t change the color to make it stand out from the poly’d top.
This is exactly the look I am going for for a smaller piece but was going to use black chalk paint. Will the result be comparable?
Thanks!
Hi Judy! I believe black chalk paint would work fine. And the results should be similar if top coated with a nice sheen. 🙂
I have a large buffet from this same era that I’ve yet to tackle. It’s fascinating to me how paint and hardware can change the look of such pieces. As for the hardware, do you have a particular vendor that you especially like for hardware choices? Thanks!
I like getting my hardware from Hobby Lobby when they have their 50% off sale. Lee Valley here in Canada has a great selection… along with shops like The Painted Bench in Hamilton. There are also some great resources for hardware online including Amazon! Good luck with your makeover Dominique!
I love this piece! I stumbled on your blog post via Pinterest. I’m working on a hutch of my own, but I’m painting it a honey-yellow. Do you think the q-tip trick will work with lighter painted pieces? Or will a darker wax help hide my heavier sanded spots?
Thanks!
thanks for the kind words Sara…and welcome! 🙂 The q-tip trick will definitely work on lighter painted pieces so long as care is taken to apply neatly just on the appropriate areas. A dark wax also works well to camouflage heavier sanded areas but it doesn’t ‘stain’ them. The wood does still appear lighter. Good luck with your project…honey yellow sounds amazing. 🙂
Good morning Denise, What a great piece! I’m getting ready to tackle this finish with my 1979, all wood, kitchen cabinets. I cannot seem to find lamp black paint to buy around here so I will have to order it online. My cabinets equal the size of maybe 4 of the buffet you featured. Do you think one gallon will be enough? Also, should a different topcoat be used for a kitchen over the black, obviously, the counter tops will be a different material.
Hi Lydia! Yes, General Finishes products have amazing coverage. I used less than a pint of Lamp Black for this buffet so I would guess a gallon should be plenty. As for top coating, I used poly for the top and wax for the bottom of this buffet but for kitchen cabinets, my preference would be poly. Easy to clean, super durable and won’t need reapplying down the road. Poly vs Wax
You do such beautiful work, and are an inspiration! I find myself coming here when I need answers in the middle of a project. I’m working on one now, and have mod-podged fabric to the bottom of the drawers. I plan to add several layers of poly on top of that, but they are feeling quite rough at the moment.
When you line your drawers, do you affix the lining permanently, or just lay it in the bottom of the drawer? I’m curious to know what you do with fabric vs. what you do with paper. Keep up the good work!
Hi Laurie! I’m so glad you’re finding the blog helpful! When I line drawers (and sometimes I paint them or leave them as-is if they are clean and in good condition), I use paper. 99% of the time I don’t affix/adhere the liner. Reason being, when I sell the piece, sometimes my choice of liner is not the choice of the buyers. Perfect example is this dresser. When the man came to pick it up, he said his wife hated animal prints, so we removed it right away! 🙂 Easy to remove, and just as easy to adhere with a little spray adhesive if thats what they choose. 🙂
Amazing job! Looks like something in an expensive shop. Thanks again for sharing your tips for us.
Thanks for being so encouraging all the time Tracy! Hugs 🙂
Thanks for sharing Denise.
Simply beautiful work.
SK on Elderberry
Thank you SK… and I noticed you shared on Pinterest…much appreciate! 🙂
Gorgeous job!! Not my style, but still beautifully done. 😀 The staging with it is perfect, too.
Hi Zovesta! Hope all is well and thanks for the kindness. <3
Hi Denise
what if i wanted a different color to come through when sanding like a tan or light blue?
Using a resist distressing method would work nicely like I did here or here. 🙂
It’s just beautiful, Denise! You rock! I love your blog and your tips. I’m practically redoing everything in my house! On a roll over here, so keep those ideas coming.
Feels good to be on a roll doesn’t it!? Good luck with all your projects and thanks for the kind words KK! 🙂
Yes, it does! Thanks, Denise. Can’t wait to see what you do next! 🙂
This is truly stunning Denise. You have incredible talent. Thanks for sharing it with us as it’s a very inspiring piece.
Thank you Josie!!! 🙂
Great job Denise! Love it!!!
thanks so much Debi! x
I LOVE this. Thanks for sharing. I’ve been dying to paint something in Lamp Black and now feel even more of an urge! I will be using this Q-Tip trick on my next dark piece! Thanks and wonderful job!
Thanks Bethany! And YES, if you get the opportunity to use General Finishes Lamp Black, DO IT! This black is gorgeous on furniture! 🙂
this is gorgeous! i am now in love with black wax-oohlala. you have such a great eye for photography. cannot wait to get my hands on black wax for my grandmother’s chiffonier.
Thanks Ruby! And clear wax would have worked nicely too but the black wax just adds that little bit extra depth on the black finish. Have fun with your grandmothers’ chiffonier! 🙂
Denise, this piece looks so much better than the original finish. I am right in the middle of an issue that needs a q-tip stain application and was going to toss the small picture frame that revealed white under wood upon sanding. Well, thank you, as I don’t usually work on anything this new, I have never learned it.
Ginene
Thanks Ginene! And I really hope the Q-Tip stain application works on your picture frame! 🙂
I love this look! You did a wonderful job Denise 🙂 I also love the drawer liner, is it paper or fabric? And one more thing…your staging pictures are AMAZING!!
As always thanks for sharing 🙂 Happy Painting ?
Aw thanks Annie!!! You just put a big smile on my face! Staging my furniture is getting easier but it’s been a real challenge for me in the past… so I take this as a HUGE compliment. 🙂 Oh, and the drawer liners are a heavy paper that I picked up from TJ Max.
Hi there…love how this piece turned out…very inspiring! You mentioned the paper for drawer lining was heavy paper from TJ Max, is it wrapping paper or paper for drawer lining? I love it! Patti
Thank you Patti! It’s nice quality heavy wrapping paper. I cut the paper to size and then used a small amount of spray adhesive to keep it in place.
Love this look, Denise. Sleek and sexy!!!
Thanks so much Mary. And loving your pillows btw 🙂
This is gorgeous. I love the qtip and matching stain idea. I have a hutch top and bottom that are different stains. I love that I could get this look by using a heavy hand to sand and then using matching stain on both pieces. Thank you for the inspiration.
Thanks so much Melissa and glad you find the tip (pun intended) helpful! 😉 Have fun with your hutch project!
It’s gorgeous! I remember seeing the ‘dip Q tip in stain’ when I first started ‘reloving’ furniture several years ago! I had no idea it was your tip! It’s been a tip that has saved me more than once. Thanks, Denise! xo ~ Robin
Thanks Robin! And the Q-Tip-in-stain has really come in handy for me over the years too! I use to use a small soft cloth until I saw the Q-Tip infograph on Pinterest. 🙂
Hi Denise, What a beautiful black buffet. I love the distressed black finish and the pretty hardware. Do you buy all your hardware to match or do you have a trick to making it all the same finish.
Hi Monique! All the original handles on this piece were replaced with new hardware from Hobby Lobby. But the door hinges and round decals on the side were spray painted in Oil Rubbed Bronze (and then sanded down a bit) to match the new Hobby Lobby handles. It’s a lot easier when all the hardware matches perfectly but sometimes I have to improvise. 🙂
This is stunning! The black is so sleek, smooth, and rich looking. Love it!
Thanks so much Angie! X