HERE’S HOW TO REMOVE WOODUBEND MOULDINGS SO YOU CAN REUSE THEM ON ANOTHER PROJECT | YOUTUBE VIDEO
Hi beautiful friends and thanks for joining me for Trash To Treasure Tuesday… the last one of the year! In keeping with tradition, I’m sharing another version of this curb-shopped washstand. Last year I used Woodubend mouldings to spruce it up. This year I’m sharing how EASY it is to remove these Woodubend Mouldings so they can be used on another project!
*As an Amazon Associate, I earn from qualifying purchases. There are affiliate links in this post to other companies/products I use and love as well. You will never be charged extra when you purchase through these affiliate links. If you purchase from my links – A BIG thank you for supporting me and the #siblog! To see my full disclaimer, click here.
I’m also joining my T2T crew and sharing links to their projects below. I’m looking forward to seeing what they’ve created for the last T2T of 2023. I hope you join me on today’s tour as well!
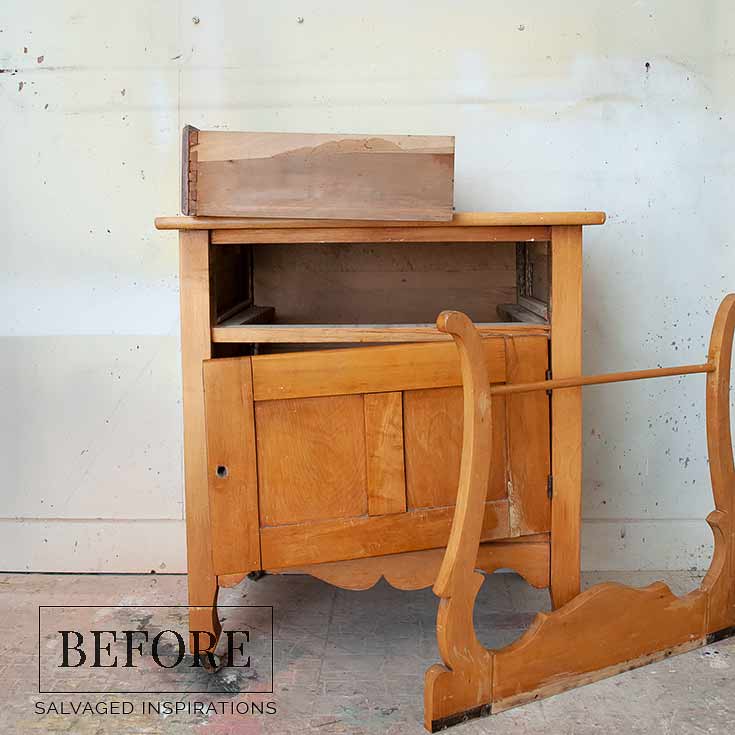
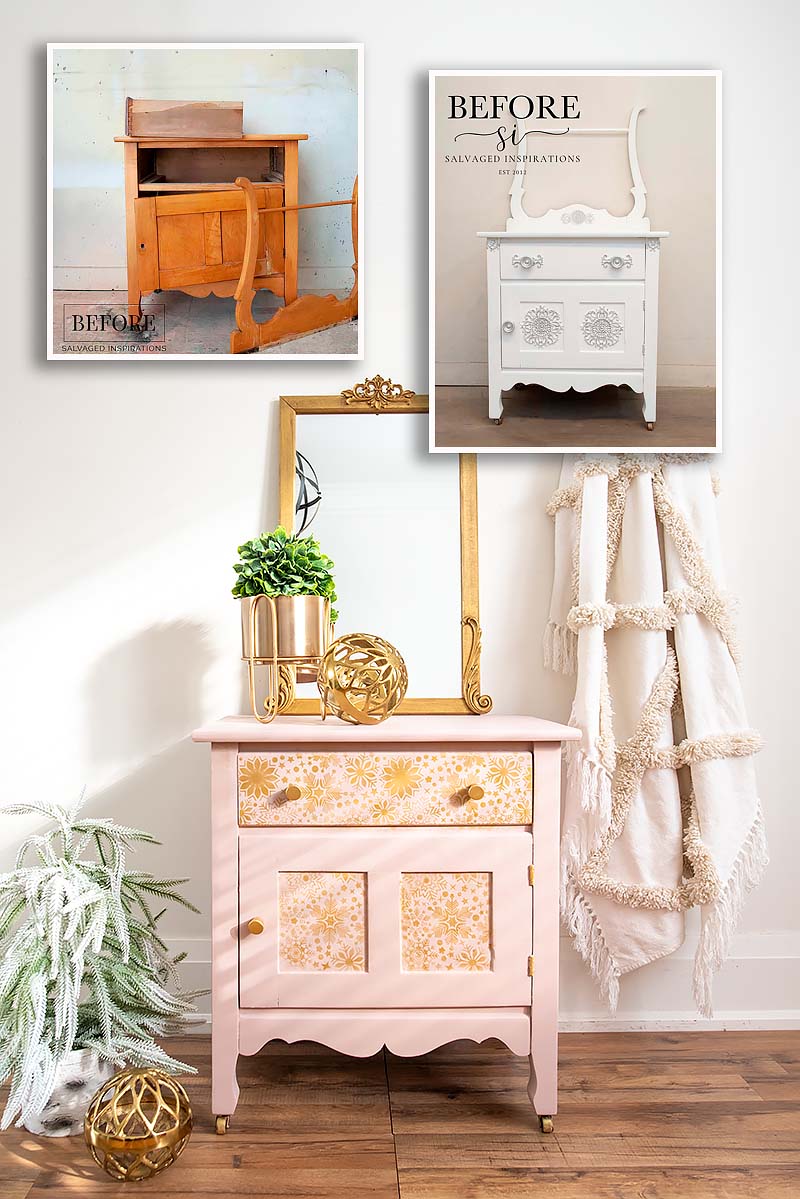
Here’s the salvaged washstand in its original state when I found it curbside back in 2018.
And here’s last year’s Christmas makeover using white paint and Woodubend mouldings. If you’d like to see ALL the previous holiday makeovers, I’ve included all the prior looks in the “Related Posts” at the end of this tutorial.

THIS POST IS SPONSORED/CONTAINS AFFILIATE LINKS TO PRODUCTS I USE. YOU CAN SEE MY FULL DISCLOSURE HERE.
WHAT YOU’LL NEED
Vintage WashStand – SALVAGED
Heat Gun (15% OFF as of writing this!)
Painters Multi Tool
Timbertech Airbrush Kit
Bosch Sander (25% OFF as of writing this!)
Conch SILK All-In-One Mineral Paint
Gold Metallic Paint
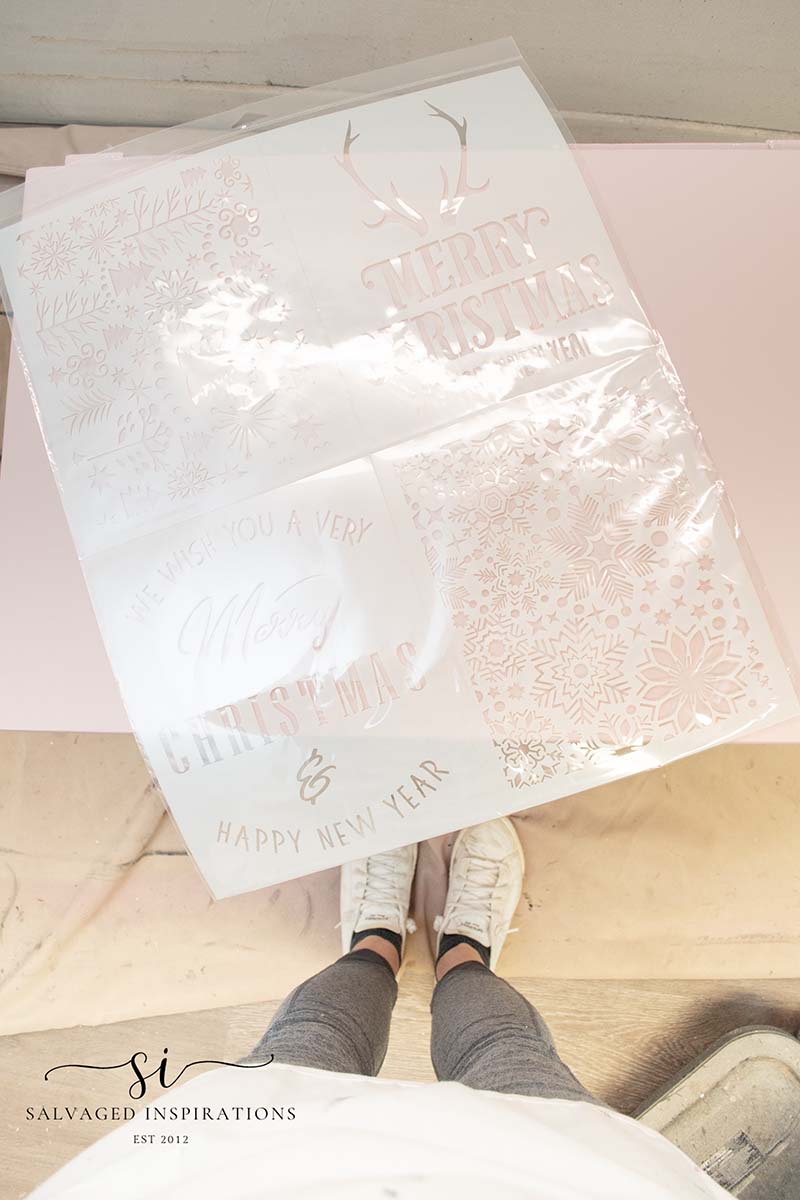
Christmas Cheer Stencil
Multi-Purpose Spray Adhesive
Brushed Gold Knobs
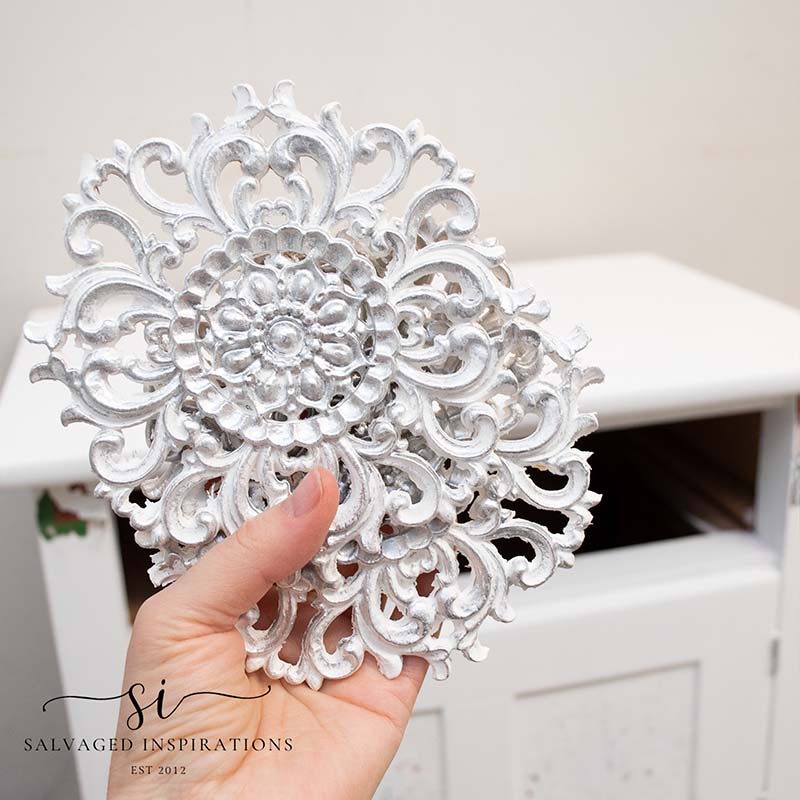
Woodubend Moulding Designs
CHRISTMAS WASHSTAND 2023
Here’s how this washstand all came together…
HOW TO REMOVE WOODUBEND
There are many reasons you may want or need to remove your Woodubend.
- Placing them in the wrong spot on your project.
- Your furniture didnt sell and you’d like to create a new look.
- You’ve created something for yourself but like you’d like to change it up.
- Whatever the reason, Woodubend is EASY to remove and use on another project!
What you’ll need is HEAT and a spatula or putty knife to pry the Woodubend up.
I used my heat gun to warm up the Woodubend on this washstand. The Woodubend was adhered to this project for a full year, but the heat loosened up the glue and made the Woodubend soft and pliable. While the moulding was still warm, I used my painter’s multi-tool, to pry off the moulding. You can also use a spatula, putty knife, or anything flat enough to get under the moulding to remove it. Once the Woodubend is removed, it will cool down and harden. Then it is ready to be stored in a bag or box for your next project. Easy as 1-2-3!
- Heat the Woodubend Moulding
- Pry it off with a spatula or putty knife
- Cool and store to reuse on another project

These will ALL be used on another project. I can go ahead and repaint them, stain them, bend them, cut them, and use them exactly as I would a brand new one right from the package!
You can browse 100’s of gorgeous Woodubend Designs HERE!
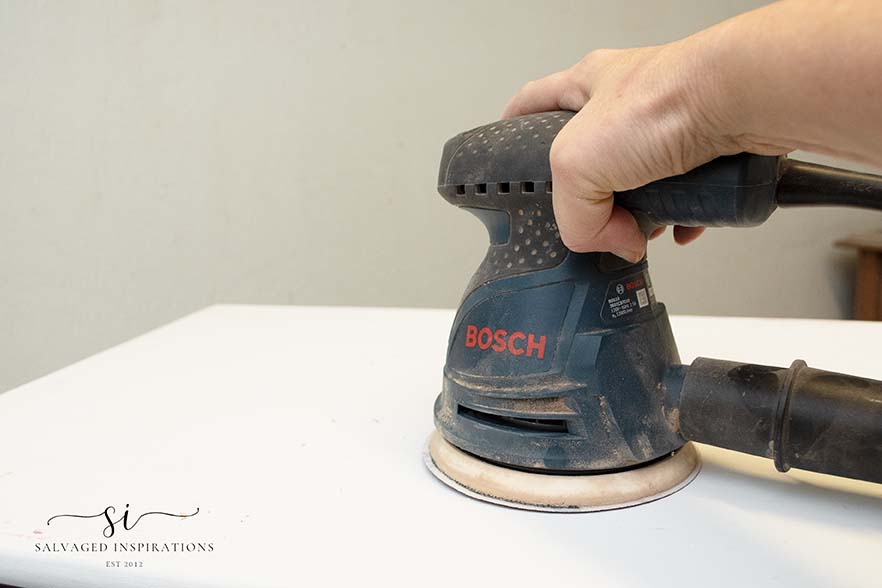
SANDING
Once all the Woodubend was removed, I gave this washstand an overall scuff sanding with my orbital sander. As of writing this post, this Bosch Sander is 25% OFF!
PAINTING
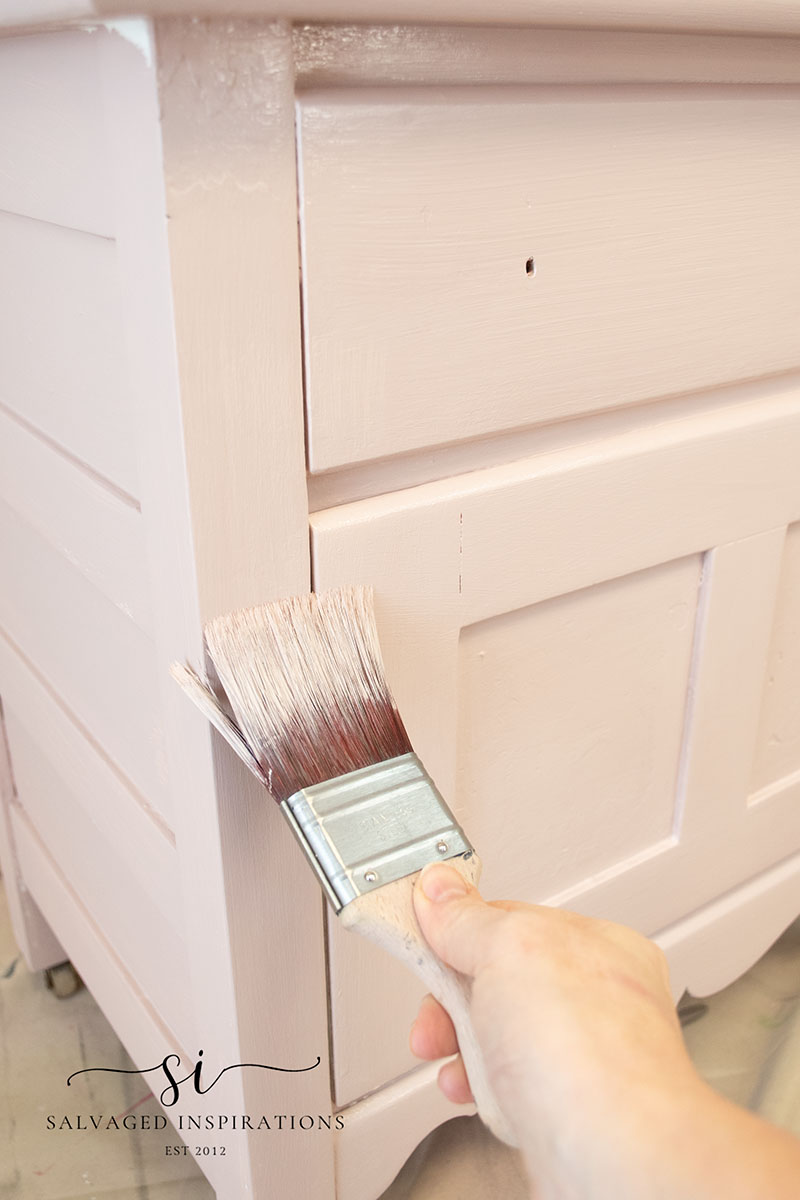
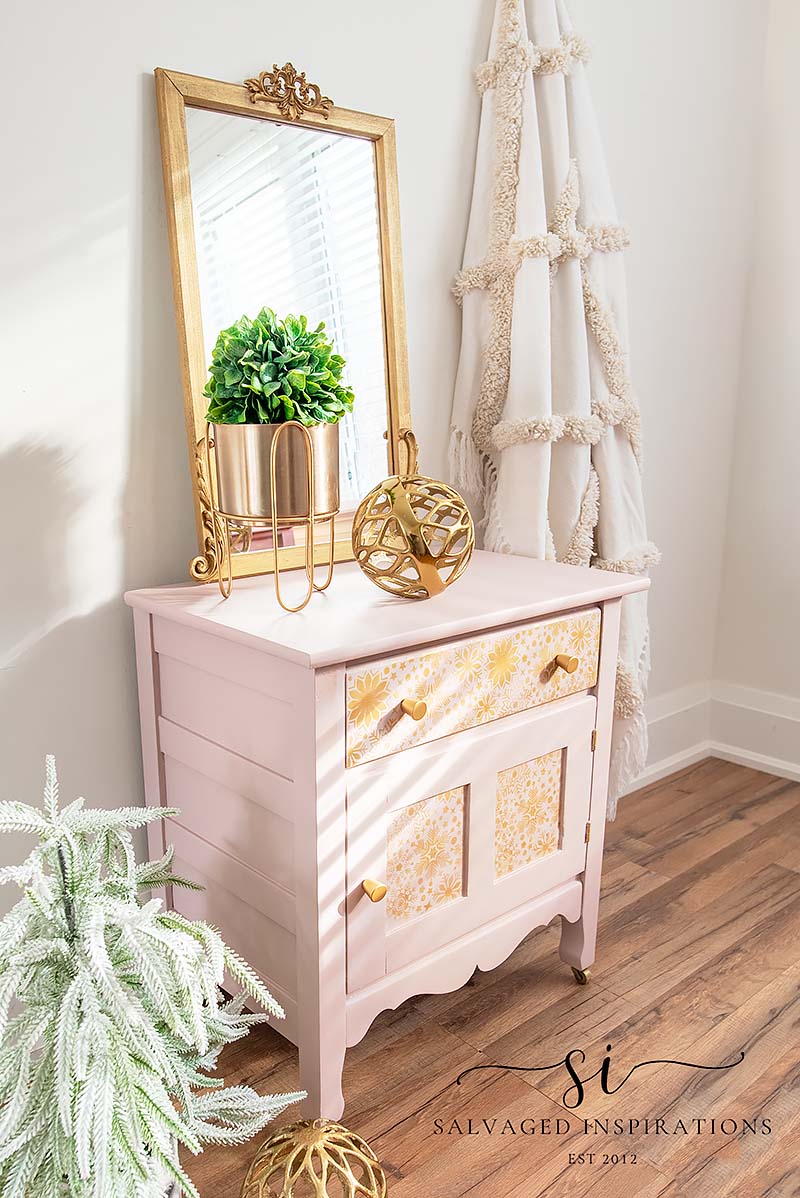
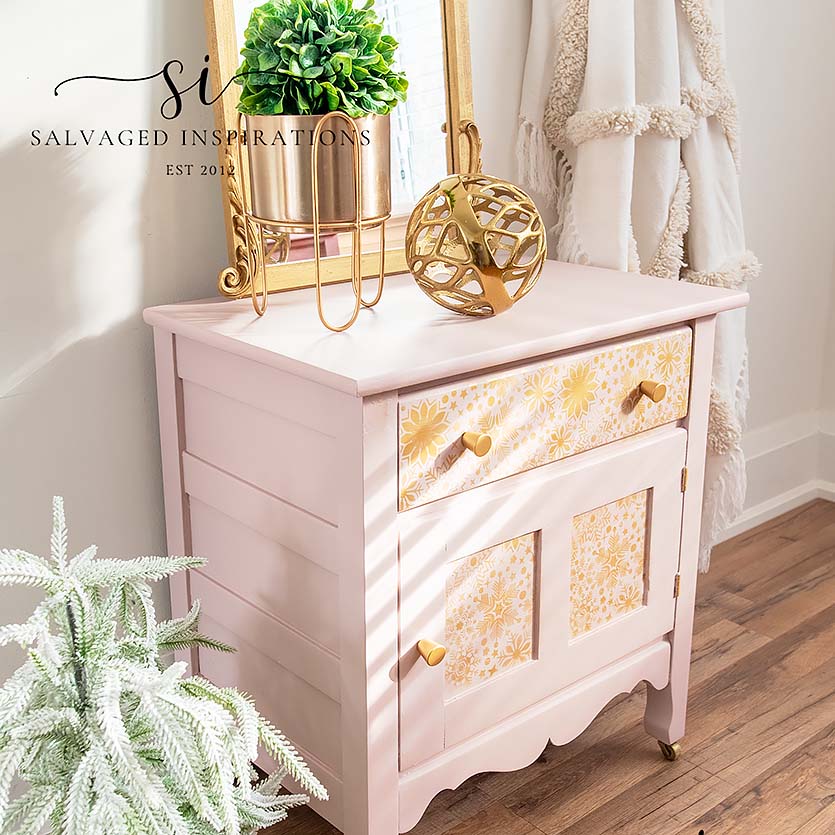
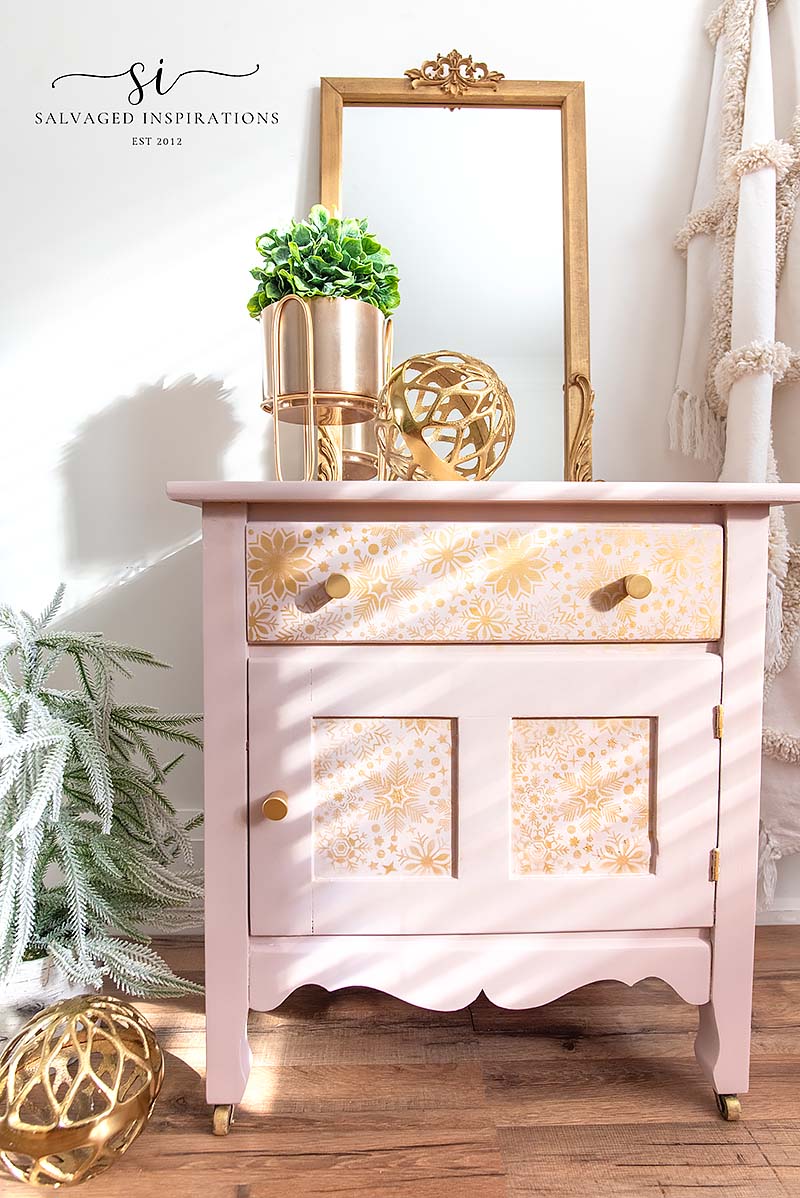
To paint this piece, I picked Conch SILK All-In-One Mineral Paint. A big thank you to Monique who suggested PINK in the comments section for this year’s Christmas Washstand Makeover!

Because this washstand is an exercise in creativity and a variety of looks each holiday season, I didn’t sand everything perfectly flush as you can see below, but this paint went on beautifully regardless. This Conch Pink is such a gorgeous color. It’s inspired by a conch shell. I applied two coats for full coverage.
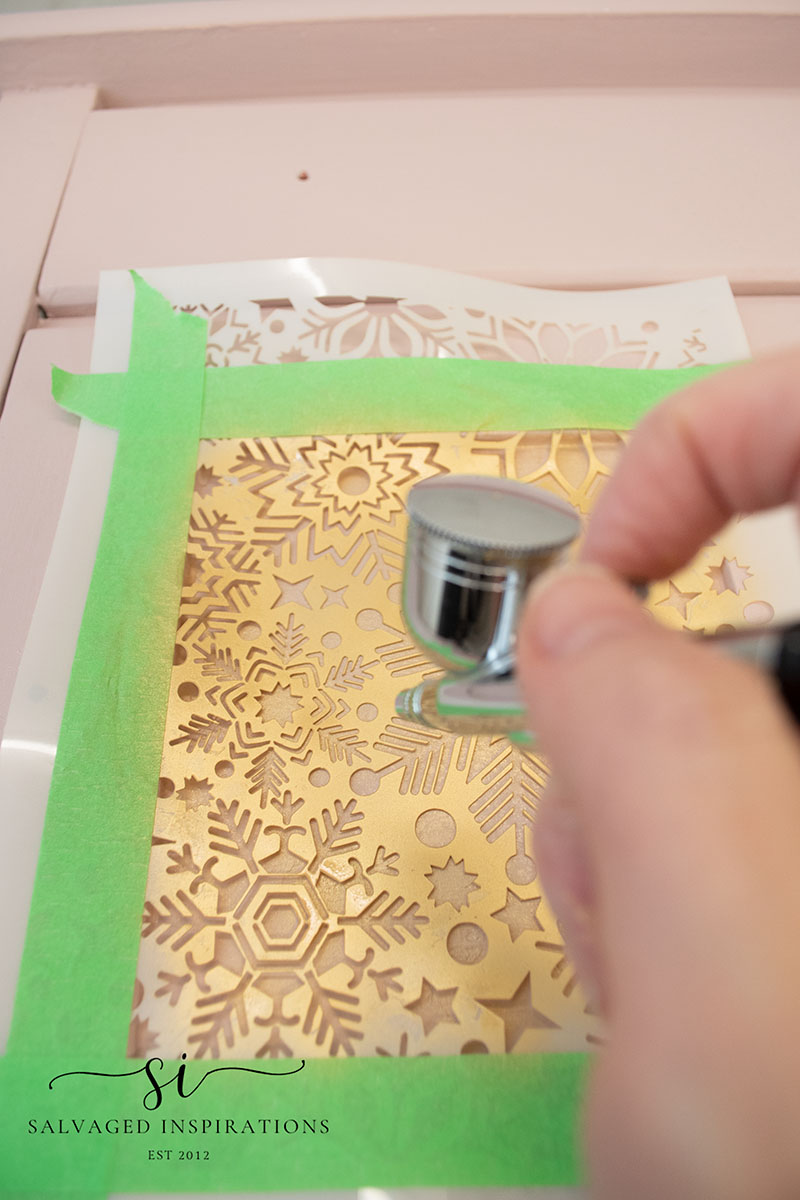
CHRISTMAS CHEER STENCIL
I left the paint to dry and came down the next day to add this Christmas Cheer Stencil design. This stencil comes with four different Christmas stencils that can be used individually or collaged together.
I used a spray adhesive to stick the stencil onto the door panels but I still had to hold down the edges as the stencil was larger than the panel inserts. Rather than brush or roll on the gold paint, I used my Airbrush Kit to airbrush the stencil on. It sprays beautifully and I love the result. You may remember the first time I Airbrushed a stencil on this dresser here.
Once the washstand was stenciled, I added on these brushed brass knobs and this washstand was complete!
FINISHED CHRISTMAS WASHSTAND
Here’s the finished look. What do you think?!
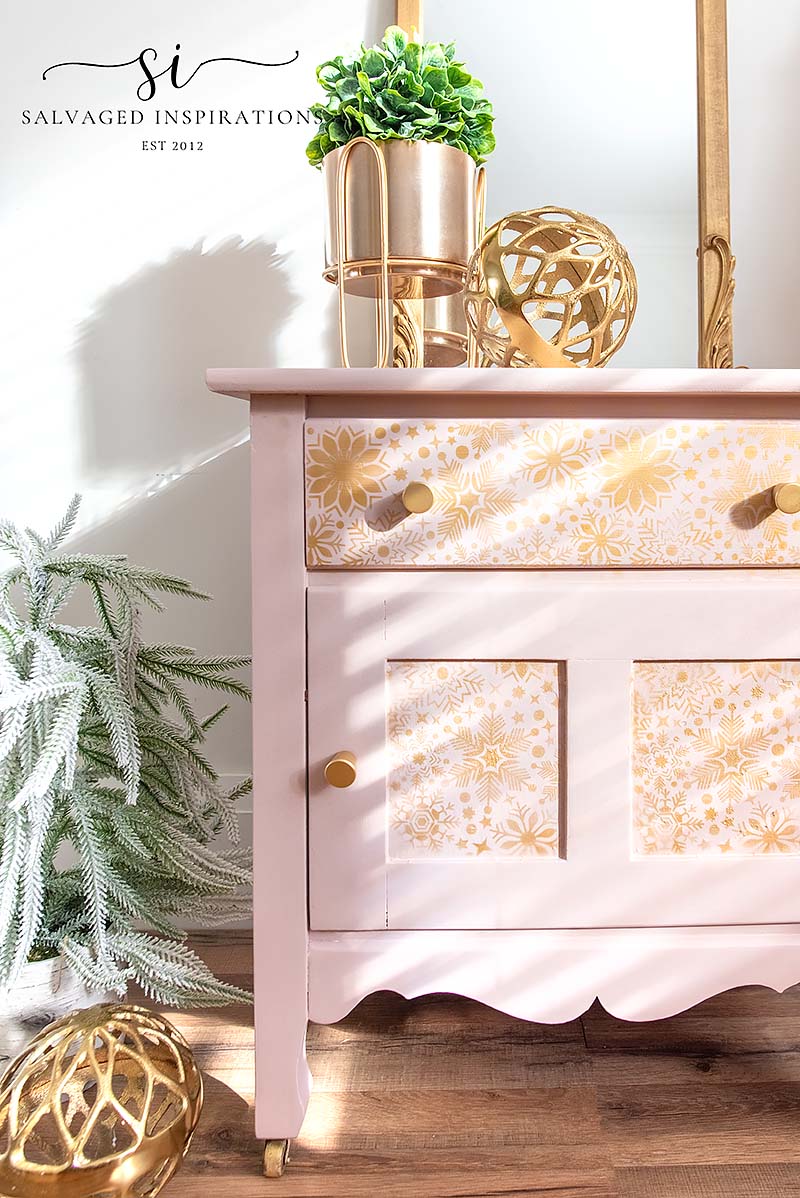
I think it looks super sweet in pink! The gold Christmas Cheer Stencil gives it a cheerful holiday look!
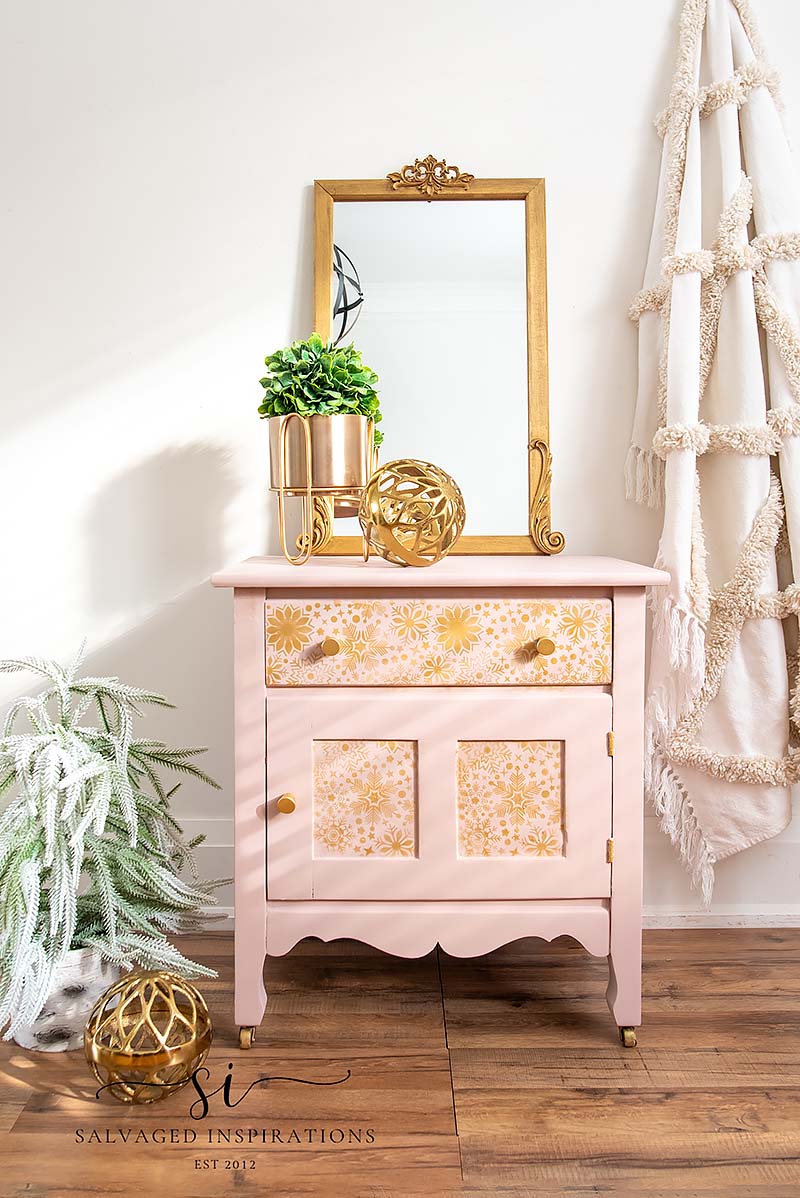
It looks very different from last year and the Woodubend is all ready for a brand new project. No waste!
I can’t wait to hear what you think of it’s NEW LOOK!
YOUTUBE TUTORIAL
Here’s the full step-by-step tutorial on YouTube. Our #siyoutubefamily is already a community of 42.3K so don’t forget to subscribe if you haven’t done so already! So exciting, thank YOU! 🙂
And now for some Trash To Treasure FUN!
You’re going to LOVE what my creative Trash To Treasure ladies do! 🙂 Below are the BEFORE photos. Visit the links underneath to see the amazing AFTERS and learn how they did it! I’m heading over to take a peek as well! x
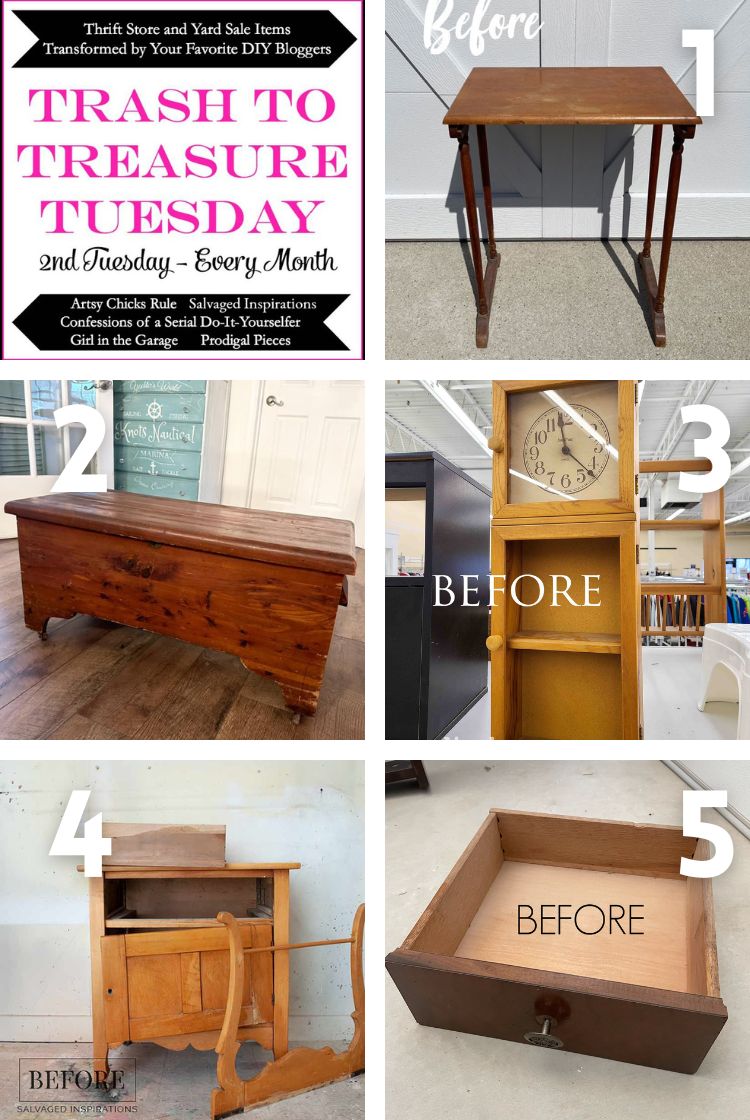
1. CONFESSIONS OF A SERIAL DIYER
2. ARTSY CHICKS RULE
3. PRODIGAL PIECES
4. SALVAGED INSPIRATIONS (HAPPY YOU’RE HERE!)
5. GIRL IN THE GARAGE
Here’s another look at this Christmas Washstand before and after. I hope it’s inspired you and given you some ideas for your holiday projects! As I mentioned, if you’d like to see all the prior year’s Christmas Washstand Makeovers, I’ve included links for each year below.
I’ll be back this Thursday with my Furniture Fixer Upper friends where we will be sharing our all-time FAVES of 2023. See you then!
LET ME KNOW WHAT YOU THINK OF THIS SALVAGED WASHSTAND MAKEOVER OR FEEL FREE TO ASK ANY QUESTIONS YOU MAY HAVE… I ALWAYS LOVE HEARING FROM YOU. IT MAKES MY DAY! 🙂
Happy painting my friends!
Denise x
RELATED POSTS::
2018 – HOW TO PAINT BUFFALO PLAID
2019 – DB EVERGREEN WASHSTAND
2020 – HOW TO STENCIL FURNITURE
2021 – HOW TO PAINT STRIPES ON FURNITURE
2022 – WOODUBEND WITER WASHSTAND
PIN AND SHARE!


So sweet this year, Denise! Love the soft colors. xo
Thanks so much Jen! Happy Holidays to you and your family! XOXO
So sweet! Love the pink and gold! xo
Thank you Nancy! XOXO
Very pretty! That stencil can pull double duty – I think that the finished piece could be year round – like I could easily see this in a girly bedroom or dressing room. Really nice job!
Thanks Coleen and I agree! I can see this in a girls room all year long as well… minus the Christmas styling… hehe.😂
I love the white yet the pink and gold is more my style as it looks warmer to me. Thank you for sharing the Woodubend tip. I had no idea they could be reused!
So glad you like it Nicki, thank you! And yes, don’t throw that Woodubend away. It can be used on multiple projects!!😃
I must admit I loved the white one. But, that’s my preferece.
White is a classic! Thanks Cynthia! XOXO
Hi Denise. It’s Monique:). I’m beyond honored that you used my suggestion. You chose the absolute perfect pink and the airbrushed stencil looks amazing. Thank you so much for valuing all of us readers. It means so much. Beautiful makeover.
Thank YOU for the fabulous suggestion and chiming in Monique! I really appreciate it! Hugs XOXO
Gorgeous, Denise! It almost looks like a totally different piece, and i love that you kept the tradition going! XOXO
Aw, thanks my friend! I have to admit I have fun with this little piece every year. It’s refreshing to paint and be creative without having to worry about everything being ‘perfect’ for a sale. 😉
I’ve always loved pink projects, but I preferred the first makeover. I must buy WoodUBend!
You’d LOVE Woodubend Lizzy! It can totally transform a piece!!!😊
Denise, this is lovely! I have so enjoyed watching you create on this little washstand year after year. But this one really speaks to my inner girl. Thank you for sharing your talents with us. Happy holidays. 🎄 xo 😘
Thank you Do! And Happy Holidays to you too! I hope you’re going to be taking some well deserved time off for yourself! XOXO
Sooo pretty!
Thank you Cyndi!🤗
Hi Denise! I live this color and the way the airbrushing stencil looks. It gives it a soft look. This little washstand has really stood the rest of time and paint. I always look forward to see your Christmas wash stand.
Oh I’m so glad Cheryl because I enjoy working on it every year! And ya, I love airbrushing stencils – super fun and I really like how much control I have over how dark or light the paint goes on. Very different from using a stenciling brush or roller!
How absolutely lovely, Denise. That pink is perfection. 🙂
Thanks so much Larissa! XOXO