HOW TO TURN A WATERFALL DRESSER INTO A PAINTED AND STAINED BEAUTY! | YOUTUBE VIDEO
Hi, sweet friends! Last week one of my readers, JoAnne who also lives in the GTA reached out and asked if I’d like this dresser. I was so flattered JoAnne thought of me. If you’re reading, thanks, JoAnne! 🤗 Today I’m sharing this painted and stained waterfall dresser makeover. I hope you all enjoy it as much as I enjoyed working on it!
It’s also Furniture Fixer Upper Day where my blogging besties share their before and afters as well. You can check them out at the bottom of today’s post!
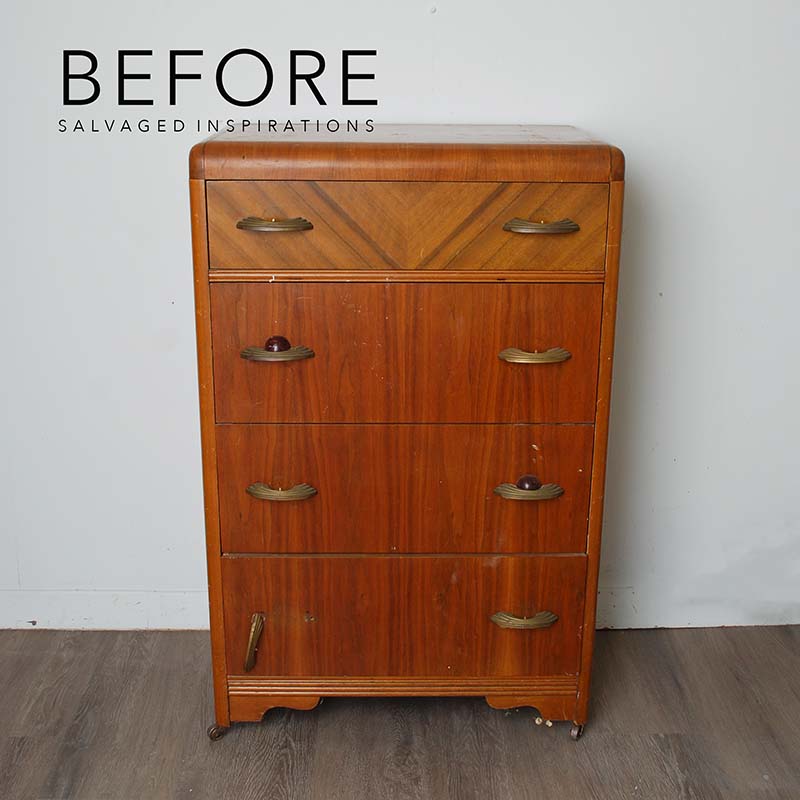
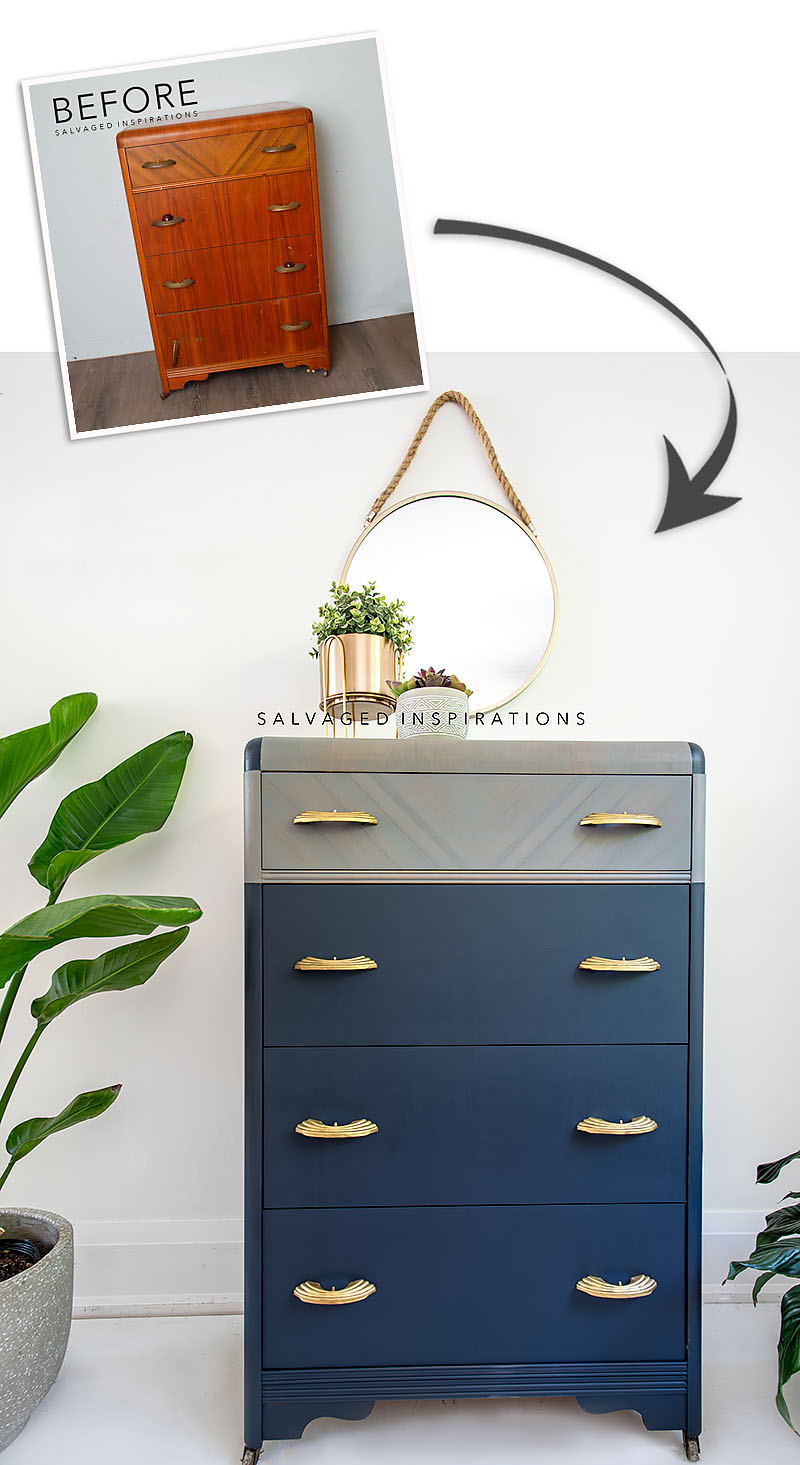
Here’s the waterfall dresser that was gifted by JoAnne. It’s in great structural shape minus surface scratches and some missing parts on the handles.
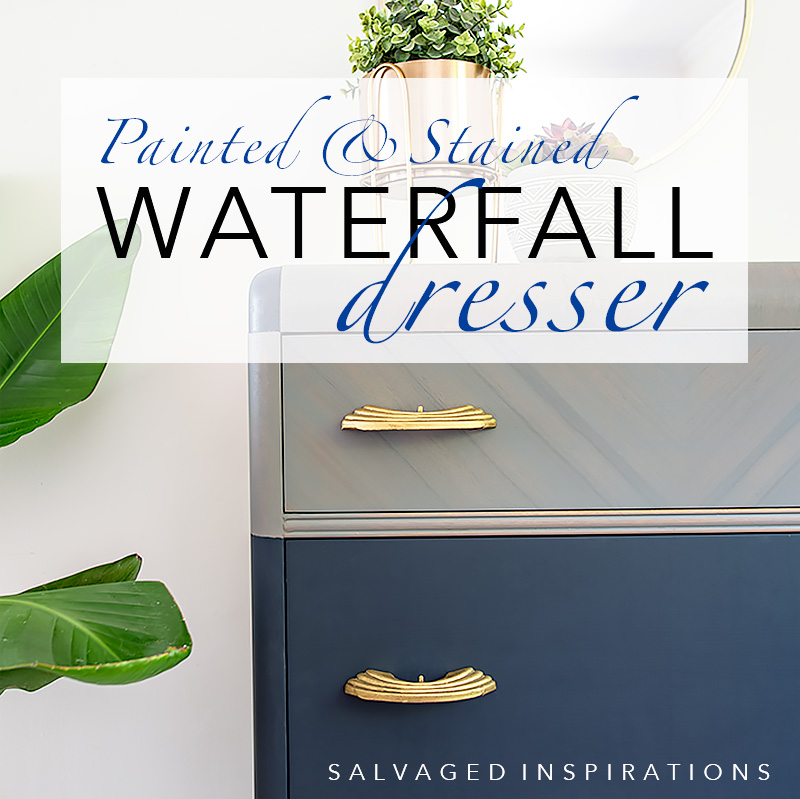
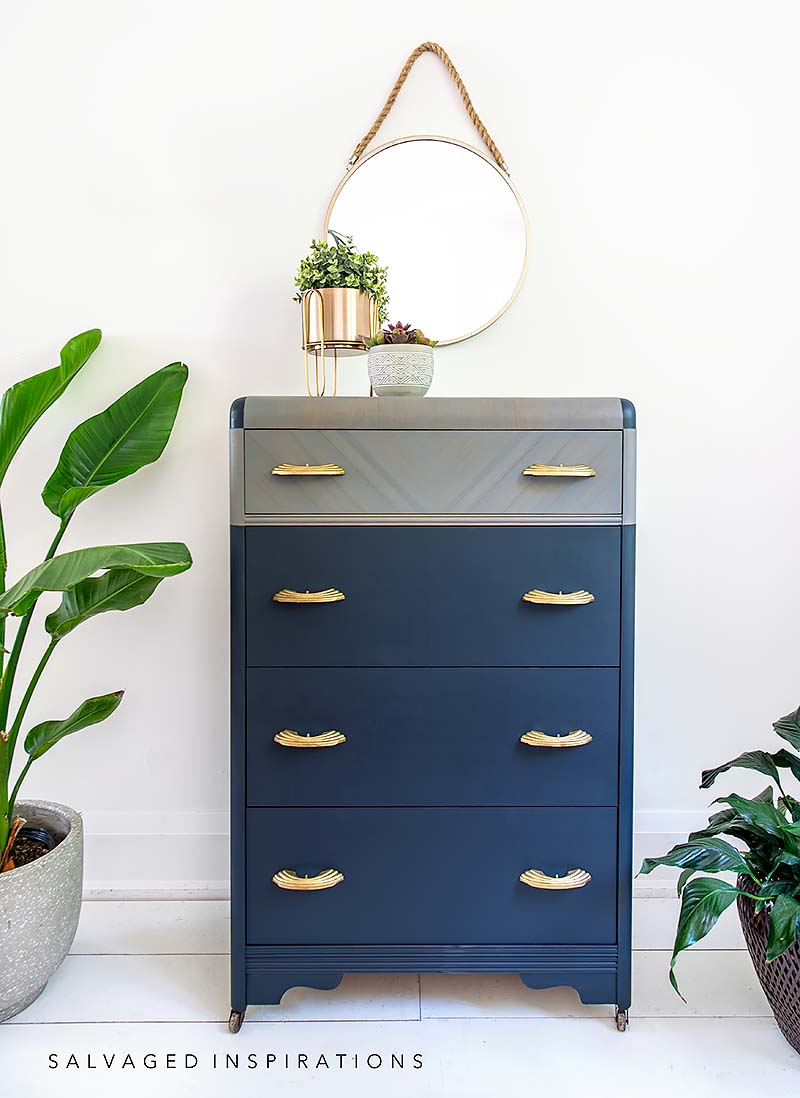
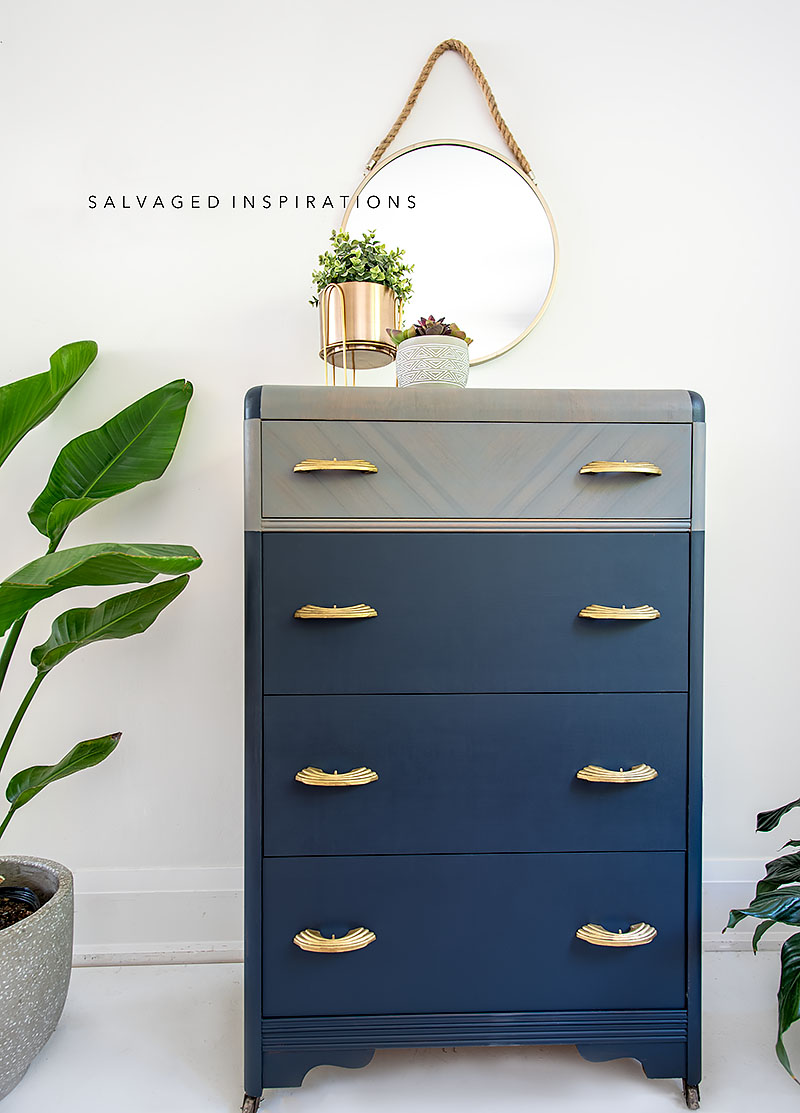
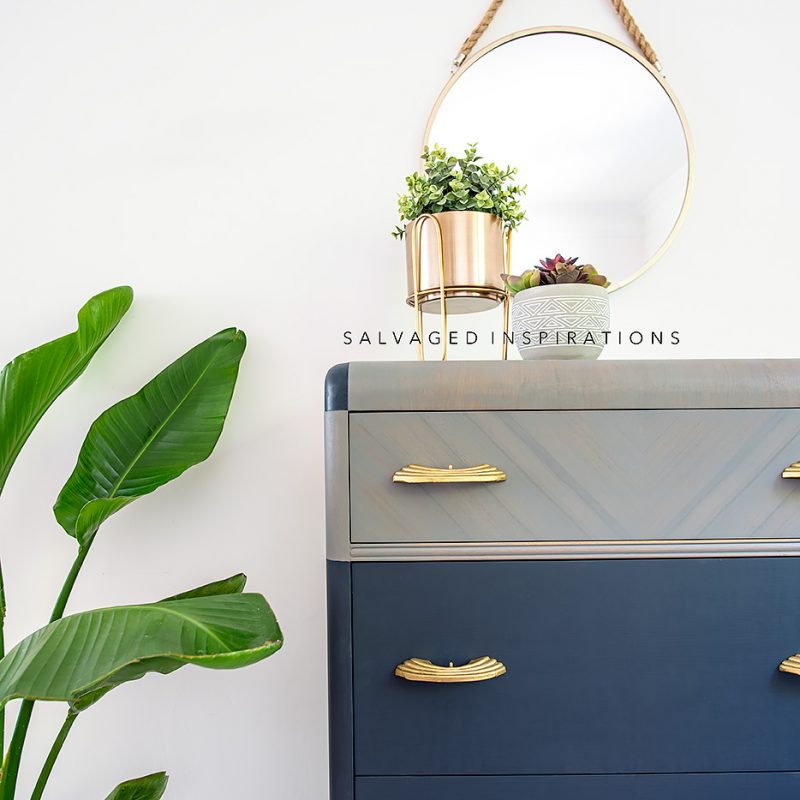
Before I get into the how-to details here’s the NEW painted and stained look! What do you think?
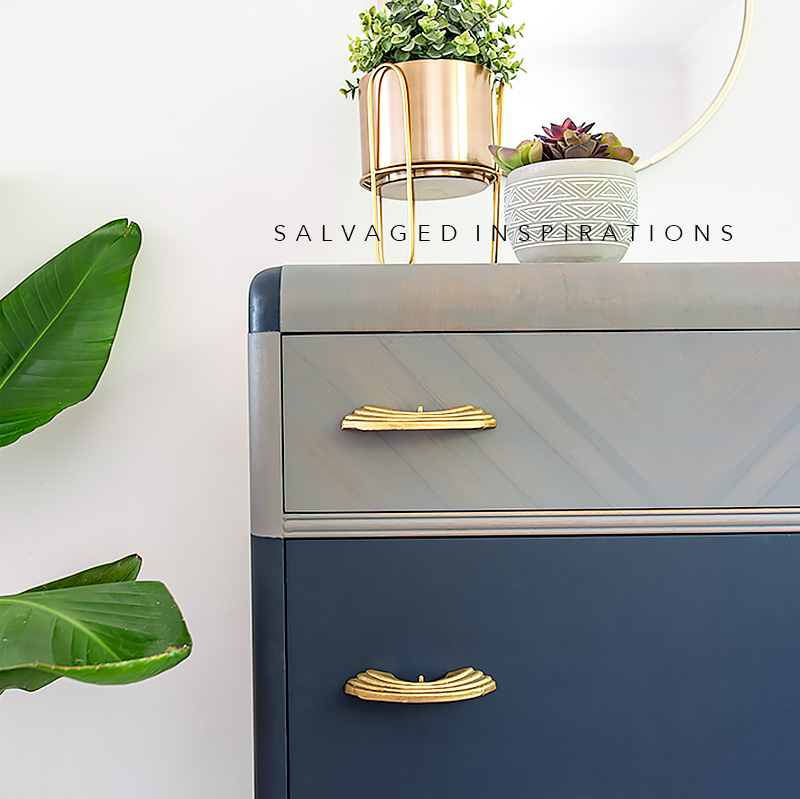
I love the grain on this top drawer! And doesn’t it look amazing stained in grey?
THIS POST IS SPONSORED/CONTAINS AFFILIATE LINKS TO PRODUCTS I USE. YOU CAN SEE MY FULL DISCLOSURE HERE.
SOURCE LIST
Waterfall Dresser – SALVAGED
White Lightning
Orbital Sander
Green Painters Tape
Citristrip Stripper Gel
Paint Brush
Deep Sea Silk Paint
Up In Smoke Stain
Gold Gilding Wax (similar)
Spray Wax
PAINTED AND STAINED WATERFALL DRESSER
Here’s how it all came together…
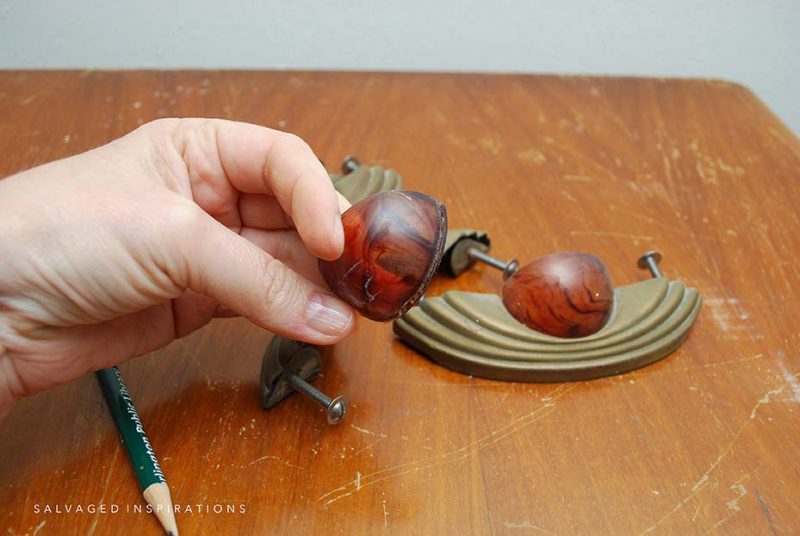
REMOVE HARDWARE
I started by removing the hardware. There were only two bakelite domes left on this hardware set so I removed them as well.
Pro Tip – I always keep my hardware in a container for safekeeping while working on a piece. I can’t tell you how many times a knob or handle has gone MIA. hehe
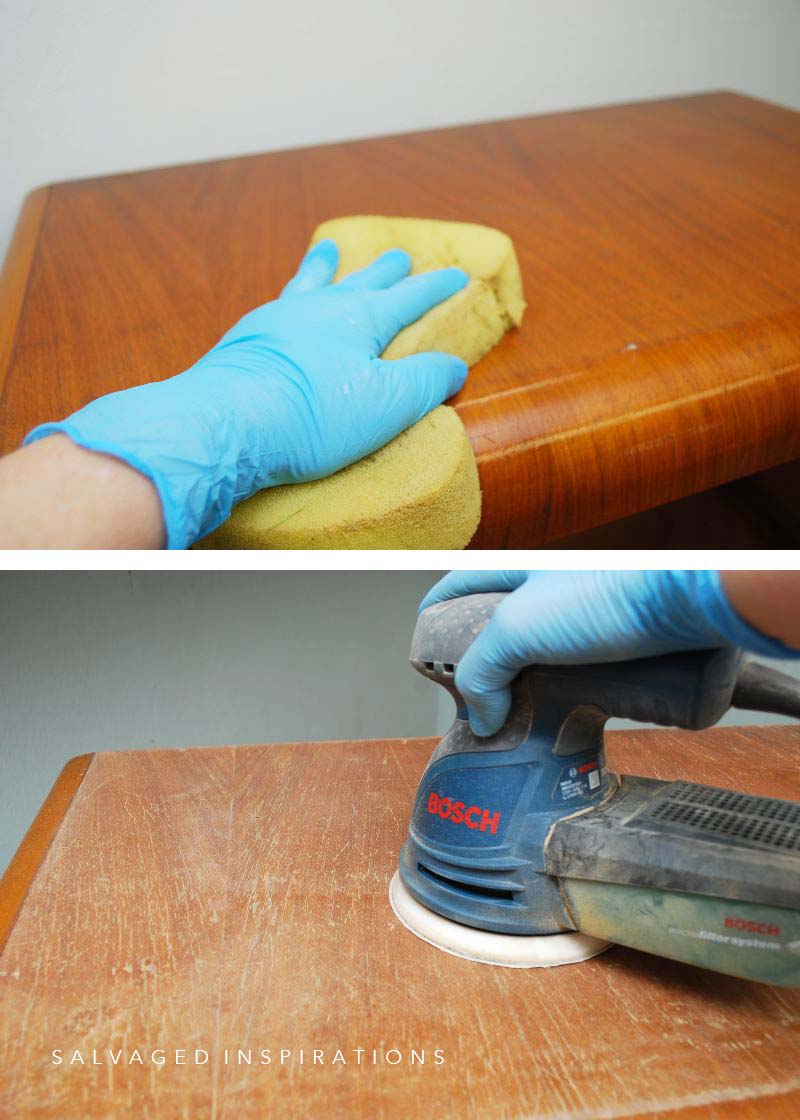
CLEAN AND SAND
Once the hardware was off and safely stashed, I went ahead and gave the inside and outside of this waterfall dresser a good cleaning with this TSP substitute. Once it was clean and dry, I scuff-sanded the entire dresser with an orbital sander and a 180 grit sandpaper.
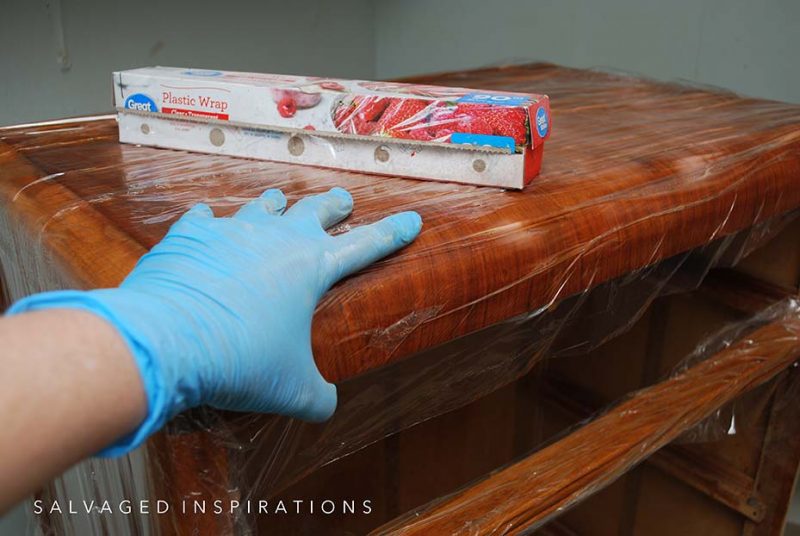
STRIP OFF OLD VARNISH
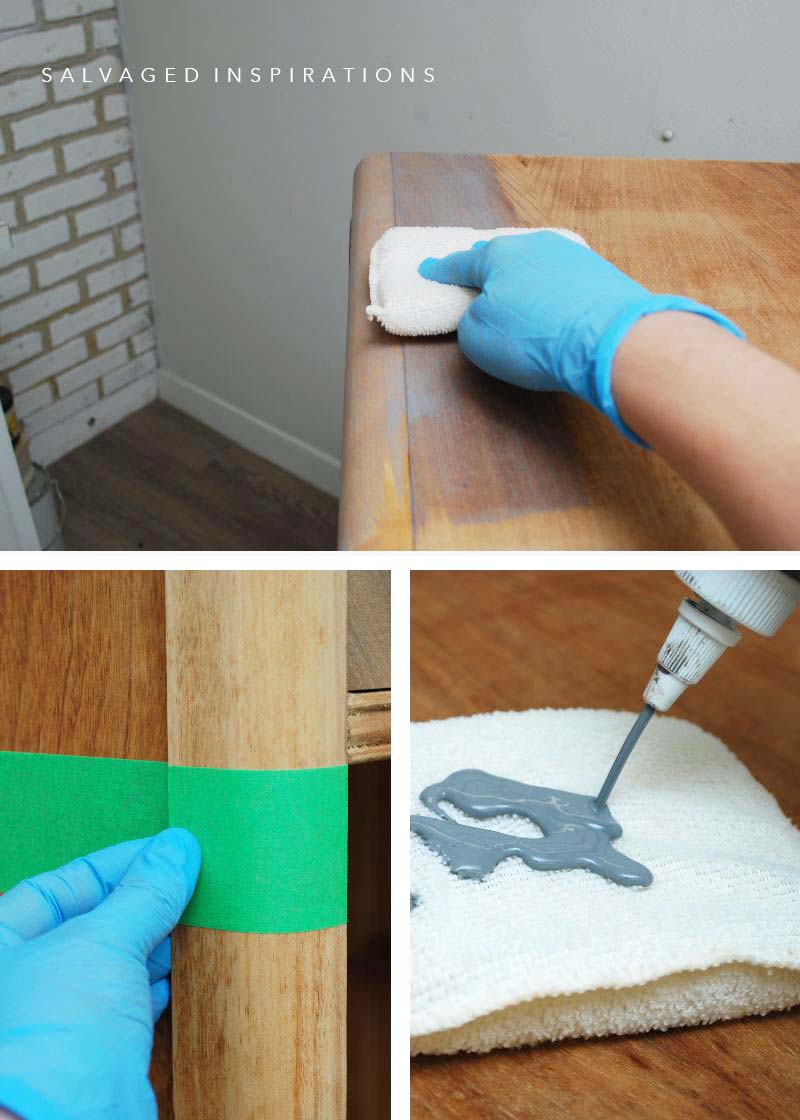
To strip the old varnish off the top of this dresser, I used Citristrip Paint Stripper. I applied the Citristrip with a chip brush and then wrapped it in plastic wrap to keep the Citristrip activated. After putting in a load of laundry and doing other chores, I went back downstairs and the varnish scraped off easily. Then I cleaned it off with Mineral Spirits.
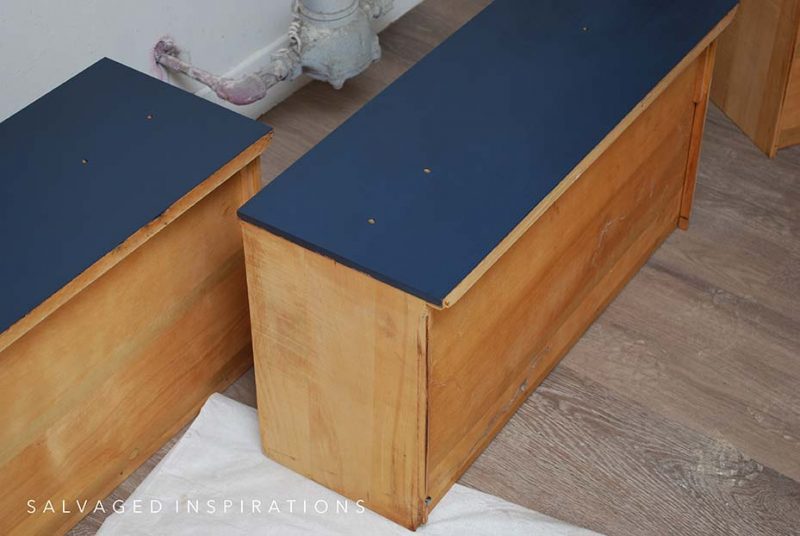
UP IN SMOKE STAIN
I masked off the top portion of the dresser with green painter’s tape. Then using this Up In Smoke water-based stain, I stained the top, the sides, and the top drawer. I have a full tutorial on How To Stain With Waterbased Stains here.
DEEP-SEA PAINT
I painted the three drawers and bottom three-quarters of this dresser in this gorgeous blue called Deep Sea. Then I masked off the corners and painted them as well which I’ve shared in the Youtube video below. This Silk paint has a primer and topcoat included, a time saver.
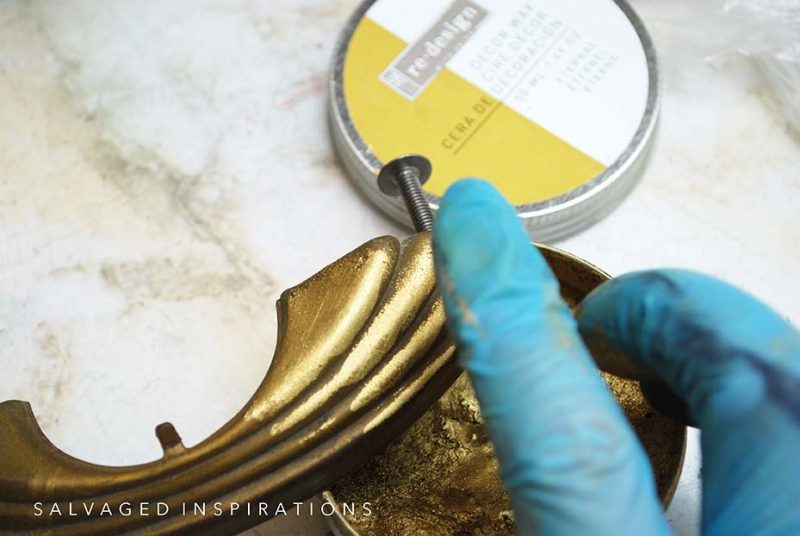
DECOR WAX HARDWARE
Check out these handles rubbed with Gold Decor Wax! What a difference and so easy to use. I took a little on my finger and rubbed it in. I looked online to link to this Redesign Eternal Decor Wax and came up empty-handed but this gilding wax works just as well!
TOPCOAT | PROTECTION
No top coat is needed for the painted portion of this dresser. To seal and protect the drawers I’m going to use this spray wax. It’s super easy to use and has a flat finish.
Here’s the finished look!
YOUTUBE TUTORIAL
Here’s a step-by-step tutorial on Youtube. If you have any problems viewing below, feel free to watch it on my Youtube Channel HERE. Our #siyoutubefamily has hit 14.1K so don’t forget to subscribe if you haven’t done so already! So exciting, thank YOU! 🙂
AND NOW FOR SOME FURNITURE FIXER-UPPER FUN!
You’re going to LOVE what my creative team of Furniture Fixer Upper ladies do! Below are their BEFORE photos. Visit the links below to see the amazing AFTERS and learn how they did it! I’m heading over to take a peek as well! x
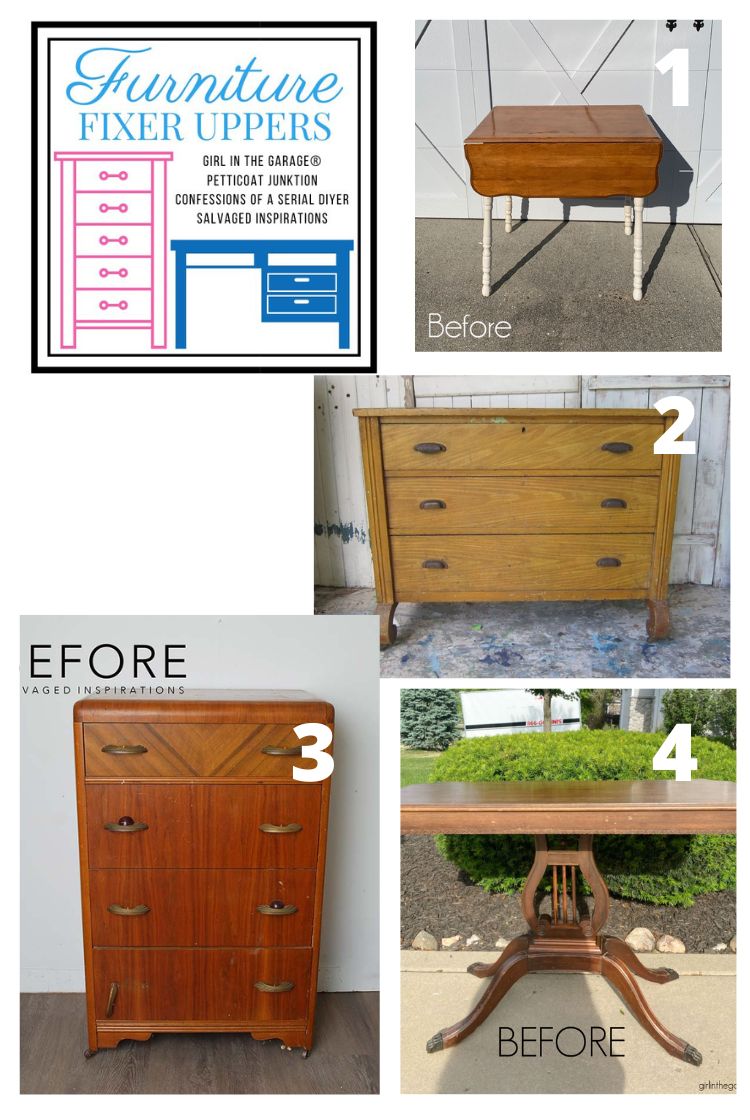
1. CONFESSIONS OF A SERIAL DIYER
2. PETTICOAT JUNKTION
3. SALVAGED INSPIRATIONS (HAPPY YOU’RE HERE!)
4. GIRL IN THE GARAGE
Here’s another look at this dresser’s before and after. I hope it’s inspired you and given you some new ideas for your projects! Again, a BIG THANK YOU JoAnne. I really appreciated you thinking of me!
LET ME KNOW WHAT YOU THINK OF THIS PAINTED AND STAINED WATERFALL DRESSER MAKEOVER. FEEL FREE TO ASK ANY QUESTIONS YOU MAY HAVE… I ALWAYS LOVE HEARING FROM YOU. IT MAKES MY DAY! 🙂
Happy furniture painting friends!
Denise x
RELATED POSTS::
PAINTED AND STAINED DRESSER
14 UPCYCLED FURNITURE IDEAS
PAINTED MID CENTURY DRESSER
DIY BOHO NIGHTSTANDS
VINTAGE HALLWAY TABLE
PIN AND SHARE!


Hello!
I have a waterfall dresser that was my grandmas..definitely in need of some love and creative inspiration! I want to update it. They sure don’t make big dresser drawers like they used to!
The veneer is missing in some places and we replaced the big, square, plastic handles about 20 years ago. The veneer isn’t as nice as your dresser. It seems as if the rounded edges on each side are plastic. Ideas for painting that too?
Thanks for your very inspiring projects!!
Your grandmas waterfall dresser sounds amazing and kudos to you for repairing and updating it! It’s hard for me to say without seeing it but from what you’ve described, the veneer could use some repair/patching. A bonding primer with stain blocking will adhere (even to plastic) and then paint. I hope this helps. 🙂
Wow, really great work. Beautiful!
Thanks Lizzy… means a lot coming from you! Good luck my friend. XOXO
Your refinishing skills are obvious. Well done. The one side note I wanted to contribute is that you have a great eye for style. All of your pieces are super sharp. Again, well done.
This is such a huge compliment Sandra! Thank you so much!!🤗
Hi! Beautiful results! I am currently restoring a waterfall tall boy with coastal blue Behr paint and want to use a stain for the top of the dresser. Do I need to use paint stripper on the original 1930’s stain or can I just sand and stain? This is my first restoration piece and I’m not sure what I’m doing! Thank you in advance for any info!
Hi Kate! To remove the original stain, you can use a paint stripper OR sand the existing finish off. Either or will work nicely. Have fun!
Another beauty, as always! I’m curious why you scuff sanded prior to using the Citristrip? And also, after cleaning with mineral spirits, do you need to rinse it off? I haven’t used stripper yet, but plan to soon and could use some advice. 🙂 Thanks for all you do—you are always an inspiration!
Thanks Jackie! I wasn’t sure what direction this piece was going in. I scuff-sanded the entire piece first. Scuff sanding is not necessary before using a stripper. And yes, you can ‘rinse’ mineral spirits before painting but no need when staining. In fact, you can ADD a little mineral spirits to your oil based stains to thin it out a little. Hope this helps.
Thank you, yes, very helpful! You are so kind to answer everyone’s questions.
These colors work so well together! Beautiful work, Denise! xo
Thanks Jen! Enjoy your weekend! XOXO
This is beautiful! I use both and never thought to put them together. I always pass up waterfall furniture but now I am so excited to try Up In Smoke on a piece. Thank you for the inspiration
I’ve never used this paint and stain combo before either, but I love it! Thanks so much and have fun Dana!
Incredible work! This dresser looks so sharp. Like the way the stain provides a glimpse of the old pattern.
Aw, thanks Ruth! I really like the peek-a-boo effect as well!🤗
This looks incredible, Denise! SO handsome!! And how nice that JoAnne thought of you…that’s the best! XOXO
It is the best, very sweet of her! Thanks Christy and have a super weekend! XOXO
The gray stain with the dee blue looks beautiful Denise. I always look forward to your emails as you always surprise me! Thanks for sharing!
I’m so happy you like it and thanks so much my friend! XOXO
‘Always get so inspired and learn so much from devouring all your posts and videos, Denise! Have just one question on this lovely redo: why did you paint the strip on the sides of the top blue instead of stain the entire top grey? It pulled my eye to it immediately so I’m curious if you had a specific reason I haven’t been able to ascertain 😉 Thx as always for being you and so graciously sharing all you do OXO!
Oh I’m so happy you find the tutorials helpful Suzy! The top corners were painted blue mostly because I wanted to be different and partly because when I stained them the corners looked slightly darker than the rest. I think you might be able to tell when I post the video this Saturday!😊
Morning ! I always look forward to see your pieces – makes my day 🙂
This piece is wonderful. Such a pretty / elegant color combination. Such pretty grain showing thru.
The hardware turned out gorgeous !
Thanks for sharing your process !!
p
Seeing your comments makes MY DAY!🤗 Thanks so much P! XOXO
Hi Denise. You turned this dresser into a beautiful piece of updated furniture. I love the colors you chose and the gold handles are the icing on the cake. What a wonderful and kind gift from JoAnne:)
Thanks and yes, it was so thoughtful for her to think of me! Thanks Monique! XOXO
Love the blues! I’d love to see a finished side view – will I be able to see that in this weekend’s video?
I have this same dresser in my store basement, I’ll have to check out the top drawer to see if it’s truly like this one. Thanks, as always, for your inspiration!
I love this blue as well! And I think I have a side view image… I’ll go check and post it for you if I do!🤗
Love this! Just gorgeous!
Thank you Cat!🤗
Hi! First time for a comment. Have been a subscriber for awhile now. Love this piece so much. Wonder how the deep sea blue would have been as a thick stain instead to show the waterfall grain? And thinking of a coastal vibe, maybe silver handles? I just painted, in a coastal vibe, an older magazine stand with Dixie paints and was very disappointed with the sanding I needed to do between coats (Needed 3 – uggh!) love your work!!!
Hi Cheryl! Thanks for taking the time to comment, love hearing from you and so happy you love the piece! Yes, I get a coastal vibe as well. And I think using the Deep Sea as a watered-down stain may have worked nicely as well.😊
Denise, this is so beautiful! I love the gray and blue together. So elegant! I haven’t tried any of the Silk paints yet, but this color is in my must try list.
Thanks Dana! 🤗 And ya, this blue is stunning! It was my first time using it and I’ll definitely be using it again!!
You are a true artist, Denise. Your projects are always fresh and extremely creative, surprising, and unique. I absolutely was bowled-over by your Anthropology mirror idea and am going to try a smaller version. I have a buffet I’d like to ask your advice on. Is that possible? If so, how should I contact you and send you a picture?
Thank you again for sharing your tremendous creativity and talent with your readers every week!
thanks, Maureen and wasn’t that Anthro Mirror fun!?! I’m so glad you’re going to give it a try! I can be reached at salvaged inspiration at gmail dot com if you’d like to email. I do get a ton of emails so thanks for being patient if it takes me a bit to get back.😊