HERE’S HOW I TRANSFORMED THESE OLD THRIFT STORE OCTAGON TABLES WITH PAINT AND CANE WEBBING | YOUTUBE VIDEO
Hi beautiful #sifamily! I hummed and hawed whether to buy these octagon tables. I have mixed feelings about them. They’re not a popular shape these days. But I decided to challenge myself and see if I could update them. Today I’m sharing how I transformed these octagon tables with some rattan-cane mesh and a gorgeous neutral color. I can’t wait to hear what you think!
It’s also Furniture Fixer Uppers Day and I’m joining my FFU crew and sharing links to their projects down below. I hope you join me in visiting their before and afters too.
*As an Amazon Associate, I earn from qualifying purchases. There may also be affiliate links in this post to other companies/products I use and love as well. You will never be charged extra when you purchase through these affiliate links. To see my full disclaimer, click here!
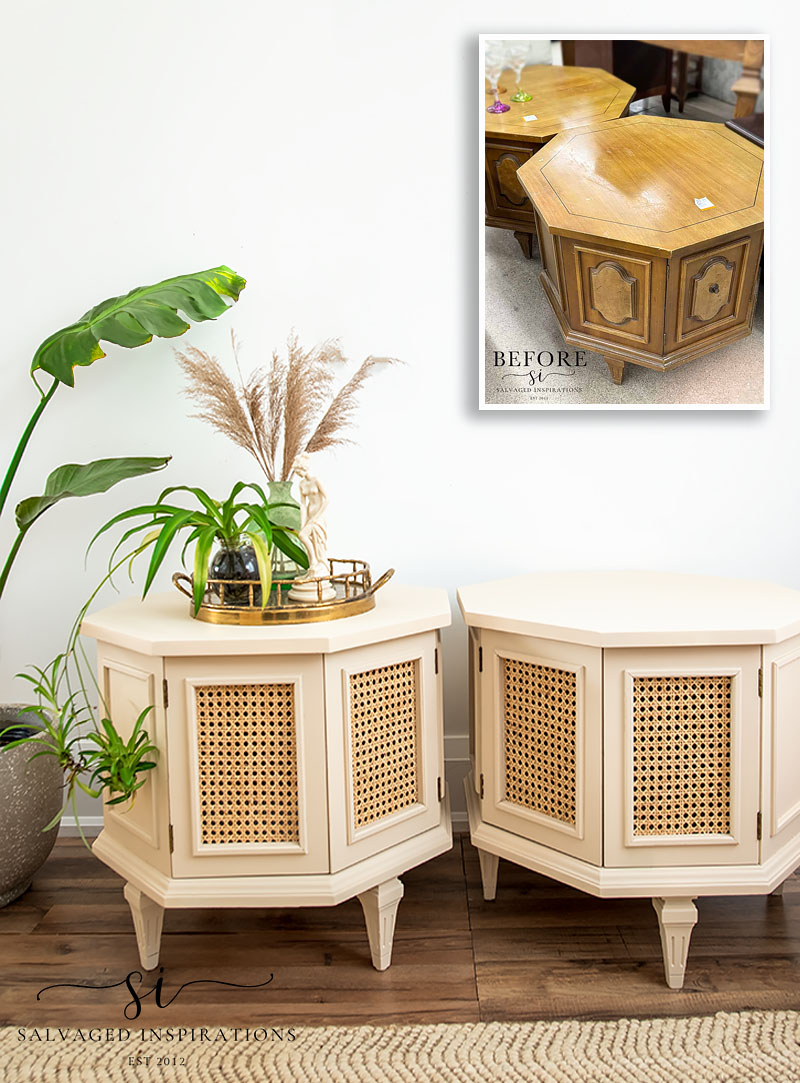
Here’s the thrift store octagon table set I started with. I thought they were selling for $22.99 for the set as it had x2 on the tag. So did the young boy who wrote the receipt for me to bring to the front. I paid and brought my FUV to the pick-up area. Once I started loading them up, another associate came out and said I only paid for one and needed to come back in to pay for the other. I don’t mind as buying thrift helps other non-profits in the area but they weren’t quite the deal I thought they were.
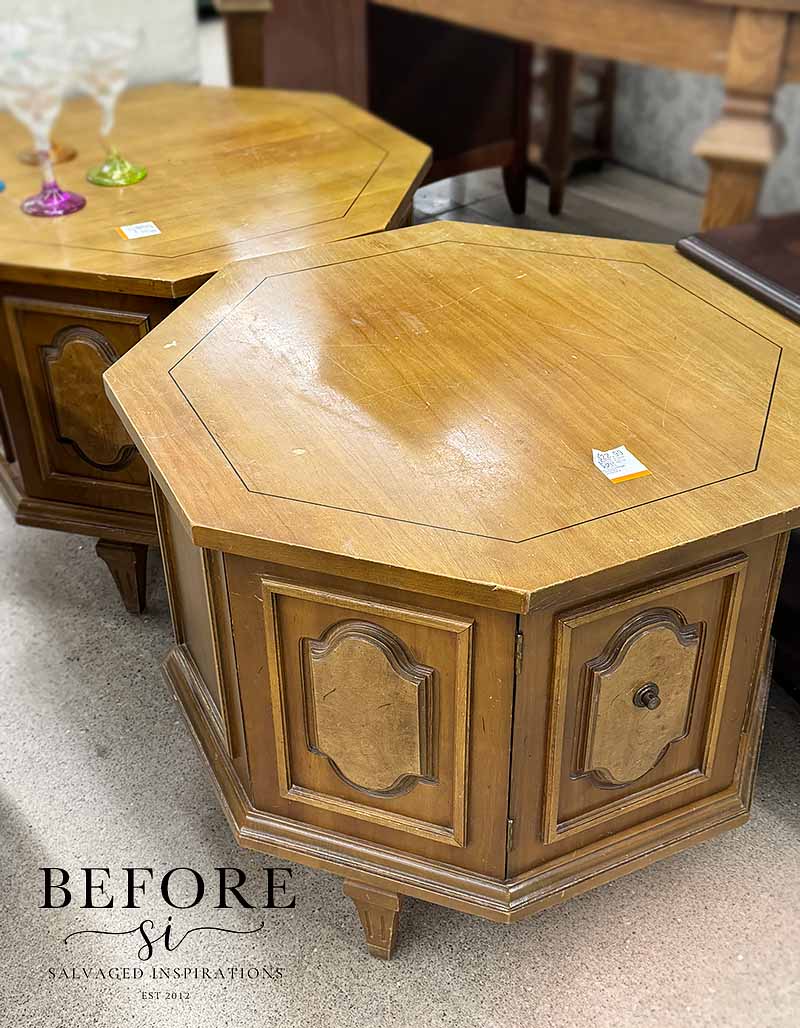
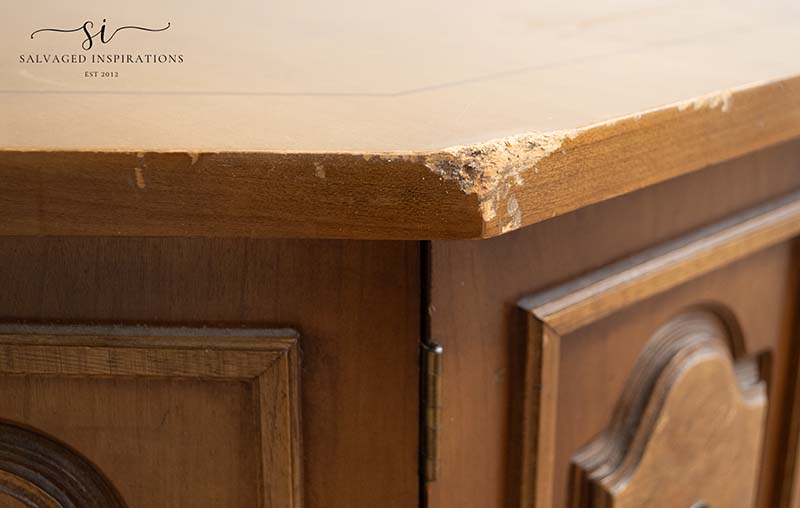
There were also a few repairs needed like this damaged corner.
Overall, really nice solid well-built pieces though. They don’t make furniture like they used to, that’s for sure!
THIS POST IS SPONSORED/CONTAINS AFFILIATE LINKS TO PRODUCTS I USE. YOU CAN SEE MY FULL DISCLOSURE HERE.
WHAT YOU’LL NEED
Octagon End Tables – SALVAGED
White Lightning Cleaner
Bondo Filler
Wood Filler
Bosch Sander
BIN Shellac Based Primer
Astro EuroPro Spray Gun 1.7mm
Pneumatic Staple Gun
Whitecap SILK Mineral Paint
Sand Castle SILK Mineral Paint
Brasso Metal Polisher
Natural Cane Webbing
OCTAGON TABLE MAKEOVER
Here’s how these end tables all came together…
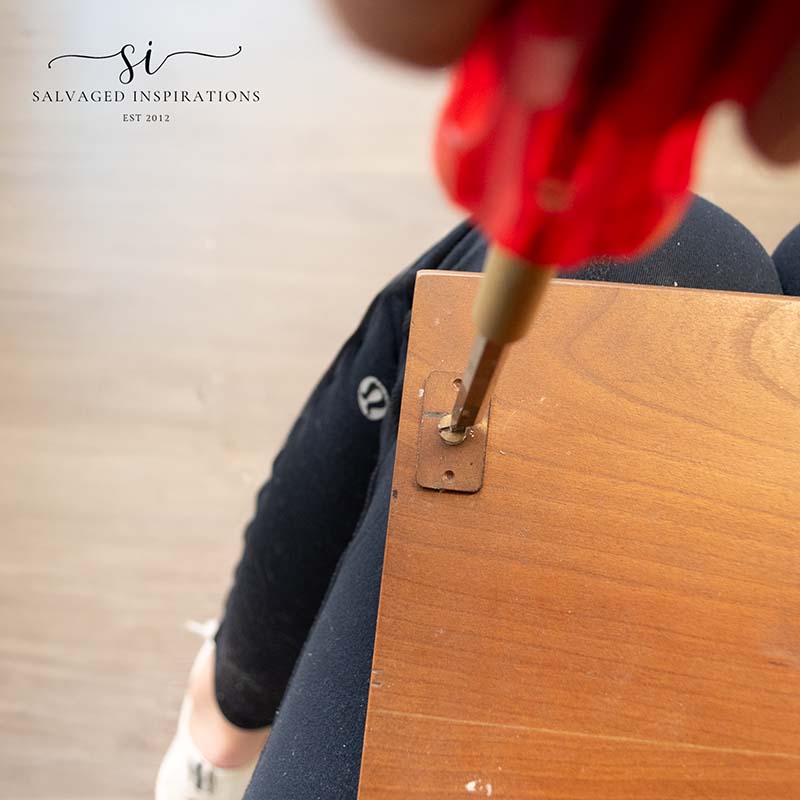
REMOVE HARDWARE
I gave these tables a cleaning with White Lightning. making sure to rinse my sponge and wipe with clean water to remove any residue before unscrewing all the hardware.
REMOVE DATED PANELS
These tables had me stumped so I asked everyone on Facebook what to do with them. You all came up with some AWESOME ideas! Dog or cat bed, indoor or outdoor planters, decorative stop signs, glow-in-the-dark night tables for kids, and more!
I decided to remove these dated panels using my multi-tool. It took me over 3 hours to remove 4 inside panels. I think I used the wrong tool but it was a learning experience.
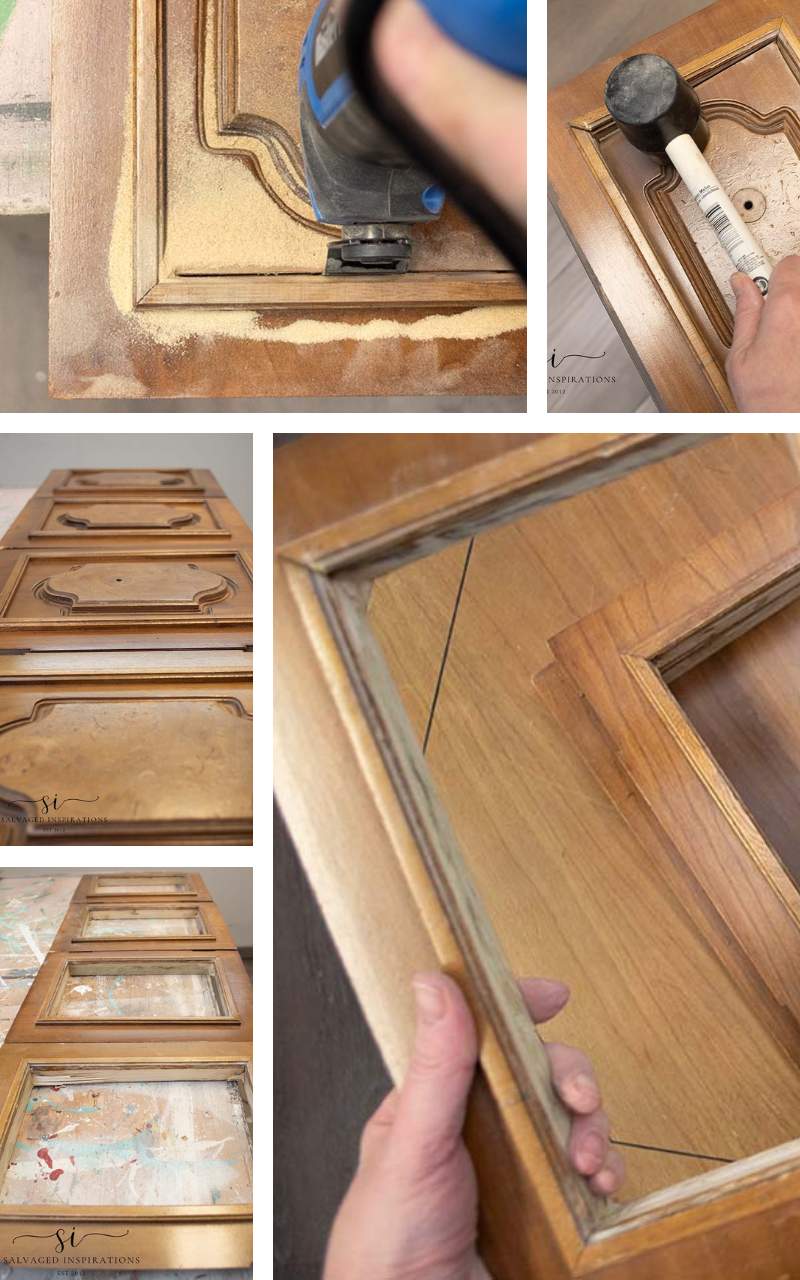
FILL – SAND – PRIME
Besides removing the panels on the four swinging doors, I removed the dated plate on the third panel on each table. To fill in the large ‘scar’ I used heavy-duty Bondo. Once the Bondo was dry and sanded smooth, I filled in all the little leftover divots with this Dixie Belle Mudd Filler. Then I sanded until everything was perfectly smooth, including the damaged corner, and then gave it two coats of primer.
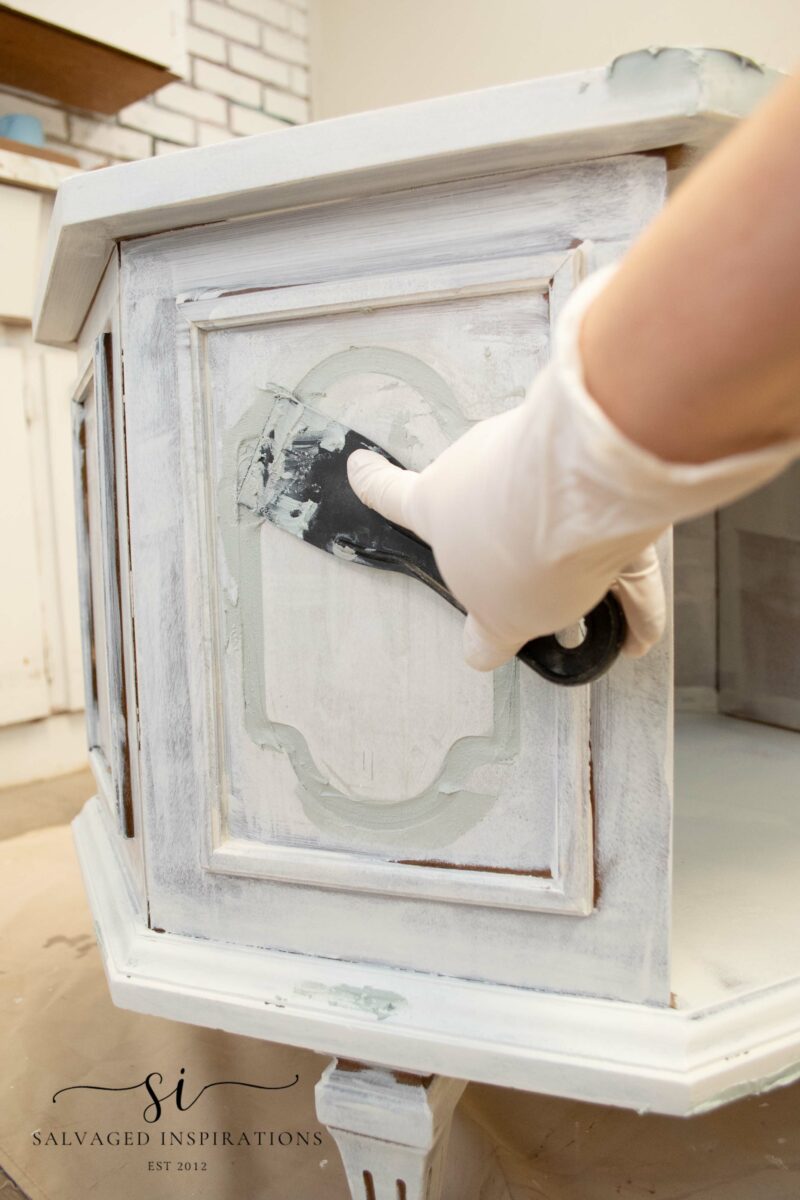
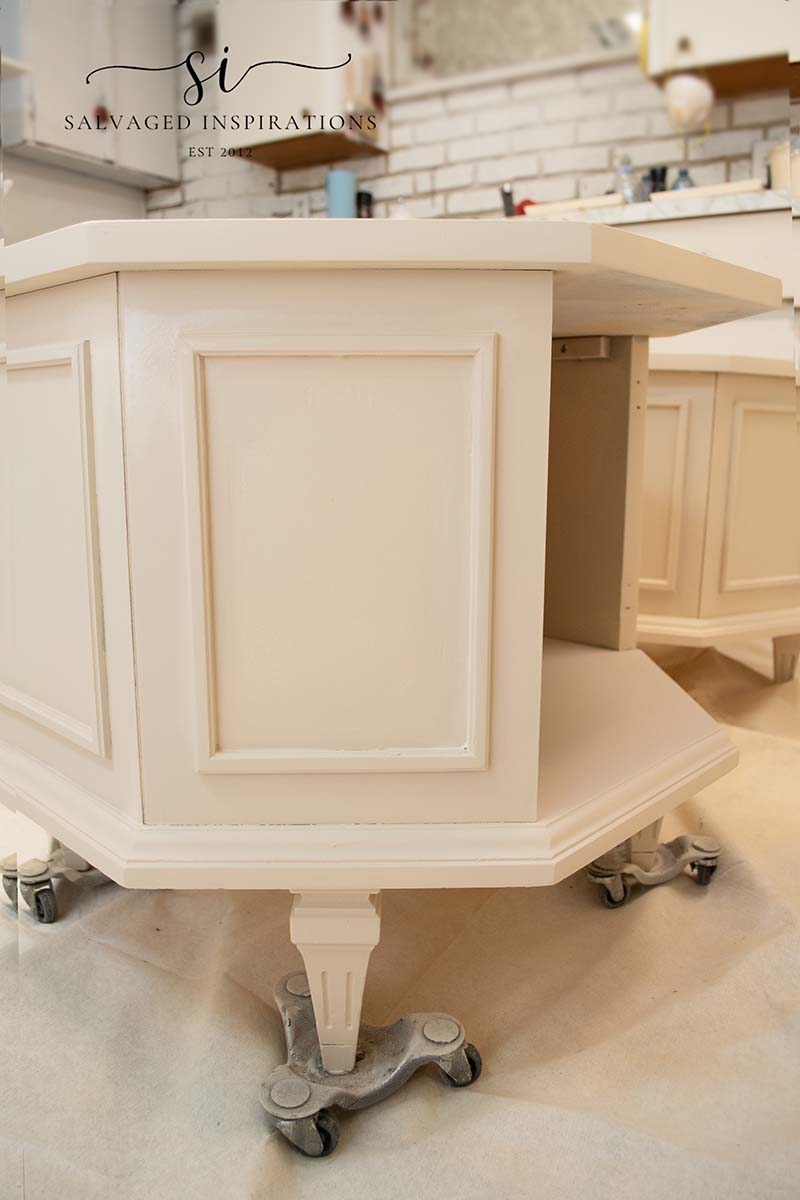
PAINT SPRAYED
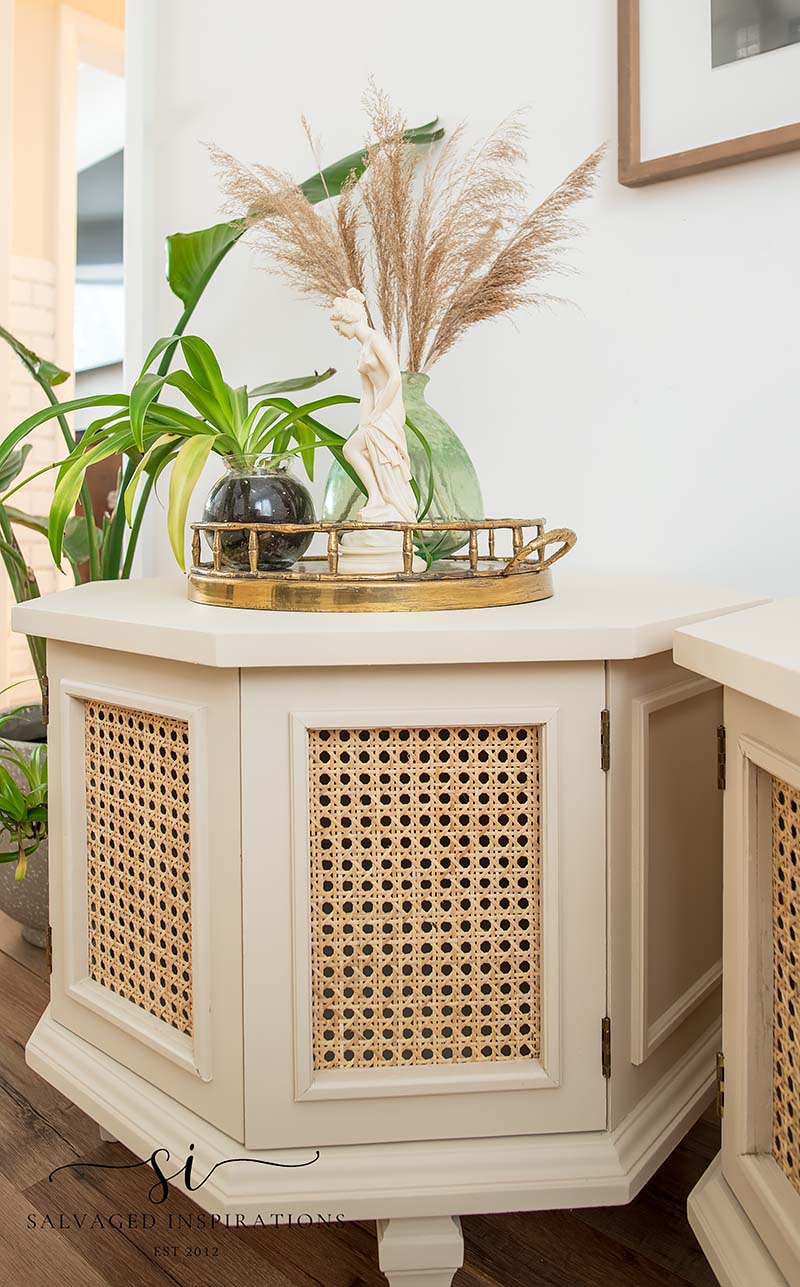
Now for the fun part! For the base coat, I created a custom color using Sand Castle SILK Mineral Paint and White Cap SILK Mineral Paint. I’m not sure the exact measurements because I eyeballed it but it was approximately 2/3 Sand Castle to 1/3 White Cap. I thinned the paint with 10% water and sprayed it through my paint gun for a perfectly smooth and flawless finish. Can you see where the Bondo fill was? Pretty amazing disappearing act, right?!
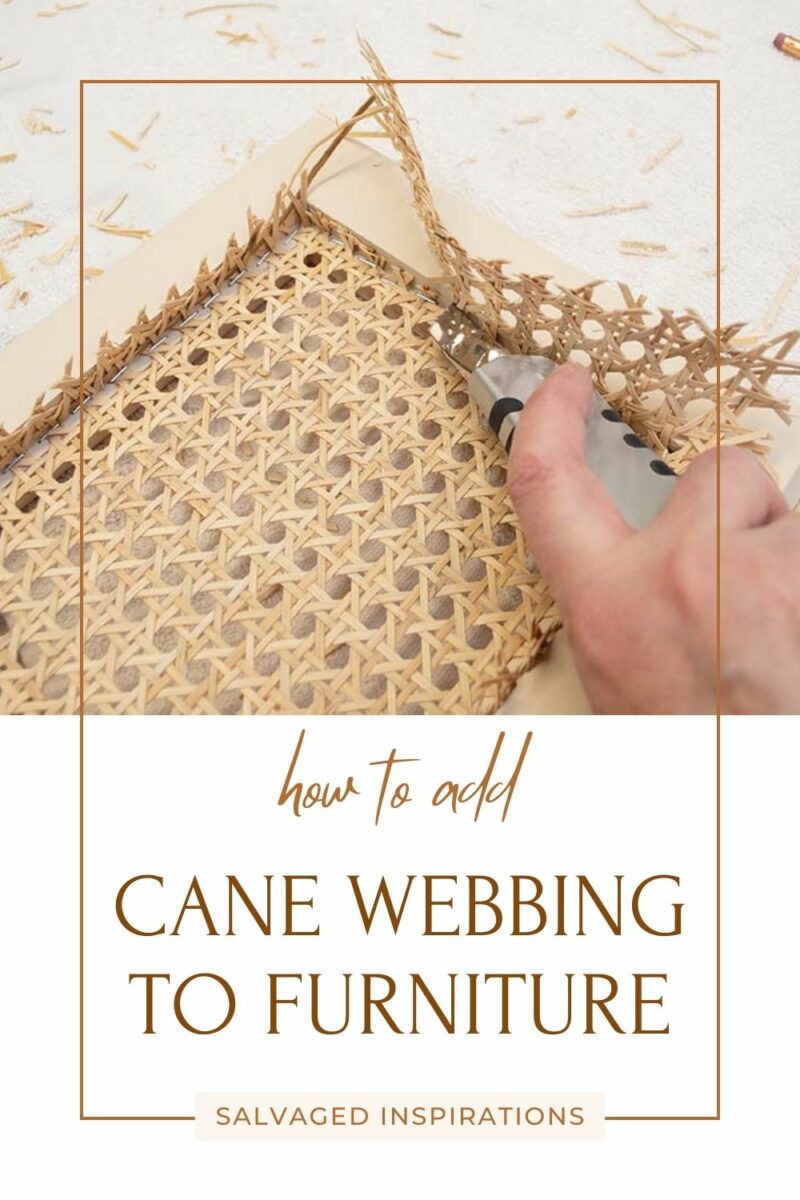
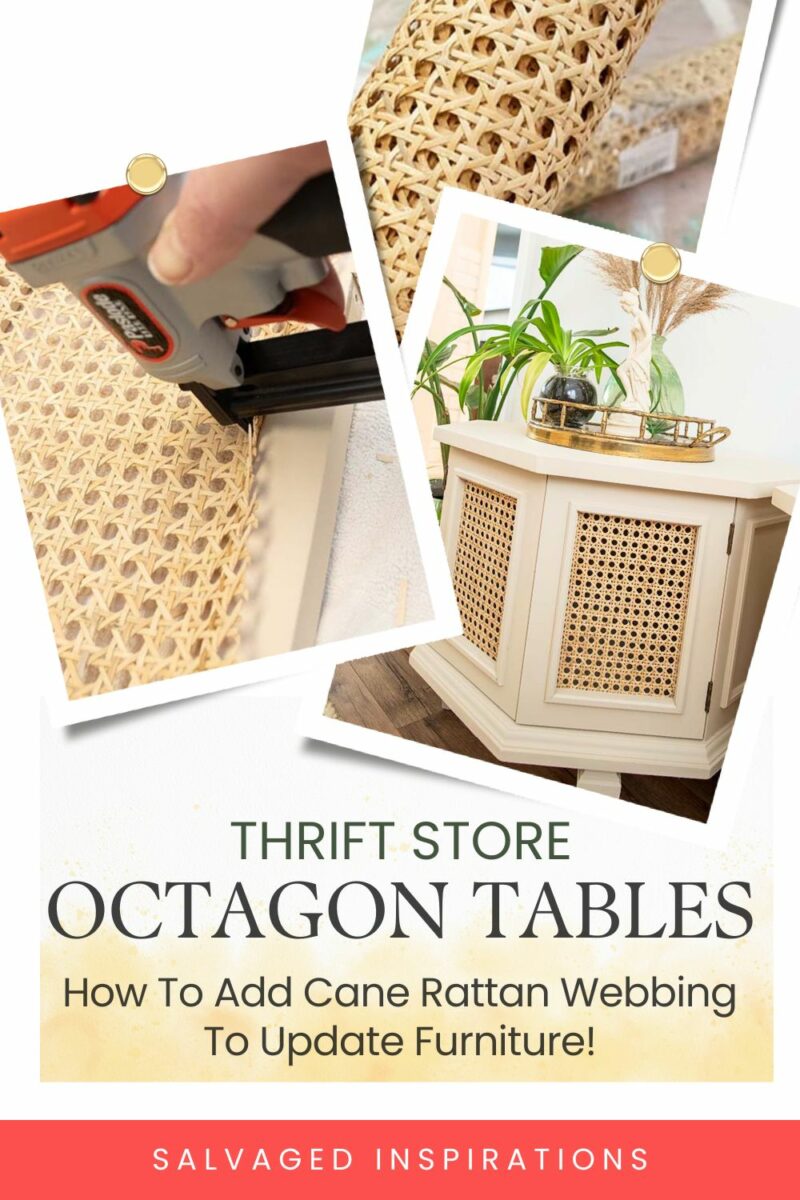
HOW TO ADD CANE WEBBING
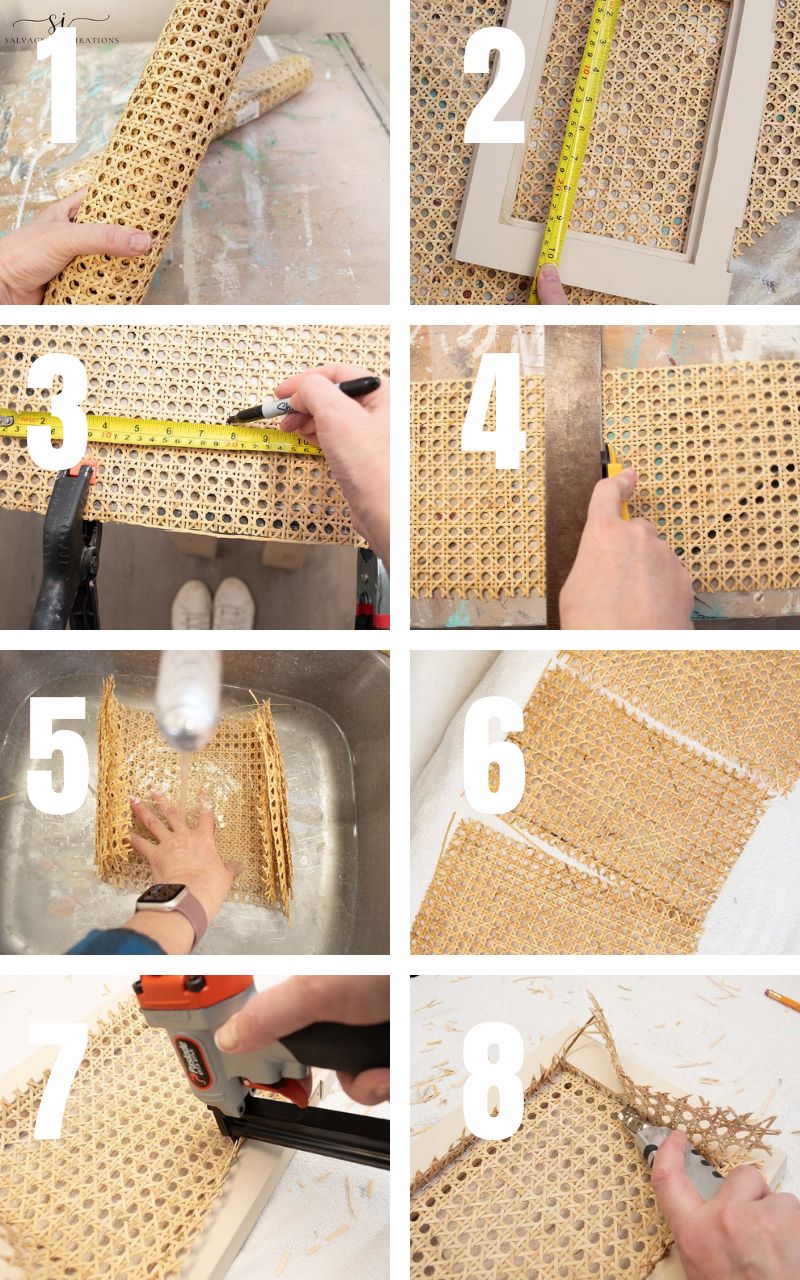
To create a ‘modern’ look for these end tables, I added this natural cane webbing that I bought on Amazon. I’ve been wanting to try this for years. I love the look of all-natural rattan/cane. I’m so happy I finally tried it on some furniture and will be using this on future projects! The key to making it simple is by soaking it in warm water for 30 minutes. This cane is an all-natural material and can be tough to work with when dry. By soaking it, the cane gets very flexible and easier to work with.
Here’s how I installed it onto the doors –
- I rolled out the cane webbing and secured it flat with a paint can and clamps
- Measured the door opening
- Measured the cane webbing adding an inch and a half to each side
- I cut the cane webbing using this rotary cutting tool – works amazing!
- Soaked the webbing in warm water for 30 minutes
- Layed it on a towel to remove most of the moisture
- Stapled it in with my pneumatic staple gun
- Cut off the excess with a utility knife
- Adding trim for a finished look is optional
CLEAN & ADD HARDWARE
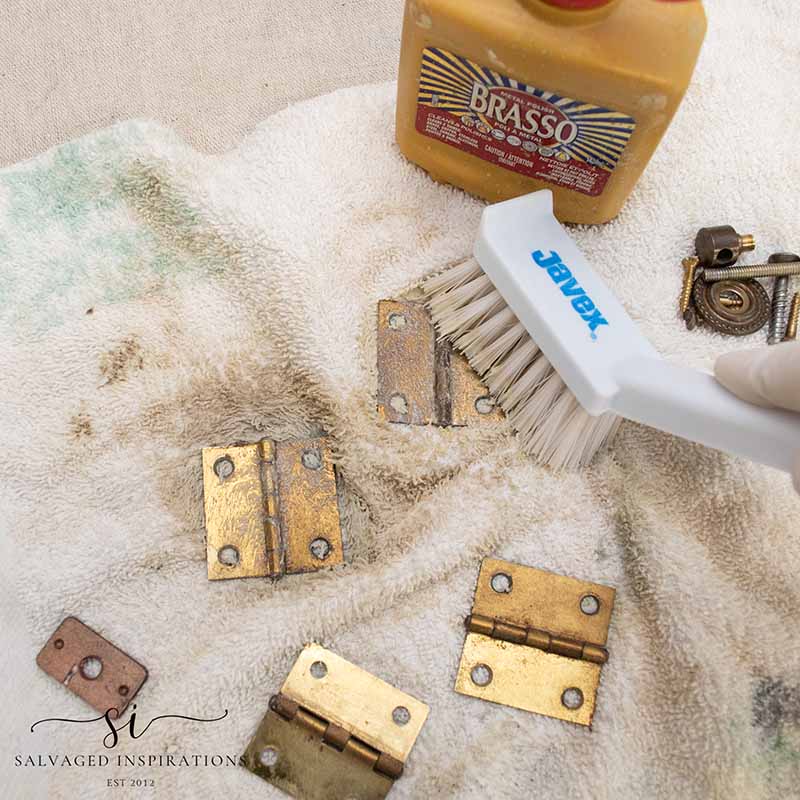
To clean up the grungy hinges I used Brasso. Brasso is a metal polisher that is easy to use – rub on rub off. I poured a little onto the hinges and rubbed with a dollar store brush. Then using a towel I wiped them down. As for the original pulls, one was missing and it looked too old for the new look. I tried out a few brushed brass handles and knobs but I didn’t like the look. They were too close together. I’ll be buying this door clasp magnetic door catch mechanism for a cleaner look.
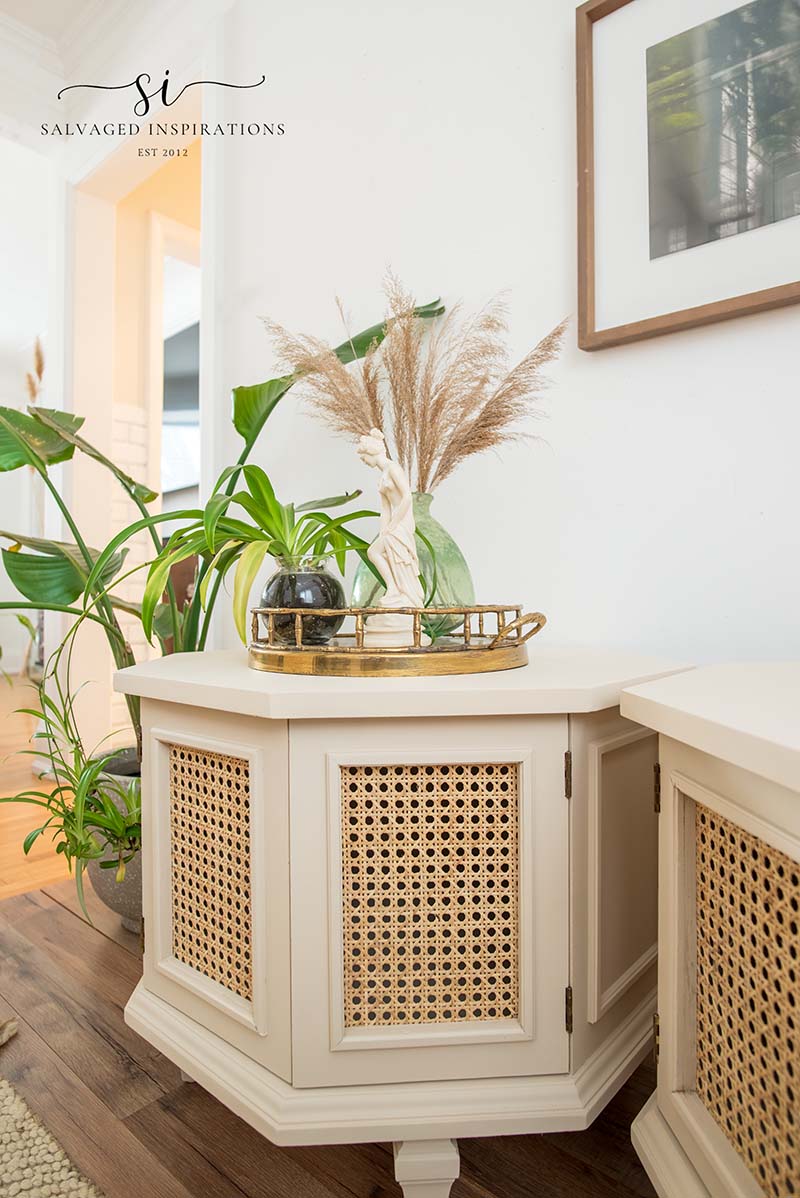
FINISHED TABLES
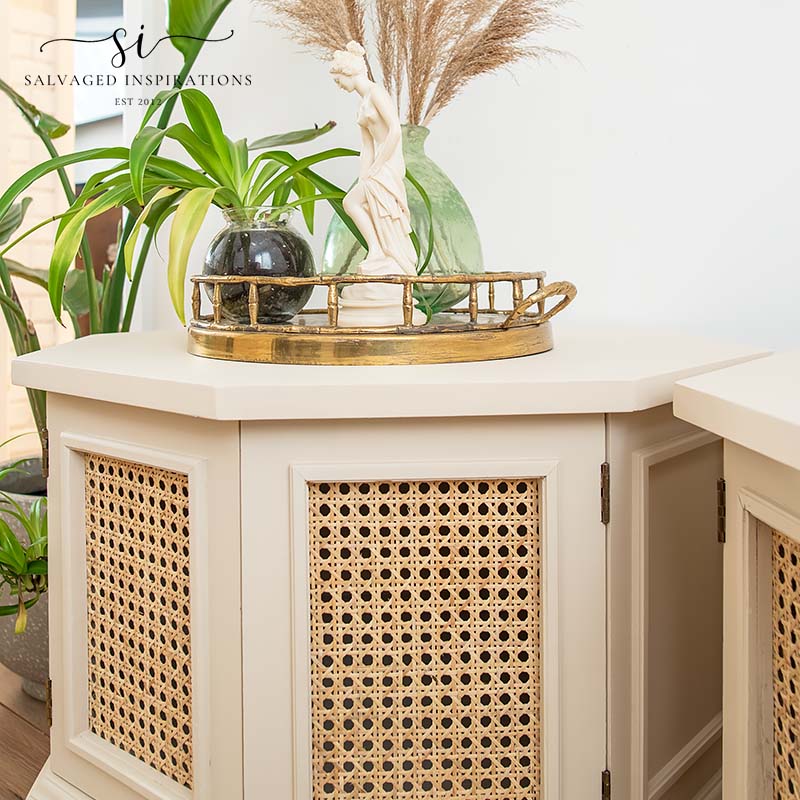
Here’s the finished look. Don’t they look more modern and fresh?! The two paint colors I mixed created a gorgeous neutral and it pairs so well with the rattan!
I also wanted to photograph the damaged corner lip that I shared with you at the top of this post… but after I filled, sanded, and painted, I’m not sure which corner it was…lol.
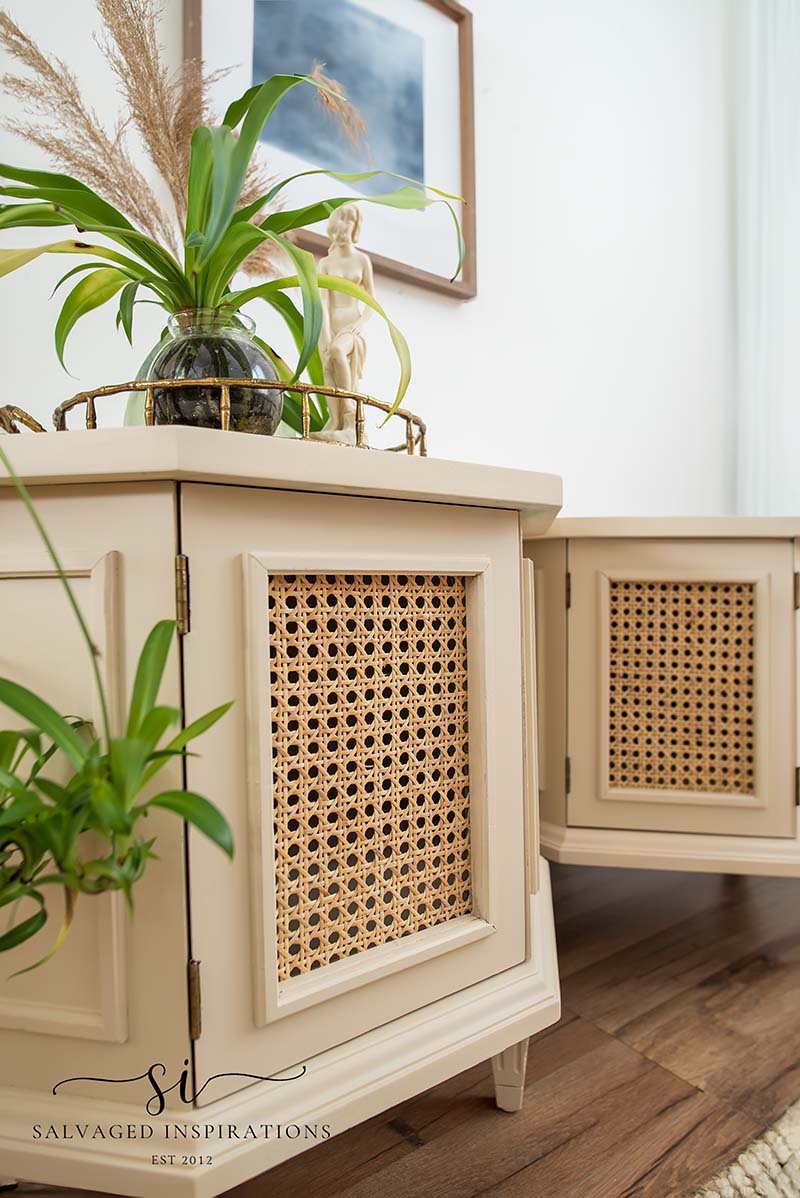
And I’m impressed with how easy it was to install this cane straight. I was worried that it would end up crooked and loosey-goosey but it’s taut and perfectly lined up. Not bad for a first attempt. And I love sharing this because if I can do it YOU can do it! 🙂
As I mentioned, I tried out a longer handle and I even had two octagon brushed brass pulls (which I was SURE I was going to use on this makeover) but I much prefer the clean look. What do you think? Would you prefer knobs or handles?
PIN FOR LATER 🥰
YOUTUBE TUTORIAL
Here’s the full step-by-step video. Our #siyoutubefamily is already a community of 42.9K so don’t forget to subscribe if you haven’t done so already! So exciting, thank YOU!
And now for some FURNITURE FIXER UPPER FUN!
You’re going to LOVE what my creative FFU ladies do! Below are the BEFORE photos. Visit the links provided to see the amazing AFTERS and learn how they did it! I’m heading over to take a peek as well!
1. CONFESSIONS OF A SERIAL DIYER
2. SALVAGED INSPIRATIONS (HAPPY YOU’RE HERE!)
3. A RAY OF SUNLIGHT
4. PETTICOAT JUNKTION
5. MY REPURPOSED LIFE
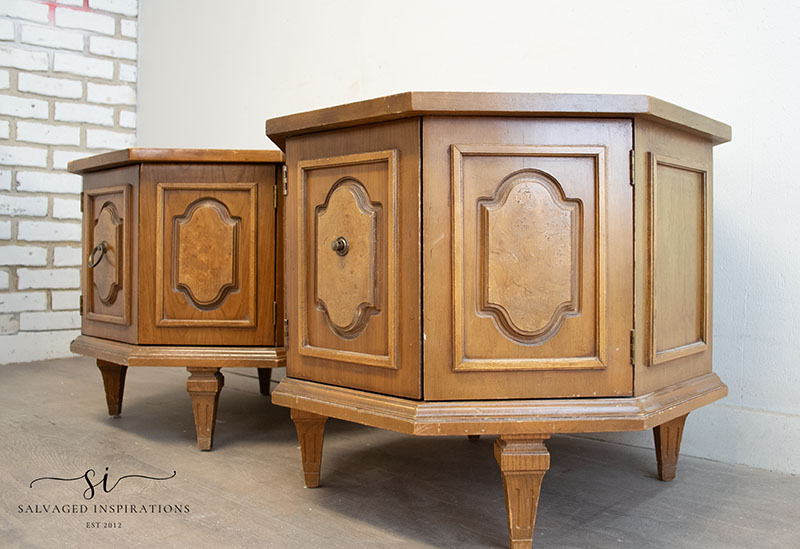
Here’s another look at this end table set before and after. I hope it has inspired you and given you some ideas for your upcoming furniture painting projects.
Wishing you a fabulous rest of the week and weekend. I’ll see you Saturday with the full video and I’ll be back next Tuesday to share where to find free furniture!
LET ME KNOW WHAT YOU THINK OF THIS OCTAGON TABLE SET AND FEEL FREE TO ASK ANY QUESTIONS YOU MAY HAVE… I ALWAYS LOVE HEARING FROM YOU. IT MAKES MY DAY! 🙂
Happy painting my friends!
Denise x
RELATED POSTS::
HOW TO MAKE PAINT LOOK LIKE WOOD
HOW TO: PAINTED FAUX LINEN DRESSER
22 SALVAGED FURNITURE FLIPPING IDEAS
JOANNES’ THRIFT STORE CHAIR MAKEOVER
HOW TO REVAMP AN OLD DESK
THRIFT STORE DEMILUNE TABLES
PIN AND SHARE!

Ohhh, they are lovely, Denise. I’ve worked with caning before and know that it will get mushy if it’s wet for too long. I redid a chair seat for a client and one end of the caning got too wet. I had softened mine in a wet bath towel and didn’t catch that the end was at the edge that was too-wet. Luckily I could salvage it. Bravo to you for your success!!
Love the color you chose, too. What tool do you think would have been better to use for removing the decorative pieces? I’m stumped for an answer. I think that after 2 hours of working on them, I might have given up LOL Good on you for your patience!!
Have a great weekend!
Good to know Caye! I wasn’t sure how long to leave it in water so I’m super glad I didn’t overdo it. And I’m not sure what tool would have been better. Maybe a jigsaw???🤔
Absolutely gorgeous! What a transformation! Incredible vision. Thank you for sharing your talents.
Thank you for being here and sharing with me Anita! XOXO
Gorgeous! Just need the beach house!
lol…yesssss!😂
Oh my word, I absolutely love the new look and the new cane! I usually skip over octagon tables, but this makeover is making me want to find some for myself.
I know you’d do something FABULOUS with them Natalie! Thanks so much! XOXO
Absolutely gorgeous, Denise! Love the combination of cane and your custom color. You’ve inspired me to break out my brand new paint sprayer and give it a try as I’ve been reluctant! Have a great weekend!
Ohhh yaaaa…doooo it Cathy!😃 Sprayers are so much fun!!!
Hi Denise! Wow! They look amazing! Thank you for sharing this tutorial but I think I will stick with Primas cane decopauge paper.🤣🤣. I’m so lazy. They really turned out pretty. .you could ad a cane knob. I have seen them at Hobby Lobby.
Ohhh, cane knobs!!! We don’t have Hobby Lobby here in Canada. Booo, I may have to take a cross border trip with my sister soon..hehe. 😉 And I haven’t seen Prima’s cane decoupage paper. I’m going to look that up online right now!
Nice job as always! The color the caning and just the new overall look make them very attractive. I’m sure you will find the right pulls in time. Since they have so much storage space, I would think someone who might be interested in purchasing them would want to be able to get inside.
For sure! The magnet pulls I want to buy are hidden/installed on the inside of the doors. The outside looks clean. Then you just give them a little push and they open right up for storage.😃
Simply Amazing Makeover Denise! The cane was the perfect addition to their new look. I love the paint color. I know it was a lot of hard work, but honestly I think this was the best save ever!
Pinned!
gail
Awww, thanks Gail! I’m really happy I finally got to try the cane because I’ve been thinking about it for a while now. 🙂
These look sooo much more current ! The color is anice soft neutral. I really like it.
Removing the panels and adding the cane was a great idea. 🙂
Hmmm. I do prefer the sleeker look. How will the door be opend wihout a handle… just lifting the door edge ?
It does work on our kitchen cabinet sans handles.
As always – great instructions – and great design.
Thanks !
Thanks P!🤗 For the doors, I’ll be buying the magnetic door hinges like I did on these nightstands here. You give the door a little push and it opens right up. Then you give it a little push to close it as well.
Turned out way better than I could have imagined, now I need to find something to use the cane webbing on! You are always a inspiration!
Thanks Carol! And ya, if you like the cane rattan look, I highly recommend trying it on something. I was a little worried about the end result but it looks awesome!
Great job!
Thank you Connie! XOXO
That was some project, Denise! Although they’ve become popular lately, I pass on those 1970s Mediterranean style pieces. Taking off the dated elements makes them so much better, though. Your treatment of these tables almost makes me want to try it myself. Almost 😁
Almost but not quite, right?!…😂😂😂 I get it. I almost passed on them as well!
You amaze me with every makeover you do! I’m always thinking, “How in the world is she going to update those??” I would like to see a pull/handle, but I absolutely love the updated feel you gave these tables! XOXO
Aw, thanks my friend! And ya, I was hoping for pulls too. But they look a little awkward because I have to place them so close together. Maybe I should look through my inventory to see if I have something smaller.🤔
Those tables were so outdated and ugly. Beautiful love them
They really were…lol. So glad you love them Barb! XOXO
You did a beautiful job with these! They were a lot of work, but they turned out so well!
They were! Way more work/time than I even imagined because I tried a few new to me techniques. They tuckered me out but I’m glad I tried. 🙂 Thanks Cyndi!!
A lot of work, but worth it. They are absolutely lovely.
Yay! Thank you Barb!🤗
I didn’t think those tables could be made pretty, but you did it! Really great work. I love the color and finish.
I wasn’t so sure either…lol. Thanks my friend! XOXO
Well, you did it again. You took the least attractive pieces and turned them into shop stoppers. I just love seeing your work.
Thanks for sharing. xo 😘
These knocked the stuffing out of me 😂 but I learned a lot. Thanks Do! Hugs to you! XOXO
I wouldn’t have given these tables a second look but you diy’d them into a great set! I love the cane rattan!
Thank you Nicki! I’m loving the cane mesh as well! Enjoy your day! XOXO
Hi Denise. I’m in love with the color, clean lines, and rattan on these tables. This is a true rescue!
Awww, thank you Monique! I almost didn’t rescue them but I’m glad I changed my mind.🤗
Wow, those tables turned out SO great! I love the cane webbing!
Tania
Thanks Tania! I’m so happy I finally gave the cane webbing a try!
They are beautiful, but old fashioned too.
Yes! Thanks Mona!🤗