HOW TO CREATE A GREY WASH WOOD FINISH USING PAINT — NO STAIN REQUIRED! | VIDEO
Hi, sweet #sifamily! Today my talented Furniture Fixer Upper friends and I are sharing our favorite makeovers, tips, and DIY projects from this past year. If you’re new here, every month, 4 talented bloggers join together to share their furniture makeovers. I’m linking to my FFU Crew at the bottom of this post. I can’t wait to see what they’re featuring for our last FFU!
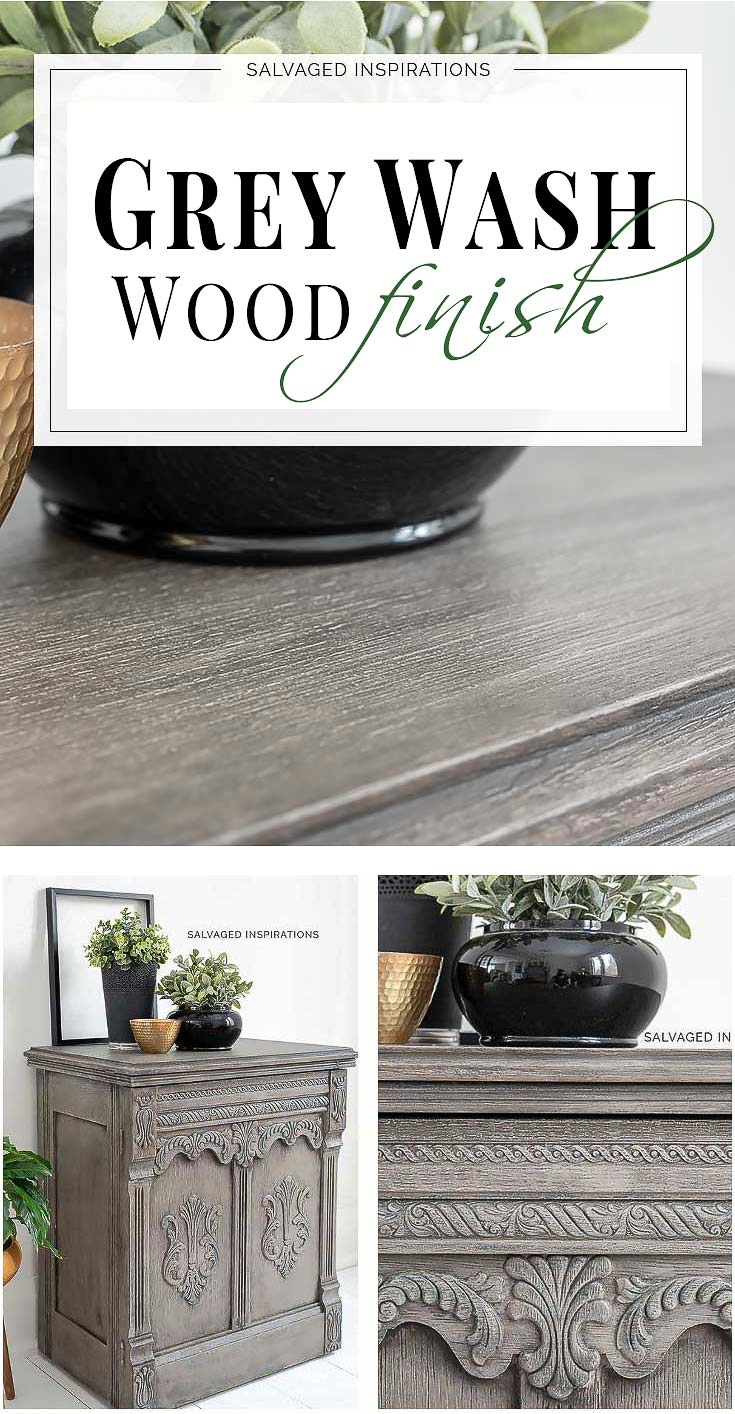
I’m highlighting YOUR favorite FFU makeover of 2020. It has close to 80K shares on Pinterest and I still get emails and DM’s commenting about this Grey Wash Wood Finish.
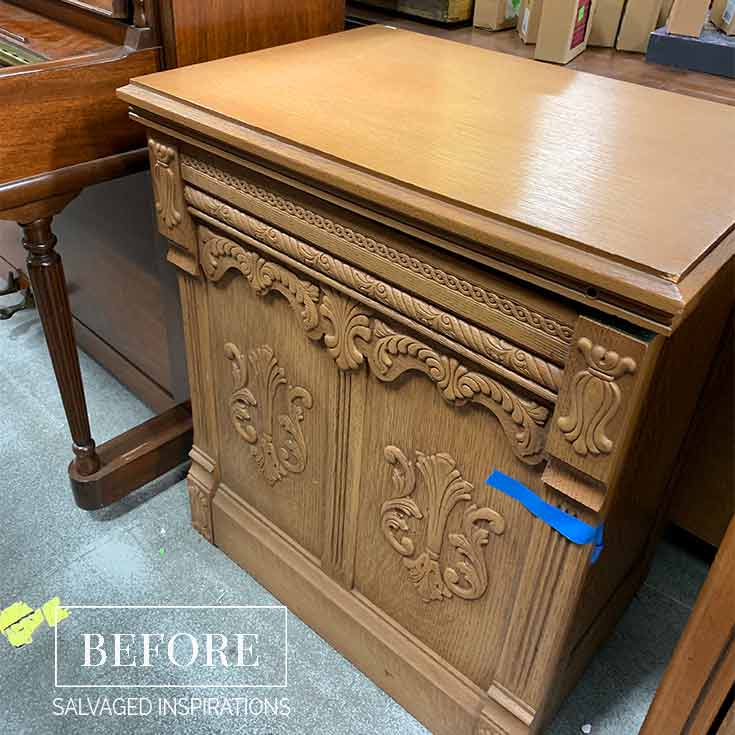
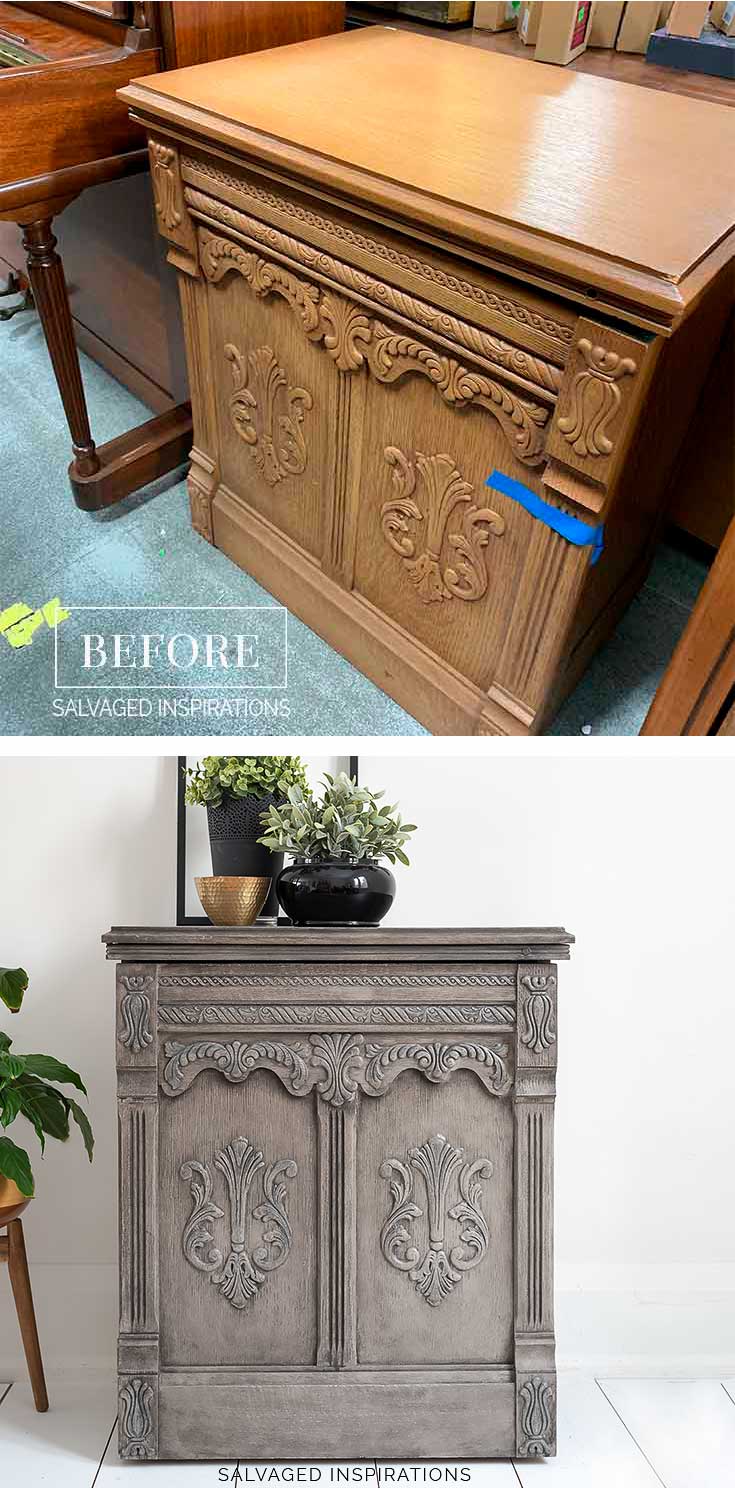
Here’s the vintage cabinet at my local Restore. She was looking sad begging me to take her home.
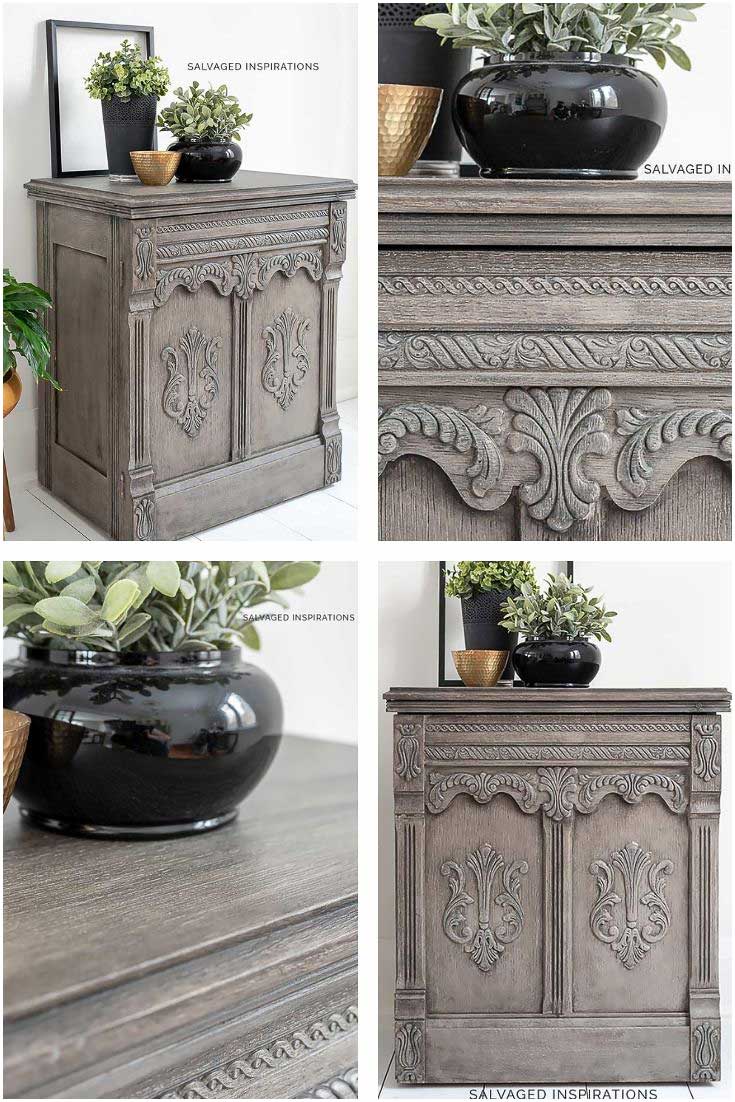
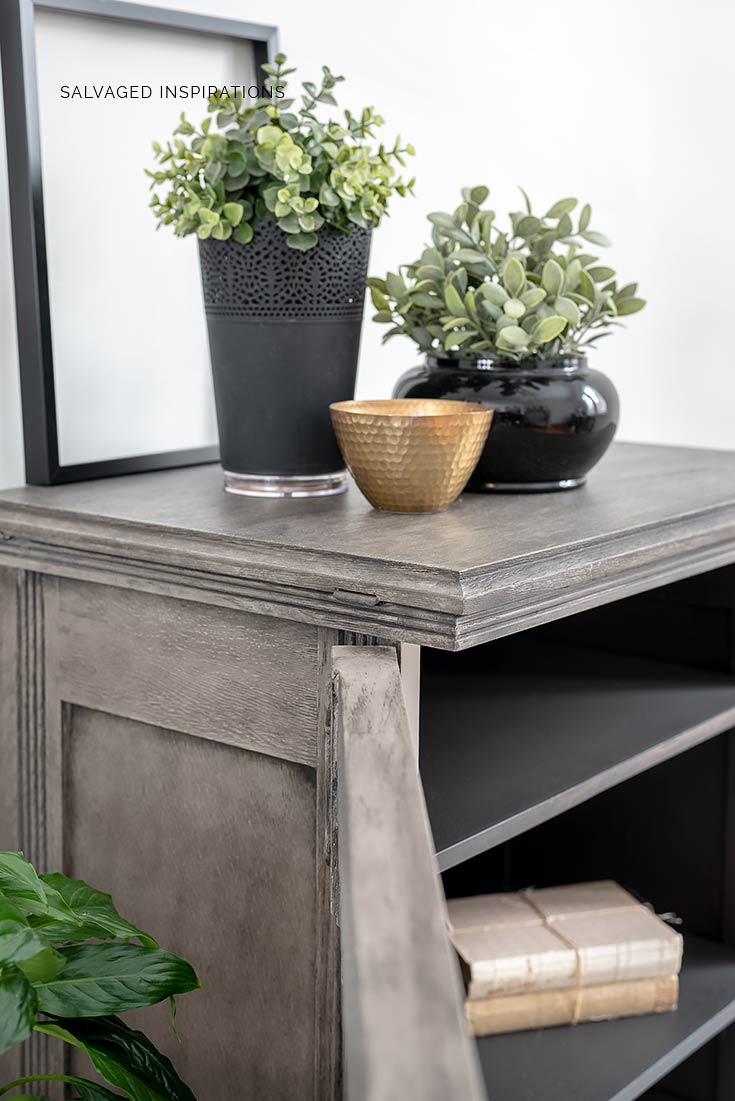
Here’s how she looks after the grey wash. Big difference, right?!
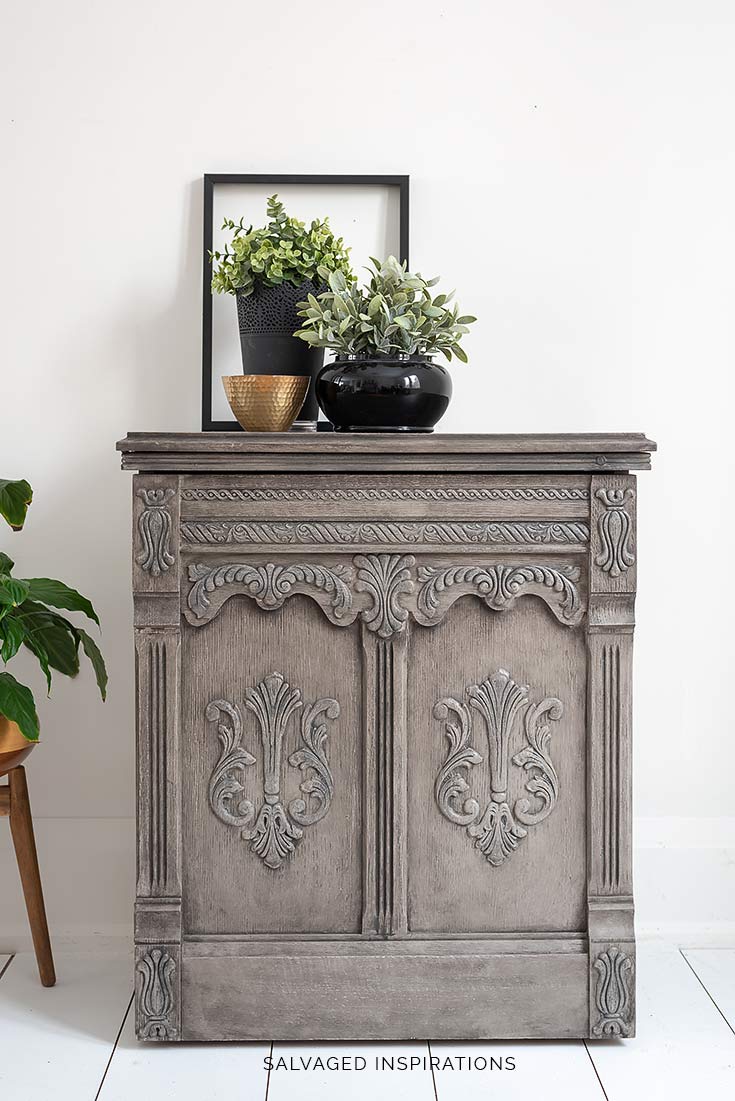
The best part, this finish can be done with two colors of paint — NO stain required!
THIS POST IS SPONSORED/CONTAINS AFFILIATE LINKS TO PRODUCTS I USE. YOU CAN SEE MY FULL DISCLOSURE HERE.
SOURCE LIST
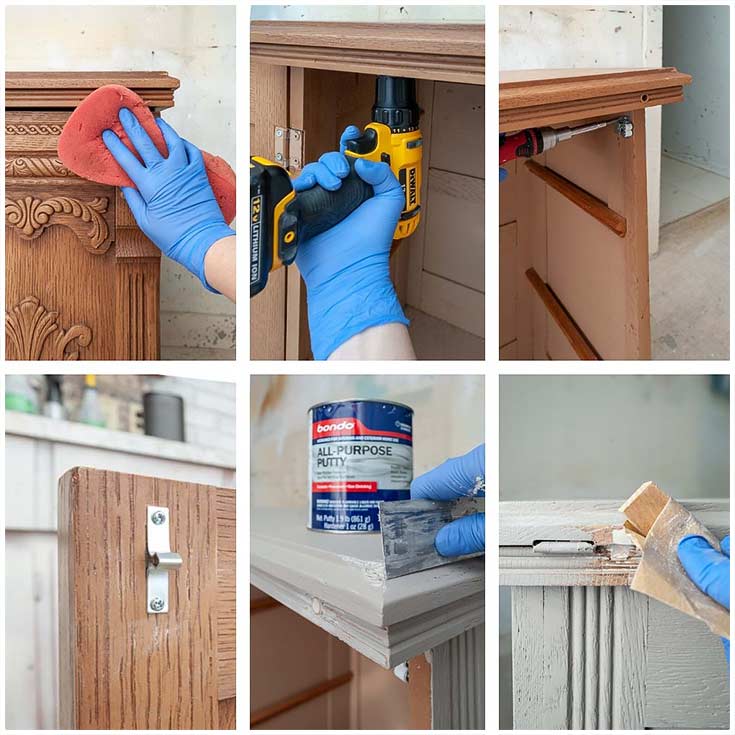
Before I started painting, I prepped the cabinet with a good cleaning and a few repairs. Sewing cabinets have a flip-top to access the sewing machine but since I didn’t want this for sewing anymore, I screwed the top down from below. New clips were added for easy opening and closing.
After I painted the first coat I filled the holes for the power cords with Bondo and then sanded everything smooth. I have no idea why I painted first. That said, you can use Bondo over primer or paint.
HERE’S A SHORT VIDEO OF THIS WASH TECHNIQUE IN ACTION
If you have any issues viewing – you can check it out here on my Youtube Channel
This finish works best if your piece has some wood grain/texture. This oak sewing cabinet was perfect!
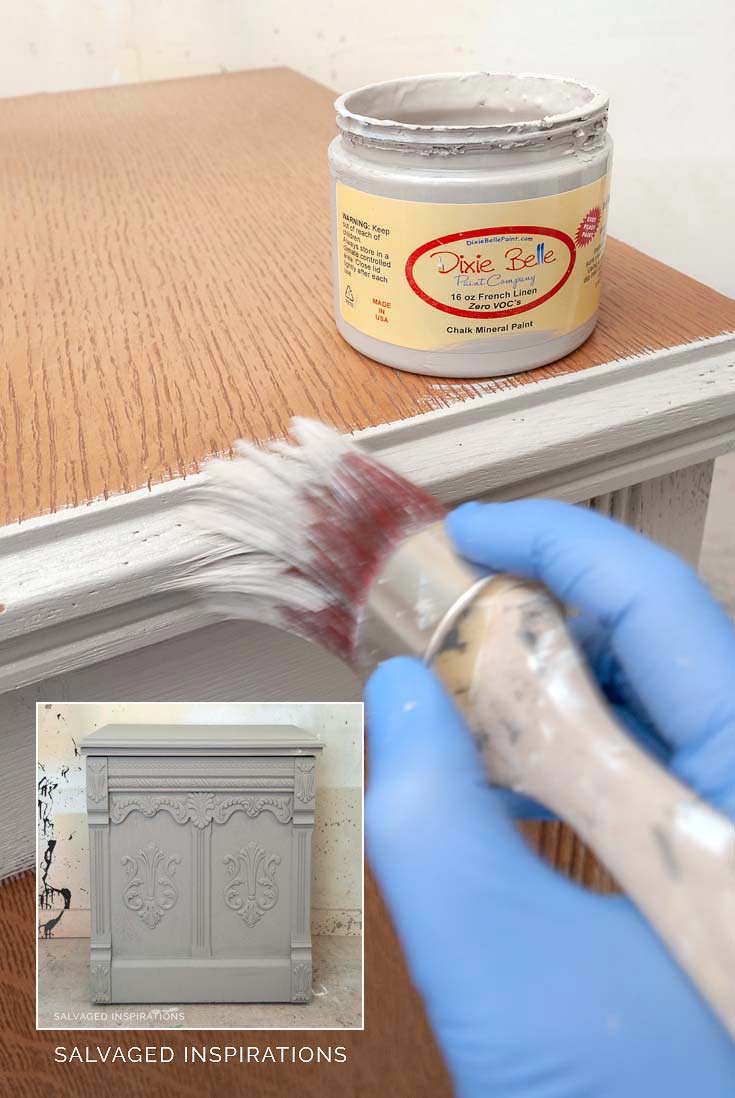
STEP 1 – PAINT BASE COAT
For my base, I painted two coats of this French Linen which is a mix of gray and brown or a very light taupe.
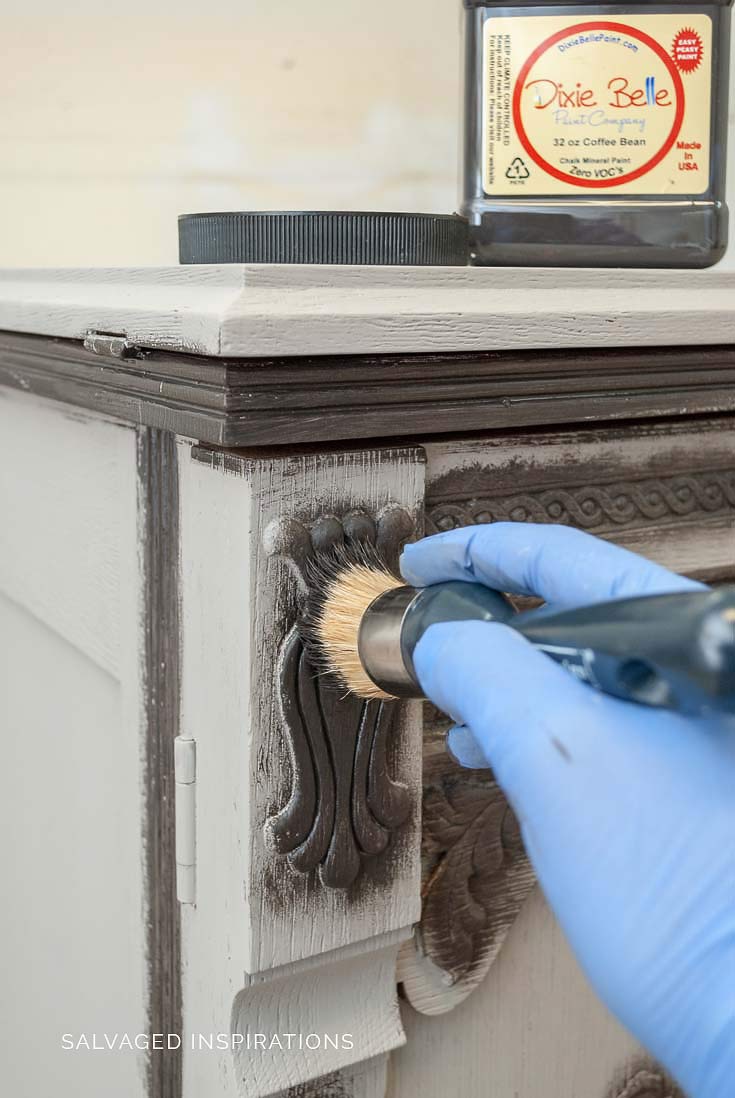
STEP 2 – ADD SOME DEPTH
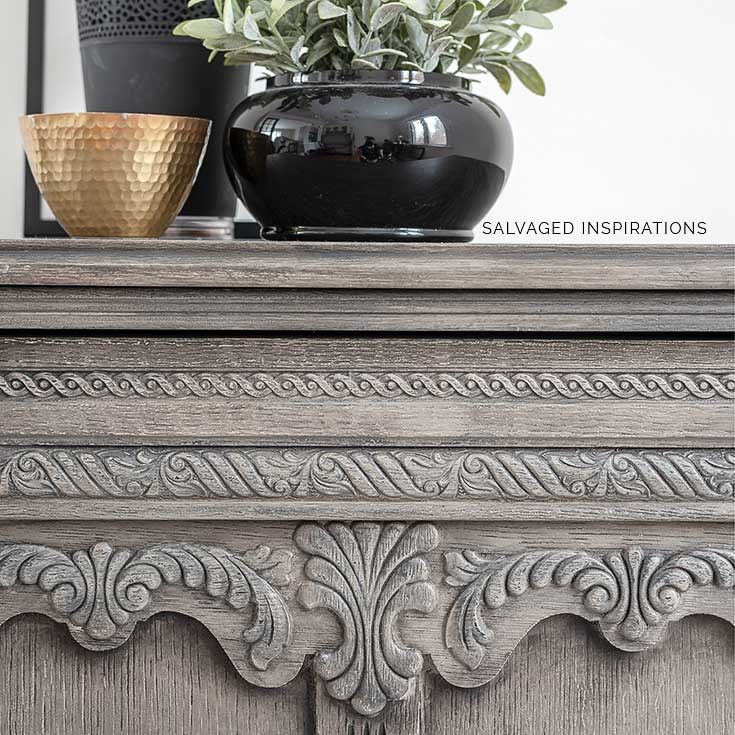
To add some depth and texture, I paint all the wood detailing in Coffee Bean. As you can see I wasn’t overly neat about it. Once another layer of French Linen was applied, it cleaned up any ‘overspill’.
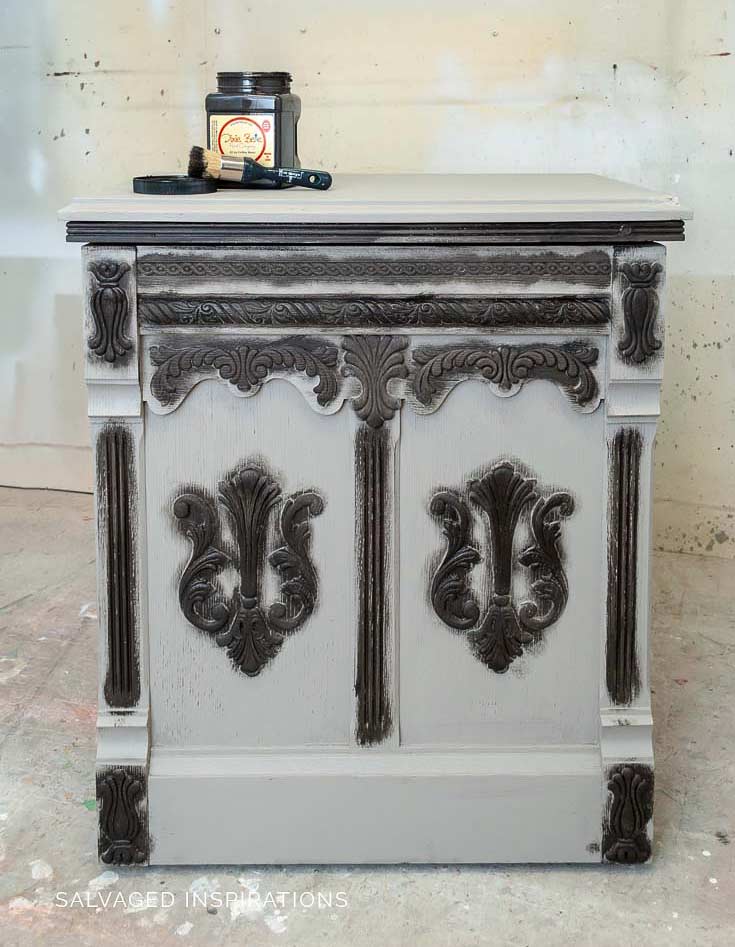
STEP 3 – DRY BRUSH FRENCH LINEN
To soften the details, I dry brushed French Linen over the Coffee Bean and added another solid layer on the top and sides.
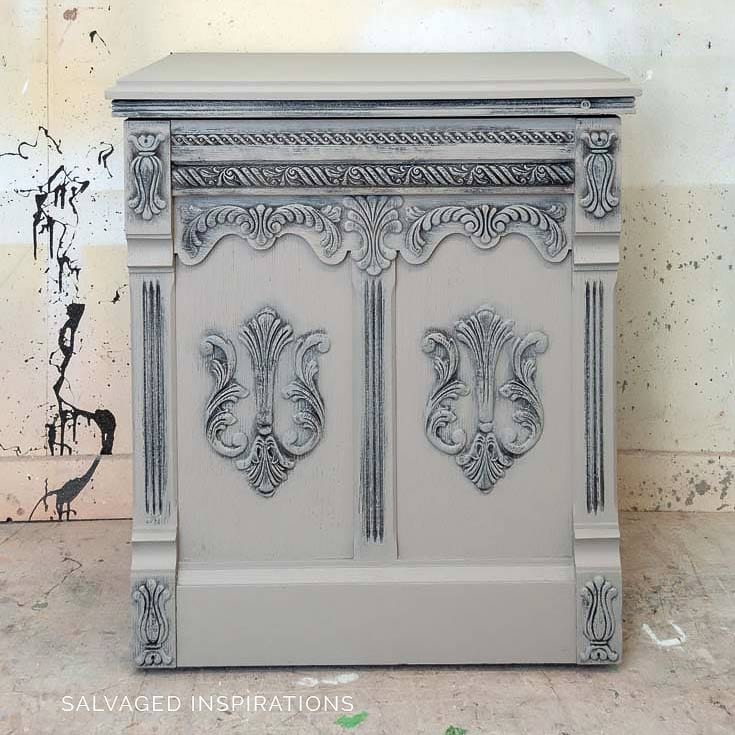
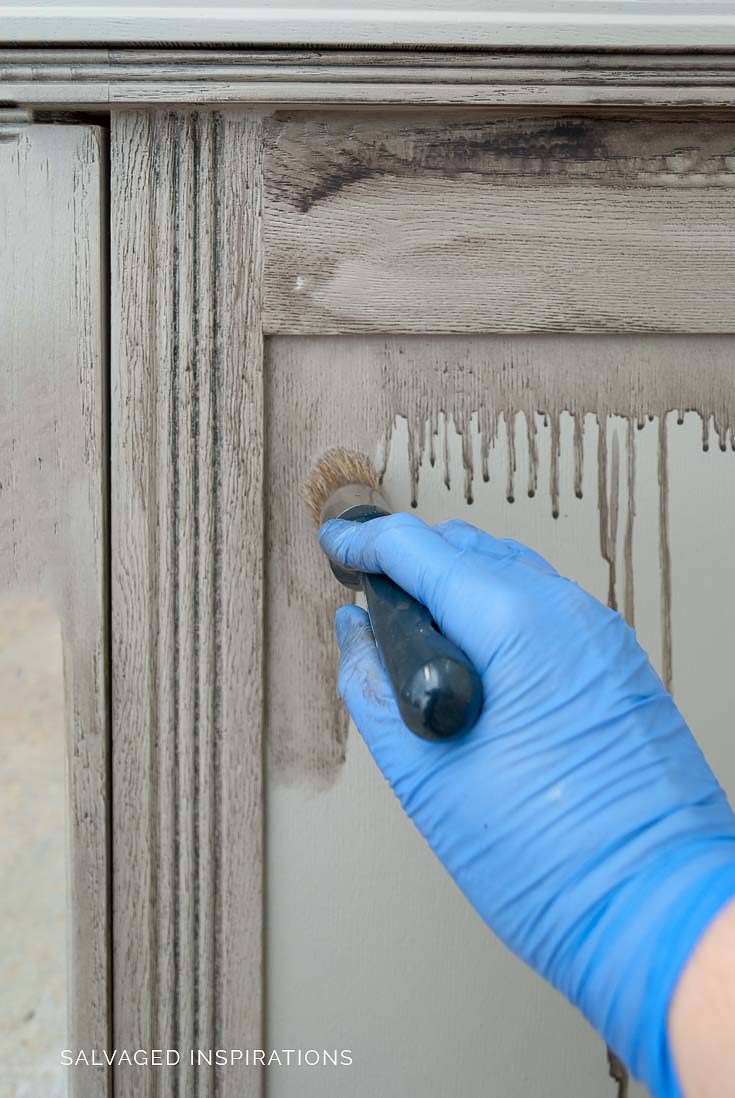
STEP 4 – APPLY A WASH
After step 3 dried, I applied a Coffee Bean wash. To do this, I dipped my brush in water and then dipped it into the paint. Working on one side at a time, I brushed on the watered-down paint. There’s no right or wrong way to do this. I left it heavier in some areas, lighter in others making sure the wash covered the entire side and got into all the crevices and details.
Tip~ This is where you control how light or dark you’d like your greige wood finish. For a lighter look use more water in your wash. For a darker look use more paint in your wash. If you find your wash is not dark enough after it has dried, repeat with another layer of wash.
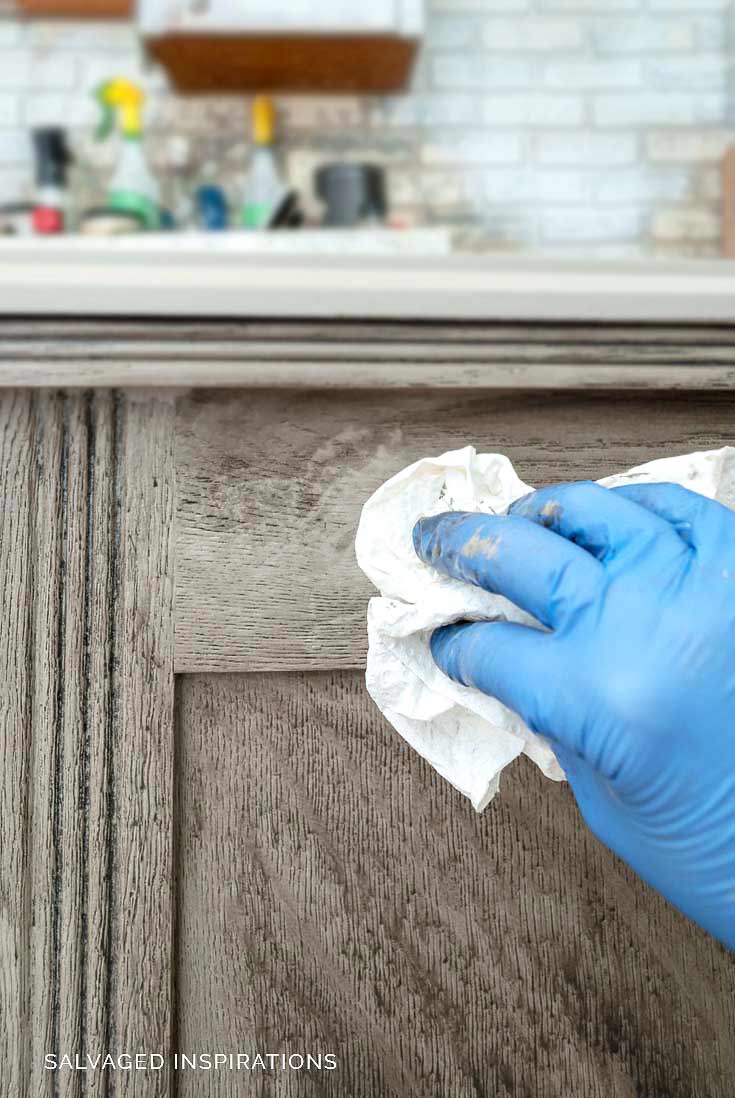
STEP 5 – REMOVE EXCESS WASH
To create more texture, I immediately started dabbing at the wash with a paper towel. I find it works best if I alternate the pattern and move my hand in a different direction. A little dabbing and smoothing to create the look you like.
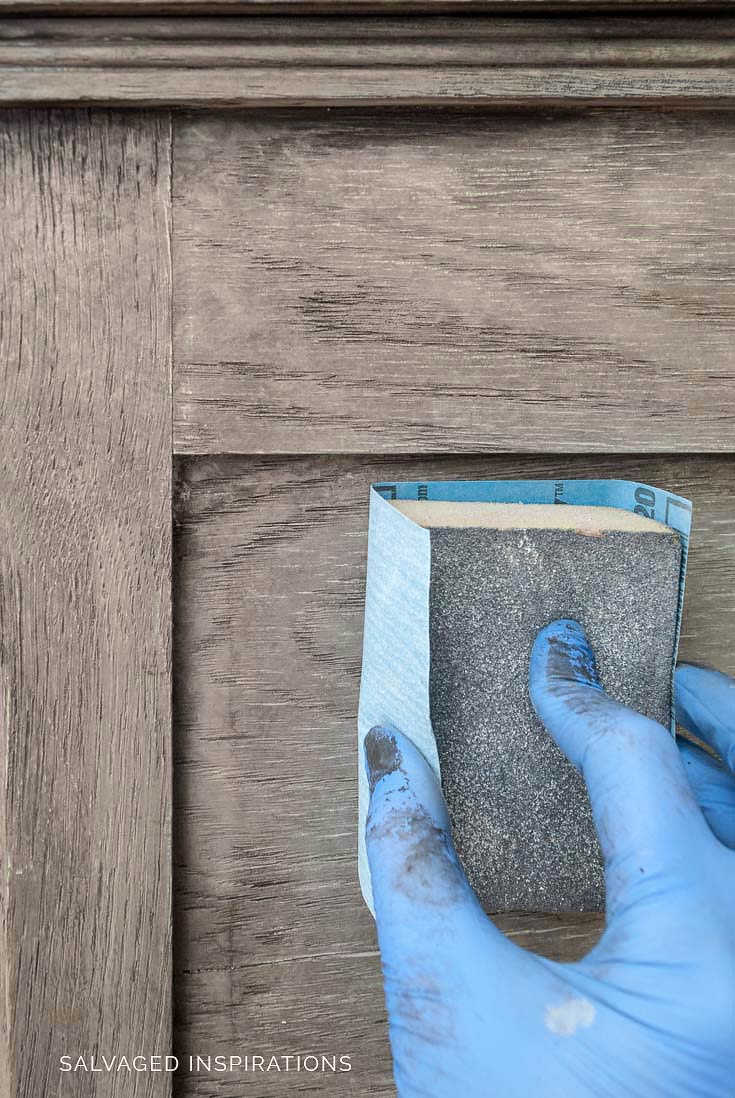
STEP 6 – SAND + TOPCOAT
Once 100% dry, I sanded with a 320 grit and removed any dust before spraying two coats of this Satin Clear Coat for a perfect finish.
The satin topcoat is super durable and gives a really subtle sheen.

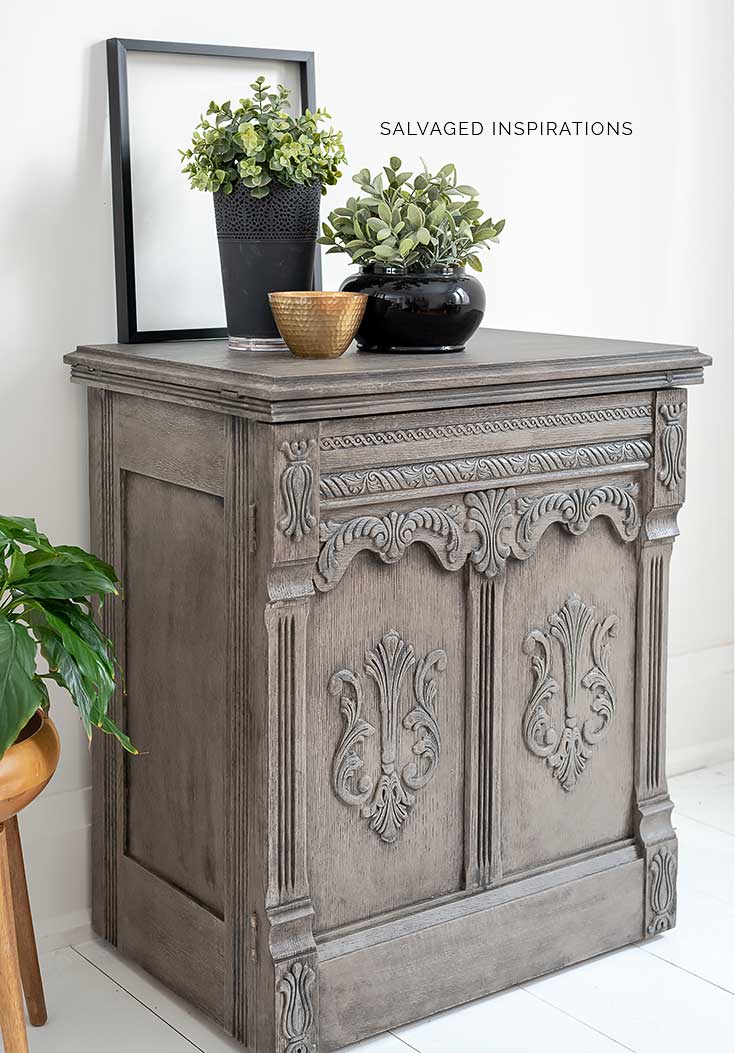
There’s a slight gap between the top and body that gives the impression that it opens, but it’s secured. I also painted the inside with Coffee Bean to finish the look.
I love these details and this finish! In fact, I was hoping to find a place for it in my home but finally listed it for sale last month. I’m happy to say it sold within an hour of posting and went to the perfect home. She’s absolutely thrilled with her new piece which makes me SO happy.
Don’t forget my Furniture Fixer Upper friends are sharing their favorite furniture tips and makeovers today too!
Below are their BEFORE photos. Visit the links underneath to see the amazing AFTERS and how they did it! I’ll meet you there! 😉
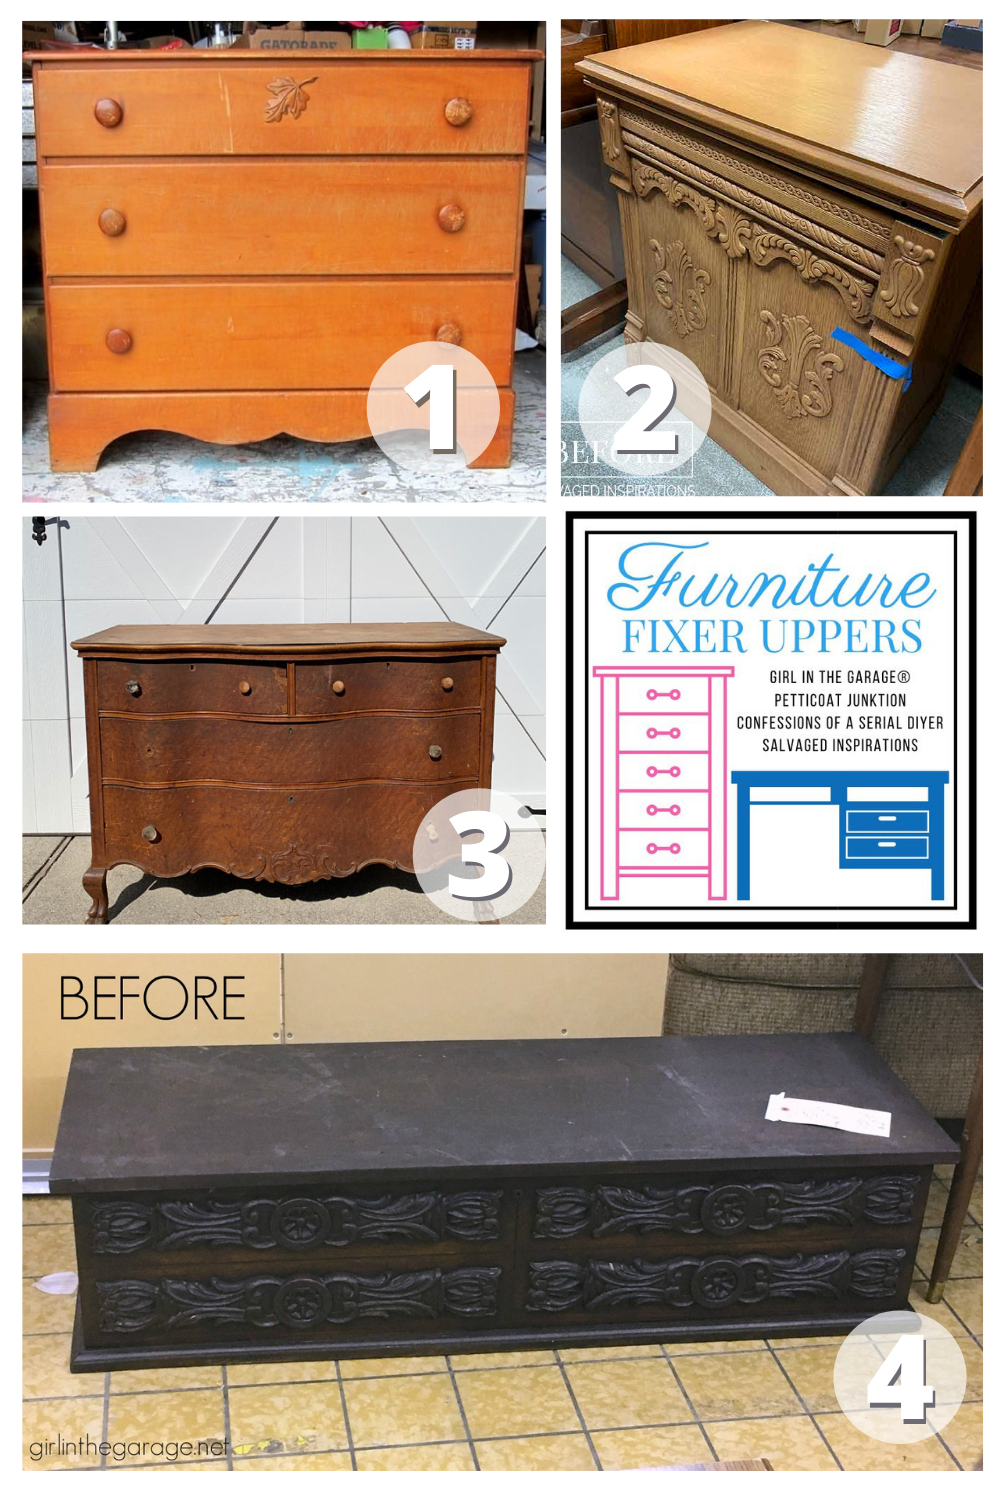
1. Petticoat JUNKtion
6. Salvaged Inspirations (I’m so happy you’re here!)
3. Confessions Of A Serial DIYer
4. Girl In The Garage
Here’s one last look at the before and after…
LET ME KNOW WHAT YOU THINK OF THIS GREY WASH WOOD FINISH … OR FEEL FREE TO ASK ANY QUESTIONS YOU MAY HAVE. I ALWAYS LOVE HEARING FROM YOU.
I’m signing off and unplugging for the holidays. I’ll be back in January with weekly inspiring furniture flips and creative tutorials!
I want to end this year by saying THANK YOU! You have no idea how much your support means to me. Especially this year. I’m super blessed to work online/from home, but there were times the isolation (multiplied by Covid) was challenging… as it’s been for all of us. Painting furniture and sharing with you has kept me sane and motivated… and for that, I’m so grateful.
Wishing you a beautiful Holiday Season and a Happy New Year. See you in 2021!
Denise xo
RELATED POSTS:
GREY WASH FURNITURE WITH WAX
HOW TO GLAZE FURNITURE
GREY WASH YOUTUBE TUTORIAL
WEATHERED GREY WOOD STAIN FINISH
10 TIPS WHEN PAINT WASHING WOOD
PIN AND SHARE!

I love the grey wash wood finish on this furniture! It’s so unique and I can’t wait to see more of your furniture in this color!
Thank you Riya!
Great job! The before and after is so satisfying. I’m going to attempt this on a nightstand. Thank you for the inspiration!
Thanks Amy and have fun!
I am wondering did you use the spray bottle to spray the paint can version of Dixie belle satin?
Thanks!!!
Sorry, I’m not sure if I’m understanding your question correctly but the spray bottle is used to thin the paint so it’s easier to manipulate. Feel free to reach out again if I misunderstood. 🙂
You say that you “spray” your piece with 2 coats of the satin clear coat. But when I click on the item in the supply list, it is a brush-on clear coat. Is there a spray version?
Great question! It is a brush-on clear coat (brushes on beautifully!) but you can also use it in a spray gun by adding a very small amount of water to thin it down slightly. 🙂
Hi! I love this so much. Wondering if I have a really shiny furniture piece, would I have to sand before this process? Thanks!!
HI Meredith! Yes, for really shiny furniture I would suggest a light sanding or a bonding primer like Slick Stick.
Beautiful make-ovet Denise 💞
Enjoy your time away from ‘the social’.
Wishing you and your family al the best of the holiday season!
Merry Christmas and Happy New Year
Thanks so much! And Merry Christmas and Happy New year to you Annie! Hugs
Love the finished color…..how do I know how much satin clear coat I need to buy? ….Sue
Thanks! 🙂 What size is your piece Sue? And will you be brushing or spraying?
Denise, this piece is so gorgeous! No wonder it sold quickly, although it was hard to say goodbye to. I just took a piece to my booth today that I’ve been hanging onto since summer. Too bad we can’t keep them all. Merry Christmas and enjoy your break!! xo
Exactly, right? 🙂 Sometimes it’s hard to let them go…lol. Merry Christmas my friend! Hugs XOXO
What a great tutorial and I love the finished colour.
Your tutorials are so easy to understand and follow.
Lynn (following you from the UK)
Hi Lynn and WELCOME! Thanks so much and I’m so glad! Have a wonderful holiday!
Wow this has got to be the best make over I’ve seen in a while. I LOVE it. Merry Christmas and a happy new year to you and your family
Aw, thank youuuuu! Merry Christmas to you and yours Julie! 🙂
Seriously Awesome.
Thanks, Denise!!!
Hi Denise. This is such a beautiful makeover. I love the depth created by the two colors you used. The sewing cabinet went from very dated to absolutely gorgeous.
Thanks so much, Monique! And wishing you a VERY Merry Christmas to you and your family. XOXO
Love the sewing cabinet redo! I have nearly the same one and would like to steal your idea with one wrinkle,it has a set in leather top. I am wondering if you have any suggestions? Thanks
Leather top… how interesting! If you don’t like the look you can paint over it. Remove the inset and replace it with a piece of wood. Or leave the leather and attach another board right on top of the leather so long as it can adhere from underneath onto the frame holding the leather inset… just a few ideas there. If you do something with yours, I’d LOVE to hear how it works out for you. These sewing cabinets are so neat!
One of my all time favorites of yours, love the results, love the technique, love that you shared it with us. Have a Merry Christmas,
A VERY Merry Christmas to you Tracy! Big virtual hugs! XOXO
Loved how that came out!
Thank you Tiffany! Happy Holidays to you! 🙂
Spectacular! I love it! You are amazing!
Thanks, Patricia! Happy Holidays to you! XOXO
This is THE color I’ve been looking for! I intend to redo my dining table top. And the best thing is , I already have these colors in Dixie Belle. Thank you for the wonderful tutorial. Now, do you have any ideas of what color to paint the match ing dining chairs?
As always you are a true inspiration! Many thanks.
Hi Sharon! I’m SO GLAD you like the color combo for your dining table… I think a table with this finish will look spectacular! As for the chairs, hmmm it really depends on your decor. But Caviar Black or maybe even the Coffee Bean would be classic and a nice contrast imo. 🙂
Denise, I love this grey wash. I want to try it soon! Thanks for sharing. Merry Christmas!
Thanks, Lori and Merry Christmas to you as well! XOXO
Denise, you do such lovely work!! This piece is just wonderful! Thank you for sharing your talents with us. God Bless.
Thanks, Cate! And Merry Christmas to you and yours. 🙂
Love it! This project inspires me to give it a try. Thank you for sharing. Have a great weekend 🤗
Thanks, Rosie! Wishing you a great weekend as well. XOXO
This is such a great makeover!! I can see why it was a fan favorite! Merry Christmas!! XOXO
Thanks and Merry Christmas my friend. I hope you and your family have an amazing one. Hugs