HOW TO TURN A BEAT-UP FBM FIND INTO AN UPDATED TWO-TONE PAINTED DRESSER | YOUTUBE VIDEO
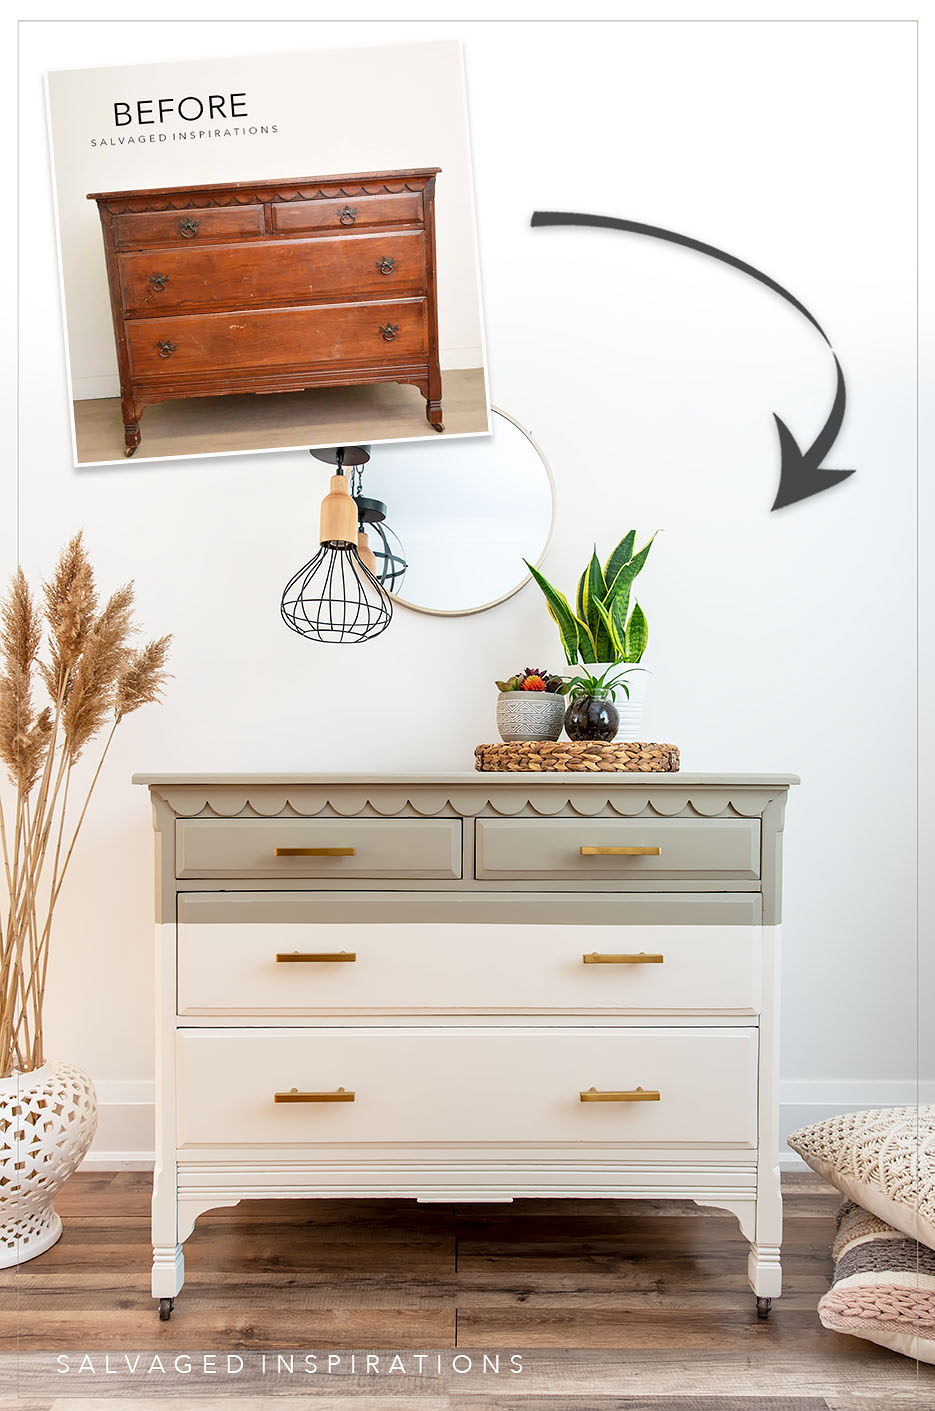
 Hi creative friends! Today I’m sharing how to update a piece of furniture using a two-tone paint finish. I bought this dresser off Facebook Marketplace over a year ago. The ad said it was in good shape but unfortunately it wasn’t. It sat in my garage until Nick repaired the top and drawers. Then it came down to my studio for more cosmetic fix-ups! I can’t wait to show you how it all came together with this updated two-tone finish!
It’s also one of my favorite days of the month – Furniture Fixer Upper Day! If you’re new to the #siblog, every fourth Thursday of the month my super-talented blogging besties and I get together and share our furniture flips. I’ve included the links to their before and after’s down below.
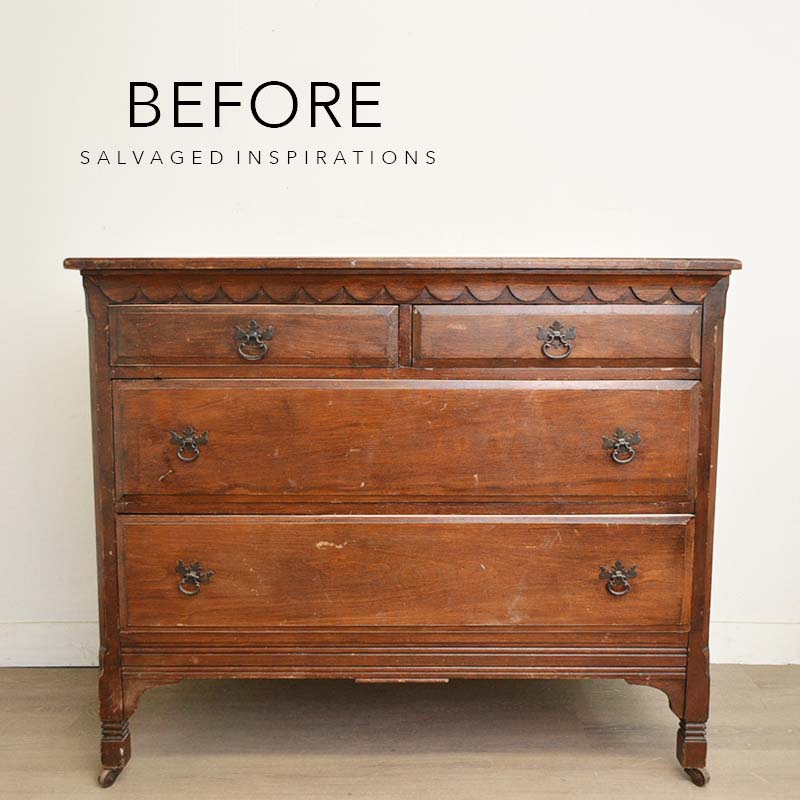
Here’s the thrift dresser I started with. Super cute but a little beat up. A few of you have mentioned how good the furniture looks in the before pic. Only sharing the front view of the before doesn’t show the extent of what these pieces need so I have included a few more before pics. Let me know what you think of this idea (and if you find it helpful) in the comments below. 🙂
The side of this dresser had someone’s name engraved into it. The entire time I was fixing this side I was trying to figure out the name. I’m seeing “Jean Dwyer”… what do you see?

The top had screw holes and deep divots and scratches in the boards.
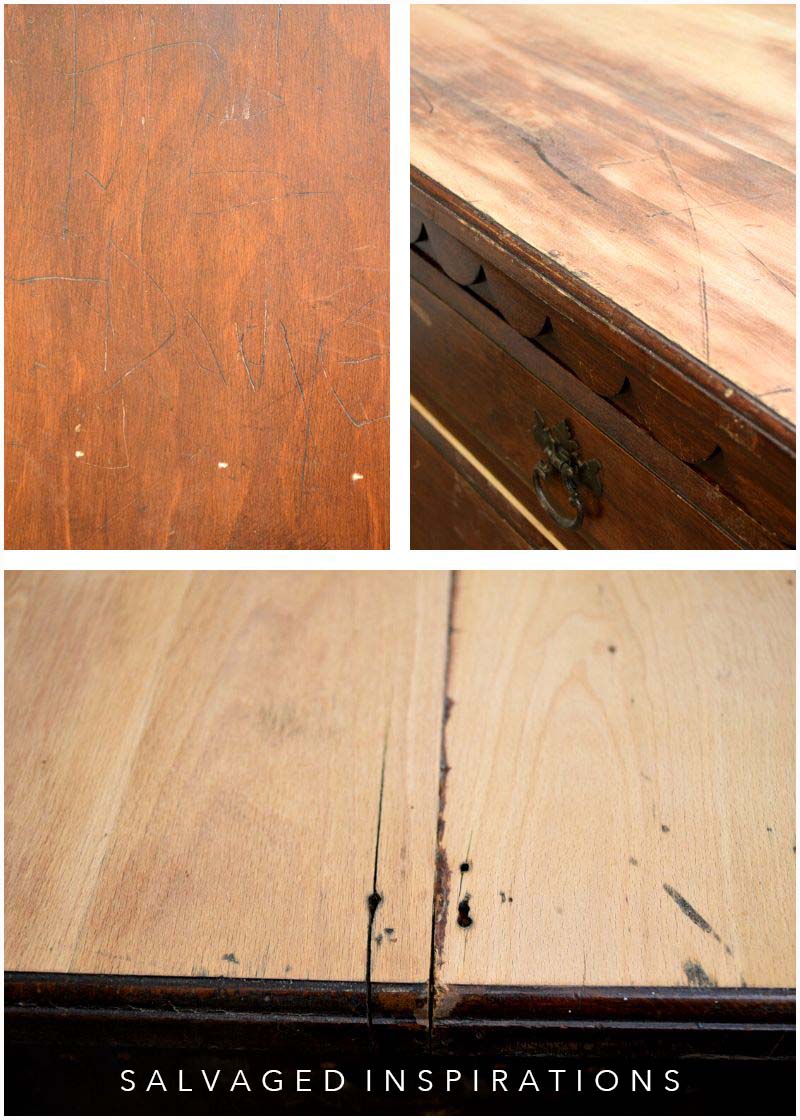
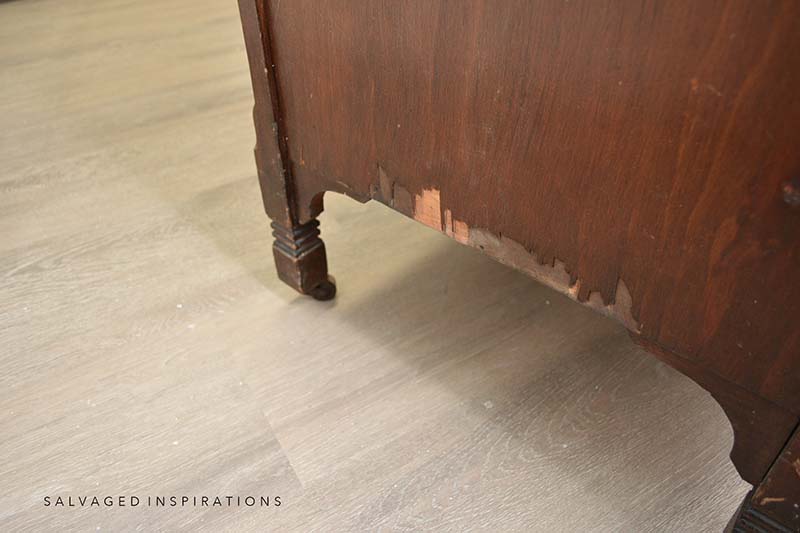
Both sides had missing veneer as shown below.
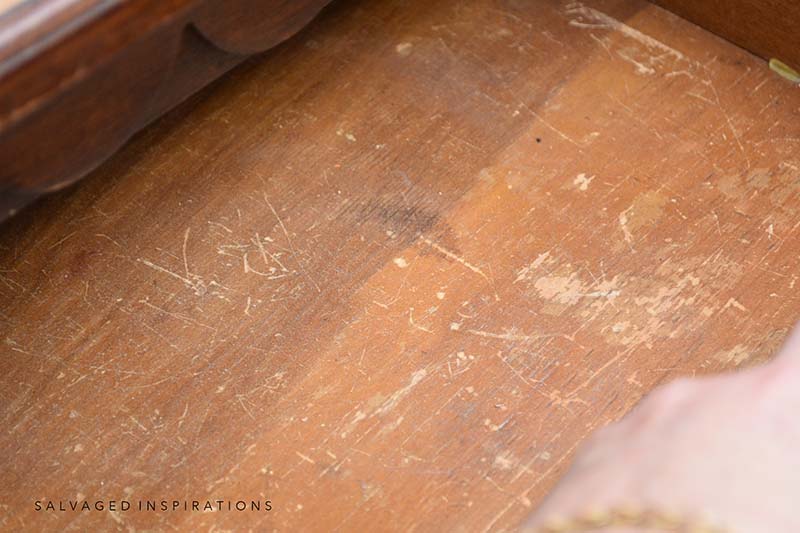
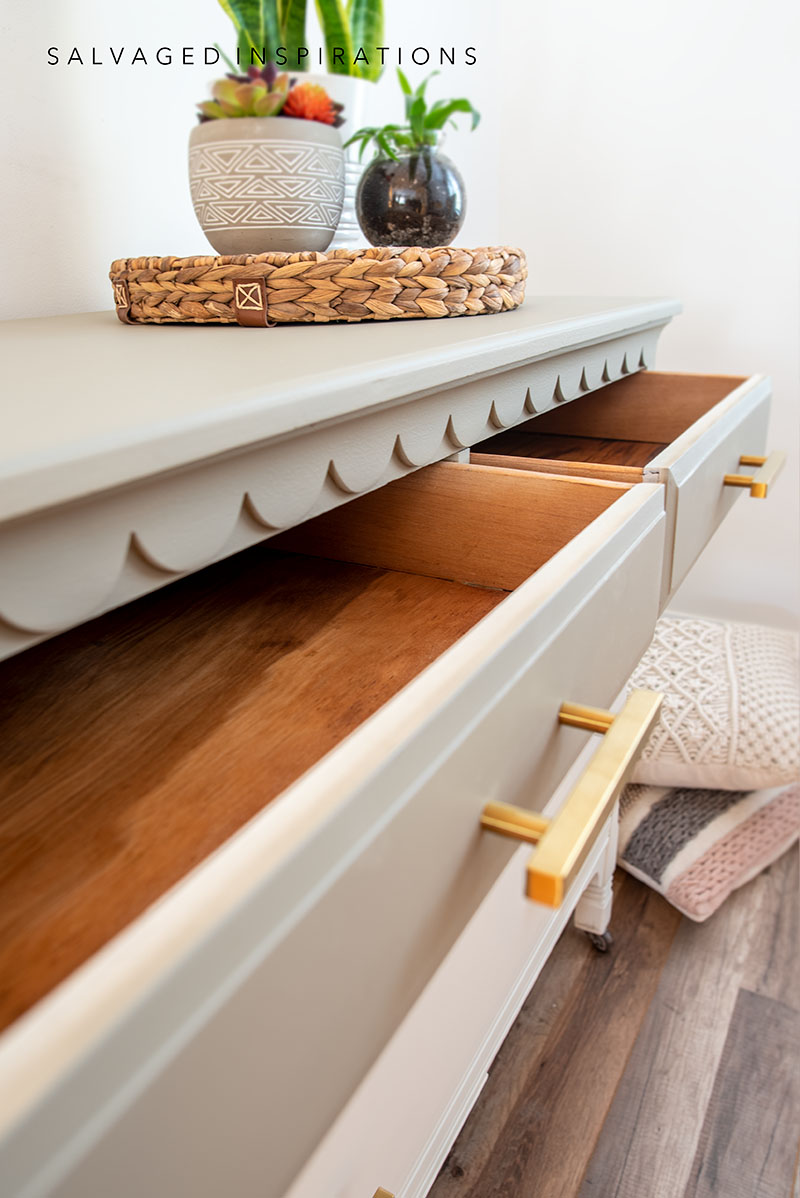
The inside was a little beat up as well. Look at the insides of these drawers. I think “Jean’ got some really good use out of this dresser. hehe
THIS POST IS SPONSORED/CONTAINS AFFILIATE LINKS TO PRODUCTS I USE. YOU CAN SEE MY FULL DISCLOSURE HERE.
SOURCE LIST
$15 Thrift Dresser – SALVAGED
White Lightening
Bondo | Wood Fill
Sand Paper | Tack Cloth
BIN Shellac-Based Primer
Endless Shore Silk Mineral Paint
Hampton Olive Silk Mineral Paint
Tape & Drape Masking Tape
Satin Clear Coat
Best Dang Brush
Big Mamas Butta
4″ Brass Hardware Pulls
TOOL LIST
Putty Knife
Orbital Sander
Heat Gun
Paint Gun Sprayer
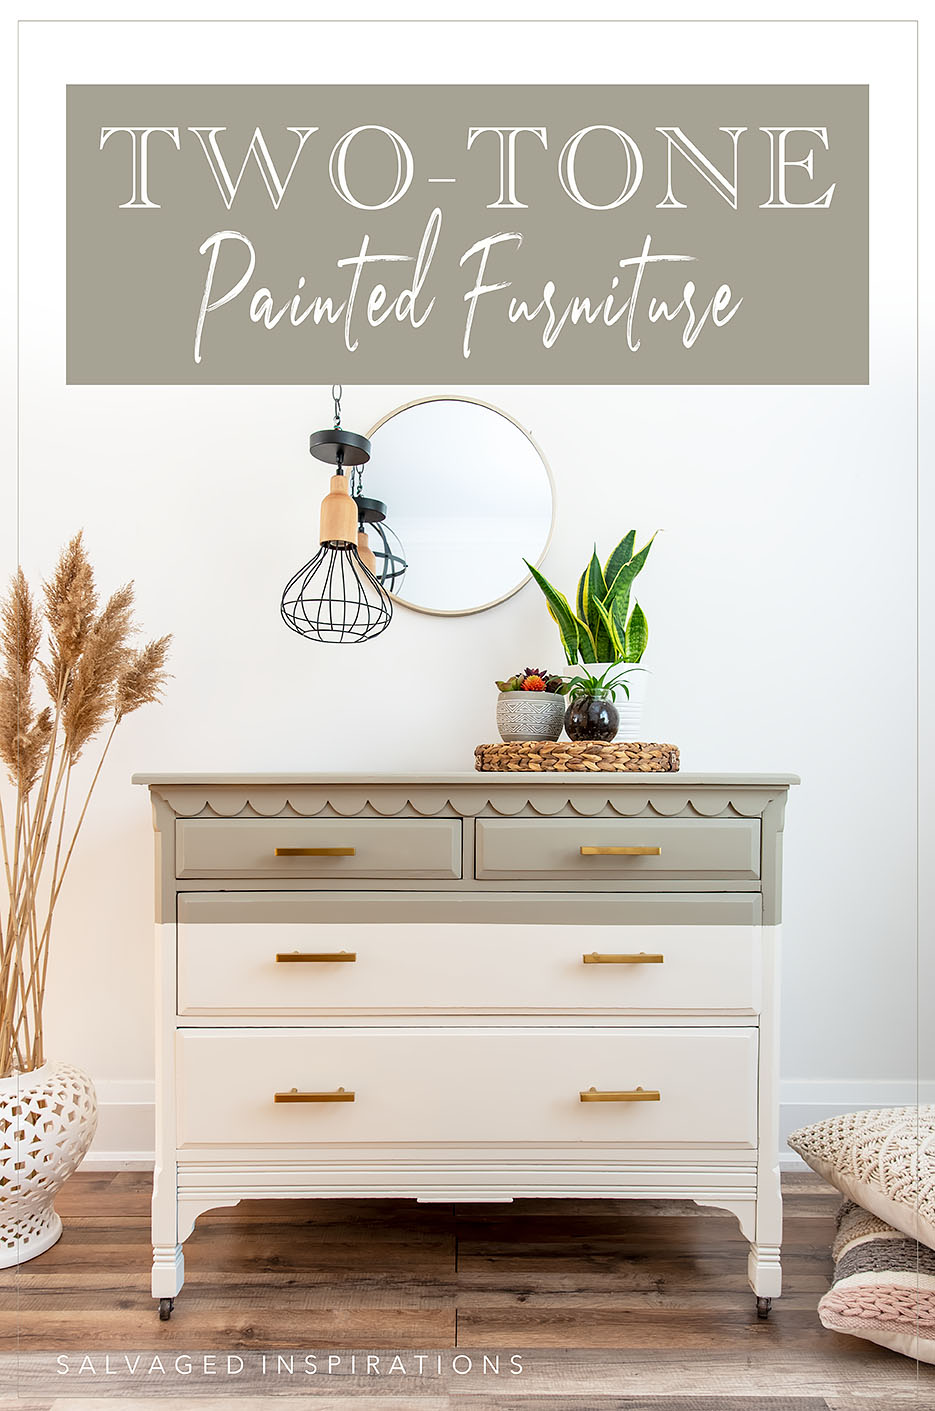
TWO-TONE PAINTED DRESSER MAKEOVER
So let’s get to work and fix her all up! Here’s how it all came together…
PREP | CLEAN
I removed the vintage hardware and then cleaned this piece with this TSP substitute. Remember the inside, back, and bottom of the piece when cleaning your furniture. This is where the spider pods and dust like to hang out!
BONDO | SAND | PRIME
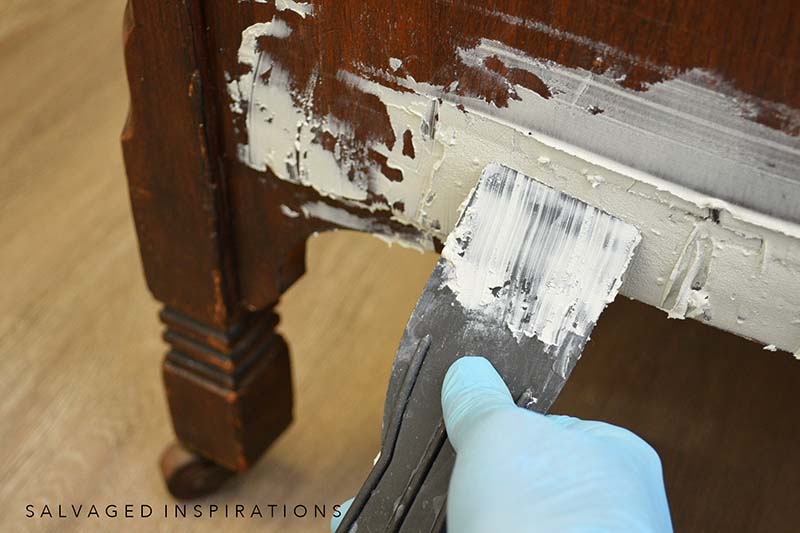
Before I sanded, I filled all the LARGE holes, gaps, and gouges with Bondo. I filled in everything that was easy to see. The hardware holes, the missing veneer on both sides, the gaps in the top boards, and more. Bondo was the first part of repairing this dresser and I have a full tutorial on How To Fix Furniture With Bondo here.
Once the Bondo dried, I sanded with my orbital sander until perfectly smooth and then using a roller, added one coat of BIN Shellac Based Primer. Part one of the fill and prime is DONE!
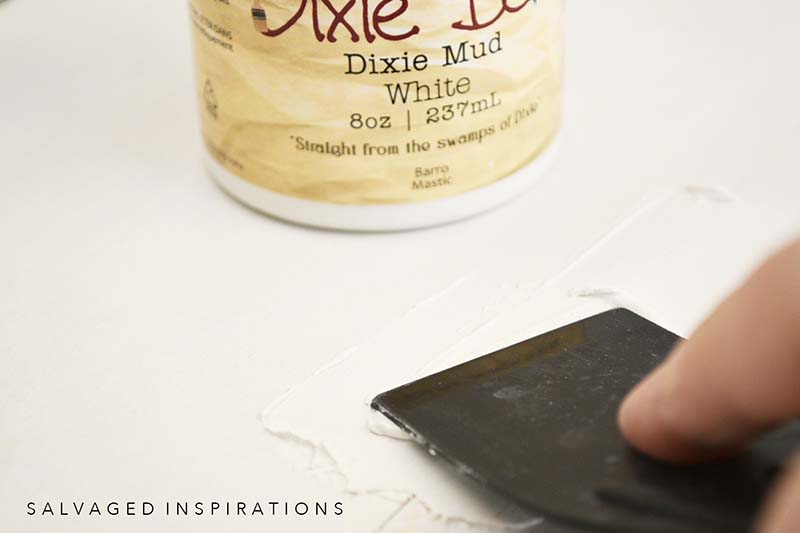
WOODFILL | SAND | PRIME
Now that I had the major flaws filled in and primed, I could see all the smaller remaining flaws perfectly. (Applying a coat of primer REALLY helps you see all the little scratches and dings you didn’t get the first time around!) Using a white wood fill, I went ahead and filled in all the rest of the scratches and dings making sure to overfill so it sands perfectly smooth.
Once the wood filler was dry and sanded smooth, I applied another coat of BIN Shellac Based Primer. This two-part fill and prime works really well if you have a lot of repairs.
SPRAY PAINT
After giving the primer a very light sanding with a 220-grit sandpaper, I used a tack cloth to wipe off the dust. Then I sprayed two coats of the gorgeous Endless Shore SILK All-In-One Mineral Paint. (I’ve had a few of you ask why I use primer when the Silk Paint has a built-in primer… it’s because I RARELY pick my paint/colors before I prep my pieces!) That said, if you KNOW you’re going to use this paint, no primer is required. 🙂

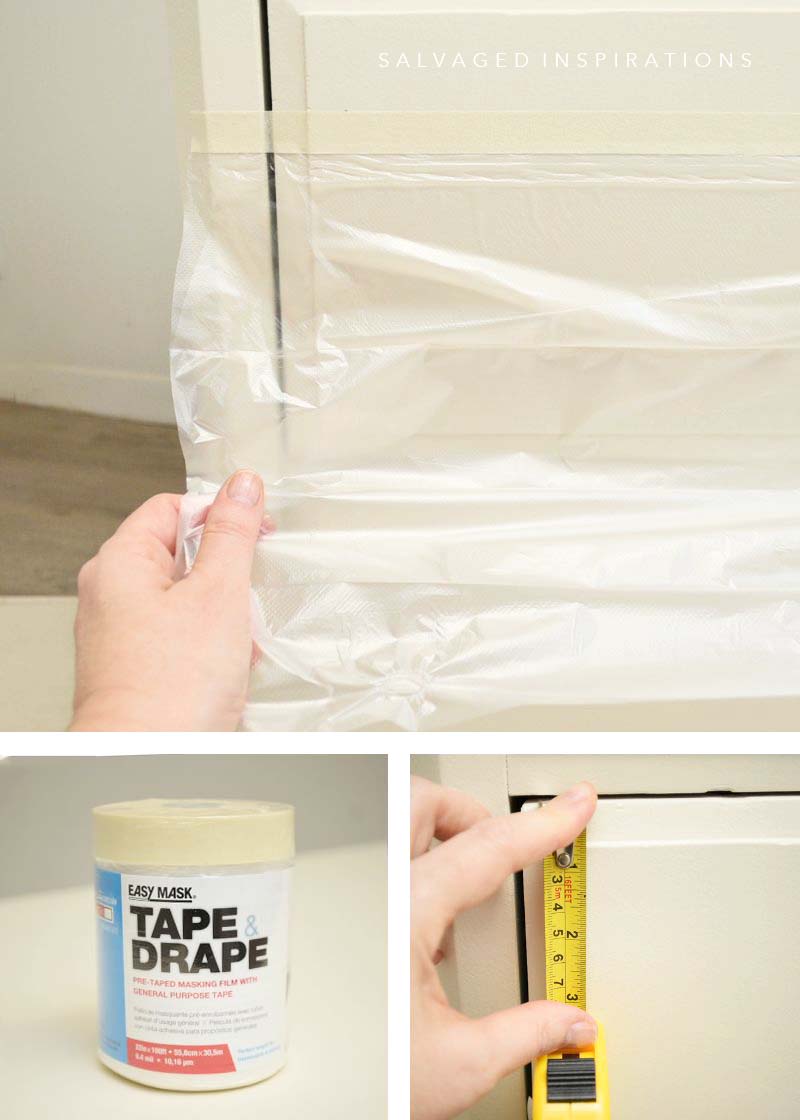
BLOCK OFF | TAPE OFF
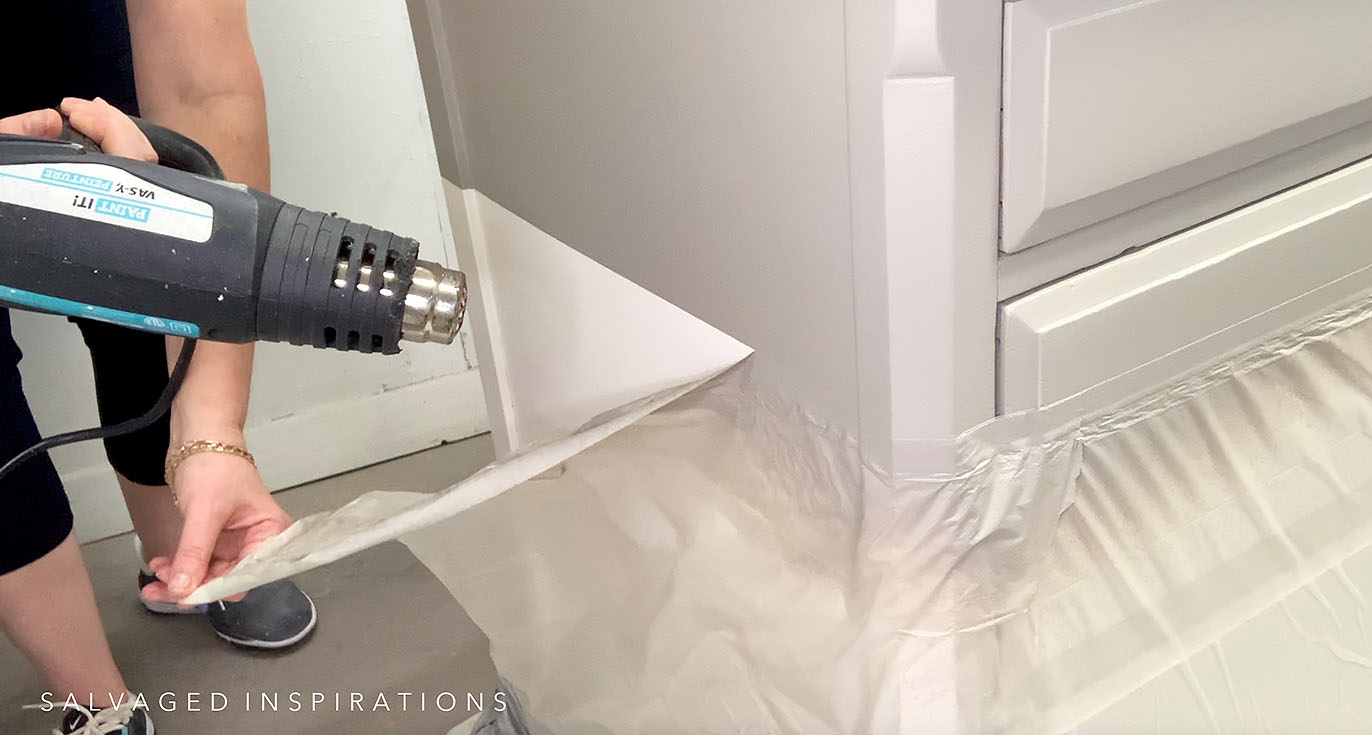
To create a two-toned paint finish I had to mask off part of this dresser. I measured where I wanted my color blocking to go and then masked the dresser. This was my first time using this Easy Mask Tape & Drape and I LOVE it! Super easy to apply. The tape adhered really well and I didn’t have any issues removing it either.
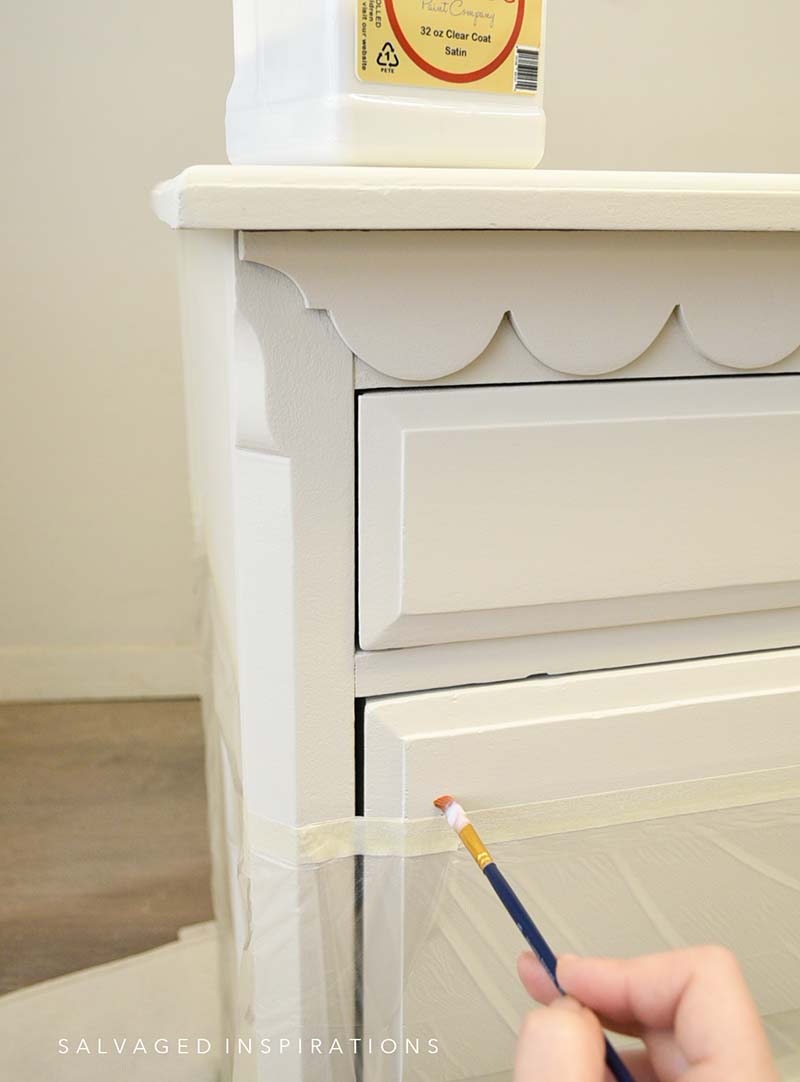
SEAL FOR CRISP LINE
To create a crisp two-tone paint line, I used an artist’s brush and brushed on a thin coat of topcoat. This prevents the paint from bleeding under the tape for a perfect line!
SPRAY PAINT CUSTOM COLOR
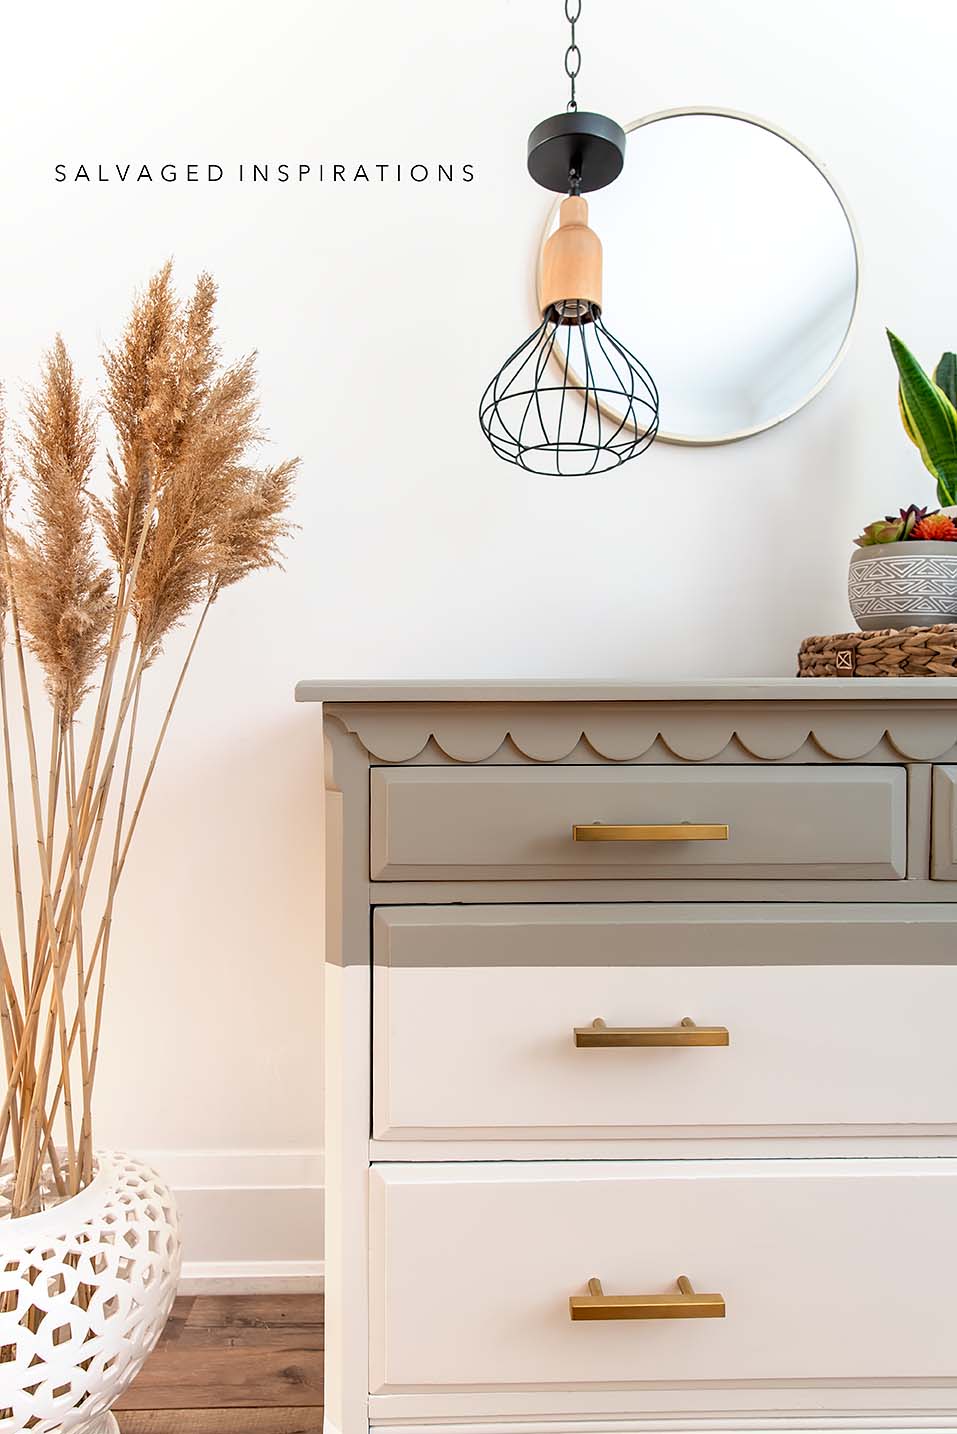
I had a little Endless Shore still in my paint cup so I mixed some Hampton Olive in to create this gorgeous custom color. I would say it was 2/3 Hampton Olive to 1/3 Endless Shore however I didn’t measure exactly. If you’re using a neutral for your base color, if you mix a little into your feature color it will tie everything together really nicely.
While my second coat was still wet, I used my heat gun to warm up the tape before pulling it off. This is a great tip to make sure the base color doesn’t stick to the tape and pull off as well.
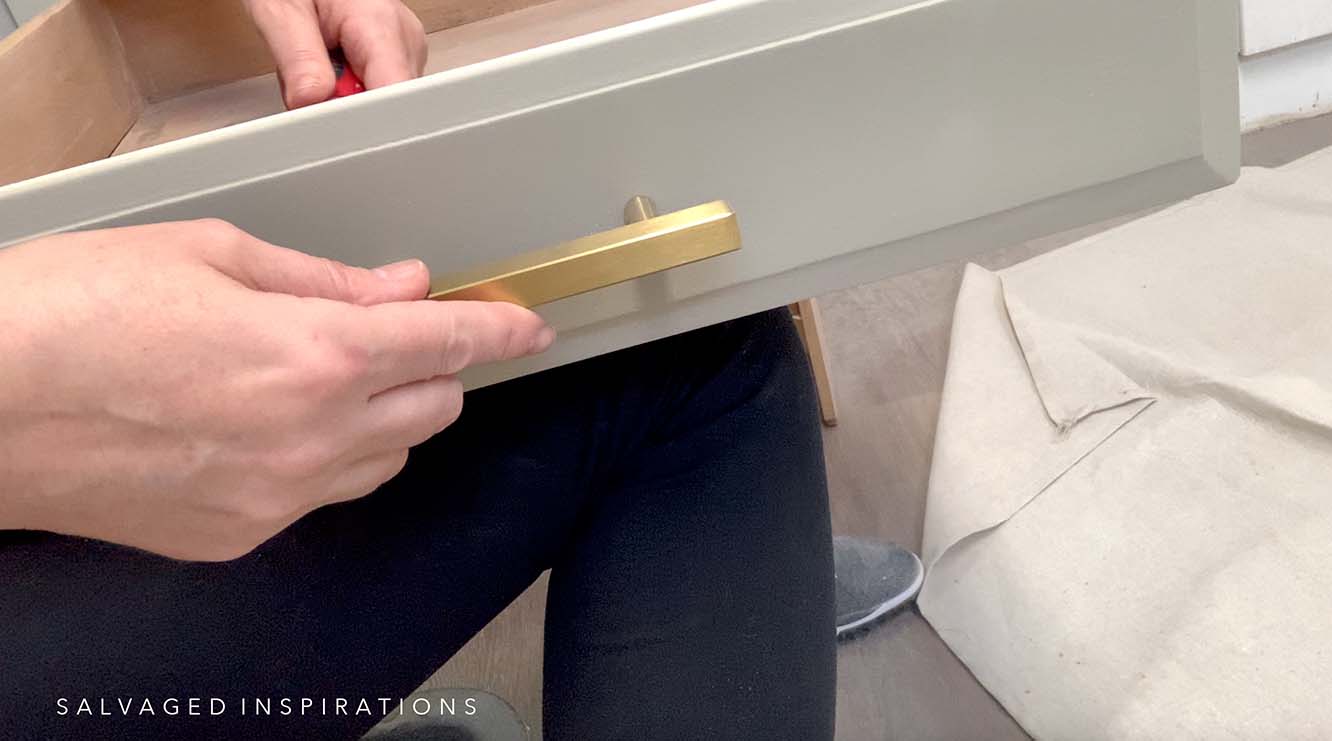
NEW HARDWARE
I ordered these 4″ Brass Hardware Pulls from Amazon and I think they work perfectly on this dresser.
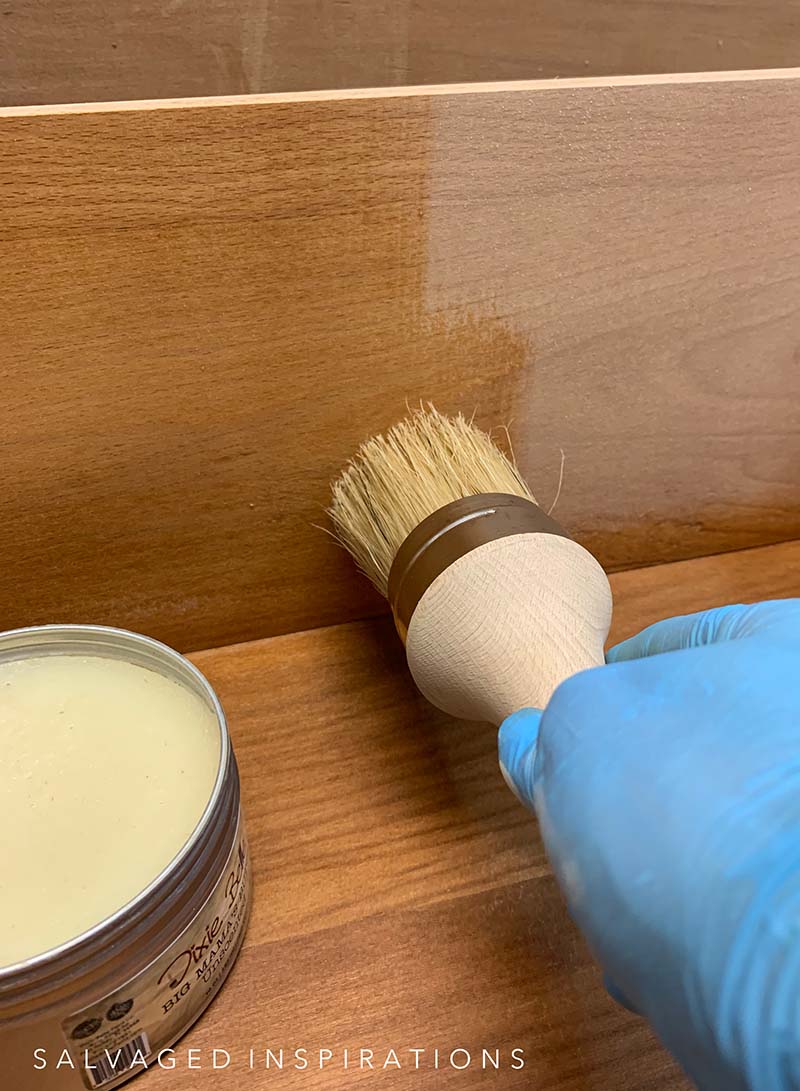
REFRESH DRAWERS
Remember how bad the inside of the drawers looked? I sanded the insides of them and then gave them a refresh with this Big Mamas Butta. This is so easy to do. I brush it on with this large brush and then wipe the excess off with a soft cloth. This is so easy to do and it works amazing for ANY drawers that are looking a little worse for wear. Check out the before and after below!
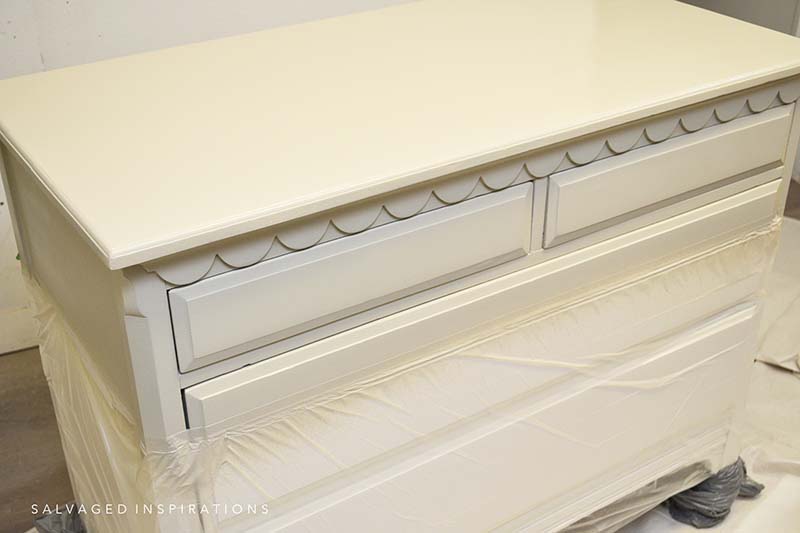
Here’s the finished look! Super sweet, right?!

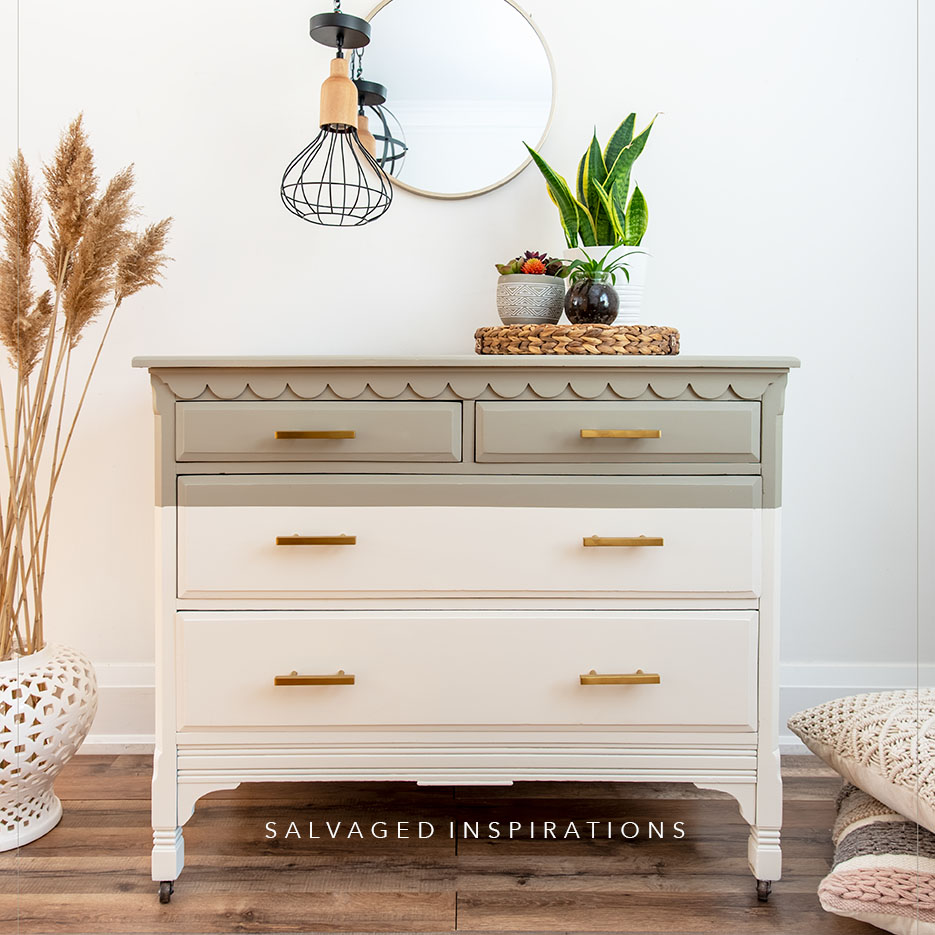
Isn’t this scalloped detail adorable!?!

And now we have beautiful clean drawers as well!
YOUTUBE TUTORIAL
Here’s a step-by-step tutorial on Youtube. If you have any problems viewing it below, feel free to watch it on my Youtube Channel HERE. Our #siyoutubefamily is already a community of 18.9K so don’t forget to subscribe if you haven’t done so already! So exciting, thank YOU! 🙂
AND NOW FOR SOME FURNITURE FIXER-UPPER FUN!
You’re going to LOVE what my creative team of Furniture Fixer Upper ladies do! Below are their BEFORE photos. Visit the links below to see the amazing AFTERS and learn how they did it! I’m heading over to take a peek as well! x
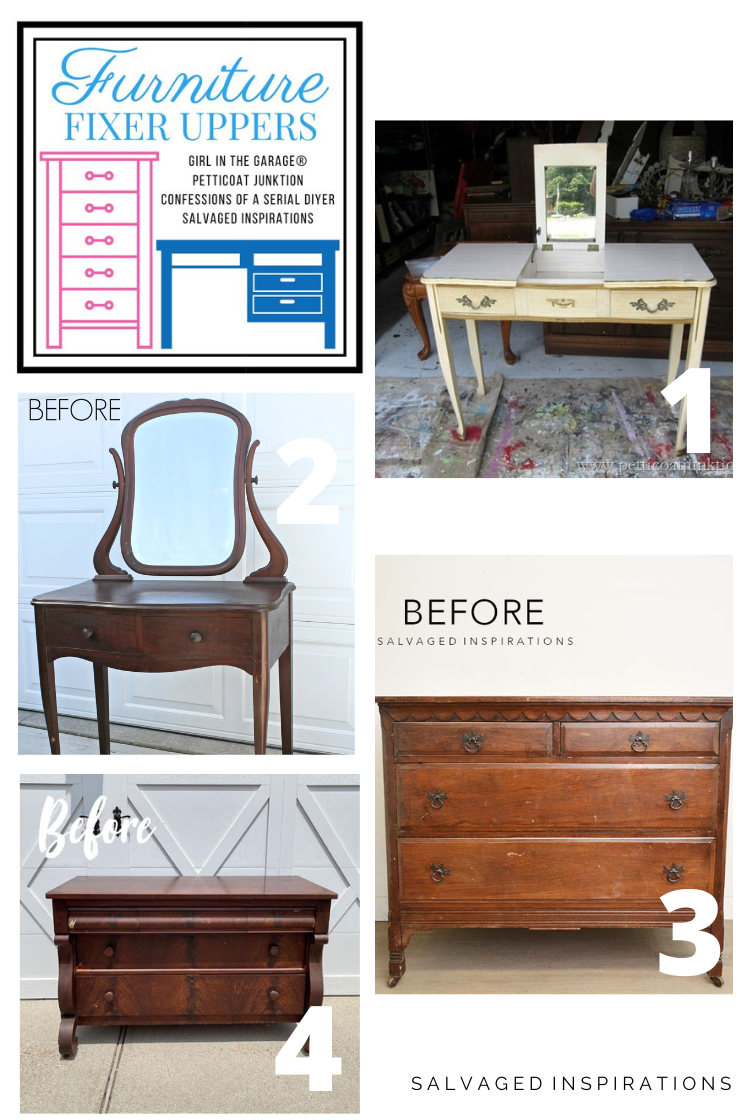
1. PETTICOAT JUNKTION
2. GIRL IN THE GARAGE
3. SALVAGED INSPIRATIONS (HAPPY YOU’RE HERE!)
4. CONFESSIONS OF A SERIAL DIYER
Here’s another look at this dresser’s before and after. I hope it’s inspired you and given you some new ideas for your projects. If so, feel free to PIN and SHARE so you can save it for later!
LET ME KNOW WHAT YOU THINK OF THIS TWO-TONE DRESSER MAKEOVER. FEEL FREE TO ASK ANY QUESTIONS YOU MAY HAVE… I ALWAYS LOVE HEARING FROM YOU. IT MAKES MY DAY! 🙂
Happy furniture painting friends!
Denise x
RELATED POSTS::
DIY ANTHROPOLOGIE DRESSER
HAMPTON OLIVE ENTRY TABLE
SALVAGED SETTEE BENCH
DIY BOHO NIGHTSTANDS
12 PAINTED NIGHTSTAND IDEAS
PIN AND SHARE!


Love how the dresser turned out! How did you keep from getting paint buildup on the tape line? I painted a 2 tone (actually 3 tone) dresser once and i could feel where my tape lines were.
Thanks Janie! And I sprayed 2 super LIGHT coats. Same goes for if you’re brushing. Light coats is the key. 🙂
That looks fantastic, Denise! The scallops are so sweet.
Super sweet, right?!😃 Thanks Marcia and have a fabulous weekend! XOXO
Just beautiful Denise!
Thanks my friend! I hope you have a wonderful relaxing weekend. XOXO
Great tutorial! Beautiful piece!
Was wondering how long you let the white part dry before taping over it? The heat gun trick is awesome!
The heat gun (or hair dryer works well too!) is awesome, works like a dream! And I waited almost a full 24 hours. I let it dry overnight and went back down the next day. 🙂
Hi Denise! I love these two colors together!! I’m painting a piece now in Safe and I just can’t get the color I like. I have dried sage and I have juniper from last Fall collection. Would I mix the two to get a pretty sage color? Dried sage is too light and Juniper is too dark so I thought about mixing the 2. Your thoughts? You did a great job!!
Thanks so much Cheryl, I love these two colors together as well! And I have the PERFECT solution for you so find how the Dried Sage and Juniper will look mixed together and it’s totally FREE! Have you tried DB Color Mixer? I’ve used it a good few times and the results were super impressive! If you give it a go, I’d love to hear what you think.😃
SWEET!!!
Thanks Donna! 🙂
You know I adore those scallops! And they look much better in a lighter color than the old brown. Beautiful save, Denise! xo
I think they are pretty sweet as well. Thanks my friend! XOXO
I see the work that you did, and it is beautiful. I imagine that you put many hours on this dresser. I would have loved to see it in either of the two colors. I really don’t like them together, but that’s just me. Kudos on your project. It is beautiful.
It wouldn’t be a two-tone dresser if I did one or the other however I understand what you’re saying. When picking two colors, personal preference comes into play. You def want to pick two colors that YOU love!
Pretty and clean looking!
Thanks Cindy!
The scalloped details add so much character to this piece. Your 2 tone paint accentuates it perfectly 🙂
I was leery of your knob selection at first – but you are right – It looks amazing !
I have a piece in serious need of bondo. Thanks for your details on your repairs. Maybe now I’ll be more confident to proceed.
I love your color choice. This is a wonderful transformation. Sooo cute !
Oh, and thanks for the tip of using topcoat along the 2 color paint line!
p
The scalloped details are quite charming and I totally agree, I think they look even better with the custom paint color…hehe. 😉 And SO HAPPY you find the Bondo tutorial helpful! I have the video coming out on Saturday morning so you can see it in action. Hopefully, this will help as well. XOXO
I love how you made this look more modern and the neutral colors you chose!!!!
Thank you Tiffany! 🙂
Very cool! I can see work in so many styles especially the “new” cottage core.
Thanks Lorin! XOXO
Beautiful!!! {Like always!}
Aw, thank you Lily!🥰
This turned out so stinkin cute, my friend! It’s almost always worse when you see more than just the front view, but you fixed it right up. Love the staging as always! XOXO
I know, right?! The front view often looks not so bad.😆 Thanks Christy and have a fabulous day! XOXO
It’s really pretty. I love the colors and finish.
Thanks Lizzy! Have a super day! XOXO
Denise, you have out did yourself on this one! Thanks for all the repair tips. Looks like this one needed a lot of rehab. It’s gorgeous!
Thank you Carolyn! I’m so glad you like it and thanks for taking the time to leave a comment!😘
Beautiful
Thank you!😃
Turned out great Denise! I like the color dip look on it, and normally I’m not a fan of brass anything-but the pulls look fabulous!
Thanks Niki! XOXO
I think you did a beautiful job on the dresser. It looks so fresh! In all honesty I’m not crazy about the line where you cut it off between the colors on the drawer, but that is my own personal preference. I would have preferred the whole top drawer being green and cutting it off there and the entire legs being green to kind of frame it. I still think the dresser is lovely. Thank you for all the info and tips on how to do this. Fantastic!
Where you choose the line is def a personal choice and this tutorial will work for any two-tone striping, dipping or color-blocking. The choices are only limited to your imagination!🙂
I agree that the division between the c[lors looks strange
I love it! Beautiful work and the pulls are perfect. Thank you for the bondo lesson as well. 😊
My pleasure. Glad you found it helpful and thank you Kelly! 🙂
Love the colors! Definitely like the extra photos of the before. With only one photo before we can never see the actual damage to a piece so it gives a false sense of how easy refinishing furniture is when it’s actually anything but.Love your style!!
Okay good to know Julie, thank you! I’ll include a couple for each post from here on out… and thank you!🥰
Hi Denise. I really appreciate the extra before pictures. It really helps showcase all the work that you need to do to make your furniture so beautiful. Gorgeous makeover. So updated and classy. I agree with Janette, the original owner Jean would definitely want this dresser back:)
Aw, thank you Monique! And I appreciate the feedback. I’ll include a few more before pics for you. 🙂
Beautiful! The two colors are perfect together and the hardware finishes it like jewelry! You did a fabulous job rescuing this one! Do you use a top coat on the silk paint? It has a more flat finish than I like; I tried buffing but that didn’t work. How does waxing work on the silk? Thanks for all the tips and instructions for repairing different problem areas! XOXO
Thank you!🤗 And great question! I’ve never used a topcoat or wax on the Silk Mineral Paint. I’m sure either would work if you’re looking for a more glossy/sheen finish. 🙂
Amazing Denise, it looks so updated with the custom colors!
Aw, thanks Nicki! I really like how the custom color turned out too! 🙂
I love it, if ‘Jean’ ever see’s it again I should think she would like it back. :)) Its a beauty.x
Thank Janette, so glad you love it! XOXO