CAN YOU USE PAINT AND STAIN TO UPDATE FURNITURE? – YES YOU CAN, AND IT’S EASIER THAN YOU MIGHT THINK! HERE ARE 25 GORGEOUS EXAMPLES AND HOW-TO’S!
Hi creative friends, and thanks for joining me today! If you’ve ever wondered why you would paint AND stain a piece of furniture, here are some wonderful reasons and gorgeous DIY examples. There’s something really special about letting wood be wood in some areas while adding painted character and color in others. It tells a story. It feels thoughtful. And honestly? I find it opens up so many creative possibilities. If you’ve been hesitant to try both finishes on one piece, I hope these painted-and-stained DIY makeovers inspire you. Sometimes the most beautiful transformations happen when we stop choosing either/or and start embracing both.
In today’s post, I’m sharing 25 amazing painted-and-stained furniture transformations that prove just how stunning these “old and dated” pieces can be with a little TLC and creativity. From bold color makeovers to sleek modern finishes, each of these makeovers proves that combining a finish can make any piece look fresh, modern, and swoon-worthy!

✨ Stick around till the end for my best tips and go-to products for painting and staining furniture like a pro— I hope it inspires you to try updating one for your home or business!
*As an Amazon Associate, I earn from qualifying purchases. There are affiliate links in this post to other companies/products I use and love as well. You will never be charged extra when you purchase through these affiliate links. If you purchase from my links – A BIG thank you for supporting me and the #siblog! To see my full disclaimer, click here.
Before I get into the makeovers, if you’ve ever wondered why you would paint AND stain a piece of furniture, here are some wonderful reasons to consider it:
-
To highlight gorgeous wood grain while still updating the color.
- To make thrifted finds look intentional and designer.
-
To keep a solid wood top natural and refresh the base.
-
To create contrast between the drawers and the frame.
-
To make carved details stand out beautifully.
-
To lighten up a heavy-looking piece.
-
To modernize orange or dated wood without losing warmth.
-
To add depth instead of a flat, single-tone finish.
-
To give a piece that custom, high-end feel.
-
To visually break up a large dresser or hutch.
-
To make hardware pop.
-
To brighten dark furniture without stripping everything.
-
To emphasize legs or feet with a rich stain.
THIS POST IS SPONSORED/CONTAINS AFFILIATE LINKS TO PRODUCTS I USE. YOU CAN SEE MY FULL DISCLOSURE HERE.
When I first started painting furniture, stain was intimidating and stuck to painting my pieces. But once I put aside my fear of and started blending the two, it was a game-changer. That’s when pieces began to feel layered, intentional, and beautifully custom. And believe me, if you can paint – YOU CAN STAIN! In fact, staining is easier when using the right products because you don’t have to worry about a brush-free finish or any paint imperfections!
Below are 25 Gorgeous Painted and Stained Furniture Makeover Ideas in no particular order. If you’d like to read the full tutorial, including colors and all the supplies used, I’ve included a link to the original post in the title above each image.
25. HOW TO APPLY GEL STAIN
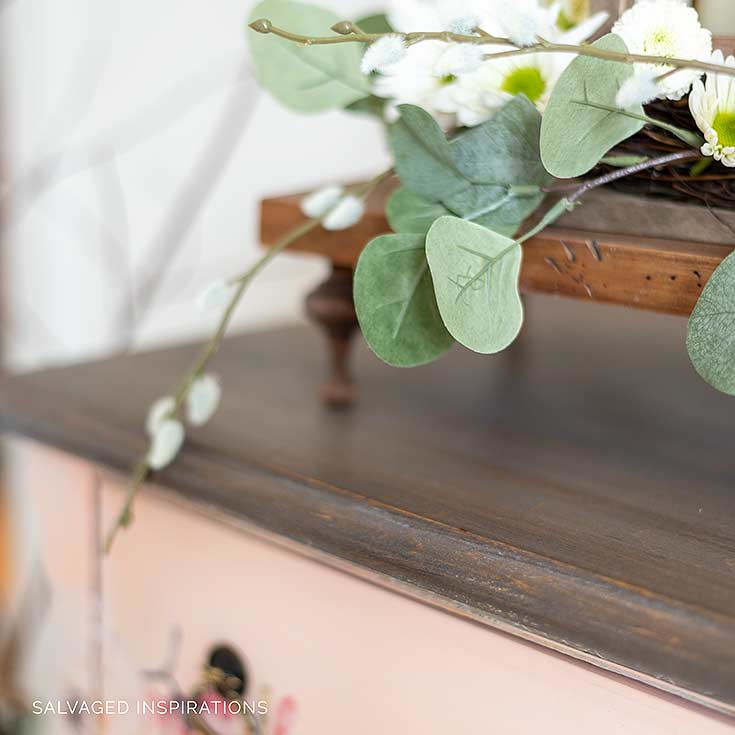
I have been hooked on gel stain for years, and it truly is my go-to for a reason! What I love most is how forgiving it is—unlike traditional stains, its thick, pudding-like consistency means no messy drips or runs, even on vertical surfaces. It’s also a total game-changer because you don’t always have to sand down to bare wood; you can apply it right over an existing factory finish to give dated furniture a deep, rich look with much less effort. Whether you’re tackling a stubborn wood like this pine chest below or refreshing old kitchen cabinets, it’s as simple as wiping it on with an applicator pad and watching the magic happen. This stained top pairs so well with the painted body.
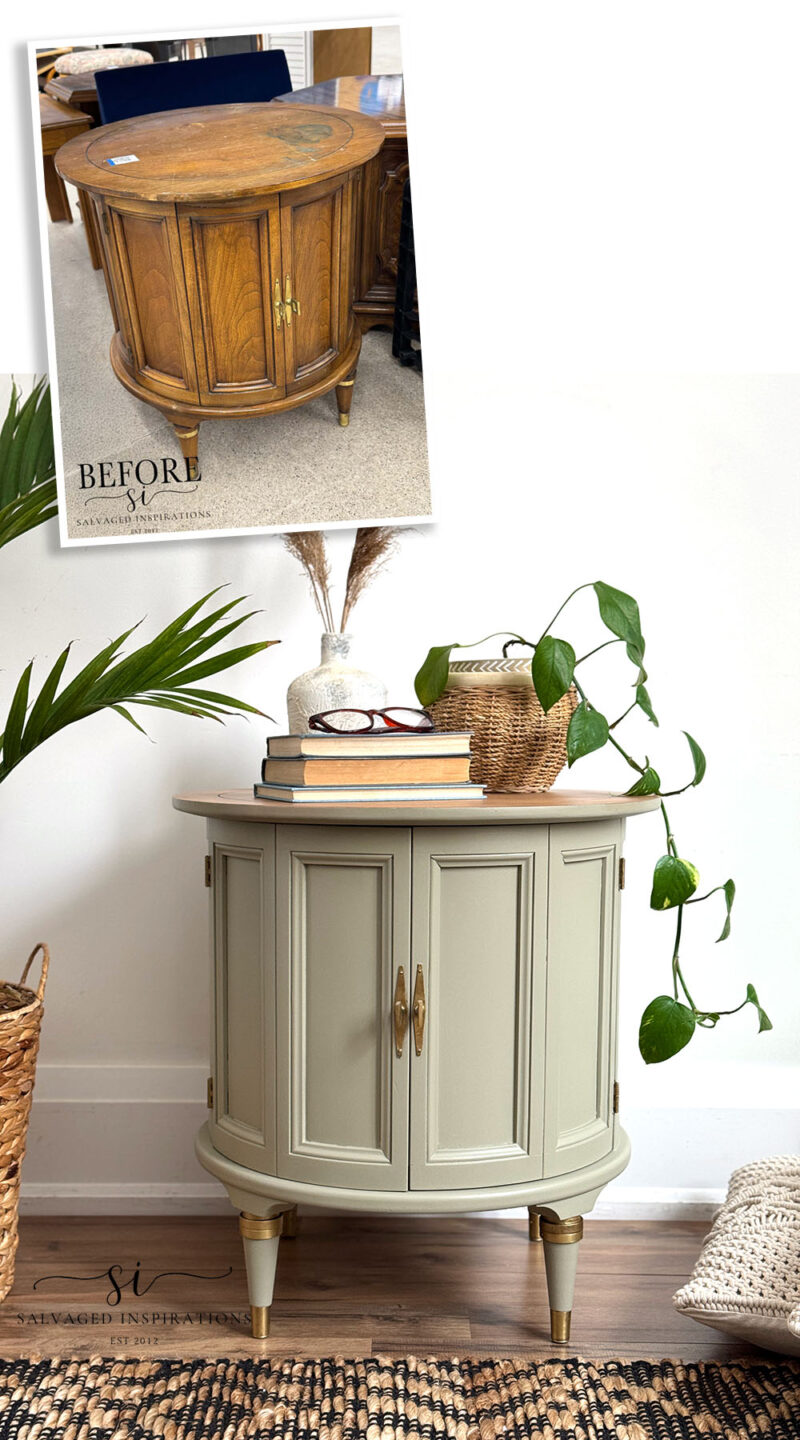
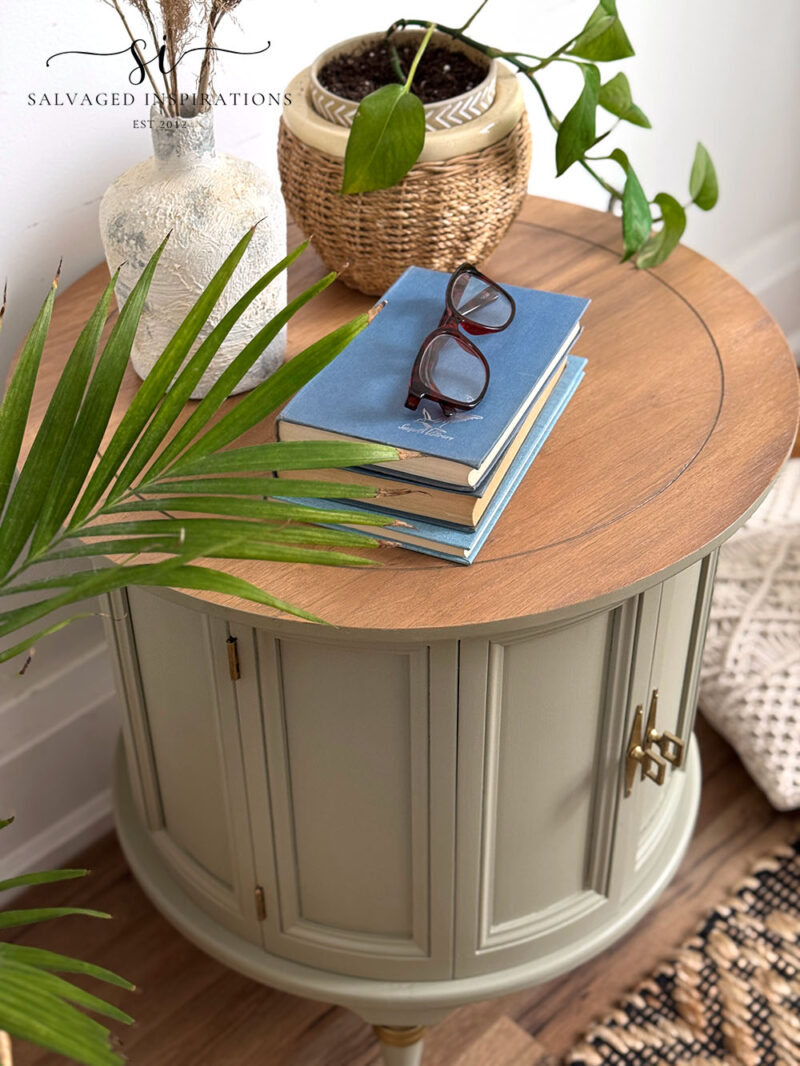
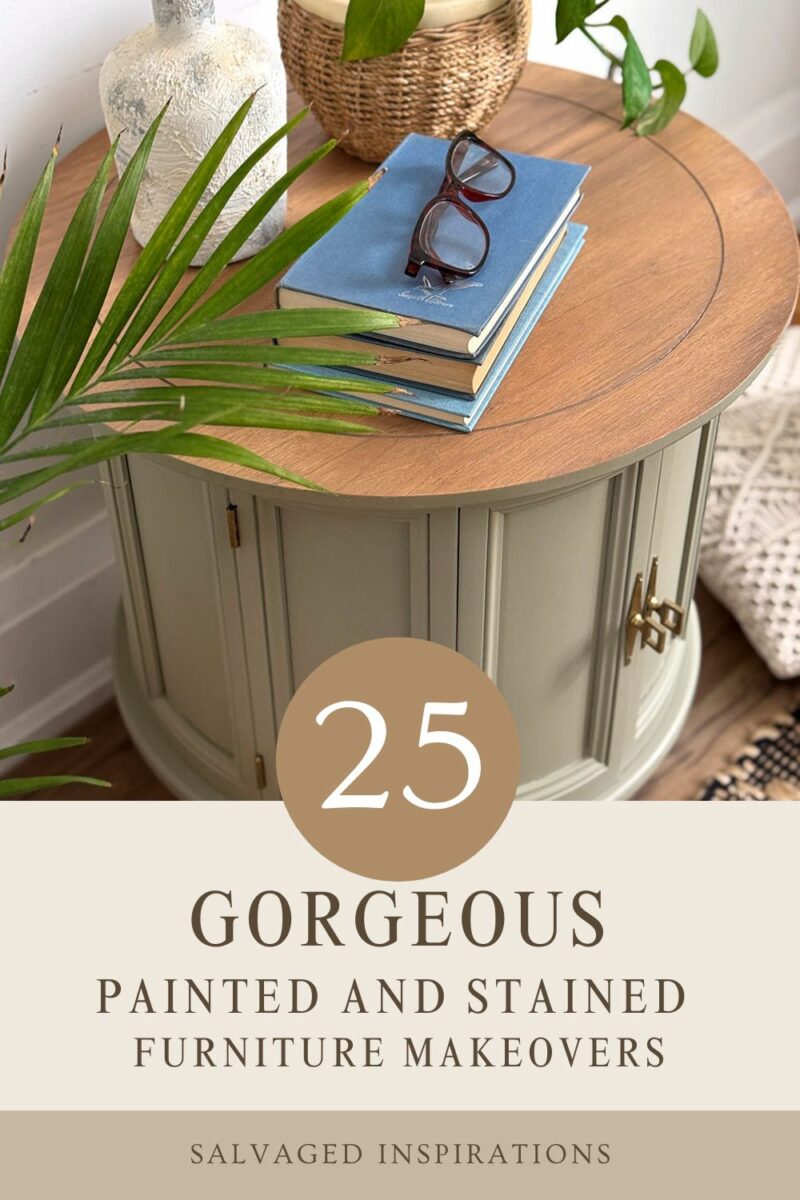
24. 1970s THRIST DRUM TABLE
I know how easy it is to overlook old, dated furniture, as I almost did with this one. But sometimes all it needs is a little vision and a fresh start. This thrifted 1970s drum table wasn’t exactly calling my name at first, but with a new-to-me stain and paint color, it found its way back to updated and beautiful. I used a water-based stain to refresh the top and a gorgeous painted body. Totally updated the look!
23. HOW TO PAIR STAIN WITH PASTEL COLORS
I still can’t believe I scored this vintage dresser for only $15, even with its missing mirror! To give it a fresh, farmhouse-inspired look, I painted the body in Tea Rose and layered it with a Whitewash Glaze for that soft, dreamy finish. I really wanted to warm up the piece, so I matched the dresser top and feet with a custom blend of Tobacco Road and Black Magic stain—mixing stains is such a fun way to get that perfect, unique shade. My favorite part of this makeover was salvaging a backboard from another piece to fill that mirror gap; it adds so much character and looks like it was always meant to be there

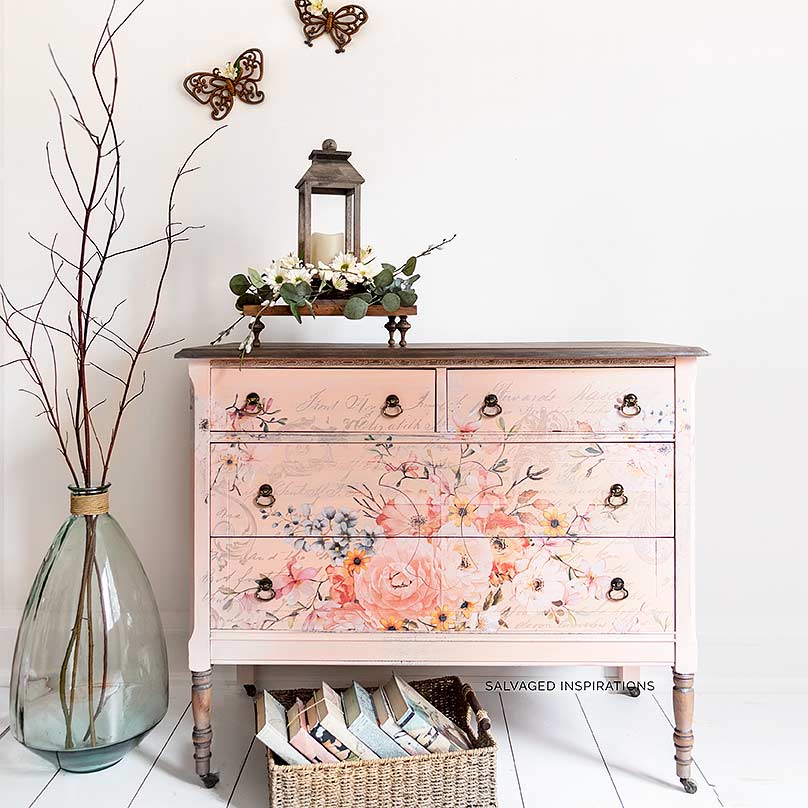
22. PAINTED AND STAINED FLORALS
I love this spring makeover! It’s such a great example of combining a classic painted and stained finish and a whimsical floral design. For this vintage dresser, I paired a soft, feminine Apricot body with a rich Walnut Gel Stain on the top and legs, creating the perfect earthy foundation for that stunning Rose Celebration floral transfer. The combination of warm natural wood, a pop of spring color, and those delicate blooms gives the piece so much depth and character.
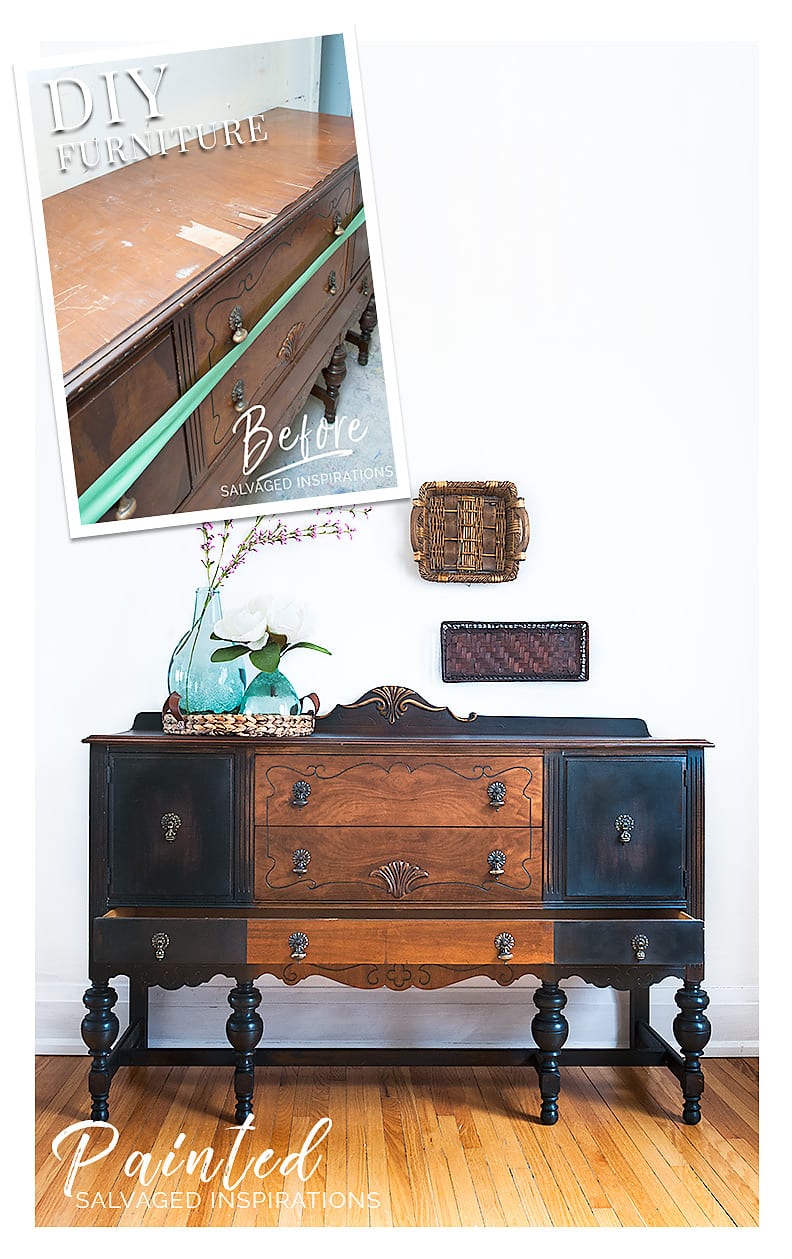
21. HOW TO PAINT AND STAIN A BUFFET
I am still in awe of how this Craigslist find was transformed into such a classic beauty! To give it that timeless, regal feel, I painted the body in Caviar, leaving just a hint of wood peeking through for a perfectly worn-in look. For the top, I stripped away the damaged veneer and layered Minwax Gunstock with Java Gel Stain to create a deep, rich finish that glows against the black. One of my favorite tricks on this piece was creating a faux drawer on the bottom using paint and extra hardware—it completely changes the scale and adds so much vintage character to this large buffet!

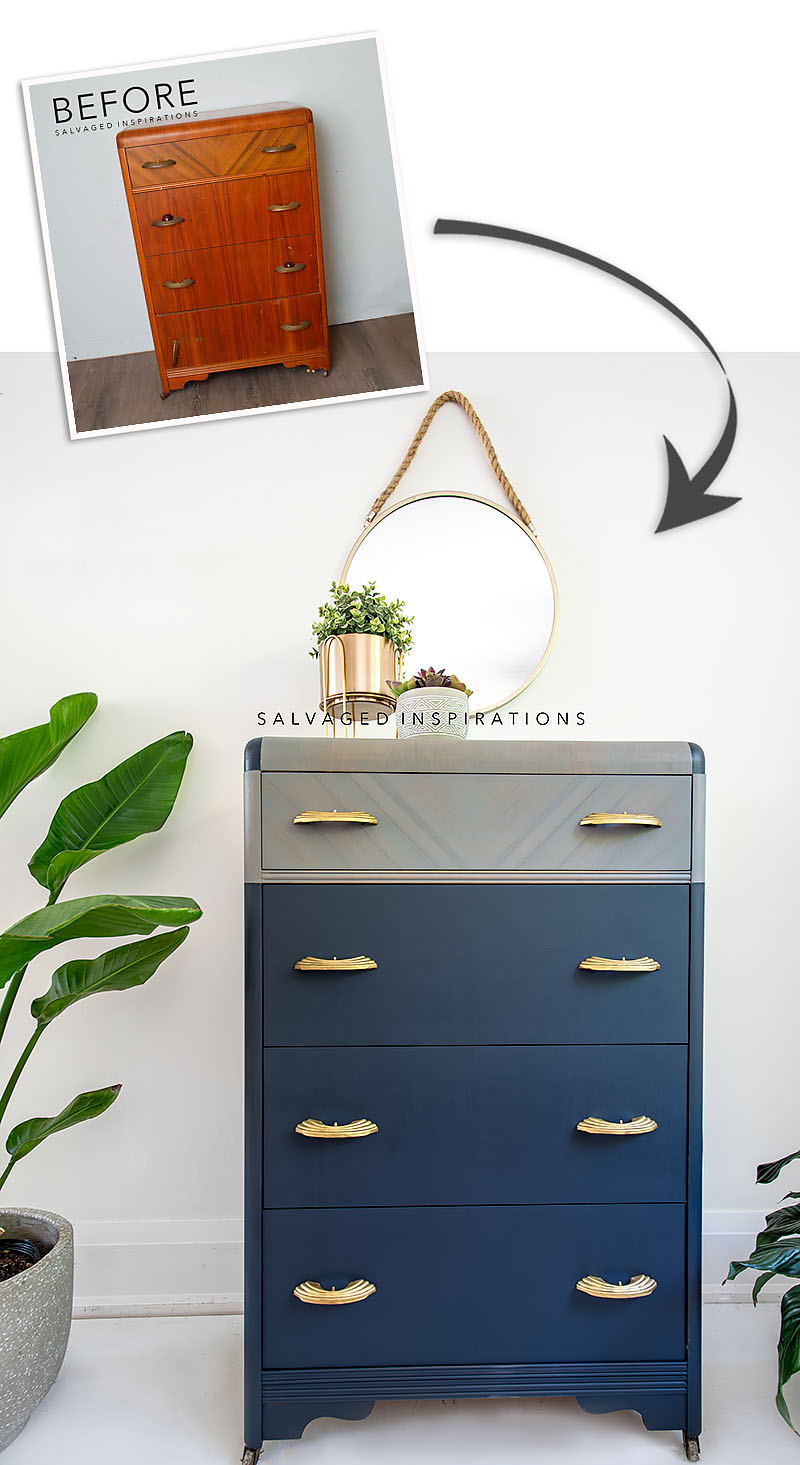
20. HOW TO PAINT AND STAIN A WATERFALL DRESSER
This waterfall dresser was gifted to me by one of my #sifamily/readers – thanks Joanne!!! It was turned into a waterfall painted and stained beauty! To give it a moody feel, I painted the lower portion in Deep Sea, a gorgeous nautical blue that has a built-in primer and topcoat. For the top and that stunning top drawer, I used Up In Smoke water-based stain—the grey tone really lets that unique waterfall grain shine through while giving it a modern edge. To finish it off, I used Gold Gilding Wax on the original handles to add a touch of elegance, making this vintage piece feel fresh, high-end, and ready for a new home!

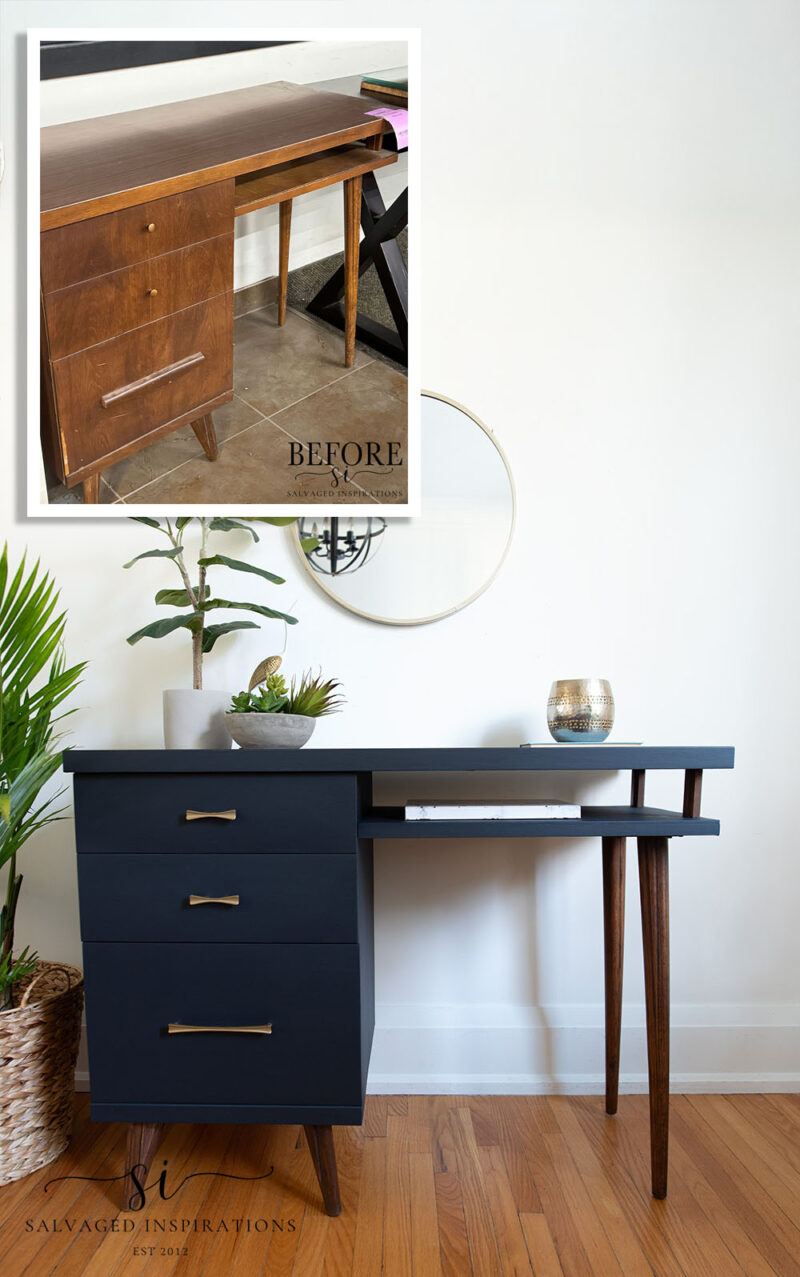
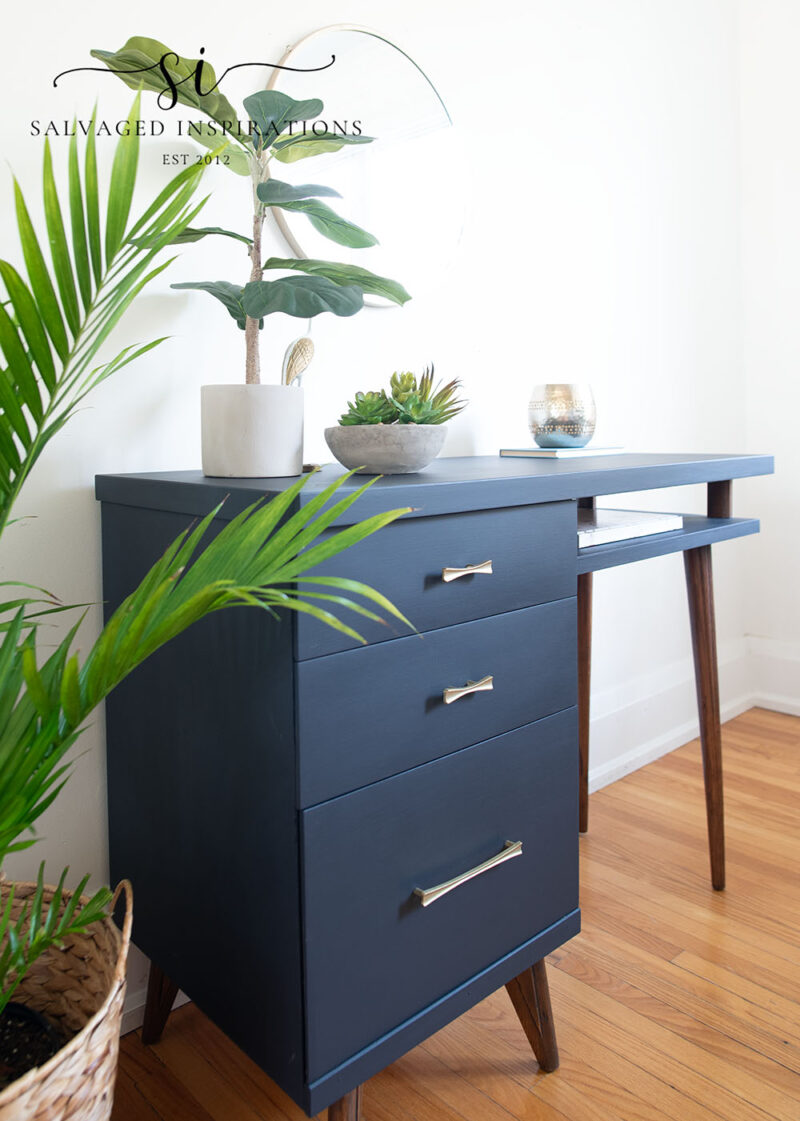
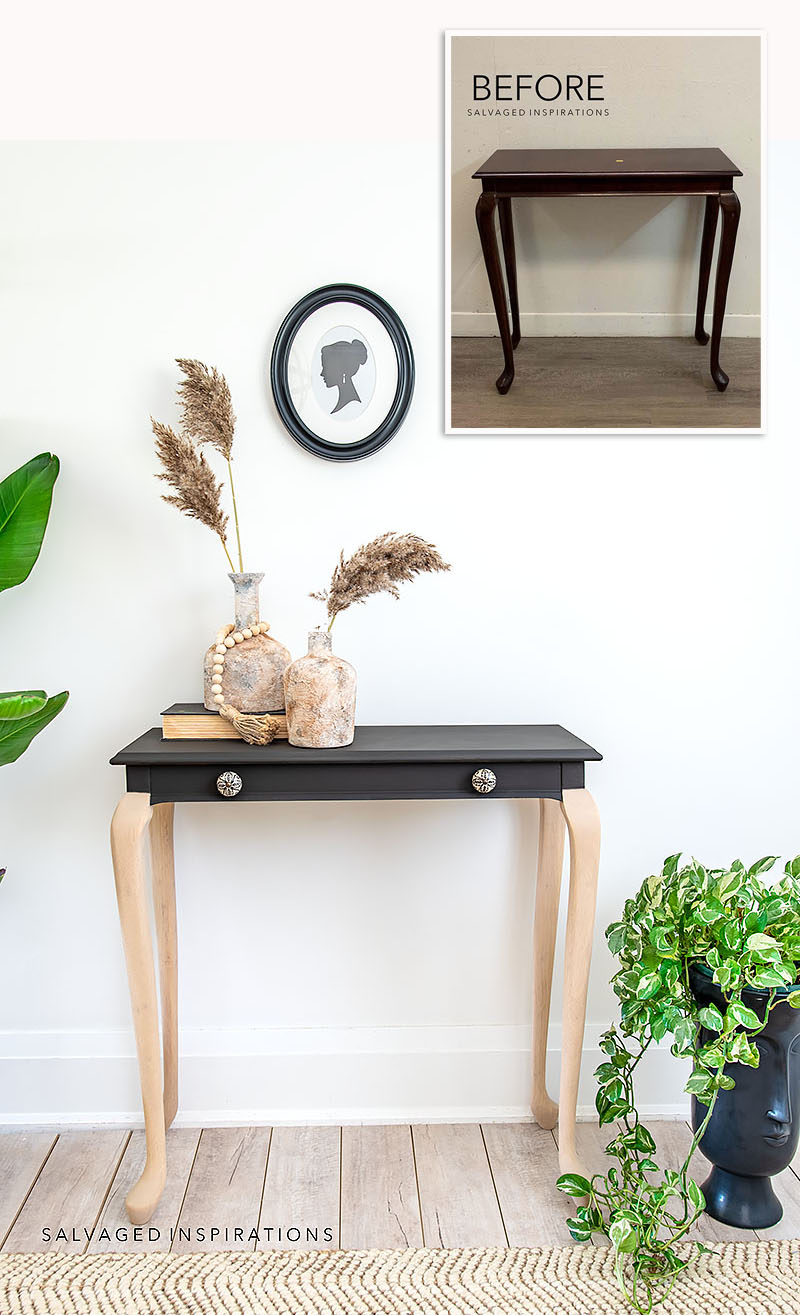
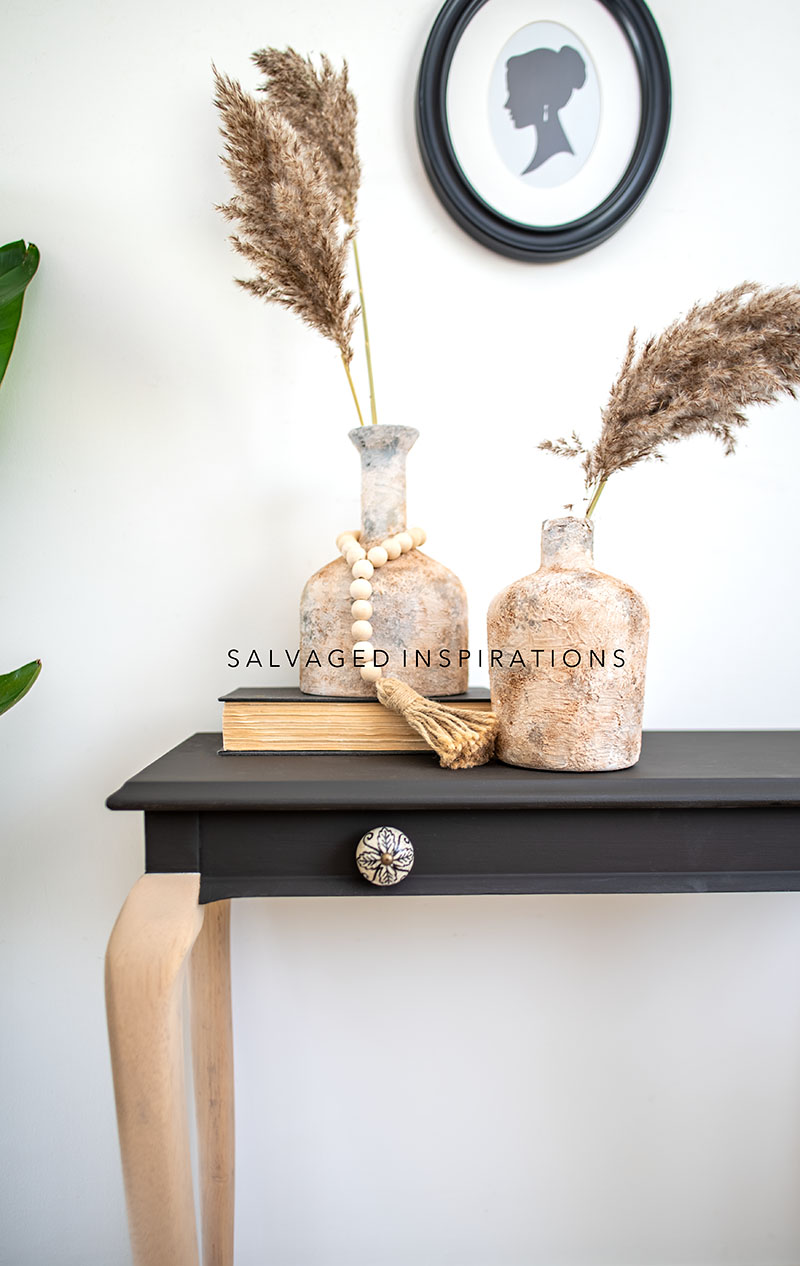
19. MCM PAINTED AND STAINED DESK
I had so much fun working on this Mid-Century Modern writing desk, and I’m just thrilled with the final look! To really emphasize those iconic tapered legs, I gave them a quick scuff-sand and a fresh coat of Walnut No Pain Gel Stain—it’s such an easy way to refresh an old finish and bring back that rich, warm wood tone. For the body, I mixed up a custom moody blue using Deep Sea and Anchor SILK Paint, which created a sophisticated, deep navy that perfectly complements the dark walnut. It’s amazing how a little bit of custom paint and some fresh stain on the legs can take a tired, $40 thrift find and make it look like a high-end designer piece.
18. $15 THRIFT PAINTED AND STAINED DRESSER
I am still pinching myself over this $15 thrift find—it just goes to show that with a little vision, even the most beat-up pieces can become a total showstopper! To give it a fresh, modern boho vibe, I updated the bottom skirt with a jigsaw and painted the body in Sand Castle Silk Paint, which is such a beautiful, warm neutral. For the drawers, I used my all-time favorite water-based stain, Tobacco Road, and I used a little ‘free’ trick—wiping the wood with water first—to help the grain soak up the color perfectly without any blotching. To top it all off, I added a surprise Basket Weave stencil detail to the sides of the drawers and finished it with gorgeous, detailed knobs for a look that is both elegant and updated.
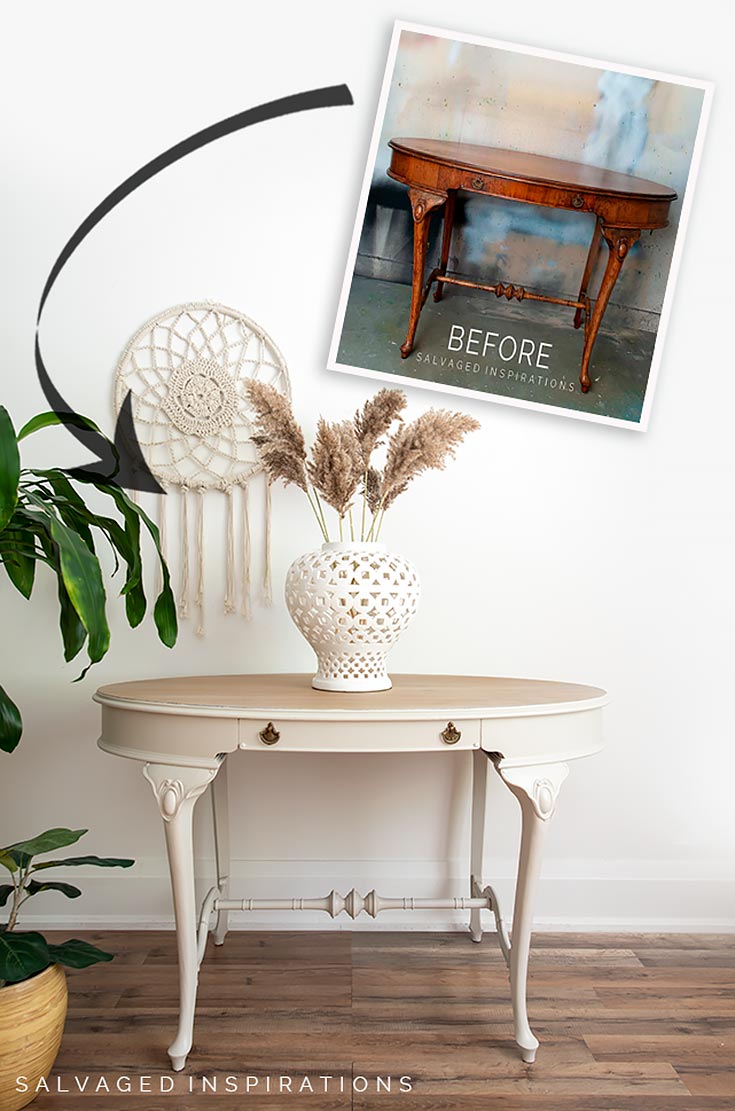
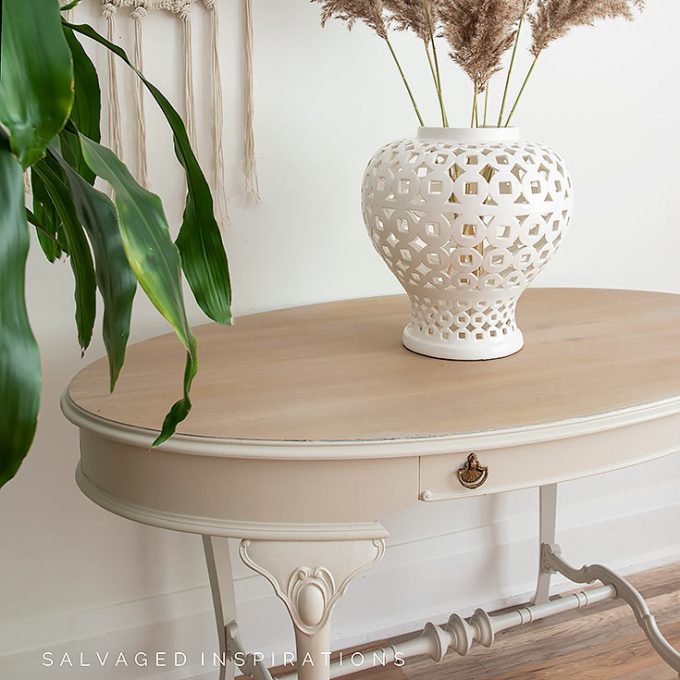
17. VINTAGE HALLWAY PAINTED AND STAINED TABLE
For this curvy vintage hallway table, I used Sawmill Gravy to brighten up the base and legs, giving it a fresh, elegant look that really highlights all those delicate details. But the real ‘secret sauce’ here is the top—I created a custom paint wash using that same Sawmill Gravy mixed with water to ‘stain’ the wood, allowing the beautiful grain to peek through while keeping the tone light and airy. It’s a super easy DIY trick that creates a perfectly coordinated, high-end finish without needing to buy a separate stain!
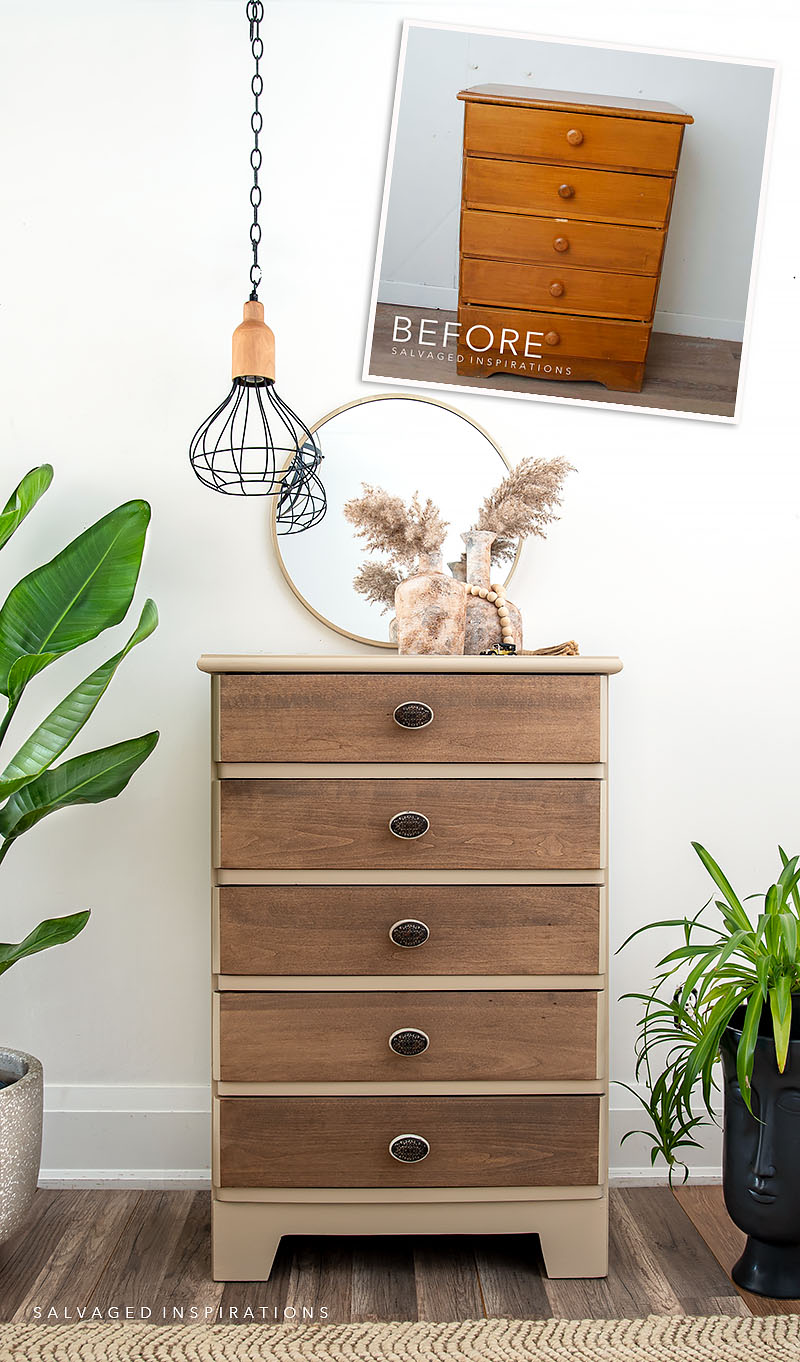
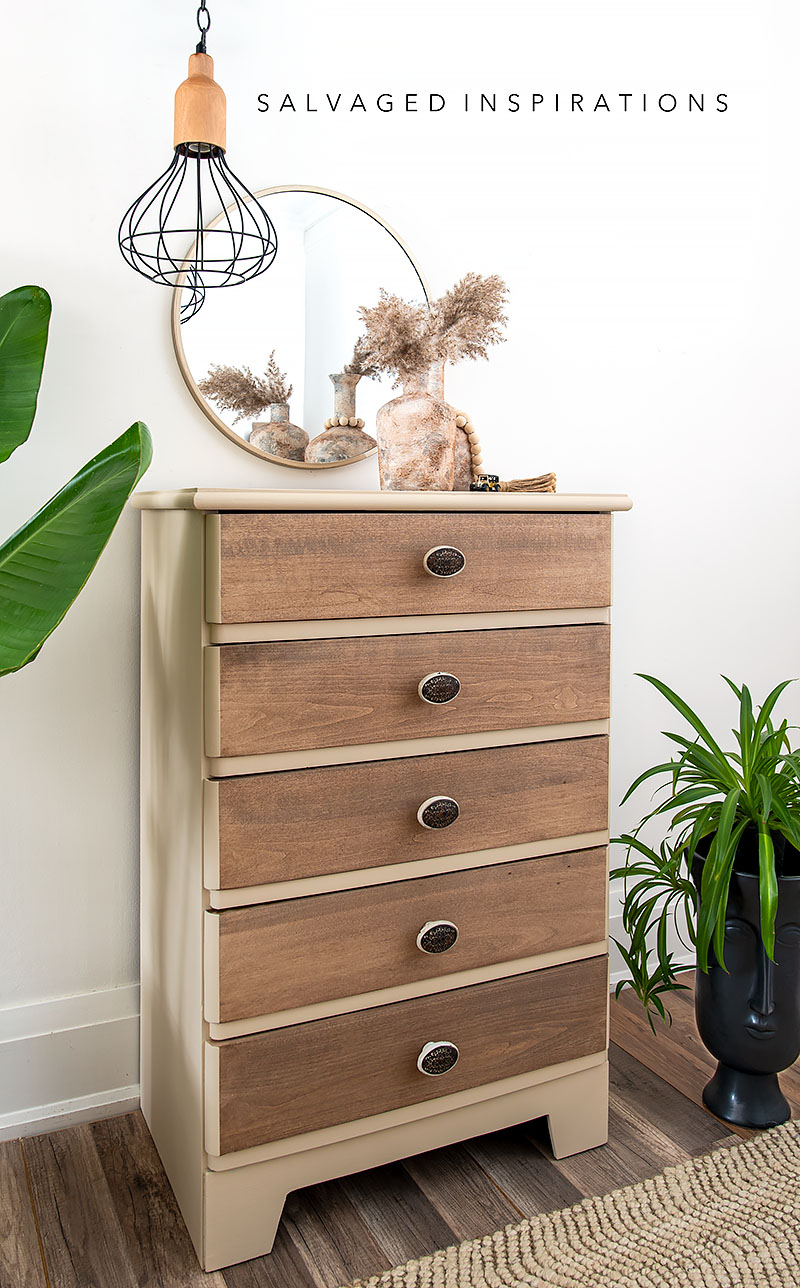
16. VINTAGE TALLBOY MAKEOVER
I’m so proud of this makeover—it was a keeper and is now lives in my bedroom. After fixing that broken spindle and recreating a missing foot with a casting kit, I wanted a finish that felt classic and warm. I chose Golden Ash Gel Stain for the drawers and top that really lets the natural wood grain take center stage. I paired it with Umber Silk All-In-One Mineral Paint on the frame, which is a rich, deep brown that made my spindle repairs absolutely disappear.


15. $10 CONSOLE TABLE MAKEOVER
I like how the contrast on this console table turned out—it really brought those long, gorgeous legs to life! By stripping them down and using an Au’ Natural Stain, I was able to highlight the raw beauty of the wood while keeping the look light and airy. To modernize the piece, I paired the light natural wood with a sleek, sophisticated body in Coffee Bean, which is a stunning brown-black that’s softer and warmer than a true black. This combination of light-stained legs and a dark painted top is such an easy way to give a traditional piece a fresh, high-end feel!
14. BUNKERHILL BLUE WITH STAINED BUFFET
I am still head-over-heels for how this makeover turned out! To get that deep, regal look, I painted the body in three light coats of Dixie Belle’s Bunker Hill Blue, leaving just a hint of the wood grain for a perfectly distressed, soulful feel. But the real showstopper? That gorgeous top! I stripped it down to the bare wood and stained it with a warm Chestnut Gel Stain—the contrast against the jewel-toned blue is just spectacular. To pull it all together, I used Bronze Metallic Paint to highlight the original hardware and add some dainty pin-striping, then sealed the top with Gator Hide for a finish that’s not only beautiful but tough enough to repel water like a pro!

13. CHARRED HICKORY PAINTED AND STAINED GATE TABLE
This little gate leg table was my sister’s neighbours and it was headed to the trash. I’m so happy I had the opportunity to bring this one back to ‘life’! To bring out that stunning wood grain on the top, I used one coat of Charred Hickory Water-Based Stain, which is so easy to wipe on and has zero odor. I paired that rich wood with Umber Silk All-In-One Mineral Paint on those gorgeous turned legs, creating a classic, earthy contrast that feels timeless.


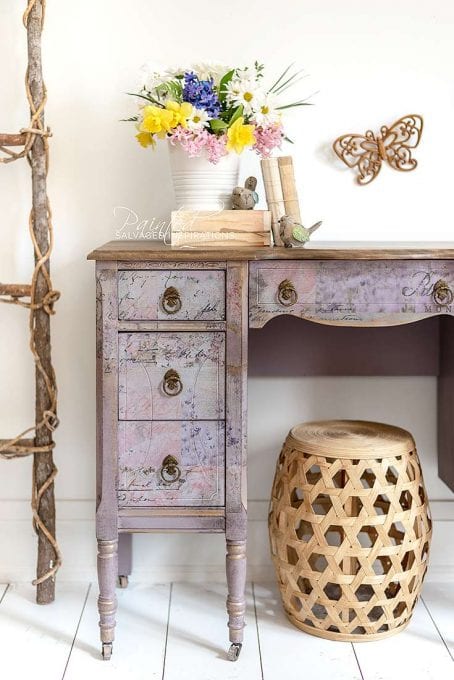
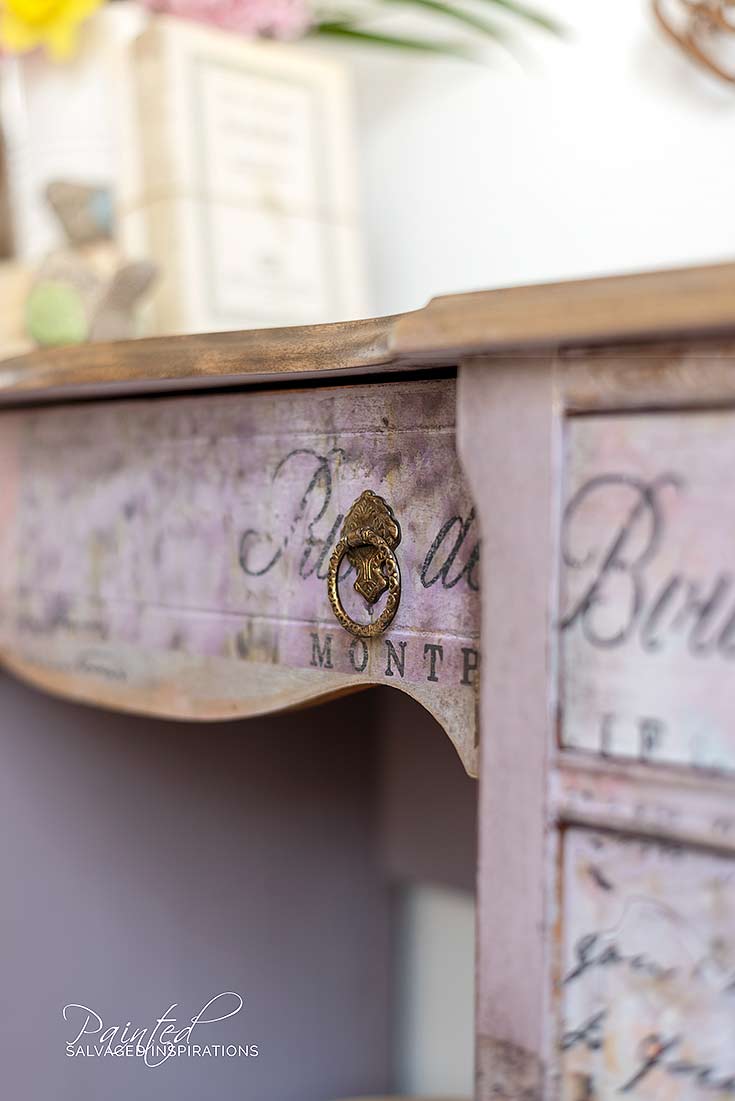
12. STAIN WITH PAINT AND FLORALS
Here’s another example of how paint stain and florals combine beautifully. I bought this desk off FBM and the woman who sold me this desk actually bought it back after it was refinished!
11. HOW TO PAIR A NATURAL WOOD STAIN WITH COLOR
This natural wood stain and painted spring-inspired paint color really updated this piece. For this thrift store dresser, I used Au Natural Voodoo Gel Stain on the top drawers to get that beautiful, raw wood look without any of those unwanted yellow or red undertones. To give the piece some personality, I mixed a custom ‘Serenity’ blue by blending Salt Water and Serenity Silk Paint, which created a gorgeous, soft teal that makes the natural wood grain really pop. This ‘half and half’ look—with stained drawers on top and a bright, sophisticated color on the bottom—is such a fun way to bring a modern, energetic vibe to a vintage piece!”
10. COFFEE BEAN WOOD WASH STAIN
I am absolutely in love with this ‘quick and dirty’ paint wash technique—it’s a total game-changer for updating vintage pieces! My PRO tip is to skip the traditional mixing and use a paint wash directly as a stain to let that gorgeous wood character shine through. For this dresser, I used Coffee Bean Chalk Mineral Paint and a water mister to create a layered, moody finish that feels incredibly high-end. By misting the surface as I went and feathering the paint out with a dry brush, I achieved a rich, ‘stained’ look that perfectly highlights the wood grain and my WoodUbend appliques without the long wait times of oil-based products!


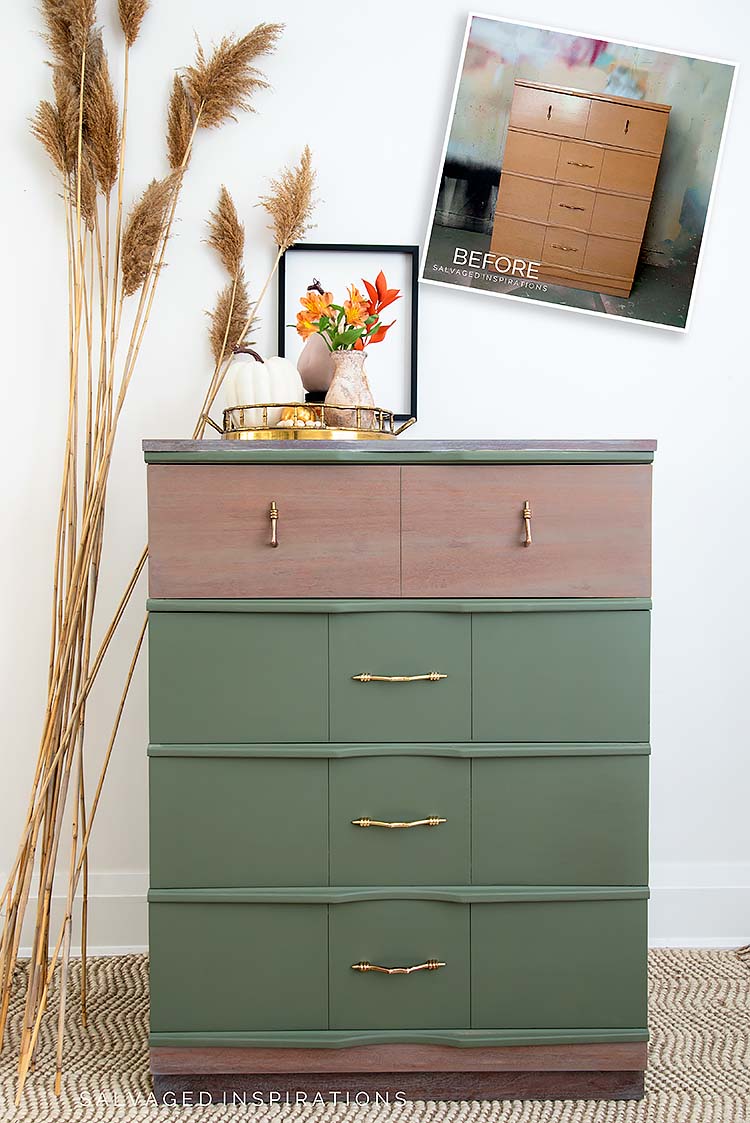
9. WEATHERED GRAY STAIN WITH PAINT
To ground this heavy looking tallboy dresser, I kept the bottom and top drawer in their natural wood veneer, using a ‘happy accident’ blend of Hemp Oil and Weathered Gray Stain to mute the red undertones and give the wood a sophisticated, modern finish. I paired that earthy texture with Juniper, a stunning woodsy green with gray undertones, which pulls the whole look together for a fresh, fall-inspired feel. By leaving those key wood elements exposed on the base and drawers, the dresser feels warm and balanced rather than heavy, making it a true standout piece

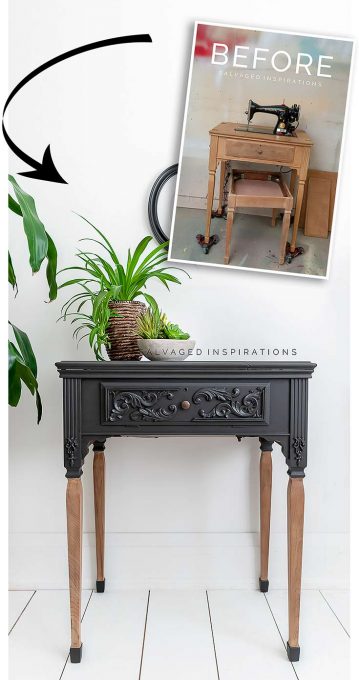
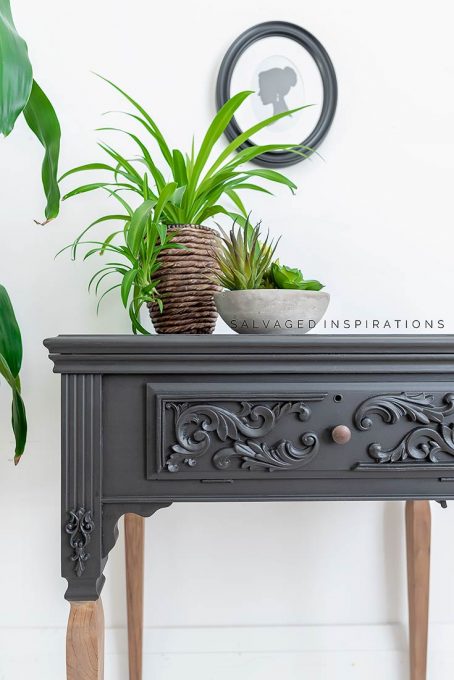
8. HOW TO UPDATE A SEWING TABLE WITH PAINT AND STAIN
Here’s one of my all-time favorites. This was such an easy update that made a huge impact and I still own and use this Singer Sewing machine to this day! This 1945 Singer Sewing Cabinet turned out—it’s like she’s wearing a brand new pair of ‘little black shoes!’ To give the body a soft, warm feel, I used Coffee Bean, which is my all-time favorite black because its brown undertones make it so much more inviting than a stark black. I really wanted to highlight the legs, so I stained them with Tobacco Road and then sanded them back; the way the sanded stain looks against the wood is just stunning. To take it up a notch, I added some beautiful WoodUbend moldings to the drawers and legs, creating a customized, high-end look that perfectly honors the history of this special piece!”
7. TRASHED TABLE WITH GEL STAIN + PAINT
I am still in shock that this roadside find went from trash-bound to totally timeless! To bring the warmth back to the top and sides, I used my current favorite, Golden Ash No-Pain-Gel-Stain, which gave the wood a rich, sunny glow that’s just spectacular. But the real ‘happy accident’? The legs! I couldn’t decide on a paint color, so I tried a little Bronze Gilding Wax and loved it so much that I did all four legs and feet. Yes, you can paint with Gilding Wax! To top it all off, I used a dollar store wire plant stand to replace the broken center medallion, proving that with a little creativity (and some gilding wax magic), you can save almost anything!


6. ROADSIDE NIGHTSTAND MAKEOVER
I finally tackled the question I get asked all the time: can you use a light gel stain over a dark finish? For these curbside nightstands, I experimented with Picklin’ White Gel Stain over the existing dark wood, and while it was a challenge to get perfectly even, it created a unique, rustic look that highlights every bit of character in the grain! To ground the experiment, I painted the tops and top drawers in Umber Silk Paint, a gorgeous deep brown that provides a sophisticated contrast to the white-washed lower drawers. It was such a fun creative experiment—even though it’s a more ‘perfectly imperfect’ finish than my usual projects, I love how the warm Umber pairs with the light-stained wood for a fresh, updated feel.


5. HOW TO UPDATE SIDETABLES WITH PAINT AND STAIN
I’m still in shock at how unrecognizable these $20 thrifted tables are after their modern glow-up! I turned them lengthwise and swapped the old legs for sleek 16-inch hairpin legs to create a high-end, mid-century look. The body was painted in a smooth Anchor Silk Paint, providing a sophisticated contrast to the Walnut Gel Stain on the top and side panels. It’s amazing how a few structural changes and a fresh coat of paint can completely reinvent a dated piece!


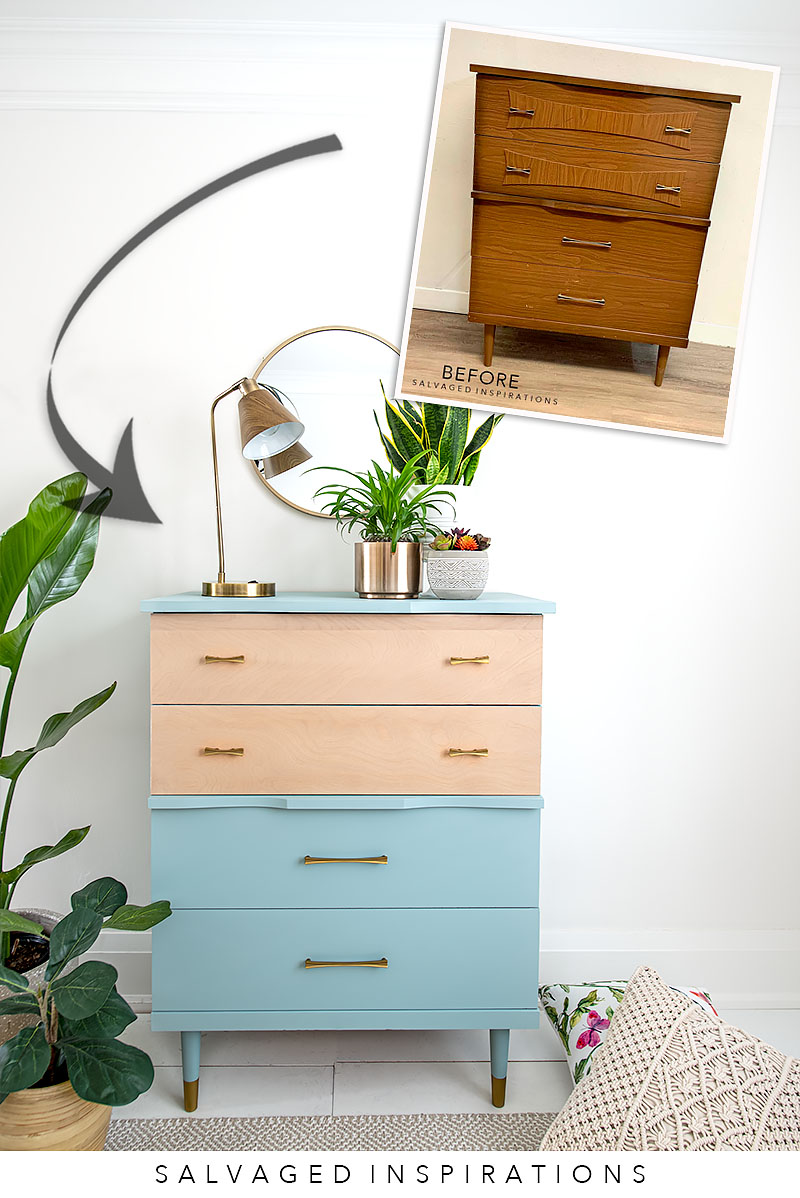
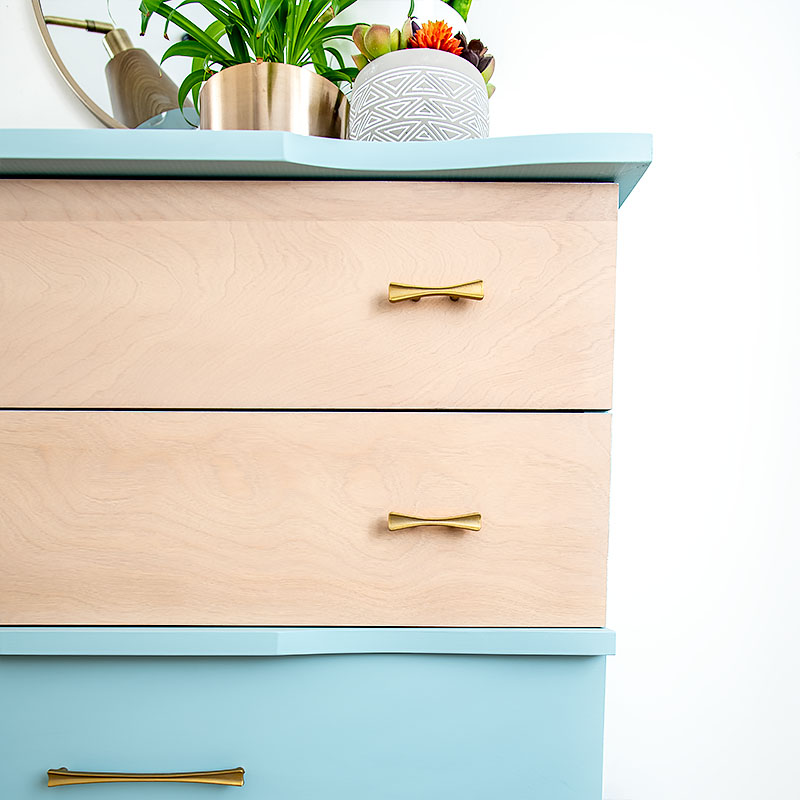
4. HOW TO PAINT TOPS AND STAIN BOTTOMS
When thinking of painted furniture we often think of painted bottoms and stained tops. Here’s a great example of the exact opposite! If the top is in really bad shape with scratches, dings etc, you can patch them up and paint and keep the base of the furniture in a lovely stain!


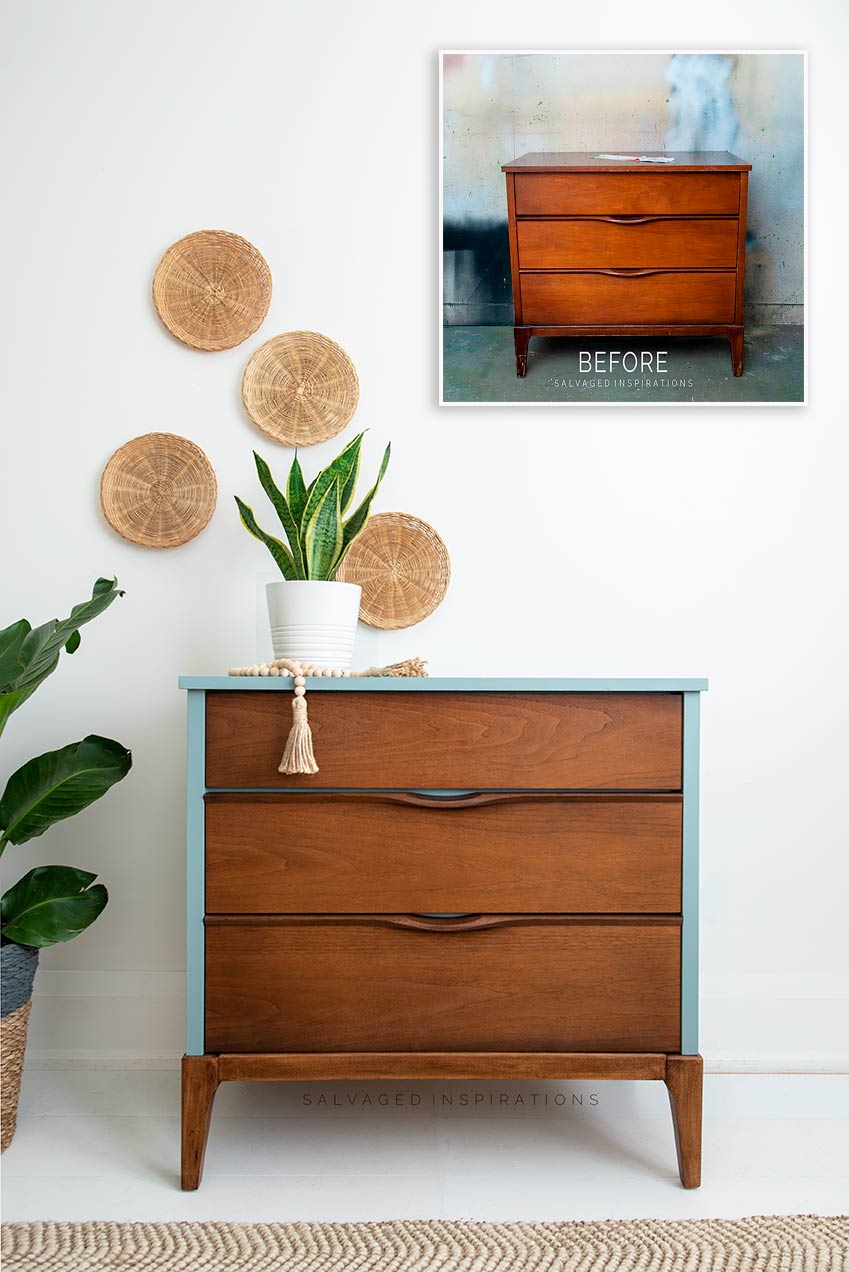
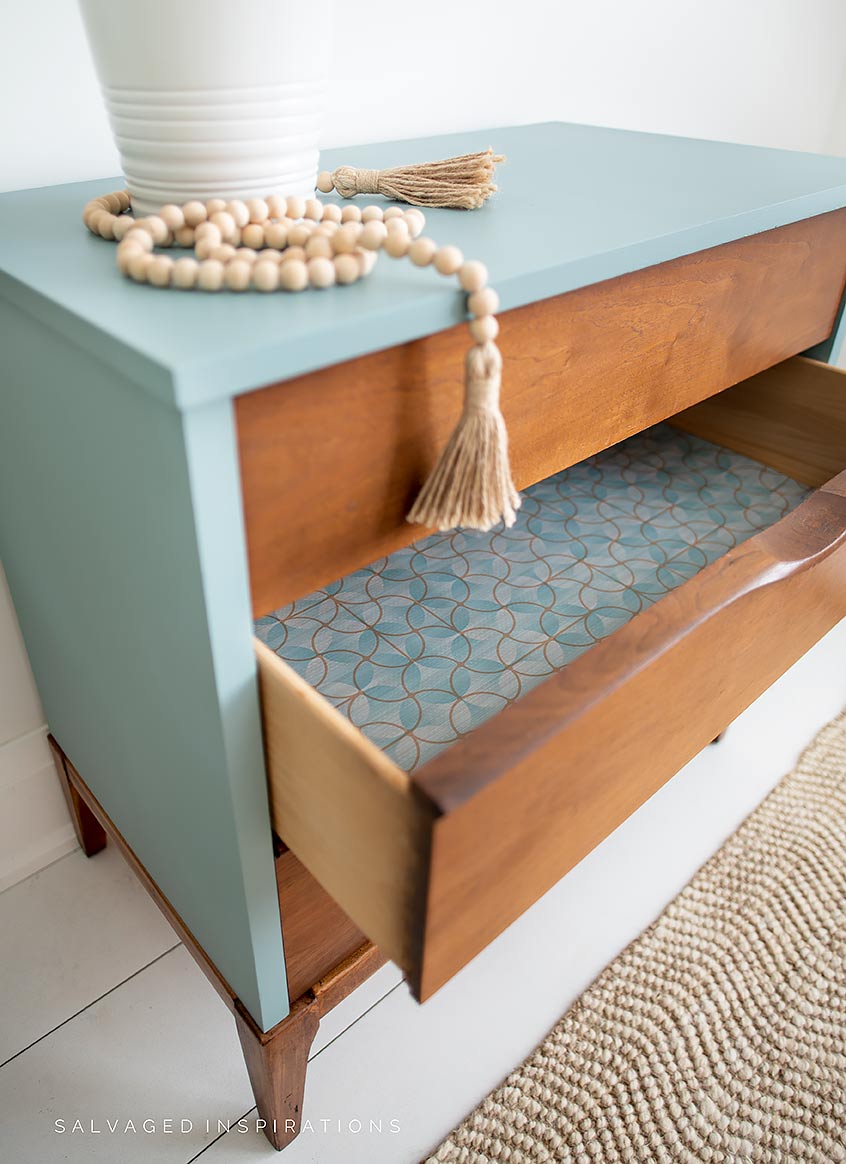
3. HOW TO USE BRIGHT COLORS WITH TRADITIONAL STAIN
To honor those beautiful MCM lines, I kept the original stained drawers but used a Trade Secret Touch-Up Marker to effortlessly hide any small imperfections. I painted the body in Serenity Silk Paint, a gorgeous, relaxing blue-green that offers a stunning cool contrast to the warm wood tones. To tie it all together, I matched the bottom skirt and legs using a custom blend of GF American Oak and Minwax Chestnut stains, then finished the interior with a pretty vinyl liner for a look that’s better than new from every angle!”
2. BLEACH CYPRESS TRASHED DRESSER FLIP
Here’s a great example proving that even a roadside ‘trash’ find can look like a high-end, upscale piece with the right combo of paint and stain!


1. HOW TO GEL STAIN OVER EXISTING STAIN
I’ve chosen this as #1 in hopes to encourage and inspire you! If you’re not up to painting and staining a large piece of furniture, a perfect project to start with is a plant stand or something on the smaller side. This little plant stand turned out so darn cute and looks much more updated with it’s new paint and stain finish. I’ve sits by my front door holding a beautiful plant!


I hope you enjoyed today’s painted and stained furniture roundup and it’s inspired you to take a second look at designing your pieces. As you can probably tell from all the makeovers I shared, my best tips and go-to products for painting and staining like a pro— are to use EASY to use GEL STAIN that can go over an existing finish OR a simple to apply water-based stain to showcase beautiful wood grain. Add a pop of color with a beginner-friendly paint and you’ll have a one-of-a-kind piece to cherish for years to come!
Happy painting!
Denise xo
RELATED POSTS::
FURNITURE PAINTING MUST-HAVES!
HOW TO ‘MODERNIZE’ OLD FURNITURE
5 IDEAS TO UPDATE YOUR OLD DESK
27 GORGEOUS DESK MAKEOVERS
25 FLORAL FURNITURE MAKEOVERS
WHERE TO FIND FREE FURNITURE
PIN AND SHARE!

Hi Denise. I love seeing your previous projects. You turn old dated pieces into absolute gorgeous one of a kind gems. Well done:)
So glad you enjoyed revisiting these makeover! Thanks so much Monique. XOXO
Tellement beau. Je les aimes tous
Continuer votre beau travail et merci beaucoup de partager votre savoir faire
Je suis ravie que les nouveaux meubles vous plaisent. Merci beaucoup, Sylvie. Bon week-end !
I have to agree with the others they all turned out beautiful .
Thanks so much Teresa! XOXO
Ohhh my. What a bunch of beauties !!
So many fav’s. 18, 17, 16, 10, 8, 4 – and basically all of them 🙂
18 – tobacco rd stain drawers – amazing color
17 – love the creamy color and the washed light top
10 – Gorgeous ! the coffee bean wash is Perfection
8 – Tobacco rd legs are so pretty – with Any color
4 – I Love this warm brown. I need to use this
I’m liking the lighter brown /tan washed wood tones. planning to try some soon. I’m thinking I can better use light / med taupish finishes to offset some darker wood pieces.
Love your work. Always.
I just want to give you a big hug P!!!🤗 Thank you for always being so encouraging, much appreciated. And so glad you enjoyed revisiting these makeovers. If you try the lighter brown /tan washed wood tones, I’m guessing you’re going to love it. It really does offset those dark wood pieces while keeping all the gorgeous character shining through.
You are a creative genius, Denise! Some of these pieces are unrecognizable after you worked your magic. Thanks for sharing! 💕
My pleasure and thanks for the kind words Nicki! So glad you enjoyed these before and afters!🤗
These are gorgeous. My favorite is #17, That’s a beautiful color. 12 & 22 are standouts, as well—really great work.
I’m with you…#17 is lovely! It ended up being sold to a boutique owner and I’m sure she made a handsome profit on it selling it in her upscale shop. I’m totally good with that and I hope its still being loved/used today. Thanks for dropping by and always putting a smile on my face! Enjoy the rest of your week. XOXO